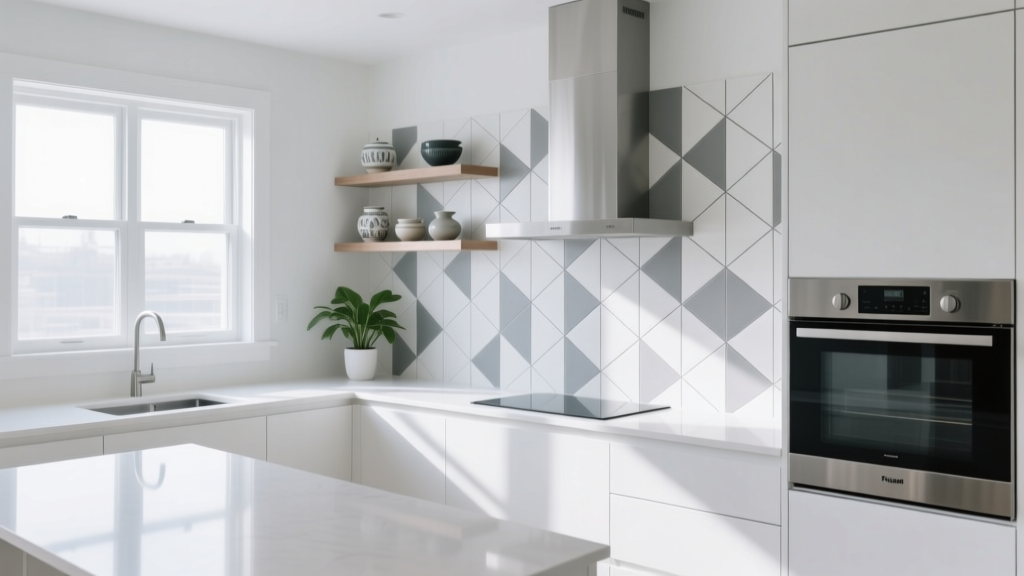
Peel-and-Stick Kitchen Backsplash Tiles
Why Your Rental Kitchen Deserves a Backsplash Upgrade (Yes, Even If You Can't Tile)
If you're renting, your kitchen probably came with one of two things: a dated 1990s laminate backsplash that's peeling at the edges, or bare drywall that's slowly absorbing every bit of cooking grease. Landlords rarely prioritize kitchen aesthetics, but that doesn't mean you have to stare at sad walls every time you cook dinner.
Peel-and-stick backsplash tiles have come a long way from the flimsy, obviously-fake options of a decade ago. Today's products feature realistic textures — real glass mosaic looks, hand-painted zellige patterns, even authentic subway tile finishes — and most renters can install a full backsplash in a single weekend for under $80.
I've tested over a dozen peel-and-stick backsplash brands in my own rental kitchen, and I'm going to share which ones actually look convincing, which ones fall apart at the first sign of steam, and exactly how to install them so they survive your entire lease.
The Products That Actually Pass the "Stand Three Feet Away" Test
The real test of a rental-friendly backsplash isn't whether it looks good up close in the packaging — it's whether your guests notice it's not real tile from normal conversation distance. Here's what worked:
Glass-look mosaic tiles (Art3d, 10-pack, ~$35): These are the ones I'd recommend first. The clear gel coating over the printed pattern creates actual depth and light reflection that mimics real glass tiles. I installed these behind my stovetop in about 45 minutes. Six months in, zero peeling, and my landlord assumed I'd done a "professional job" during a routine inspection.
Zellige-style textured tiles (StickGoo, 12-pack, ~$42): If you want something with more character, the zellige pattern is your best bet. The uneven, handcrafted look is inherently forgiving — slight alignment imperfections actually add to the aesthetic rather than detracting from it. The 3D texture is substantial enough that you'd need to touch it to confirm it's not ceramic.
| Product | Price (10-pack) | Best For | Durability |
|---|---|---|---|
| Art3d Glass Mosaic | ~$35 | Behind stovetop | Excellent (6+ months) |
| StickGoo Zellige | ~$42 | Full wall coverage | Good (3-6 months) |
| TIKTAG Subway | ~$28 | Budget projects | Fair (1-3 months) |
| Faux Tin Panels | ~$45 | Statement wall | Good (3-6 months) |
The Ones to Avoid
Flat-printed "subway tile" stickers from generic Amazon sellers? Skip them. The printed pattern looks convincing from the box, but once installed, the complete lack of texture reads as obviously fake. Save your money.
Prep Is Everything (Even for Peel-and-Stick)
Here's the mistake I see in every rental backsplash tutorial: people stick directly onto dirty, greasy walls. No adhesive — peel-and-stick or otherwise — will bond to a surface coated in cooking oil. Your backsplash will be curling within a month.
The right prep routine takes about 20 minutes and costs almost nothing:
- Degrease thoroughly. Use TSP (trisodium phosphate) or a heavy-duty degreaser like Krud Kutter. Wipe the entire area, let it sit for 10 minutes, then rinse with a clean damp cloth. If you skip this step, nothing else matters.
- Let it dry completely. This is non-negotiable. Any trapped moisture = bubbling and premature failure. I waited 2 hours with a fan running before I started applying tiles.
- Lightly sand glossy surfaces. If your existing wall has a semi-gloss or gloss paint finish, a quick pass with 120-grit sandpaper creates micro-scratches that dramatically improve adhesion. Wipe away the dust afterward.
Installation: The Method That Actually Looks Professional
Most people start tiling from the top-left corner and work across. That's fine if your countertop is perfectly level, but in 15 years of rental apartments, I've never encountered a level countertop. Starting from the top means you end up with an ugly tapered gap at the bottom.
Start from the countertop, work upward
Here's the trick: place a level line one tile-height above your countertop and use it as your starting row. Why? Because the bottom row is where you'll need to cut tiles to accommodate countertop irregularities, and it's also where cabinets and outlets create the most awkward gaps. By starting with a full, level row, everything above it falls into place naturally.

Pro tip for outlet covers: Turn off the breaker, remove the outlet cover plates, and tile right up to the edge of the electrical box. Replace the covers when you're done. The cover plate will hide any rough edges, and the finished look is infinitely cleaner than trying to cut tiles around the cover.
Cutting tiles without special tools
You don't need a tile cutter for peel-and-stick products. A sharp utility knife (or even heavy-duty scissors for thinner products) works perfectly. Score along your cut line on the front, then snap along the score. For the 3D textured tiles, a Dremel with a cutting wheel gives clean results if you have one.
"The biggest mistake renters make is rushing the cutting process. Measure twice, cut once — and always cut with the printed side facing up so you can see exactly what you're trimming." — Sarah J., DIY Home Editor
Removal: Keeping Your Security Deposit Intact
When your lease is up, you'll want these off the wall without damage. Here's what works:
- Heat gun or hairdryer on high. Apply heat for 30-45 seconds per tile, starting from a corner. The adhesive softens and the tile peels away cleanly. This takes patience — don't try to rip them off cold, or you'll pull paint with them.
- Residue cleanup. Any leftover adhesive can be removed with Goo Gone or rubbing alcohol. Test on a hidden area first if you're worried about the underlying paint.
- Touch-up paint. In the rare case that paint does come off, keep a small sample of your wall color (or get a color match at any hardware store) for a quick touch-up before your final walkthrough.
Real Cost Breakdown for a Standard Rental Kitchen
Most rental kitchens have about 15-20 square feet of backsplash area (the space behind the stove and along a short counter run). Here's what you're actually looking at:
- Peel-and-stick tiles (mid-range): $35-50 for coverage
- Degreaser: $8
- Sandpaper (small pack): $3
- Utility knife: $5 (if you don't have one)
- Total: $51-66 — vs. $800-2,000 for professional tile installation
For less than the cost of a decent dinner out, you can transform the single most visible wall in your kitchen. And when you move out? An hour with a hairdryer and your walls are back to normal.
Your kitchen doesn't have to look like a compromise just because you rent. That's the whole point of living somewhere — you should enjoy the space you're in today, not just the one you'll get someday.
More Articles
 Studio and Styling Compared: What Each Service Delivers — And Why the Difference Matters in Kitchen Design
 Smart Kitchen Lighting: 4 Layers That Transform Your Cooking Space
 The Precision Place Checklist: A Kitchen Designer’s Field-Tested Protocol for Flawless Installation
 Open Kitchen Command Center: Organizing Family Life Without Closing the Door
 Small Kitchen Appliance Garage: Declutter Your Countertop
 Cheap vs Premium Bathroom: What You’re Really Paying For — And Where It Matters Most
 Kitchen Island Seating: How Many Stools Fit
 Best Space Outdoor: Designing High-Functionality, Aesthetic, and Sustainable Outdoor Living Areas
 Kitchen Countertop Height: An Ergonomic Guide
 Best Kitchens for Bathroom: Functional, Code-Compliant Mini-Kitchens for Wet Areas