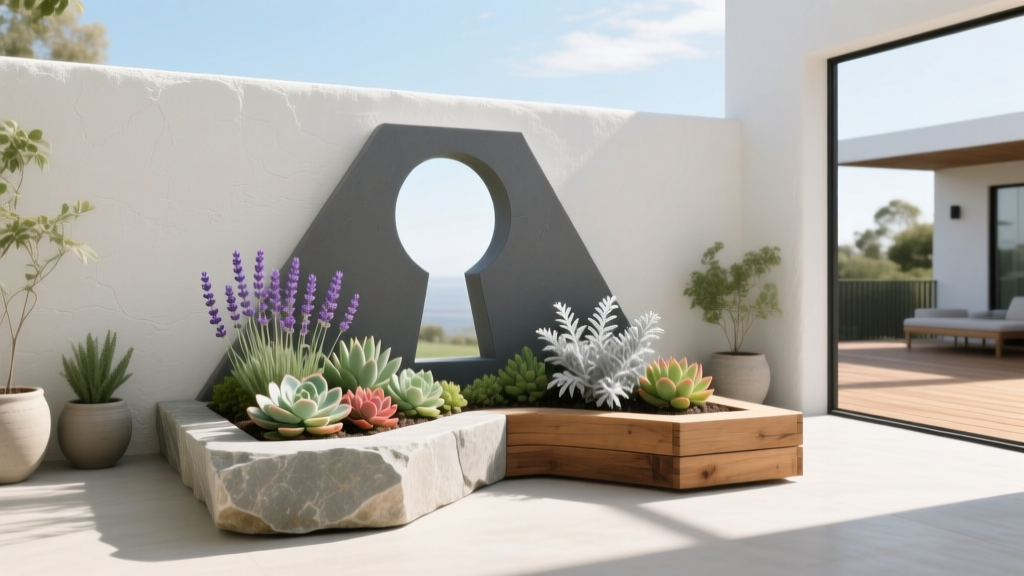
How to Create a Keyhole Garden - The Decor Mag
A beautiful outdoor living space isn’t only about the patio set and string lights—it’s also about what surrounds you while you relax, host friends, or step outside with your morning coffee. A keyhole garden brings structure, productivity, and a strong design statement to your yard in one compact footprint. It’s the kind of landscaping feature that feels intentional, sculptural, and surprisingly easy to maintain.
Originally popularized as a water-wise, high-yield garden concept, a keyhole garden is a raised circular bed with a small “keyhole” path cut into it, leading to a central compost basket. That one feature—composting in the middle—turns kitchen scraps and yard waste into slow-release nutrients while helping the bed retain moisture. For homeowners looking to upgrade backyard design, it’s a smart way to combine sustainable landscaping with practical outdoor living.
Whether you’re working with a sunny side yard, a patio-adjacent corner, or a larger backyard where you want an eye-catching focal point, a keyhole garden can be tailored to your style—rustic stone, modern corten steel, or clean-lined timber. Let’s build one that looks as good as it grows.
What Is a Keyhole Garden (and Why It Works So Well)?
A keyhole garden is typically a 6–8 foot diameter raised bed shaped like a circle, with a narrow wedge-shaped path that lets you step into the center. In the middle sits a compost basket (often wire mesh), where you add kitchen scraps, leaves, and garden trimmings. Watering into the compost basket distributes moisture and nutrients outward through the bed.
Outdoor design benefits
- Compact and sculptural: A circular raised bed creates a strong focal point—perfect near a patio, pergola, or fire pit zone.
- Ergonomic: Raised height reduces bending, making gardening more comfortable.
- Efficient: The central composting and layered soil approach can reduce watering and boost yields.
- Customizable: Works in modern, cottage, Mediterranean, and xeriscape-style landscapes.
Planning Your Keyhole Garden: Best Location, Size, and Layout
Choose the right spot
- Sun: Aim for 6–8 hours of sunlight for most vegetables and herbs. For partial shade yards, focus on leafy greens and shade-tolerant herbs.
- Access: Place it within easy reach of your kitchen door or outdoor prep area—closer means you’ll compost and harvest more often.
- Water: Keep it near a hose bib or plan for drip irrigation. A keyhole garden is water-wise, but you’ll still want reliable access.
- Integration: Position it where it enhances patio living—visible from seating, framed by a path, or lit for evening ambiance.
Ideal dimensions
- Diameter: 6–8 feet is classic. Smaller yards can go 4–5 feet wide.
- Bed height: 24–36 inches is comfortable for most homeowners and provides deep rooting space.
- Path width (the “keyhole”): 18–24 inches for easy movement and kneeling.
- Compost basket: 12–18 inches wide and about 3 feet tall.
Design tip: make it feel like an outdoor room
Anchor your keyhole garden with a small landscape moment nearby:
- A compact bistro set for “garden-to-table” coffee breaks
- A gravel or stepping-stone path that connects the garden to the patio
- Low-voltage path lights for year-round outdoor living and safer evening harvesting
Materials and Style Options (From Rustic to Modern)
Your material choice affects durability, heat retention, and the overall look of your backyard design. Pick what matches your home’s architecture and patio finishes.
Best edging/wall materials
- Natural stone (fieldstone, limestone, stacked stone): Timeless, blends into landscaping beautifully, excellent thermal mass.
- Brick: Classic and tidy; great if you already have brick pavers on the patio.
- Corten steel: Sleek modern aesthetic; long-lasting and visually striking.
- Cedar or redwood: Warm and natural; choose thick boards and reinforce corners.
- Concrete block with a stone veneer: Budget-friendly and sturdy; can be finished to look high-end.
Compost basket materials
- Hardware cloth (1/2-inch mesh): Durable and keeps rodents out better than chicken wire.
- Chicken wire: Easier to find and cheaper, but less rigid and more prone to damage.
- Optional liner: Add a layer of burlap inside to help hold finer compost while still draining.
Budget ranges (typical DIY costs)
- Budget build ($150–$350): Concrete block or reclaimed brick + basic soil + chicken wire basket.
- Mid-range ($350–$900): Cedar or nicer block/stone + better soil mix + drip kit + gravel path.
- Premium ($900–$2,500+): Natural stone masonry or corten edging + high-quality compost/soil + lighting + integrated patio planter styling.
How to Build a Keyhole Garden: Step-by-Step
Step 1: Mark the circle and keyhole path
- Drive a stake where the center will be.
- Use a string to mark a 3–4 foot radius (for a 6–8 foot diameter garden).
- Outline a wedge path from the edge to the center (18–24 inches wide).
Step 2: Prepare the base
- Remove grass and weeds. For a low-maintenance approach, lay down overlapping cardboard to smother weeds.
- If drainage is poor, add a thin layer of crushed gravel under the wall line.
Step 3: Build the raised wall
- Stack stone/brick/block in a circle, leaving the keyhole opening.
- Build up to 24–36 inches tall, checking level as you go.
- For dry-stack stone, choose flatter stones and stagger joints for stability.
Step 4: Install the compost basket in the center
- Form a cylinder from hardware cloth (12–18 inches diameter, ~3 feet tall).
- Secure with wire ties.
- Set it in the center and stabilize it with a few stones at the base.
Step 5: Layer and fill the bed (the keyhole “engine”)
Keyhole gardens often use a layered fill to hold moisture and gradually break down into rich soil. A practical, homeowner-friendly approach:
- Bottom layer: Small sticks, chopped branches, or wood chips (2–6 inches) for airflow and water movement.
- Middle layer: Leaves, straw, and partially finished compost (6–10 inches).
- Top layer (planting layer): 10–14 inches of quality soil blend.
Recommended soil blend (high-performing and easy)
- 40% screened topsoil
- 40% compost (store-bought or homemade)
- 20% aeration material (pumice, perlite, or pine fines)
Step 6: Create a clean, patio-friendly path
The keyhole path should feel stable, tidy, and comfortable on bare feet if it’s near a pool or lounge area:
- Decomposed granite: A designer favorite for modern landscaping; compact it well.
- Pea gravel: Affordable, great drainage, classic cottage vibe.
- Large stepping stones: A more refined look—pair with gravel joints.
Planting Design: What to Grow in a Keyhole Garden
Think of your keyhole garden like a living centerpiece. Combine edibles with pollinator-friendly flowers for a lush, layered look that complements outdoor living spaces.
Smart planting layout (height and sun)
- Tall plants (trellised beans, tomatoes) on the north side to avoid shading.
- Medium plants (peppers, basil, bush cucumbers) in the middle zones.
- Low plants (lettuce, thyme, strawberries) along the edge for easy harvesting.
Reliable plant picks for most homeowners
- Herbs: Basil, parsley, chives, oregano (keep mint in a pot to prevent spreading).
- Leafy greens: Lettuce, Swiss chard, spinach, kale (great for spring/fall).
- Vegetables: Cherry tomatoes, peppers, bush beans, radishes, carrots (shorter varieties work well).
- Edible flowers: Nasturtium (spills beautifully over edges), calendula, violas.
- Pollinator companions: Marigolds, alyssum, borage (if you have room).
Design-forward plant pairings (looks + function)
- Modern patio: Corten steel garden + rosemary, lavender, thyme, purple basil, globe amaranth.
- Cottage garden vibe: Stone wall + nasturtiums, calendula, chard, dill, marigolds.
- Mediterranean-inspired yard: Gravel path + oregano, sage, peppers, eggplant, dwarf citrus in containers nearby.
Furniture and Outdoor Living Enhancements Around Your Keyhole Garden
Because a keyhole garden is inherently sculptural, it pairs beautifully with intentional patio living elements. Treat it as a feature, not an afterthought.
Furniture recommendations (durable and style-friendly)
- Compact bistro set (2 chairs + table): Place 6–10 feet from the garden for a cozy “harvest corner.” Look for powder-coated steel or teak for weather resistance.
- Outdoor bench: A simple slatted bench or concrete bench creates a viewing spot and doubles as party overflow seating.
- Potting cart or outdoor console: Perfect near the garden for tools, gloves, and a harvest basket—choose marine-grade polymer or sealed eucalyptus.
Lighting and ambiance
- Path lights: Low-voltage LED along the keyhole approach for safe evening watering.
- String lights or a lantern post: Makes the garden feel part of a year-round outdoor room.
- Water source styling: A discreet hose reel or slim rain barrel can look intentional instead of messy.
Climate, Seasonal Strategy, and Year-Round Maintenance
Warm and dry climates
- Mulch deeply with straw or shredded leaves to reduce evaporation.
- Consider a drip irrigation ring around the bed plus occasional watering into the compost basket.
- Plant heat lovers: peppers, eggplant, basil, okra, rosemary.
Humid and rainy climates
- Prioritize airflow: avoid overcrowding and prune tomatoes/peppers.
- Use pine fines or pumice in your soil mix to prevent waterlogging.
- Rotate crops and remove diseased leaves quickly to reduce fungal issues.
Cold winters and freeze-thaw regions
- Choose durable walls: stone, brick, or reinforced block handles freeze-thaw better than thin wood.
- In late fall, top-dress with compost and cover with straw or a frost blanket.
- Early spring: refresh the top 2–3 inches with compost and replant cool-season greens.
Simple maintenance routine
- Weekly: Add kitchen scraps to the compost basket and water as needed.
- Biweekly: Check for pests, thin crowded seedlings, harvest often.
- Seasonally: Top-dress with compost, rotate plant families, refresh mulch.
Common Mistakes to Avoid
- Building too wide to reach: If you can’t comfortably reach the far edge from the path, you’ll neglect it. Stay in the 6–8 foot diameter range unless you expand the access path.
- Using poor soil: Cheap fill dirt leads to frustration. Invest in a compost-rich blend—this is where yields and plant health come from.
- Compost basket neglect: If it dries out completely, it won’t feed the bed. Add a mix of “greens” (kitchen scraps) and “browns” (leaves, shredded paper) and water occasionally.
- No mulch: Mulch is the difference between a thirsty garden and a resilient one—especially for summer and vacation weeks.
- Overplanting: A lush look is great, but crowding increases disease and reduces airflow. Follow spacing guidelines and prune thoughtfully.
- Ignoring the patio connection: A keyhole garden should feel intentional—add a path, lighting, or seating so it becomes part of your outdoor living design.
FAQ: Keyhole Gardens
How big should a keyhole garden be for a beginner?
A 6-foot diameter bed is an ideal starter size. It’s large enough to grow a meaningful amount of herbs and vegetables but still easy to reach, water, and maintain.
Do keyhole gardens attract pests?
They can if the compost basket is managed poorly. Use hardware cloth (not wide chicken wire) to discourage rodents, avoid adding meat/dairy, and keep a good balance of greens and browns.
Can I build a keyhole garden on a patio or hardscape?
Yes, with planning. Use a raised container-style build (corten steel or framed wood with a liner), ensure drainage, and protect the surface with a waterproof barrier and drainage layer. For most homeowners, placing it adjacent to the patio is simpler and more cost-effective.
What’s the best mulch for a keyhole garden?
Straw, shredded leaves, or untreated grass clippings (thin layers) work well for vegetables. For a more polished landscape design look, use fine bark mulch around ornamentals and keep veggie zones mulched with straw.
How do I keep it productive through the seasons?
Plant in waves: cool-season greens in spring and fall, heat lovers in summer, and protect shoulder seasons with row cover or frost cloth. Add compost at each seasonal transition for steady fertility.
Is a keyhole garden good for small yards?
Absolutely. A 4–5 foot diameter keyhole garden can fit in compact spaces and still deliver strong yields, especially if you focus on herbs, greens, and compact varieties.
Your Next Steps: Build a Keyhole Garden That Elevates Your Outdoor Space
Start by choosing a sunny location that connects naturally to your patio or backyard hangout area. Sketch a simple circle-and-wedge layout, pick materials that match your home’s style, then invest in a great soil blend. Once the bed is built, plant with intention—tall plants to the north, spillers on the edges, and a mix of herbs and pollinator-friendly flowers to keep the garden looking lush.
If you’re ready to make your outdoor living space feel more purposeful, a keyhole garden is a weekend project that keeps paying you back—through better landscaping, fresher meals, and a backyard that invites you outside in every season. For more patio living ideas, backyard design inspiration, and practical landscaping guides, explore the latest on thedecormag.com.
More Articles
 Best Outdoor Heater Options for Cool Nights - The Decor Mag
 Modern Outdoor Living Space Ideas for 2026 - The Decor Mag
 Cheap vs Premium Outdoor Living: A Data-Driven Checklist for Smart Investment Decisions
 How to Create a Zen Garden - The Decor Mag
 Outdoor Kitchen Side Burner Setup - The Decor Mag
 How to Create a Night Blooming Garden - The Decor Mag
 How to Design a Moonlight Garden - The Decor Mag
 How to Create a Firefly Garden - The Decor Mag
 Poolside Design and Decor Ideas - The Decor Mag
 Best Outdoor Bar Garnish Tray Ideas - The Decor Mag