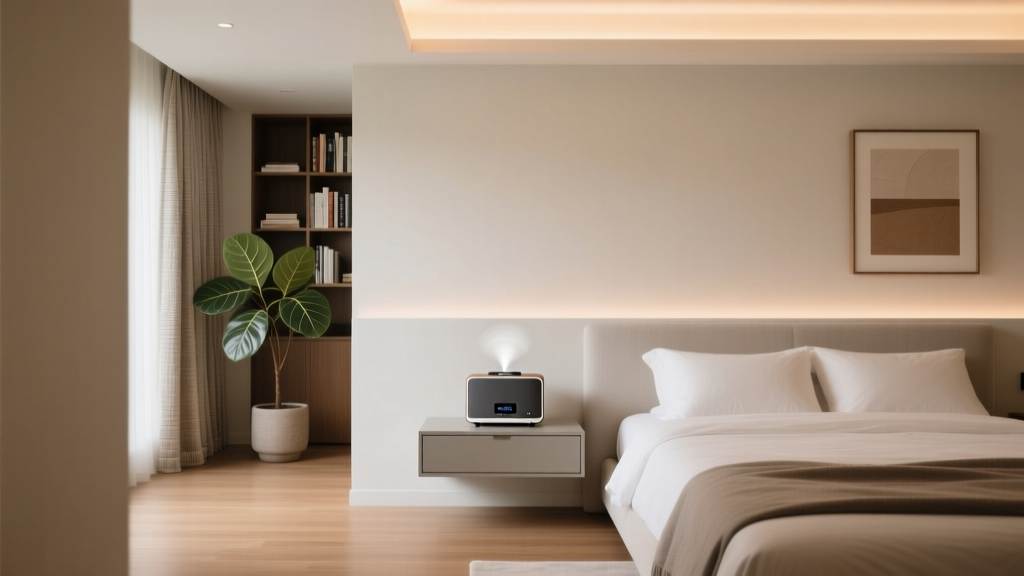
Best Bedroom Sound Machine Placement - The Decor Mag
A restful bedroom is more than a pretty space—it’s a carefully tuned sleep environment. Sound is one of the most overlooked design elements, yet it has a direct impact on how quickly you fall asleep, how often you wake, and how deeply you rest. A well-placed sound machine can soften traffic noise, mask a snoring partner, and reduce the “alert” response your brain has to sudden sounds, helping your body stay in a calmer, sleep-friendly state.
Placement matters because sound behaves like light: it bounces, it spreads, and it interacts with your room’s layout and materials. Put the machine in the wrong spot and you may get uneven masking, harsh directional sound, or a device that’s simply annoying to live with. Put it in the right spot and it becomes part of your bedroom decor strategy—supporting sleep quality without cluttering your nightstand or disrupting your design.
This guide breaks down the best bedroom sound machine placement for common room layouts, plus practical decor tips—furniture choices, bedding, lighting, and color—so your bedroom looks good and feels even better at night.
Why Sound Machine Placement Affects Sleep Quality
Sound machines work by creating a consistent audio “blanket” (white noise, pink noise, brown noise, nature sounds, or fan-like sound) that reduces the contrast between silence and sudden disruptions. When the sound source is positioned well, it:
- Creates even coverage across the bed, especially around your head and ears.
- Masks peak noises (hallway footsteps, neighbors, street traffic) more effectively.
- Feels less intrusive by reducing directional or “speaker-like” sound.
- Supports a calmer bedtime routine by pairing consistent sound with dim lighting and tidy surfaces.
From a bedroom design standpoint, placement also influences cord management, nightstand function, and the visual calm of your sleep environment—key ingredients for relaxation.
Quick Rules of Thumb for Sound Machine Placement
If you want a fast starting point, use these guidelines and fine-tune after a few nights:
- Distance: Place the sound machine 3–7 feet from your head (closer for low-volume masking, farther for broader coverage).
- Height: Aim for mattress to nightstand height (roughly 18–28 inches off the floor). Avoid the floor unless you’re using it to mask under-door noise.
- Direction: Point the speaker toward open space, not into a wall corner, to prevent boomy reflections.
- Safety: Keep cords away from walking paths and away from bedding that could cover vents.
- Consistency: Use the same spot nightly—your brain learns cues that support sleep onset.
Best Bedroom Sound Machine Placement by Room Scenario
1) Nightstand Placement (Most Common and Most Convenient)
A nightstand is usually the easiest and cleanest choice for bedroom sound machine placement. It keeps controls accessible and helps the sound disperse at a comfortable ear level.
Best for: Small to medium bedrooms, renters, minimal decor changes
- Place the device on the far side of the nightstand (not right beside your pillow) to avoid overly directional sound.
- Keep it 6–12 inches away from the wall if possible, which helps the sound spread more evenly.
- If you have two nightstands, place it on the one closer to the main noise source (street-facing window, shared wall).
Design pairing: Choose a sound machine in matte white, sand, charcoal, or light woodgrain to blend with bedroom decor. Pair with a tray to visually “anchor” it and keep your nightstand calm.
2) Between the Bed and the Noise Source (Most Effective for Masking)
If your goal is maximum masking—traffic outside the window, roommates in the hall, or neighbors through a shared wall—place the sound machine between you and the noise.
Best for: City apartments, street-facing rooms, thin walls
- Set it on a dresser, bookshelf, or console that sits along the shared wall or near the window.
- Keep it at least 3 feet from your head to avoid harshness.
- Angle it slightly so sound disperses across the room rather than shooting directly at your bed.
Decor tip: Add a lined curtain (blackout or thermal) and a soft area rug to reduce sound reflections. This improves the “smoothness” of masking and makes your sleep environment feel more cocoon-like.
3) Across the Room for Balanced Sound (Great for Light Sleepers)
If you’re sensitive to sound quality, a machine too close can feel like a speaker in your ear. Placing it across the room can create a more diffuse, gentle sound field.
Best for: Light sleepers, those who dislike directional noise
- Use a dresser top or a low bookcase across from the bed.
- Aim for 4–10 feet from your head depending on room size and volume level.
- Keep it away from corners to reduce bass buildup (common with brown noise).
Wellness note: With farther placement, you can often use a slightly higher volume without it feeling “loud,” which can improve masking consistency through the night.
4) Under a Console Table Near the Door (For Hallway Noise)
For apartment living, hallway and entry sounds can be the biggest disruptor. Placing a sound machine near the door can mask footfalls and voices before they feel intrusive.
Best for: Renters, shared homes, bedrooms near common areas
- Place the machine on a low shelf of a slim console or on a stable stool near the door.
- Keep vents clear and avoid placing it directly on thick carpet that may block airflow.
- Combine with a door sweep ($10–$25) to reduce sound leaks under the door.
5) Dual Sleepers: Two Machines or One Centered Placement
If one partner snores or keeps different hours, placement becomes a relationship-friendly design decision.
- If one person is the lighter sleeper, place the device closer to them but not right at pillow level.
- For equal coverage, place it on a centered surface (headboard shelf, console behind the bed, or a dresser facing the bed).
- In larger rooms, two smaller machines at lower volumes can feel smoother than one machine running loud.
Budget note: Two compact units may cost $40–$120 total, while one higher-end unit can run $60–$150+.
Choosing the Right Sound Machine for Your Bedroom Design
Sound machines come in a few styles. Your ideal pick depends on your decor, noise problems, and how “techy” you want your nightstand to feel.
Product Types (and Where They Work Best)
- Dedicated white noise machines: Simple, consistent, often best for sleep. Great on nightstands and dressers.
- Fan-based machines: Create real airflow sound; place on a stable surface with clear ventilation. Good for warm sleepers.
- Portable travel sound machines: Smaller and flexible; ideal for door placement, shelves, or renters with limited furniture.
- Smart speakers/apps: Convenient but can bring notifications and bright LEDs; best if you can fully disable alerts and lights.
Materials and Finishes That Feel Calming
- Matte plastics (white, cream, warm gray): visually quiet and easy to clean.
- Wood veneer or oak finishes: blends with Scandinavian, Japandi, and warm minimalist bedrooms.
- Textile-wrapped speakers: soften the look, reduce visual “tech clutter,” and pair well with upholstered headboards.
Budget Ranges to Plan Around
- $20–$45: Basic portable machines, plug-in models with a few sound options.
- $50–$90: Better sound quality, timers, more even output, nicer finishes.
- $100–$200+: Premium audio, adaptive masking, high-quality speakers, and refined design details.
Design Recommendations That Make Sound Masking Work Better
Bedroom decor choices can either amplify harsh echoes or create a softer, sleep-friendly soundscape. Use design to support your sound machine instead of fighting it.
Furniture and Layout
- Anchor the bed away from the noisiest wall when possible (even 6–12 inches can help in some rooms).
- Add a bookcase or upholstered bench along a shared wall to add mass and reduce sound transmission.
- Choose sturdy nightstands (solid wood or MDF with weight) so the device doesn’t rattle.
Bedding and Soft Layers
- Use cotton percale for a crisp, cool feel or cotton sateen for smoother softness—both support relaxation without noisy rustling.
- Add a quilt or coverlet layer to dampen room echo and create a more cocooned vibe.
- Consider a fabric-upholstered headboard to soften reflections behind your head.
Lighting Choices That Complement a Sound Machine Routine
- Use warm bulbs (2200K–2700K) to reinforce melatonin-friendly evening light.
- Swap harsh overhead light for bedside lamps or wall sconces with dimmers.
- If your sound machine has LEDs, look for models with auto-dimming or keep it positioned so lights aren’t in your line of sight.
Colors That Feel Quieter at Night
- Try soft neutrals (warm white, greige, oatmeal) for a calm baseline.
- For more depth, use muted blues, sage green, or dusty mauve—colors often associated with lower visual stimulation.
- Keep high-contrast patterns minimal near the bed to reduce mental “alertness” at bedtime.
Sleep-Friendly Wellness Tips for Using a Sound Machine
- Pick one sound and stick with it for a week. Consistency helps your brain associate it with sleep.
- Set a gentle volume: loud enough to mask peaks, soft enough that it fades into the background.
- Use a timer if preferred, but many people sleep better with continuous sound if disruptions happen overnight.
- Pair with airflow: a ceiling fan or quiet air purifier can complement masking and improve perceived comfort.
- Keep the bedroom tech-light: if you use an app or smart speaker, enable Do Not Disturb and disable voice confirmations.
Common Mistakes to Avoid
- Placing it too close to your pillow: can feel sharp or annoying, especially with white noise at higher frequencies.
- Hiding it in a drawer or under bedding: muffles sound unevenly and can create overheating risk for some devices.
- Putting it in a corner: often boosts bass and causes boomy resonance—especially noticeable with brown noise.
- Using it as a “fix” for a chaotic bedroom: clutter, bright lighting, and uncomfortable bedding still undermine sleep quality.
- Choosing a machine with bright LEDs: light pollution in the sleep environment can disrupt relaxation and circadian cues.
- Ignoring room acoustics: bare floors and empty walls create echo; soft textiles help your masking sound feel smoother.
FAQ: Bedroom Sound Machine Placement
Where should I put a sound machine if my bedroom faces a busy street?
Place it between the bed and the window (on a dresser, shelf, or nightstand closer to the street side). Combine with blackout or lined curtains and a rug to reduce harsh reflections and improve masking.
Is it better to place a sound machine near the door or near the bed?
If hallway noise is the issue, place it near the door. If the noise is more general or you’re a light sleeper, place it 3–7 feet from the bed for consistent coverage. Many homes benefit from a bed-adjacent placement unless the hallway is particularly loud.
How far should a sound machine be from my head?
A comfortable range is usually 3–7 feet. Closer can work at very low volume; farther works well if you want more diffuse sound and dislike directional audio.
Should the sound machine be higher or lower than the mattress?
Most people prefer nightstand height or slightly higher on a dresser. Floor placement can help mask under-door noise, but it may sound muffled or uneven unless the device is designed for it.
What’s the best sound for sleep: white noise, pink noise, or brown noise?
White noise is brighter and can be effective for speech masking. Pink noise is softer and more balanced for many sleepers. Brown noise is deeper and can feel soothing, but it can get “boomy” if placed in a corner.
Can a sound machine replace soundproofing?
It can reduce the impact of disruptive noise, but it doesn’t block sound the way insulation or acoustic upgrades do. For better results, pair it with decor-based sound softening: curtains, rugs, upholstered furniture, and door seals.
A Simple Setup Plan for Tonight
- Identify your main noise source (window, shared wall, hallway).
- Place the sound machine between you and that source or on a nightstand 3–7 feet from your head.
- Adjust volume to mask peaks without feeling loud.
- Reduce light clutter by facing LEDs away from the bed and using warm, dim lighting.
- Add one softening layer if your room echoes (a rug, lined curtains, or an upholstered headboard).
Your bedroom design and your sleep quality are deeply connected—layout, materials, lighting, and sound all work together to signal safety and calm to the nervous system. With the right sound machine placement and a few decor tweaks, you can turn nightly noise into a steady, soothing backdrop that supports deeper rest.
For more calming bedroom decor ideas, sleep environment upgrades, and layout inspiration, explore the latest guides on thedecormag.com.
More Articles
 Bedroom Limewash Ceiling Treatment Idea - The Decor Mag
 Bedroom Rattan Furniture Trends - The Decor Mag
 How to Choose Bedroom Comforter Fill - The Decor Mag
 Bohemian Bedroom Decor Inspiration - The Decor Mag
 Best Bedroom Shoe Storage Solutions - The Decor Mag
 Summer Bedroom Design: Stay Cool & Stylish
 How to Create a Bedroom That Feels Collected - The Decor Mag
 How to Style a Bedroom with Neutral Tones - The Decor Mag
 Best Bedroom Jewelry Organization - The Decor Mag
 How to Mix Patterns on Your Bed - The Decor Mag