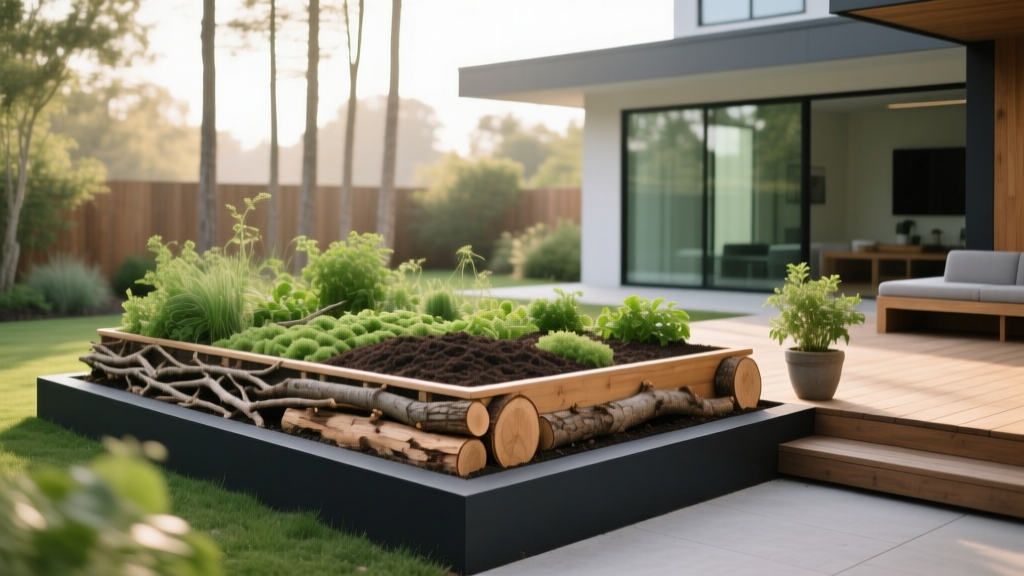
How to Create a Hugelkultur Garden Bed - The Decor Mag
A great outdoor living space isn’t just about a beautiful patio set and string lights (though we love those, too). It’s also about how your landscape works for you—how it handles heat, holds moisture, and stays lush even when life gets busy. A hugelkultur garden bed is one of the most practical, design-forward ways to upgrade a yard because it turns natural materials into a self-watering, soil-building garden feature that looks intentional and feels abundant.
Originally popularized in permaculture circles, hugelkultur (pronounced “HOO-gul-kul-tur”) uses layered logs, branches, leaves, and compost to create a raised bed that slowly decomposes. The wood acts like a sponge, storing water and releasing it back to plants over time. For homeowners, that translates into fewer watering sessions, healthier soil, and a landscape element that can double as a sculptural berm, a privacy screen, or a productive “green wall” near a patio.
If you want a garden bed that supports year-round outdoor living—spring blooms, summer harvests, fall texture, and winter structure—this is a smart build. Done well, it’s also a beautiful landscaping move: soft mounded shapes, layered plantings, and a more naturalistic, resort-like garden vibe.
What Is a Hugelkultur Bed (and Why Homeowners Love It)
A hugelkultur bed is a raised mound built from woody debris and organic matter, topped with soil and planted like a traditional raised bed. As the interior breaks down, it improves soil structure, feeds plants, and increases moisture retention.
Key benefits for outdoor design and landscaping
- Water-wise gardening: Great for drought-prone regions and homeowners who travel.
- Improved drainage: Especially helpful in clay soil yards where plants struggle.
- Warmer soil earlier in spring: The decomposing core generates mild heat.
- Less yard waste: Put fallen branches and logs to work instead of hauling them away.
- More dynamic landscape shaping: Mounds add dimension near patios, pathways, and fences.
Planning Your Hugelkultur Bed: Placement, Size, and Layout
Before you start stacking logs, treat this like any other outdoor living upgrade: plan how it fits the flow of your yard, patio, and daily routines.
Best locations in a yard or patio garden
- Near the kitchen door or grilling area: Perfect for herbs, salad greens, and edible landscaping.
- Along a fence line: Use the mound as a planting backdrop for screening shrubs and trellised vines.
- Bordering a patio: Create a soft, planted edge that feels lush and resort-like.
- On a slope: Hugelkultur mounds can slow runoff and reduce erosion when positioned thoughtfully.
Sun, wind, and view lines
- Choose 6–8 hours of sun for veggies and flowering plants; partial shade works for woodland-style beds.
- Use the mound to block prevailing winds for a cozier patio zone.
- Keep taller plantings on the side that won’t block favorite views from seating areas.
Recommended dimensions
- Starter bed: 3–4 ft wide, 6–10 ft long, 18–24 in tall (easy to build and maintain).
- Classic mound: 4–6 ft wide, 10–20 ft long, 3–5 ft tall (bigger water reservoir, bigger statement).
Tip: If you want easy access from both sides, keep the maximum width to about 5 feet so you can reach the center without stepping on soil.
Materials and Tools: What to Use (and What to Avoid)
Core materials (the “sponge” layer)
- Rotting logs (ideal) or fresh logs (also usable, but may tie up nitrogen early)
- Branches and sticks to fill gaps
- Wood chips (small amounts mixed in, not as the only fill)
Organic layers (the “composting” layer)
- Leaves, grass clippings (thin layers), straw
- Finished compost or well-aged manure
- Garden trimmings (non-diseased only)
Top layer (planting soil)
- High-quality topsoil blended with compost (roughly 60/40)
- Optional: worm castings for a nutrient boost
Materials to avoid
- Black walnut logs (can inhibit plant growth)
- Treated lumber or painted wood (chemicals can leach)
- Invasive weed seed heads or diseased plant debris
Tools checklist
- Shovel and garden fork
- Pruners/loppers or a small saw
- Wheelbarrow
- Hose for soaking layers
- Optional: hand tamper for shaping
Budget ranges
- $0–$150: Use on-site logs/branches + DIY compost + basic topsoil
- $150–$450: Add bulk compost delivery, better topsoil blend, drip line
- $450–$1,000+: Decorative edging, hardscape integration, premium soil, trellises, lighting
Step-by-Step: How to Build a Hugelkultur Garden Bed
-
Mark the footprint.
Use a hose or marking paint to outline a gentle curve if you want a more natural, landscape-design look. Curves feel softer next to patios and pathways than straight rectangles.
-
Prep the base.
Mow low and remove thick turf. For a more stable mound, dig a shallow trench 4–8 inches deep. This helps lock in logs and improves moisture capture.
-
Lay the logs (biggest first).
Stack logs like a loose crib. Aim for stability over perfection—gaps are fine because branches and organic matter will fill them.
-
Fill gaps with branches and sticks.
Think of this as building internal structure. Pack in smaller wood to reduce air pockets and help the mound hold its shape.
-
Add nitrogen-rich material.
Layer in grass clippings (thin), kitchen scraps (if buried well), fresh green plant matter, or manure. This balances the carbon-heavy wood and supports decomposition.
-
Water each layer thoroughly.
Soak as you build. This is one of the biggest “success multipliers” for first-year performance.
-
Top with compost and soil.
Add 6–12 inches of soil/compost blend. If you want to plant immediately, go closer to 12 inches.
-
Shape the mound and mulch.
Slope the sides around 45 degrees to reduce erosion. Finish with 2–3 inches of straw or shredded leaf mulch to protect the surface.
-
Plant and water in.
Install seedlings or direct sow, then water deeply for the first few weeks while roots establish.
Design Ideas: Make Hugelkultur Look Intentional in an Outdoor Living Space
A hugelkultur bed can be purely functional, but it can also become a focal point—especially near a patio, pergola, or outdoor kitchen zone.
Edging and structure options
- Natural stone edging: Gives a high-end, landscaped look and helps hold soil on steeper mounds.
- Corten steel edging: Modern and clean; looks sharp alongside contemporary patio pavers.
- Untreated cedar boards: Great for hybrid builds (part mound, part raised bed) and pairs well with wood decks.
Pathways and access
- Install decomposed granite or gravel paths around the bed for tidy, low-mess access.
- Use stepping stones if the bed borders a seating area—practical and polished.
Furniture and patio styling near the bed
- Adirondack chairs or low lounge seating placed to face the mound creates a “garden room” feel.
- Add a small bistro set for morning coffee with views of pollinator flowers.
- Include outdoor lanterns or low-voltage path lights to make the planting glow during evening patio time.
Best Plants for Hugelkultur Beds (Edible + Ornamental)
Plant choice is where hugelkultur shines for homeowners who want landscaping that’s both beautiful and useful. The mound creates microclimates: the top is drier and warmer; the lower sides hold more moisture.
Top of the mound (drier, sun-baked zone)
- Herbs: thyme, oregano, sage, lavender (great for patio fragrance)
- Drought-tolerant ornamentals: yarrow, salvia, sedum
- Veggies: peppers, eggplant (with consistent early watering)
Mid-slope (balanced moisture)
- Veggies: tomatoes, bush beans, cucumbers (add a trellis)
- Cut flowers: zinnias, cosmos, calendula
- Pollinator favorites: echinacea, bee balm (monarda)
Base of the mound (moister zone)
- Greens: lettuce, spinach, arugula (especially in spring/fall)
- Moisture lovers: celery, parsley
- Groundcovers: strawberries (also help reduce erosion)
Vertical elements for outdoor design
- Trellis on the north side to avoid shading sun-loving plants.
- Try snap peas in spring and pole beans in summer for a seasonal “living screen.”
Climate and Seasonal Considerations
Hot, dry climates
- Build slightly lower and wider to reduce drying winds.
- Use thicker mulch (3–4 inches) and consider drip irrigation for the first season.
- Plant heat-tough choices: rosemary, thyme, peppers, okra, lantana (ornamental).
Rainy climates
- Prioritize drainage: avoid building in low spots where water collects.
- Use coarser woody material at the base to keep airflow.
- Choose plants that handle moisture swings: kale, chard, mint (contained), ferns for ornamental edges.
Cold and snowy regions
- Build in fall if possible; the mound settles over winter and is ready for spring planting.
- Use a winter cover (straw + tarp or frost cloth) to prevent erosion and nutrient loss.
- Early spring: plant peas, brassicas, and hardy greens as soon as the soil is workable.
Year-round outdoor living tie-in
Hugelkultur beds add texture in every season: spring bulbs at the base, summer color mid-slope, fall seed heads for a natural look, and winter structure from ornamental grasses or evergreen herbs. Placed near a patio, they keep your view alive even when the grill cover is on and the fire pit is doing the heavy lifting.
Maintenance: What to Expect in Year 1 vs. Year 3
- Year 1: Water regularly until roots reach the moisture-storing wood. Add a nitrogen boost (compost tea or fish emulsion) if plants look pale.
- Year 2: The bed holds water better; weeds often decrease because the soil ecosystem improves.
- Year 3+: The mound settles. Top-dress with compost each spring and re-mulch to maintain shape and fertility.
Easy upkeep checklist
- Add 1–2 inches of compost each spring.
- Refresh mulch after heavy rains or summer heat waves.
- Replant bare spots quickly to prevent erosion.
- Rotate vegetables yearly to reduce pests and disease.
Common Mistakes to Avoid
- Using only fresh wood without enough nitrogen: This can cause nutrient lock-up. Fix it with compost/manure layers and a compost-rich top.
- Skipping the soak: Dry wood takes time to “charge.” Water the mound deeply during construction.
- Building too steep without mulch: Soil slides and seeds wash away. Keep slopes reasonable and mulch immediately.
- Planting thirsty crops on the peak: Put moisture lovers lower on the mound where water collects.
- Ignoring access: If you can’t reach it comfortably, it won’t get harvested or maintained. Design paths like you would for any patio garden.
FAQ: Hugelkultur Garden Beds
How long does a hugelkultur bed last?
Most beds perform well for 5–10 years depending on the size of the wood and climate. As the mound settles, you simply top-dress with compost and mulch to maintain height and fertility.
Can I build a hugelkultur bed in a small yard?
Yes. A compact bed (around 3 ft x 8 ft and 18–24 inches tall) works beautifully in small outdoor living spaces and can be styled like a raised garden feature near a patio.
Do hugelkultur beds attract pests?
They can if you use food scraps near the surface or create voids. Bury compostable material well, avoid meat/dairy scraps, and pack branches to reduce cavities. If termites are a concern in your region, keep the bed away from the home’s foundation and avoid building directly against wood structures.
Should I use cardboard at the bottom?
Cardboard can help suppress grass and weeds, especially for no-dig builds. Use plain, non-glossy cardboard, remove tape, and wet it thoroughly so it conforms to the ground.
What’s the best time of year to build one?
Fall is ideal because materials are plentiful (leaves, trimmings), and the mound has time to settle by spring. Spring builds also work—just plan for more watering in the first growing season.
Next Steps: Build a Bed That Elevates Your Yard
Start with one hugelkultur garden bed in a spot you’ll actually enjoy—near a patio seating area, along a path, or beside an outdoor dining zone. Sketch the footprint, gather logs and branches, and commit to a soil-and-mulch finish that looks as polished as the rest of your landscaping. Once the bed is planted and thriving, you’ll have a living feature that makes your outdoor space feel richer, greener, and easier to maintain season after season.
For more outdoor design, landscaping ideas, patio living upgrades, and garden styling inspiration, explore the latest articles on thedecormag.com.
More Articles
 Best Outdoor Lighting Ideas for Ambiance - The Decor Mag
 Best Outdoor Pouf and Ottoman Choices - The Decor Mag
 How to Design a Rooftop Terrace - The Decor Mag
 Outdoor Kitchen Flat Top Grill Setup - The Decor Mag
 Best Outdoor Bar Glass Rack Storage - The Decor Mag
 Best Outdoor Bar Orange Twist Station - The Decor Mag
 How to Design a Tropical Garden Oasis - The Decor Mag
 Outdoor Hammock and Swing Ideas - The Decor Mag
 Best Outdoor Bar Mint Sprig Glass Ideas - The Decor Mag
 How to Design a Permaculture Garden - The Decor Mag