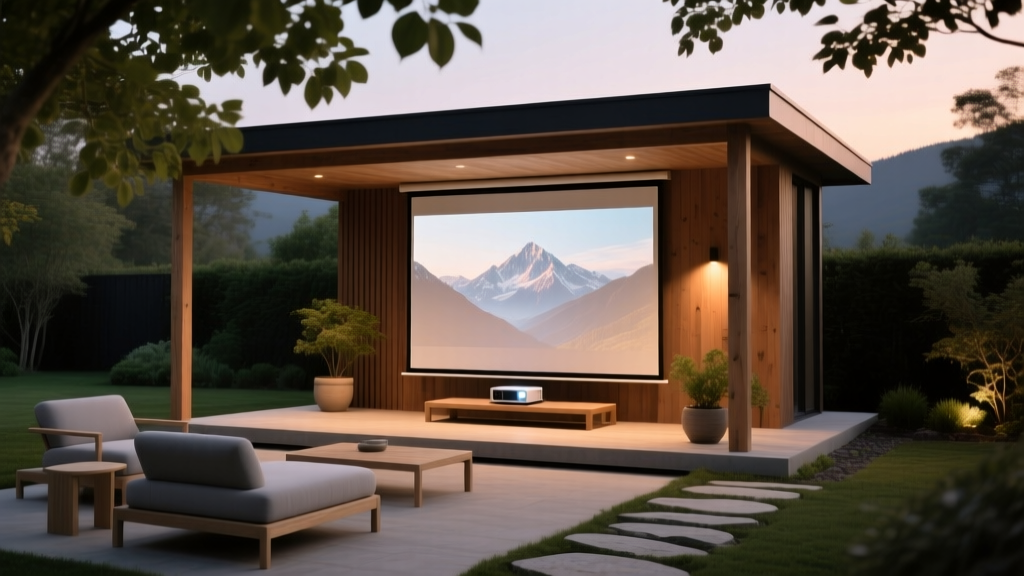
Outdoor Pavilion Projector Screen Setup - The Decor Mag
Few upgrades transform a backyard as quickly as an outdoor pavilion designed for movie nights. A well-planned outdoor pavilion projector screen setup creates an experience that feels part resort, part private cinema—without sacrificing the comfort and beauty that make outdoor living spaces worth investing in. Whether your pavilion sits beside a pool, anchors a patio, or overlooks a garden, adding a projector and screen turns it into a true destination for family gatherings, game days, and relaxed evenings under the lights.
What makes this topic especially valuable for homeowners is that it blends outdoor design with real-world performance. You need more than a “screen on a wall.” You need thoughtful patio layout, glare control, weather-ready materials, and landscaping that supports the mood (and the maintenance schedule). Done right, your pavilion becomes a year-round outdoor living hub—cozy in fall, breezy in summer, and ready for spontaneous entertainment whenever the mood strikes.
This guide covers the design essentials, recommended materials, furniture and planting ideas, seasonal strategies, and the most common mistakes people make when building an outdoor home theater under a pavilion.
Start with the Pavilion: Location, Orientation, and Screen Placement
Choose the best viewing direction
Before buying equipment, step into your pavilion at the time you’ll actually watch—often dusk through late evening. Notice where ambient light comes from: neighbor porch lights, streetlights, landscape uplighting, and even reflections from a pool or light-colored pavers.
- Aim the screen away from the brightest light sources (including the setting sun in summer, which can linger late).
- Prioritize a shaded wall or “dark end” of the pavilion for the screen.
- Plan for sightlines: avoid columns splitting the view, and don’t place the screen where people must walk through the beam path.
Screen placement rules of thumb
- Bottom of screen height: Typically 24–36 inches from finished floor for seated viewing (adjust for lounge seating).
- Viewing distance: About 1.2–1.6x the screen’s diagonal for a comfortable cinematic feel.
- Keep airflow in mind: Breezes can move lightweight screens; stable mounting matters.
Screen Options: Fixed, Retractable, Inflatable, or DIY
Best overall: Motorized retractable screen (ceiling or beam mounted)
If your pavilion doubles as a dining area or daytime lounge, a retractable screen preserves the space’s design and keeps the screen protected when not in use.
- Look for: outdoor-rated housing (or at least moisture-resistant), tab-tensioned fabric for fewer waves, and a quiet motor.
- Ideal for: covered pavilions with beams/joists for mounting.
Best value: Manual pull-down screen or tripod screen
Manual screens cost less and can still look polished if stored properly.
- Tip: choose a slightly heavier fabric to reduce rippling.
- Storage: keep it indoors or in a weather-sealed deck box to extend lifespan.
Fixed-frame screen for dedicated outdoor theaters
If your pavilion is primarily a movie pavilion, a fixed-frame screen delivers the flattest surface and the most “premium” look.
- Best for: pavilions with a protected back wall and limited wind exposure.
- Design tip: frame it with a simple trim surround (painted matte black) to create a built-in focal point.
DIY approach: Smooth exterior wall + projector paint
For smaller budgets or minimalist patios, a flat, light-colored wall can work—especially under a roof. Projector paint boosts reflectivity, but surface prep is everything.
- Use: exterior-rated patching and sanding, followed by a high-quality primer.
- Finish: matte to reduce hotspots.
Budget ranges for screens
- DIY wall setup: $50–$300
- Tripod/manual pull-down: $120–$500
- Fixed-frame: $300–$1,200+
- Motorized retractable: $700–$2,500+
Choosing the Right Outdoor Projector: Brightness, Resolution, and Placement
Brightness that fits real outdoor conditions
Outdoor spaces have more ambient light than indoor rooms—even at night. For most pavilions, prioritize brightness and contrast over chasing ultra-high resolution.
- Minimum for pavilions (evenings): 2,500–3,500 lumens
- For mild ambient light (string lights, nearby windows): 3,500–5,000 lumens
- For partial dusk viewing: 4,000+ lumens plus strong light control
Resolution and streaming
- 1080p: Great value and still looks fantastic outdoors.
- 4K: Worth it for large screens (120 inches+) and film lovers.
- Streaming tip: Use a dedicated streaming stick and a weather-protected outlet; keep Wi-Fi coverage strong (mesh node near the patio helps).
Mounting and throw distance
- Ceiling/beam mount: Cleanest look and safest for foot traffic.
- Shelf mount at the back: Easier maintenance; hide it in a ventilated cabinet.
- Short-throw projectors: Helpful when your pavilion is shallow and you want to avoid people walking through the beam.
Weather strategy for projectors
Even in covered pavilions, humidity and wind-blown dust take a toll. Unless your projector is specifically outdoor-rated, plan to bring it inside or protect it.
- Use: a ventilated, weather-resistant projector enclosure for seasonal setups.
- Maintenance: clean filters regularly and keep vents clear.
Sound That Feels Like a Theater (Without the Mess of Cables)
Outdoor sound needs clarity and enough volume to overcome open-air acoustics. A beautiful pavilion can hide speakers elegantly—think integrated design, not temporary party gear.
Recommended audio setups
- Simple and solid: Weather-resistant soundbar mounted near the screen (best for smaller pavilions).
- Better coverage: Two outdoor speakers under the pavilion eaves plus a small subwoofer in a protected corner.
- Whole-yard entertaining: Multi-zone outdoor speaker system for pavilion + patio + pool area.
Practical cable and power planning
- Install a GFCI-protected outlet near the screen and projector location.
- Run wiring through conduit for a clean, code-friendly finish.
- Use a weather-rated outdoor AV box for connections and surge protection.
Furniture and Layout: Designing Seating for Comfort and Sightlines
Layout ideas that work in most pavilions
- Lounge-first layout: Outdoor sectional facing the screen, with two swivel lounge chairs on the sides for flexible seating.
- Conversation + cinema hybrid: U-shaped seating with a central coffee table that converts to ottomans or poufs for movie nights.
- Dining-to-movie layout: Dining table pushed to the rear with a sofa set in front; add lightweight chairs that can rotate toward the screen.
Furniture recommendations (materials that hold up)
- Frames: powder-coated aluminum (rust-resistant) or premium teak (ages beautifully, needs oiling if you want to maintain color).
- Cushions: solution-dyed acrylic fabrics (Sunbrella-style) for fade resistance and easy cleaning.
- Rugs: polypropylene outdoor rug to soften acoustics and add warmth underfoot.
- Tables: concrete composite or slatted teak—stable in wind, easy to wipe clean.
Comfort upgrades for year-round outdoor living
- Ceiling fan: improves summer comfort and reduces bugs by keeping air moving.
- Infrared heater: extends movie season into fall and early spring.
- Throw blankets basket: keep a lidded deck box or waterproof storage bench nearby.
Budget ranges for furniture
- Starter lounge set: $800–$2,000
- Mid-range sectional + chairs + rug: $2,500–$6,000
- Premium pavilion lounge: $6,000–$15,000+
Lighting and Ambiance: Keep It Cozy Without Washing Out the Screen
The right lighting makes your pavilion feel magical while protecting picture quality.
- Use warm, dimmable lights (2700K–3000K) on separate zones.
- Place task lighting behind seating, not near the screen.
- Choose downlights or shielded sconces to reduce glare.
- Path lights along walkways keep guests safe without blasting the viewing area.
Seasonal lighting ideas
- Summer: subtle string lights on a dimmer plus lanterns on side tables.
- Fall: add battery candles and warmer layered light for cozy movie nights.
- Winter (mild climates): soft perimeter lighting paired with a heater; avoid cold-white LEDs that feel harsh.
Landscaping Around the Pavilion: Plants That Frame the Experience
Landscaping can improve privacy, reduce glare, and make your outdoor home theater feel intentional—like an extension of your interior design.
Planting strategies for a pavilion theater
- Create a “green wall” behind seating to absorb sound and add intimacy.
- Use taller plantings to block neighbor lights and views.
- Keep the screen wall clean: avoid plants that drop leaves/pollen directly in front of the screen area.
Plant suggestions by style (choose what fits your climate)
- Evergreen privacy (many regions): arborvitae, podocarpus, clumping bamboo (non-invasive varieties), wax myrtle.
- Mediterranean/patio look: olive (where hardy), rosemary, lavender, boxwood-style shrubs, ornamental grasses.
- Shade-friendly near covered areas: hostas, ferns, hellebores, heuchera, hydrangeas (depending on zone).
- Containers for flexible styling: dwarf citrus (warm climates), bay laurel, dwarf conifers, seasonal annuals for color.
Hardscape materials that pair well with AV zones
- Pavers: textured concrete pavers or natural stone with a matte finish to reduce light bounce.
- Decking: composite decking for low maintenance; choose mid-tone colors that hide dust and footprints.
- Wall finishes: stained wood, fiber cement, or exterior plaster—avoid glossy paint near the screen.
Climate and Maintenance Considerations
Hot and humid climates
- Choose mildew-resistant cushion inserts and quick-dry foam.
- Use a ceiling fan and prioritize airflow in any AV cabinet.
- Plan for bug control: oscillating fans, citronella in moderation, and avoid standing water near seating.
Dry and dusty climates
- Opt for sealed pavers or hardscape that reduces dust.
- Clean projector filters more often; store equipment in a sealed bin or enclosure.
- Use drought-tolerant landscaping: lavender, salvia, yarrow, agave (where appropriate), ornamental grasses.
Cold or four-season climates
- Invest in weatherproof covers for furniture and consider storing cushions in winter.
- Add wind-blocking outdoor curtains or clear panels to extend shoulder-season use.
- Use a heater (infrared or gas) and keep cords and pathways tidy for safety.
Maintenance checklist (simple habits that protect your investment)
- Wipe down the screen casing and projector mount monthly during peak season.
- Store streaming devices and remotes in a sealed container when not in use.
- Inspect outdoor outlets and cable connections at the start of spring and fall.
- Refresh mulch and trim plantings so nothing blocks views or lighting.
Common Mistakes to Avoid
- Underestimating ambient light: the most common reason outdoor projector images look washed out. Plan light control first.
- Placing seating too far away: people end up chatting instead of watching because the screen feels distant.
- Ignoring wind: lightweight screens ripple, and tripod screens tip. Anchor or mount properly.
- Using indoor power solutions outdoors: skip household extension cords and non-rated power strips.
- Forgetting storage: even “covered” pavilions get humidity and dust. Plan a cabinet, bench, or deck box.
- Too much bright lighting near the screen: keep lighting zones behind viewers and on dimmers.
Project Planning and Budget: What to Expect
Your total cost depends on how integrated you want the setup to feel and whether your pavilion already has power and lighting.
- Budget-friendly setup ($600–$2,000): manual screen or DIY wall, 1080p projector, portable speaker or basic outdoor soundbar, minimal wiring.
- Mid-range upgrade ($2,000–$6,500): higher-lumen projector, fixed-frame or quality retractable screen, two outdoor speakers, dedicated outlets, better seating.
- Premium pavilion theater ($6,500–$20,000+): motorized tab-tension screen, 4K projector, integrated audio zones, concealed wiring, lighting control, upgraded furniture and landscaping.
FAQ: Outdoor Pavilion Projector Screen Setup
What size screen works best under a pavilion?
Most homeowners love 100–135 inches diagonal for pavilions. Choose based on seating distance: if your main seats are 10–12 feet away, a 120-inch screen is usually a sweet spot.
Can I leave my projector outside under a covered pavilion?
Covered helps, but humidity and dust still shorten lifespan. For best results, bring it inside after use or install a ventilated weather-resistant enclosure and keep up with filter cleaning.
Do I need a special outdoor screen material?
If the screen will stay outdoors, choose a screen designed for humidity resistance and tensioning. For occasional use, a quality manual screen stored in a deck box can work well.
How do I reduce glare and improve picture quality?
Use a brighter projector, reduce nearby lighting, and consider outdoor curtains or shades on the pavilion’s open sides. Also avoid light-colored, glossy surfaces near the screen that reflect light back onto it.
What’s the best seating for outdoor movie nights?
An outdoor sectional with deep cushions plus a couple of lounge chairs creates a theater-like arrangement. Add ottomans or poufs for flexible footrests and extra seating.
How can I make it work for year-round outdoor living?
Layer comfort and protection: a ceiling fan for summer, an infrared heater for cool nights, wind-blocking curtains for shoulder seasons, and weatherproof storage for cushions and AV accessories.
Next Steps: Bring Your Pavilion Theater to Life
Walk your pavilion at dusk, choose your screen wall, and sketch a simple layout showing seating, screen, projector position, and lighting zones. From there, pick the screen type that matches how you use the space—retractable for multifunctional patios, fixed-frame for a dedicated cinema feel, or a DIY wall for a clean, budget-friendly start. Add weather-ready furniture, privacy-enhancing landscaping, and storage that keeps everything looking intentional.
For more outdoor living ideas, patio layout inspiration, and landscaping design tips, explore the latest guides and projects on thedecormag.com.
More Articles
 How to Create a Rock Garden - The Decor Mag
 Smart, Stylish, and Sustainable Outdoor Storage Ideas for Modern Living Spaces
 Outdoor Kitchen Griddle Top Surface Guide - The Decor Mag
 Best Outdoor Bar Bread Basket Station - The Decor Mag
 Outdoor Kitchen Power Burner Installation - The Decor Mag
 Outdoor Kitchen Range Hood Exterior - The Decor Mag
 Modern Outdoor Living Space Ideas for 2026 - The Decor Mag
 How to Create a Medicinal Herb Garden - The Decor Mag
 Outdoor Pizza Oven Installation Guide - The Decor Mag
 Performance Alternatives to Styling: Why Functionality Should Anchor Outdoor Living Design