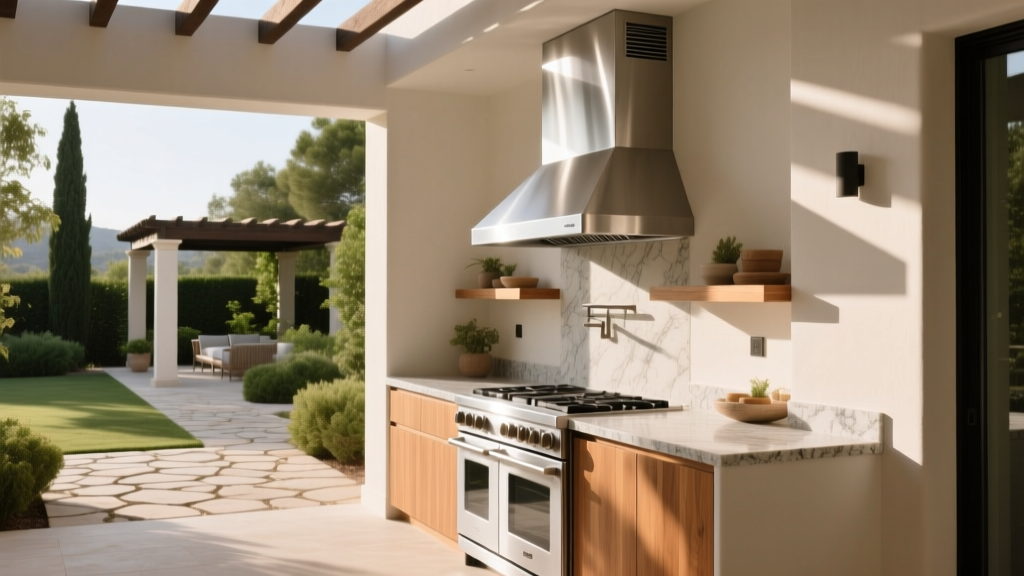
Outdoor Kitchen Ventilation Guide - The Decor Mag
An outdoor kitchen is one of the quickest ways to level up patio living—suddenly your deck becomes the hub for weeknight dinners, holiday gatherings, and slow weekends spent outside. But there’s a design detail that separates a dreamy, year-round outdoor living space from a smoky, uncomfortable one: ventilation. When smoke hangs under a pergola, grease settles on cabinetry, and heat pools where guests want to relax, even the most beautiful outdoor kitchen can feel like a hassle.
Good ventilation is about comfort, safety, and longevity. It keeps the air fresh, helps control heat, protects outdoor kitchen materials from grease buildup, and makes your entire landscape design feel more intentional. Whether you’re building a full outdoor kitchen with a pizza oven and bar seating or upgrading a simple grill station, a smart ventilation plan can extend the season, reduce maintenance, and make every cookout feel effortless.
This guide breaks down how to choose the right setup for your layout—open-air patio, covered porch, pergola kitchen, or poolside pavilion—along with practical design tips, plant and furniture recommendations, climate considerations, budget ranges, and the most common mistakes homeowners make.
Why Outdoor Kitchen Ventilation Matters
Comfort for cooks and guests
Even outdoors, smoke can collect under roofs and shade structures. Without airflow, the chef ends up standing in a hot, smoky pocket while guests avoid nearby seating. Ventilation helps:
- Move smoke and cooking odors away from dining and lounge zones
- Reduce heat buildup under covered patios and pergolas
- Make the space feel inviting during summer entertaining
Protecting your investment
Grease vapor and soot settle on surfaces—especially under a roof. Over time, that buildup can stain ceilings, dull stainless steel, and shorten the life of cabinet finishes. Better ventilation supports:
- Cleaner ceilings and walls under patio covers
- Less frequent deep-cleaning of appliances and backsplashes
- Longer lifespan for outdoor-rated cabinetry and lighting
Safety and code compliance
If your outdoor kitchen sits under a roofline, near windows, or close to combustible materials, ventilation becomes a safety feature. Local building codes vary, but many municipalities have guidelines for clearances, hood requirements, and fuel types (gas vs. charcoal). When in doubt, consult your local code office and a licensed contractor—especially for covered outdoor kitchens.
Start with Your Outdoor Kitchen Layout
The right ventilation strategy depends on how enclosed your outdoor cooking area is. Use this as a quick guide:
1) Fully open patio kitchen (no roof overhead)
If your grill is in the open air, natural airflow does most of the work. You’ll focus on placement, wind direction, and creating comfortable “escape routes” for smoke.
- Best approach: Smart positioning + wind-aware layout
- Consider adding: A small windbreak wall or glass panel if wind pushes smoke toward seating
2) Pergola or partially covered outdoor kitchen
Pergolas reduce heat and glare, but they can trap smoke depending on slat spacing, ceiling height, and nearby walls.
- Best approach: Add a properly sized hood if the area feels “roofed”
- Design tip: Choose an open-top pergola or wider slat spacing above the grill zone to allow smoke to rise
3) Covered patio, pavilion, or outdoor room
This is where dedicated mechanical ventilation matters most. Smoke and grease will collect under the ceiling without a hood system designed for outdoor use.
- Best approach: Outdoor-rated vent hood + makeup air strategy (fresh air coming in as exhaust goes out)
- Design tip: Keep at least one side open when possible for cross-ventilation
Ventilation Options: What Actually Works Outdoors
Natural ventilation (layout-driven airflow)
Natural ventilation relies on open sides, breeze patterns, and spacing. It’s often enough for an open-air grill station—but it must be planned.
Practical layout tips:
- Place the grill so prevailing winds carry smoke away from dining chairs and lounge seating.
- Aim for at least 6–10 feet between the grill and the main seating zone when space allows.
- Use an L-shaped or U-shaped island as a subtle wind buffer, with the grill positioned on the outer edge.
- Avoid boxing the grill into a corner between solid walls—smoke will swirl and linger.
Outdoor-rated vent hoods (the gold standard for covered kitchens)
If you have any kind of roof overhead—patio cover, pavilion, or outdoor room—an outdoor-rated hood is typically the most effective solution for smoke and grease control.
What to look for in a hood:
- Outdoor rating: Built to handle humidity, temperature swings, and wind gusts.
- Corrosion-resistant build: 304 stainless steel is ideal for most climates; 316 stainless is best for coastal or salty air.
- Coverage: A canopy that extends beyond the cooking surface helps capture smoke before it spreads.
- Grease filters: Baffle filters are durable and cleanable—great for outdoor cooking.
Budget range:
- $600–$1,500: Entry-level outdoor hoods (lighter duty, fewer size options)
- $1,500–$4,000: Mid-range, reliable stainless hoods with stronger blowers
- $4,000–$10,000+: Premium custom hoods, high CFM blowers, integrated lighting and controls
Downdraft ventilation (limited outdoor use)
Downdraft systems pull smoke downward, but wind and open-air conditions can reduce performance. They’re generally not the first choice for a grill-heavy outdoor kitchen. If you’re planning a sleek outdoor kitchen design with a cooktop (less smoke than grilling), a downdraft may be an option—but verify outdoor rating and expectations.
Fans, cross-ventilation, and “assist” strategies
Sometimes you don’t need a full hood—you need airflow support. These strategies help move heat and odors away:
- Ceiling fans (outdoor-rated): Great for comfort, but don’t rely on them to capture grease; place them to improve circulation, not to blow smoke around.
- Wall-mounted fans: Can push smoke away from seating zones in open-air kitchens.
- Strategic openings: Keep at least two sides open under a roof to encourage cross-breezes.
Design Recommendations for a Cleaner, More Comfortable Patio Kitchen
Best materials for smoke, grease, and weather exposure
Ventilation reduces mess, but materials do the heavy lifting when it comes to durability.
- Countertops:
- Granite: Classic, durable, heat-resistant (seal regularly).
- Concrete: Modern and customizable (needs sealing; can develop patina).
- Porcelain slabs: Excellent stain resistance and low maintenance (premium price).
- Cabinetry:
- Marine-grade polymer (HDPE): Great for humid climates and low maintenance.
- 304/316 stainless steel: Sleek and durable; 316 is best near the coast.
- Powder-coated aluminum: Lightweight, corrosion-resistant, modern.
- Backsplash and wall surfaces:
- Porcelain or ceramic tile: Easy to wipe down; choose matte finishes to hide smudges.
- Stainless steel panels: Professional look, quick cleaning behind grills.
- Natural stone veneer: Beautiful but can trap soot in texture; seal it and plan for more maintenance.
- Ceiling under a cover: Fiber cement panels, tongue-and-groove cedar (sealed), or exterior-rated composite are durable choices. Lighter colors show less soot and brighten the space.
Furniture and layout ideas that work with ventilation
Ventilation isn’t just mechanical—it’s how you zone your patio for cooking, dining, and relaxing.
Smart outdoor living layout:
- Create a “hot zone”: Grill, smoker, side burner, and trash pull-out in one cluster.
- Keep the “cool zone” upwind: Lounge seating, outdoor rugs, and soft furnishings away from smoke.
- Add a buffer: Use a bar-height counter, a planter wall, or a storage run between cooking and dining.
- Plan traffic flow: Leave 42–48 inches for walkways behind the cook so guests aren’t trapped in smoke.
Furniture picks that hold up near a grill:
- Powder-coated aluminum dining sets: Easy to clean, rust-resistant.
- Teak or ipe accent pieces: Naturally weather-resistant; oil if you want to maintain color.
- Sling chairs and PVC-coated mesh: Great near cooking areas—wipeable and breathable.
- Performance fabrics: Solution-dyed acrylic (like Sunbrella-style fabrics) resists fading and cleans well.
Planting ideas that support outdoor kitchen comfort
Plants can improve the experience by filtering dust, providing shade, and softening hardscape. They won’t “solve” smoke, but they can help create breezy, comfortable garden and patio living zones.
Best plant strategies near outdoor kitchens:
- Use plants as a soft wind buffer: Cluster tall grasses or shrubs to redirect smoke away from seating.
- Choose low-litter plants: Avoid species that drop sticky sap, heavy petals, or lots of leaves over counters.
- Keep fragrant plants slightly away from the grill: Smoke can overwhelm delicate scents.
Plant suggestions (region-friendly options):
- Ornamental grasses: Feather reed grass (Calamagrostis), muhly grass—movement, low maintenance.
- Evergreen structure: Boxwood alternatives like inkberry holly (cooler climates), podocarpus (warmer zones).
- Herb planters for function: Rosemary (also a hardy shrub in warm climates), thyme, oregano—keep in pots so you can move them seasonally.
- Shade helpers: Small trees like olive (warm climates), serviceberry (cooler climates), or multi-stem crape myrtle (many regions)—placed to shade seating, not the grill exhaust path.
Climate & Seasonal Considerations for Year-Round Outdoor Living
Hot, humid climates
- Prioritize open-sided structures and strong airflow; humidity makes smoke feel heavier.
- Choose HDPE or aluminum cabinetry for moisture resistance.
- Add outdoor ceiling fans for comfort—paired with a hood if covered.
Dry, windy climates
- Wind can push smoke back into the patio. Use partial wind screens (tempered glass panels or slatted privacy walls) positioned to deflect without enclosing the space.
- Select non-combustible finishes around the grill (stone, metal, porcelain tile).
- Consider a spark-resistant plan if using charcoal or wood—keep planters and cushions farther away.
Cold or four-season climates
- Covered patios are common for shoulder seasons—plan for mechanical ventilation if the grill is under a roof.
- Use 316 stainless if roads are salted heavily (corrosion can be a problem).
- In fall and winter, smoke can linger in still air; add task lighting and keep a clear airflow path to prevent the space from feeling stuffy.
Maintenance Checklist: Keep Ventilation Performing Like New
- Monthly (during peak grilling season): Clean baffle filters; wipe hood surfaces with mild soap and water.
- Quarterly: Inspect ducting (if applicable) for grease buildup; check fasteners for corrosion.
- Seasonally: Deep clean surrounding walls/backsplash; reseal stone or concrete as recommended.
- Year-round tip: Use an outdoor hood cover when not in use, especially in snowy or coastal areas.
Common Outdoor Kitchen Ventilation Mistakes to Avoid
- Undersizing the hood: A hood that’s too small won’t capture smoke—especially under a patio cover.
- Placing the grill in a dead corner: Two walls + a roof creates a smoke trap.
- Skipping outdoor-rated components: Indoor hoods and fans can fail quickly outdoors.
- Ignoring prevailing winds: A gorgeous outdoor kitchen design can still be miserable if smoke blows directly into seating.
- Using high-texture finishes behind the grill: Deep stone texture looks great but can hold soot and grease.
- No plan for cleaning: If filters are hard to access, maintenance won’t happen—choose easy-to-reach designs.
FAQ: Outdoor Kitchen Ventilation
Do I need a vent hood for an outdoor kitchen?
If your grill is under a covered patio, pavilion, or roof extension, a vent hood is strongly recommended for smoke and grease capture. For a fully open patio kitchen, smart placement and natural airflow may be enough.
What’s the best hood material for outdoor use?
304 stainless steel is a strong choice for most regions. For coastal yards or salty air, 316 stainless steel offers better corrosion resistance and holds up longer.
Can I use an indoor range hood outside?
It’s usually a poor fit. Indoor hoods aren’t designed for wind, humidity, or temperature swings, and they can corrode or fail prematurely. Look for an outdoor-rated hood specifically labeled for exterior use.
How do I keep smoke away from guests?
Start with layout: put seating upwind, leave generous spacing (6–10 feet when possible), and create a buffer with a bar counter or planter wall. Under a roof, pair that plan with a properly sized outdoor vent hood.
What plants work well near an outdoor kitchen?
Choose low-litter, easy-care plants such as ornamental grasses (muhly, feather reed grass), evergreen shrubs suited to your zone, and potted herbs. Keep plants far enough from heat and flare-ups, and avoid sticky or messy fruiting trees over counters.
What’s a realistic budget for ventilation?
For open-air kitchens, you may spend $0–$500 on layout tweaks, fans, or wind screens. For covered kitchens, outdoor hood systems often run $1,500–$6,000 installed depending on hood size, blower strength, ducting, and electrical work, with premium builds reaching $10,000+.
Next Steps: Build a Ventilation Plan That Matches Your Lifestyle
Walk your patio on a breezy day and note where smoke would naturally travel, then sketch a simple zone plan: hot zone (grill), warm zone (prep/serving), cool zone (dining and lounging). If your outdoor kitchen is under any kind of roof, prioritize an outdoor-rated vent hood built from quality stainless steel and pair it with wipeable, weather-ready materials that can handle real cooking.
If you’re still deciding between an open pergola kitchen and a fully covered pavilion, let ventilation guide the choice—more cover often means you’ll want more mechanical exhaust. Once the airflow is right, the rest of your outdoor living space design falls into place: comfortable seating, durable finishes, and landscaping that makes the entire yard feel like a resort.
For more outdoor kitchen ideas, patio living layouts, and landscape design inspiration, explore the latest guides and trends on thedecormag.com.
More Articles
 DIY Summer Porch Makeover: Budget Refresh Under $100
 Premium Outdoor Living Trends 2026: Innovation, Sustainability, and Elevated Craftsmanship
 How to Create a Container Herb Garden - The Decor Mag
 Outdoor Kitchen Countertop Expansion Joints - The Decor Mag
 Kitchen Design Tools Checklist: Essential Instruments for Precision, Efficiency, and Professional Results
 How to Design a Coastal Garden - The Decor Mag
 Best Outdoor Cushion Fabric Choices - The Decor Mag
 Outdoor Pergola Fairy Light Draping Guide - The Decor Mag
 How to Create a Pollinator Garden - The Decor Mag
 How To Clean Living: A Practical Guide to Healthier Outdoor Spaces and Sustainable Habits