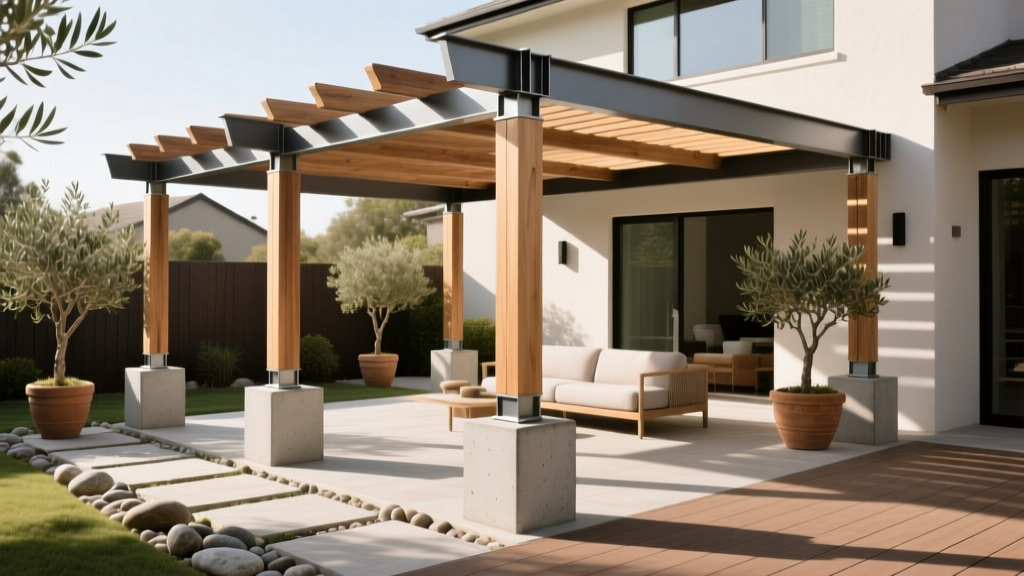
Outdoor Pergola Post Base Options - The Decor Mag
A pergola has a special way of turning an ordinary patio or garden corner into a destination. It creates shade where you want it, defines an outdoor “room,” and gives you a structure to hang lights, train vines, or add privacy screens. But the true performance of a pergola—how solid it feels in the wind, how long it lasts through rainy seasons, and how polished it looks next to your pavers—starts at ground level with one decision: the post base.
Outdoor pergola post base options aren’t just a structural detail; they influence your layout, your budget, your maintenance schedule, and even your planting choices. The right base keeps wood posts away from standing water, resists rust, and anchors the structure to withstand storms. The wrong one can lead to wobble, premature rot, cracked concrete, and a project that never quite feels finished.
Below you’ll find a practical, design-forward guide to pergola post bases—covering what works best for patios, decks, lawns, and poolside hardscapes—plus climate considerations, common mistakes to avoid, and recommendations that help your pergola look intentional year-round.
How to Choose the Right Pergola Post Base
Before you pick hardware, get clear on five key factors. These determine which pergola post base option makes the most sense for your outdoor living space.
- Surface type: Concrete patio, pavers, deck, compacted gravel, or soil each require different anchoring methods.
- Post material and size: Most pergolas use 4x4, 6x6, or 8x8 posts in pressure-treated lumber, cedar, redwood, or aluminum.
- Local wind/snow loads: Coastal winds and heavy snow regions demand stronger anchors and deeper footings.
- Moisture exposure: Irrigated lawns, pool splash zones, and rainy climates need bases that elevate the post and resist corrosion.
- Design intent: Visible decorative bases versus concealed brackets; modern minimalism versus rustic timber styling.
Quick rule: If you want a pergola that feels “built-in,” prioritize post bases designed for structural loads and water separation—then select a decorative wrap or trim detail to match your outdoor design style.
Best Outdoor Pergola Post Base Options (Pros, Cons, and Use Cases)
1) Surface-Mount Post Bases (Anchored to Concrete)
Surface-mount post bases are steel brackets anchored into a concrete patio or concrete footings using wedge anchors or epoxy-set bolts. They’re one of the most popular pergola post base options for patios because they’re clean, strong, and relatively straightforward to install.
Best for: Existing concrete patios, pool decks, outdoor kitchens, and modern patio living layouts.
- Pros:
- Elevates wood posts above wet surfaces to reduce rot
- Strong lateral stability when properly anchored
- Works well for precise layouts and straight lines
- Cons:
- Requires accurate drilling into concrete
- Visible metal hardware may need a decorative skirt for certain styles
- Not ideal on thin slabs without reinforcement (risk of cracking or pull-out)
Material recommendations:
- Hot-dip galvanized steel for general use and wet climates
- Stainless steel (304/316) for coastal areas, saltwater pools, and high-humidity zones
Budget range: $25–$120 per base (galvanized to stainless), plus anchors. For a 4-post pergola, expect $120–$500 in bases/hardware.
Design tip: Pair surface-mount bases with a clean paver border or a contrasting inlay (like dark basalt or charcoal pavers) to make the pergola feel intentionally “set” into the patio.
2) Embedded Post Bases (Wet-Set in Fresh Concrete)
Embedded or “wet-set” post bases are installed while pouring new concrete footings or a new slab extension. This approach is excellent when you want maximum strength and a cleaner final look because the base aligns perfectly with the layout.
Best for: New pergola builds, new patios, and projects where you’re already pouring footings.
- Pros:
- Very strong, especially for wind resistance
- Allows precise placement and consistent post alignment
- Often looks more integrated than retrofitting on an old slab
- Cons:
- Requires careful planning before the pour
- Harder to adjust later if you change the pergola size
- DIY mistakes can be permanent (crooked alignment)
Budget range: $25–$120 per base, plus concrete/footing costs. Footings can add $200–$1,000+ depending on size, frost depth, and labor.
Climate note: In freeze-thaw regions, footings typically must extend below frost depth to prevent heaving. This is where wet-set bases shine—your pergola stays level season after season.
3) Post Anchors for Paver Patios (Pier Footings Below Pavers)
Pavers look beautiful under a pergola, but pavers alone aren’t structural. The best practice is to install concrete pier footings below the paver base, then bring a post base up through the pavers so the pergola is anchored to concrete—not to sand or gravel.
Best for: Paver patios, outdoor fire pit zones, and landscape design projects with segmented hardscape.
- Pros:
- Protects the integrity of your paver patio
- Creates a high-end, built-in look when detailed correctly
- Excellent for drainage because pavers shed water well
- Cons:
- More labor-intensive (cutting pavers, digging piers)
- Requires careful waterproofing and weed control around penetrations
Design approach: Consider adding a slightly larger “post pad” detail—like a 12"x12" stone or porcelain paver under each post—to visually ground the structure and hide cut edges.
Budget range: $400–$1,800+ for footings and paver modifications (varies widely by region and whether you DIY).
4) Raised Deck Pergola Post Bases (Through-Bolted or Structural Mounts)
For deck pergolas, the post base choice is as much about framing as it is about hardware. A pergola can act like a sail in strong wind, so avoid relying on deck boards alone. Posts should be attached to framing members with structural connectors and through-bolts where appropriate.
Best for: Pergolas over composite decks, wood decks, rooftop decks (with engineering guidance), and covered grilling areas.
- Pros:
- Can look seamless with a deck-focused outdoor living design
- Works well for pergolas that align with railings and stairs
- Cons:
- Requires access to framing and careful water management
- Improper attachment can lead to bounce, sway, or deck damage
Maintenance tip: On decks, water tends to collect around post penetrations. Use high-quality flashing and sealant, and keep leaf debris from building up at the base.
Budget range: $150–$800 in connectors/hardware depending on complexity, plus potential framing upgrades.
5) Direct-Bury Posts (Generally Not Recommended for Long-Term Builds)
Direct-bury pergola posts are set into a hole in the ground with concrete or gravel. It’s common for quick builds, but it often shortens the life of wood posts because the buried section holds moisture. For homeowners aiming for a lasting outdoor pergola design, this is usually the option to skip.
Best for: Temporary structures, very low-budget garden pergolas, or non-structural vine trellises (not full patio pergolas).
- Pros:
- Low upfront cost
- No need for a slab or existing hardscape
- Cons:
- Higher risk of rot and insect damage
- Harder to repair—replacing a buried post is messy
- Can heave in freeze-thaw climates if not properly below frost line
Budget range: $50–$300 for concrete and basic materials, but potentially higher long-term costs due to repairs.
6) Decorative Post Base Wraps (For the Finished Look)
Decorative post base covers don’t carry the load, but they transform the final look—especially when the structural base is visible. If you want that “custom outdoor living space” feel, this is a small detail with big impact.
Best for: Traditional and transitional patio design, craftsman-style pergolas, and high-visibility poolside pergolas.
- Material options:
- Powder-coated aluminum wraps for modern pergolas
- PVC wraps for low-maintenance, moisture-prone areas
- Wood skirts for a cohesive cedar/redwood aesthetic
Budget range: $20–$150 per post depending on material and detailing.
Outdoor Design Recommendations: Make the Base Work With Your Space
Furniture Pairings That Complement a Pergola
- Under-pergola dining: A 6–8 seat outdoor dining set centered between posts, with 36–48 inches of clearance for chairs and circulation.
- Lounge layout: A modular outdoor sectional plus two swivel chairs for flexible conversation zones.
- Materials that age well: Teak, powder-coated aluminum, and all-weather wicker with solution-dyed acrylic cushions (great for year-round patio living).
Budget range for furniture:
- Budget: $600–$1,500 (resin wicker sets, smaller dining)
- Mid-range: $1,500–$4,000 (aluminum/teak mixes, better cushions)
- Investment: $4,000–$10,000+ (premium teak, large modular sets)
Plants That Love Pergolas (And Where to Put Them)
A pergola is a built-in support system for vertical gardening. Match plants to your climate, sunlight, and maintenance style.
- Fragrant climbers: Star jasmine (warm climates), honeysuckle (many regions), climbing roses (sunny sites)
- Fast coverage: Clematis (varieties for many zones), passionflower (warm climates)
- Edible shade: Grapes (great for sun and summer shade), hardy kiwi (needs sturdy structure)
- Container accents at post corners: Lavender, rosemary, dwarf fountain grass, or boxwood for a clean architectural look
Layout tip: Place large containers just outside the post line to keep foot traffic clear and protect post bases from constant irrigation splash.
Materials That Perform Outdoors Year-Round
- Posts: Cedar and redwood for natural beauty; pressure-treated lumber for value; aluminum for low maintenance and modern lines
- Fasteners: Use exterior-rated structural screws/bolts; stainless steel near salt air or chlorine exposure
- Base hardware: Hot-dip galvanized for most climates; upgrade to stainless for coastal durability
- Underfoot: Porcelain pavers, textured concrete, or composite decking for slip resistance and easy cleanup
Climate & Maintenance Considerations
Coastal and High-Humidity Climates
- Choose stainless steel (316 preferred) post bases and fasteners to resist corrosion.
- Keep posts elevated and maintain airflow around the base.
- Rinse hardware periodically if you’re near salt spray.
Freeze-Thaw and Snow Regions
- Plan for below-frost-depth footings to prevent shifting.
- Use post bases that keep wood off wet concrete to reduce winter moisture wicking.
- Consider a winter-ready layout: leave room for furniture covers and snow-clearing paths.
Hot, Sunny, and Dry Regions
- Opt for UV-stable finishes, especially on composite or powder-coated components.
- Add seasonal comfort upgrades: outdoor curtains for afternoon sun, a ceiling fan (if covered/approved), or a shade canopy.
- Choose drought-tolerant plantings: rosemary, salvia, lantana, olive, or agave (region-appropriate).
Seasonal Maintenance Checklist
- Spring: Inspect anchors/bolts for loosening; wash pollen off beams and hardware.
- Summer: Check for irrigation overspray at post bases; touch up protective finishes as needed.
- Fall: Remove leaves from around bases; prune vines to prevent excess weight and wind drag.
- Winter: After storms, inspect for movement; clear snow buildup where it piles against posts.
Common Mistakes to Avoid
- Mounting to pavers only: Pavers are not structural. Use concrete piers/footings below.
- Skipping the moisture gap: Wood posts sitting directly on concrete invite rot. Choose bases that elevate the post.
- Using interior or low-grade fasteners: They rust quickly and stain surrounding materials.
- Ignoring wind uplift: Pergolas catch wind. Use structural-rated connectors and follow local code guidance.
- Misaligned layout: Small errors at the base become big visual problems at the top. Square and level everything before final tightening.
- Overwatering at the corners: Sprinklers hitting post bases repeatedly shorten the life of wood and accelerate corrosion.
Budget Snapshot: What Homeowners Typically Spend
- Budget pergola base setup: $150–$500 (basic galvanized bases + anchors, DIY on sound concrete)
- Mid-range, long-lasting setup: $500–$2,000 (quality bases, stainless upgrades where needed, new footings or paver pier work)
- High-end/architectural build: $2,000–$6,000+ (engineered footings, premium stainless, decorative base wraps, complex hardscape integration)
Where it pays to invest: Bases, anchors, and fasteners. These are hard to upgrade later, and they determine how confident your pergola feels in every season.
FAQ: Outdoor Pergola Post Bases
What’s the best pergola post base for an existing concrete patio?
A structural surface-mount post base anchored into concrete is typically the best choice. Look for hot-dip galvanized or stainless steel hardware and use anchors rated for your slab condition.
Can I install a pergola over pavers without pouring concrete?
If you want a stable, long-term pergola, you’ll still need concrete piers/footings below the pavers. Pavers and compacted base layers are excellent for drainage but not for structural anchoring.
Do I need stainless steel post bases?
Stainless is strongly recommended for coastal homes, saltwater pools, and very humid climates. For most inland backyards, hot-dip galvanized steel performs well.
How do I keep my wood pergola posts from rotting at the bottom?
Use a post base that elevates the post above the surface, ensure proper drainage, and avoid constant irrigation spray. Seal cut ends of wood and maintain the finish (especially in rainy climates).
What size post base do I need—4x4 or 6x6?
Match the base to your post size and pergola design. Many patio pergolas look and feel sturdier with 6x6 posts, especially for larger spans or windy areas. Always confirm sizing against your plan and local requirements.
Should I hide the metal post bases?
Not necessarily—visible brackets can suit modern outdoor design. If you prefer a warmer, custom look, add decorative post base wraps or wood skirts to coordinate with your beams, lighting, and furniture.
Next Steps: Plan Your Pergola Like a Pro
Start by mapping your pergola footprint on the patio or in the garden with painter’s tape or stakes, then decide where the posts land in relation to furniture and circulation. Choose the post base option that matches your surface (concrete, pavers, or deck), upgrade materials for your climate, and build in maintenance-friendly details—like keeping planters and sprinklers a few inches away from the bases.
If you’re aiming for year-round outdoor living, think beyond the structure: add layered lighting, weather-ready furniture, and plants that bring fragrance and texture through multiple seasons. A pergola anchored correctly becomes the backbone of a backyard you’ll actually use—spring dinners, summer lounging, crisp fall evenings, and even winter sun breaks.
Want more patio, pergola, and landscape design ideas? Explore fresh outdoor inspiration, practical guides, and seasonal styling tips on thedecormag.com.
More Articles
 Outdoor Pavilion Torch Light Placement - The Decor Mag
 Outdoor Kitchen Ideas: Budget & Space Solutions
 Best Outdoor Pouf and Ottoman Choices - The Decor Mag
 How to Create a Three Sisters Garden - The Decor Mag
 Best Outdoor Bar Glass Rack Storage - The Decor Mag
 Outdoor Pavilion Misting System Setup - The Decor Mag
 Premium Alternatives to Paint: Durable, Sustainable, and Aesthetic Solutions for Outdoor Living Surfaces
 How to Design a Drought-Tolerant Landscape - The Decor Mag
 How to Design a Japanese-Inspired Garden - The Decor Mag
 Outdoor Kitchen Design and Planning Guide - The Decor Mag