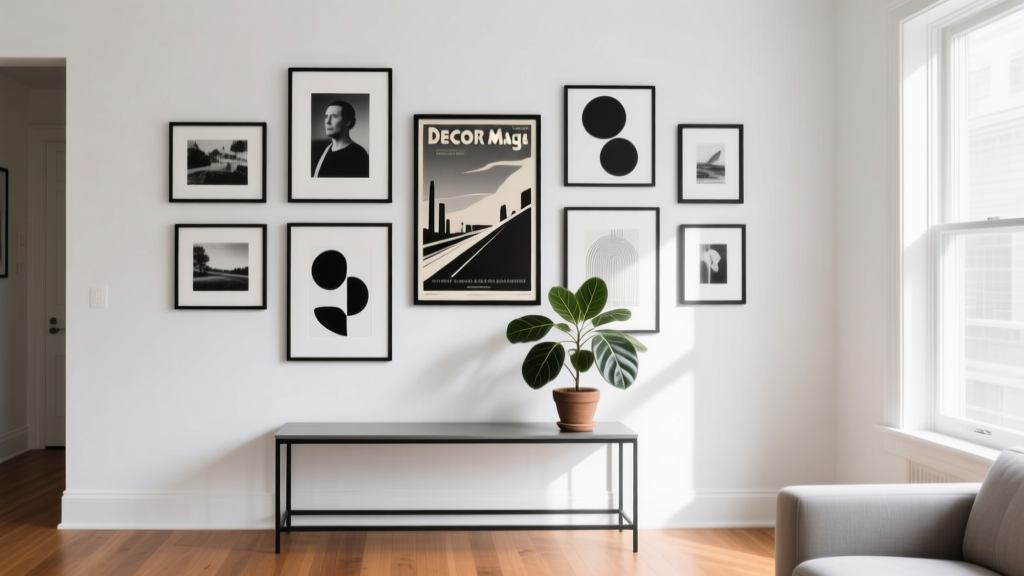
Gallery Wall Ideas for Living Rooms (2026)
A gallery wall can do what a single oversized artwork sometimes can’t: tell a story. It’s part design statement, part personal scrapbook—one that instantly makes a living room feel layered, lived-in, and intentional. Whether you’re a homeowner ready to elevate a blank wall or a renter craving personality without a renovation, a well-planned gallery wall is one of the highest-impact living room decor upgrades you can make.
The best part is that gallery walls aren’t reserved for perfectly styled homes. They work in small apartments, open-plan family rooms, and everything in between. The key is pairing a cohesive layout with the right scale, spacing, and frame choices so the final result feels curated rather than cluttered.
This guide walks you through planning, designing, and installing a gallery wall in your living room—complete with layout ideas, real-world examples, measurements, budget ranges, and common mistakes to avoid. You’ll finish with a clear plan (and fewer holes in the wall).
Step 1: Choose the Right Wall (and Purpose) for Your Gallery
Before you pick frames, choose the wall that makes the most sense for your living room layout. Your gallery wall should support how the space is used, not fight it.
Great spots for a living room gallery wall
- Above the sofa (the most common choice, and easiest to anchor visually)
- Behind a sectional (use a wider layout that follows the sectional’s length)
- On a main focal wall across from the seating (ideal when there’s no fireplace)
- Along a hallway-like stretch in open-plan living rooms (helps define zones)
- Around the TV (when done carefully, art can soften a screen-dominant wall)
Decide what you want it to do
- Add warmth: mix family photos, textiles, and softer tones.
- Create a focal point: go bold with high-contrast art and larger pieces.
- Make a small living room feel bigger: use lighter mats, consistent frames, and a wider horizontal arrangement.
- Bring in a trend: try sculptural frames, vintage prints, or a salon-style layout (more on trends below).
Step 2: Pick a Style Direction (So It Looks Curated, Not Random)
The most cohesive gallery walls balance variety and repetition. You can mix frame sizes and art styles, but you’ll want at least one unifying element.
3 reliable style formulas
- Modern and minimal: black/white frames, simple mats, abstract or photography prints, clean spacing.
- Warm and eclectic: mixed wood tones, vintage finds, line art, travel prints, small objects (like a woven piece or mini shelf).
- Classic and tailored: matching frames (black, brass, or walnut), consistent mat size, symmetrical layout.
Current gallery wall trends (with staying power)
- Oversized anchors: one or two larger pieces (18"x24", 24"x36", or bigger) surrounded by smaller frames.
- Natural materials: oak frames, linen mats, woven wall art, and textured paper prints.
- Color-drenched rooms: gallery walls on painted accent walls (deep green, clay, navy) for a “collected” look.
- Thin frames + wide mats: a timeless trick that makes inexpensive prints look elevated.
Step 3: Plan the Size and Placement Using Simple Measurements
Scale is the difference between “designer” and “floating postage stamps.” Use these measurements as your starting point.
Above the sofa: the ideal dimensions
- Total gallery width: aim for 2/3 to 3/4 the width of your sofa.
Example: A 90" sofa looks best with a gallery that spans about 60"–70". - Spacing above the sofa: hang the bottom edge of the lowest frame 6"–10" above the sofa back.
- Frame-to-frame spacing: keep gaps consistent at 2"–3" for a clean look. (For a looser, eclectic vibe, you can stretch to 3"–4", but keep it consistent.)
Eye level rules (that actually work)
- Standard height: center of the overall gallery at about 57"–60" from the floor (museum standard).
- If you have tall ceilings: don’t automatically raise everything—anchor to furniture height first.
- If kids/pets are a factor: consider slightly higher placement or use acrylic glazing for safety.
Step 4: Collect Your Pieces (Art, Photos, and Objects)
You don’t need all “art” to create a gallery wall. The most interesting living room gallery walls mix mediums and meaning.
What to include
- Art prints (downloadable or limited-edition)
- Family photos (black-and-white is an easy unifier)
- Vintage finds (botanical prints, maps, postcards)
- Textural elements (small woven hanging, framed fabric, pressed flowers)
- 3D accents (a shallow wall sconce, mini shelf, or sculptural object—use sparingly)
Product recommendations (by category)
- Frames: simple wood, matte black, brushed brass, or thin-profile acrylic styles for a modern living room decor look.
- Mats: bright white for crisp contrast; warm white/ivory for softer, organic modern rooms.
- Glazing: acrylic (lighter and safer) or anti-glare glass if reflections are an issue near windows.
- Hanging systems: picture-hanging hooks for drywall, or removable picture strips for renters and commitment-phobes.
Budget ranges (realistic and flexible)
- Budget-friendly ($75–$250): 6–10 frames, downloadable prints, DIY mats, removable strips.
- Mid-range ($250–$800): upgraded frames, custom-sized mats, a few larger statement prints.
- Investment ($800–$2,000+): original art, museum-quality framing, professional installation or rails.
Step 5: Choose a Layout That Matches Your Living Room
Layout should reflect the room’s architecture and furniture arrangement. These are the most foolproof options.
Popular gallery wall layouts
- Grid layout: best for modern, minimal living rooms; easiest to keep visually calm.
- Salon-style (organic cluster): best for eclectic homes; feels collected over time.
- Linear ledge layout: frames sit on picture ledges; great for renters and frequent re-stylers.
- Triptych + supporting frames: three larger pieces centered with smaller accents; great over long sofas.
Quick guide: how many frames do you need?
- Small wall section (40"–55" wide): 4–7 frames (mix of 8"x10", 11"x14", 12"x16")
- Over a standard sofa (60"–75" wide gallery span): 7–12 frames (include at least one 18"x24" anchor)
- Large feature wall: 12–20 pieces (include 2–3 medium-to-large anchors for structure)
Step 6: Build Your Gallery Wall on the Floor First (No Guesswork)
This step saves time, holes, and frustration. Lay everything out on the floor (or a large rug) and refine until it feels balanced.
Floor-planning checklist
- Start with your largest piece as the anchor.
- Distribute visual weight: don’t cluster all dark frames in one corner.
- Mix orientations: aim for a blend of portrait and landscape shapes.
- Repeat elements: for example, repeat a frame color 3–5 times to create rhythm.
The paper template method (highly recommended)
- Trace each frame on kraft paper or taped-together printer paper.
- Cut templates and label them (Frame A, B, C…).
- Tape templates to the wall with painter’s tape.
- Step back 6–10 feet and adjust spacing until it looks right.
- Mark nail points directly on the paper where the hanging hardware lands.
Step 7: Hang Like a Pro (Tools, Hardware, and Renter Options)
Your living room gallery wall should feel secure and aligned. Use the right hardware for your wall type and frame weight.
Tools you’ll want
- Tape measure
- Level (a small one is fine)
- Pencil
- Hammer or drill
- Painter’s tape
- Stud finder (helpful for large frames)
Hanging hardware basics
- Light frames (under 3–5 lbs): removable strips or small picture hooks (check weight ratings).
- Medium frames (5–15 lbs): picture hooks rated for weight, or drywall anchors.
- Heavy frames (15+ lbs): screw into studs when possible, or use heavy-duty anchors.
Renter-friendly gallery wall options
- Removable hanging strips (best for smooth walls; follow cure-time instructions).
- Picture ledges (one or two ledges can create a flexible gallery with fewer holes).
- Leaning gallery on a console table (art layered against the wall, anchored with decor objects).
Real-World Gallery Wall Examples (So You Can Picture It at Home)
Example 1: Small apartment living room with a loveseat
Scenario: You have a 68" loveseat, neutral walls, and limited budget.
Solution: Create a compact gallery spanning about 45"–50" wide using 6–8 frames.
- 1 anchor piece: 16"x20" print with a white mat
- 2 medium frames: 11"x14" (black-and-white photos)
- 3–5 smaller frames: 8"x10" or 5"x7" (line art, a quote, a postcard)
- Use removable strips and keep spacing to 2" for a tidy look
Example 2: Family living room with a sectional and high traffic
Scenario: Kids, pets, and a big sectional mean the wall needs presence and durability.
Solution: Go larger, use acrylic glazing, and anchor with 2 substantial pieces.
- 2 anchors: 18"x24" or 24"x36"
- Surround with 8–10 smaller frames
- Bottom edge 8" above the sofa back to avoid bumps
- Choose wipeable frames and avoid fragile float glass at kid height
Example 3: Open-plan living room with a TV wall
Scenario: The TV dominates the space and the wall feels unfinished.
Solution: Create a balanced arrangement around the TV with art that matches the room palette.
- 2–3 frames on each side of the TV (vertical stacks work well)
- 1 long horizontal piece above or below (only if it won’t compete with the screen)
- Keep frames consistent (thin black or warm wood) to reduce visual noise
Common Gallery Wall Mistakes to Avoid
- Hanging too high: a gallery that floats near the ceiling feels disconnected. Anchor it to furniture and eye level.
- Too small for the wall: if it looks like an afterthought, add larger anchors or expand the footprint.
- Inconsistent spacing: uneven gaps read as messy. Stick to 2"–3" across the whole arrangement.
- Using all same-size frames without intention: it can look flat unless it’s a true grid with uniform alignment.
- Ignoring glare: if the wall faces windows, use matte prints, anti-glare glazing, or adjust placement away from direct reflection.
- Overcrowding with too many tiny pieces: peppering the wall with small frames can feel chaotic—add a larger piece to calm it down.
FAQ: Gallery Walls in the Living Room
How do I make a gallery wall look cohesive if my art styles don’t match?
Choose one unifying element: matching frames, consistent mat color, a limited color palette (2–4 main colors), or all black-and-white photography. Even eclectic art looks intentional with repetition.
What’s the best spacing between frames for a living room gallery wall?
For most living room gallery walls, 2"–3" between frames is the sweet spot. If you want an airy look, you can go slightly wider—just keep it consistent throughout.
Should the gallery wall be centered on the sofa or centered on the wall?
Center it on the sofa (or main furniture piece) if the wall is wider than the seating area. In living room design, furniture alignment usually looks more intentional than centering on the entire wall.
Can renters create a gallery wall without damaging walls?
Yes. Use removable hanging strips rated for the frame’s weight, or rely on picture ledges. For very light frames, adhesive hooks can work well—test one first and follow removal instructions carefully.
How do I choose the right frame colors?
Match your frames to your living room decor “metals and woods.” Warm rooms (beige, tan, terracotta) love oak and walnut; cooler rooms (gray, crisp white, black accents) look great with matte black or thin brushed metal. Mixing is fine—repeat each finish at least a few times.
What if I’m not ready to commit to a big arrangement?
Start with 3–5 pieces in a tight cluster or build a ledge-based gallery. You can grow it over time without re-hanging everything.
Your Next Steps: A Simple Gallery Wall Plan You Can Follow This Weekend
- Pick the wall (above the sofa is the easiest place to start).
- Choose a layout (grid for modern, salon-style for eclectic, ledges for flexibility).
- Decide your unifier (frame color, mat color, or a tight palette).
- Mock it up on the floor, then tape templates to the wall.
- Hang with consistent spacing (2"–3") and keep the bottom edge 6"–10" above the sofa.
- Refine: swap one piece if it feels too busy, add a larger anchor if it feels too small.
A gallery wall is one of those living room decorating ideas that keeps paying off—you’ll notice it in every photo you take, every time guests come over, and every day you settle into the sofa. Make it personal, keep the scale right, and let it evolve as your home does.
Looking for more living room design inspiration? Explore more wall decor, furniture layout, and styling ideas on thedecormag.com.
More Articles
 Best Living Room Designs for 2026: Stylish & Human-Centered
Living Room Color Schemes That Work Every Time
Best Living Room Designs for 2026: Stylish & Human-Centered
Living Room Color Schemes That Work Every Time
 Budget-Friendly Smart Organization Ideas for 2026
 Cheap vs Premium Living Room Setup Cost in 2026
 Living Room TV Stand Styling Tips - The Decor Mag
 Best Swag Curtain Ideas for Living Rooms - The Decor Mag
 Industrial Chic Living Room Inspiration - The Decor Mag
 Living Room Ceiling Design Inspiration - The Decor Mag
 Best Accent Pillow Fill Inserts - The Decor Mag
 Living Room Elevated Casual Design - The Decor Mag