Best Outdoor Drink Tray Cart Ideas - The Decor Mag
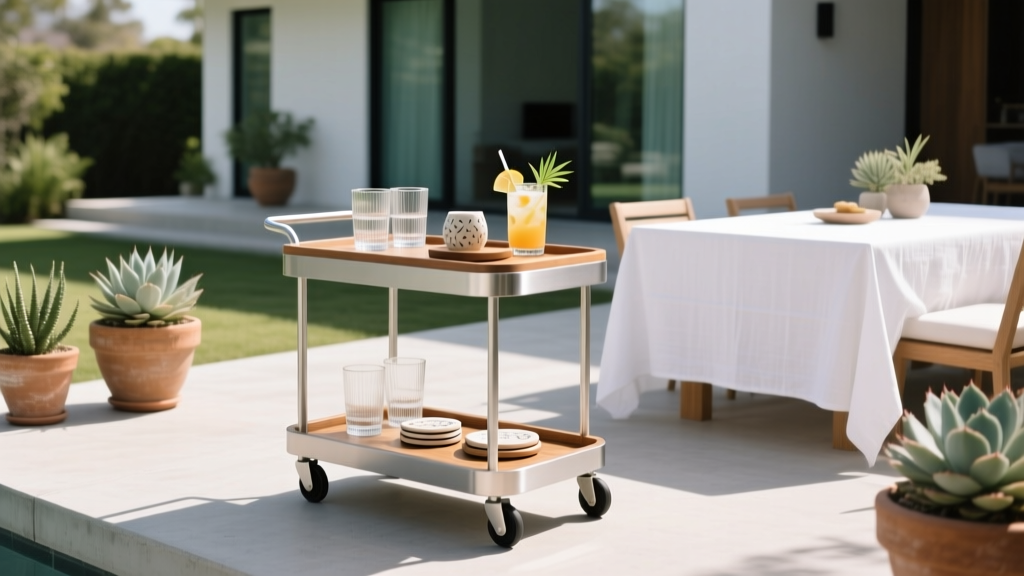
An outdoor drink tray cart is one of those small upgrades that changes how your patio, deck, or garden actually functions. Instead of making constant trips inside, juggling glasses, or running out of space on a side table, a well-planned outdoor bar cart keeps everything organized—ice, bottles, mixers, garnishes, glassware, napkins—right where the conversation is happening.
Beyond convenience, a drink cart is a design tool. It can anchor a seating layout, add a “destination” moment to a backyard, and make even a compact balcony feel like a curated outdoor living space. Whether your style is coastal, modern, cottage garden, or resort-inspired, there’s a cart idea that fits your home—and your climate.
Below are outdoor drink tray cart ideas that work for real homeowners: durable materials, smart layouts, plant pairings, seasonal setups, and budget ranges you can plan around.
What Makes a Great Outdoor Drink Cart Setup?
The best outdoor bar cart is equal parts durability, mobility, and layout. Before choosing a look, think through how you’ll use it in your outdoor living space.
Key features to look for
- Weather-ready materials: powder-coated aluminum, stainless steel, teak, acacia, HDPE/poly lumber, all-weather wicker, or sealed concrete/stone.
- Stable wheels + locking casters: essential for pavers, flagstone, or slightly sloped decks.
- Two-tier storage: top for serving, bottom for bottles/backup supplies.
- Raised-lip tray: prevents spills and sliding glasses when rolling.
- Ice strategy: built-in ice bucket, removable tub, or a dedicated cooler shelf.
- Easy-clean surfaces: outdoor living gets messy—choose finishes that wipe clean fast.
Ideal sizing (so it works in real patios)
- Small balcony: 18–24" wide cart or slim console cart
- Standard patio: 28–36" wide two-tier cart
- Entertaining-focused yard: 36–48" wide cart or rolling buffet with prep space
11 Best Outdoor Drink Tray Cart Ideas (With Style + Function)
1) Teak Rolling Cart for a Resort-Style Patio
Teak is a classic for outdoor furniture because it naturally resists moisture and insects. A teak drink cart instantly elevates a pool deck or covered patio and pairs beautifully with neutral cushions, woven textures, and stone.
- Best for: coastal, tropical, modern resort, traditional patios
- Pair with plants: bird of paradise (warm climates), dwarf palms, lavender (drier climates)
- Maintenance: leave to silver naturally or apply teak oil 1–2x/year for warmer tone
- Budget range: $250–$900+
2) Powder-Coated Metal Bar Cart for Modern Outdoor Living
Powder-coated aluminum or steel is sleek, durable, and easy to wipe down after summer gatherings. Choose matte black, white, or sage green to coordinate with outdoor rugs and cushions.
- Best for: modern, contemporary, minimalist patios and decks
- Pro tip: choose stainless hardware and covered wheels to reduce rust staining
- Maintenance: hose off pollen; touch up chips to prevent corrosion
- Budget range: $120–$500
3) All-Weather Wicker Cart for a Cozy Conversation Area
All-weather resin wicker softens hardscapes and looks right at home near deep seating. Choose UV-stable wicker and an aluminum frame so the cart doesn’t warp or rust.
- Best for: traditional patios, cottage garden style, layered lounge setups
- Pair with plants: hydrangeas (cooler climates), ferns (shade), begonias (containers)
- Maintenance: rinse and brush debris from the weave; store cushions dry
- Budget range: $150–$450
4) Built-In Drink Station with Removable Serving Tray
If you’re designing a year-round outdoor living area, consider a built-in drink station adjacent to your grill or outdoor kitchen—then add a removable tray that carries drinks to the seating zone.
- Best for: outdoor kitchens, pergola lounges, serious entertainers
- Materials: stainless steel + stone countertop (granite, quartzite, porcelain slab)
- Layout tip: keep it 3–6 steps from seating to minimize traffic through cooking zones
- Budget range: $800–$6,000+ (depending on masonry and appliances)
5) Slim Cart for a Balcony, Small Patio, or Narrow Side Yard
When space is tight, go vertical and slim. A narrow cart can hold a tray, a small ice bucket, and a few bottles without crowding your outdoor seating layout.
- Best for: apartment patios, townhome decks, compact courtyards
- Design move: match the cart color to railings or trim for a built-in look
- Budget range: $80–$250
6) Rustic Garden Cart with Galvanized Tubs (Cottage Charm)
A repurposed garden cart or potting bench can double as an outdoor beverage station. Galvanized tubs hold ice, drinks, and even potted herbs for garnishes.
- Best for: farmhouse, cottage garden, relaxed backyard parties
- Plant pairings: rosemary, mint (keep contained), basil, thyme
- Maintenance: seal wood if exposed; keep metal tubs dry between uses
- Budget range: $60–$300 (DIY-friendly)
7) Coastal Rattan + Melamine Tray Setup (Lightweight & Safe)
For pool areas or households with kids, swap breakable glass and heavy ceramics for melamine trays, acrylic drinkware, and shatter-resistant pitchers.
- Best for: pool decks, family patios, beachy outdoor living spaces
- Materials: resin rattan cart, marine-grade hardware, acrylic accessories
- Budget range: $100–$400
8) Concrete or Stone-Top Cart for High-End Hardscape Pairing
If your landscape design features stone pavers, a fire pit, or a modern retaining wall, a cart with a concrete-look or stone-look surface ties everything together.
- Best for: modern landscapes, desert landscaping, structured patios
- Climate note: dark stone tops can get hot in full sun—use coasters or a tray liner
- Budget range: $200–$800
9) Cooler Cart Combo (The Ultimate Summer Upgrade)
A rolling cooler cart is a summer entertaining MVP: ice stays cold longer, and you free up the main serving surface for snacks and cocktails.
- Best for: backyard BBQs, pool parties, large gatherings
- Look for: drain plug, insulated lid, bottle opener, lower shelf
- Budget range: $120–$600
10) Bar Cart Under a Pergola (Shade + Style)
Placing your outdoor drink cart under a pergola keeps beverages cooler and reduces sun fading on finishes. It also creates a natural “service zone” that feels intentional.
- Best for: year-round outdoor entertaining, hot climates, sunny patios
- Add-ons: string lights, outdoor-rated sconce, mosquito fan, weatherproof speaker
- Budget range: $150–$900 for the cart; pergola varies widely
11) The “Tray-Only” Approach: Two Beautiful Trays + A Side Table
If you don’t want a cart, you can still get the function. Use two trays—one for drinks, one for garnishes and tools—on a sturdy outdoor side table or ottoman.
- Best for: minimalists, renters, small patios
- Recommended tray materials: melamine, powder-coated metal, teak, sealed acacia
- Budget range: $40–$200
Designing the Perfect Drink Cart Zone (Layout Tips)
Placement is everything. A drink cart that’s constantly in the way won’t get used, no matter how pretty it is.
Best placement rules
- Keep it within arm’s reach of seating (ideally 2–4 feet), but not in the main walkway.
- Park it on a stable surface—flat pavers, a deck, or compacted gravel with a paver pad.
- Place it near lighting for evening use: solar path lights, string lights, or a wall sconce.
- Use a “cart companion”: a small lidded trash can or discreet bin for bottle caps and napkins.
Style it like a pro (without clutter)
- Top tier: serving tray + coasters + 2–4 glasses + small vase or lantern
- Bottom tier: bottles, extra mixers, folded bar towel, bug covers, spare cups
- Garnish moment: a small lidded container with lemon/lime wedges and a herb bundle
Best Materials for Outdoor Drink Trays & Accessories
The wrong tray material warps, stains, or cracks after one season. Choose outdoor-ready pieces that stand up to sun, humidity, and temperature swings.
- Melamine: budget-friendly, lightweight, great for poolside (avoid high heat exposure).
- Powder-coated aluminum: durable, modern, easy to clean.
- Teak or acacia (sealed): warm and timeless; re-seal as needed.
- Stainless steel: excellent near outdoor kitchens; choose 304 grade for better corrosion resistance.
- Outdoor acrylic: ideal for drinkware; clearer and more scratch-resistant than basic plastic.
Plant Pairings: Make Your Bar Cart Feel Built-In
Landscaping and patio living go hand in hand. The right plants make a drink cart feel like part of the outdoor design, not an afterthought.
Best plants for a drink cart vignette
- Herbs for garnishes: mint (in its own pot), basil, thyme, rosemary, lemon balm
- Fragrant picks: lavender, jasmine (warm climates), sweet alyssum (cooler seasons)
- Low-mess containers: dwarf boxwood (in pots), succulents, snake plant (covered patios)
Container tips
- Use heavy planters (concrete or ceramic) nearby to visually “anchor” a lightweight cart.
- Choose drip trays under pots so watering doesn’t create slippery patio spots.
- In windy yards, go for short, wide pots rather than tall, tippy planters.
Seasonal & Year-Round Outdoor Living Considerations
Summer (heat, sun, and bugs)
- Park carts in shade whenever possible to protect finishes and keep drinks cooler.
- Add a lidded ice bucket and keep a spare bag of ice in a cooler nearby.
- Use citronella plants (in moderation), a small fan, or mosquito repellent devices around seating—not directly on the cart.
Fall (temperature swings and leaves)
- Swap to darker, richer accents: amber acrylic glasses, brass-toned accessories.
- Keep a small brush or handheld broom on the bottom shelf for leaves and debris.
Winter (freeze-thaw and storage)
- Store liquids indoors to prevent freezing and bottle breakage.
- If the cart stays outside, use a breathable furniture cover (avoid trapping moisture).
- In snowy climates, roll carts into a garage or shed to protect wheels and joints.
Spring (pollen and refresh)
- Wash cart surfaces with mild soap, rinse, and dry before the season starts.
- Refresh sealants on wood and tighten hardware after winter storage.
Common Mistakes to Avoid
- Choosing indoor-only materials: untreated wood, non-coated steel, and cheap plastics break down fast outdoors.
- Overstyling the top tier: leave space for real use—serving should be easy, not precious.
- Ignoring wheel quality: flimsy casters snag on pavers and tip when loaded.
- Placing it in the traffic lane: carts belong just outside the main path between kitchen and seating.
- Letting water sit: trapped water causes rust rings, mildew, and warped wood—dry after rain.
- Planting mint in the ground nearby: it spreads aggressively; keep it in containers.
Budget Guide: What to Expect to Spend
- Under $100: tray-only setup, basic slim cart, DIY upgrades (paint + new casters)
- $100–$300: solid powder-coated metal carts, resin wicker options, cooler carts on sale
- $300–$700: higher-quality teak/acacia, better wheels, larger serving surfaces
- $700+: premium teak, stainless steel, built-in outdoor kitchen drink stations
FAQ: Outdoor Drink Tray Cart Ideas
What is the best material for an outdoor drink cart?
For most patios, powder-coated aluminum is the best balance of durability and maintenance. For a warmer, high-end look, teak performs beautifully outdoors with minimal upkeep.
How do I keep my outdoor bar cart from rusting?
Choose powder-coated metal with stainless hardware, dry it after rain, and touch up paint chips. If you live near the coast, prioritize aluminum or stainless steel and use a breathable cover when not in use.
Where should I place a drink cart on a patio?
Place it 2–4 feet from seating, off the main walkway, and ideally under partial shade. If you entertain often, keep it close to the door or outdoor kitchen for quick restocking.
What plants look good next to a drink cart?
Herbs (rosemary, thyme, basil) are functional and stylish. For a decorative container moment, try lavender, boxwood in pots, or succulents—depending on sun and climate.
Can I use a drink cart outside year-round?
Yes, if it’s made for outdoor use and you adjust seasonally. Store liquids and delicate accessories indoors in winter, and protect the cart with a breathable cover or garage storage during snow and freeze-thaw cycles.
How do I style an outdoor drink cart without making it cluttered?
Stick to a simple formula: one tray, one ice solution, a small set of glasses, and one decorative element (lantern or vase). Store backups on the bottom shelf so the top stays open for serving.
Next Steps: Build Your Outdoor Drink Cart Setup This Weekend
Start by choosing a cart style that matches your outdoor furniture and climate—teak for timeless warmth, powder-coated metal for modern durability, or a slim cart if space is tight. Add an outdoor-safe tray, acrylic drinkware, and a small herb pot for garnishes. Then place the cart where it supports your patio layout: close to seating, out of the walkway, and near lighting for evening hangouts.
For more patio living upgrades, landscaping ideas, and outdoor design inspiration, explore the latest guides on thedecormag.com.
More Articles
 Outdoor Arbor and Gate Design Ideas - The Decor Mag
 How to Design a Permaculture Garden - The Decor Mag
 Outdoor Daybed and Cabana Ideas - The Decor Mag
 Best Outdoor Bar Bottle Opener Mount - The Decor Mag
 Best Outdoor Planters for Every Style - The Decor Mag
 How to Create a Herb Garden Near the Kitchen - The Decor Mag
 Best Outdoor Bar Lime Wheel Display - The Decor Mag
 How to Create a Lasagna Garden Bed - The Decor Mag
 Rooms vs Headboard: Understanding the Critical Distinction in Outdoor Living Design
 Outdoor Pergola Motorized Shade System - The Decor Mag