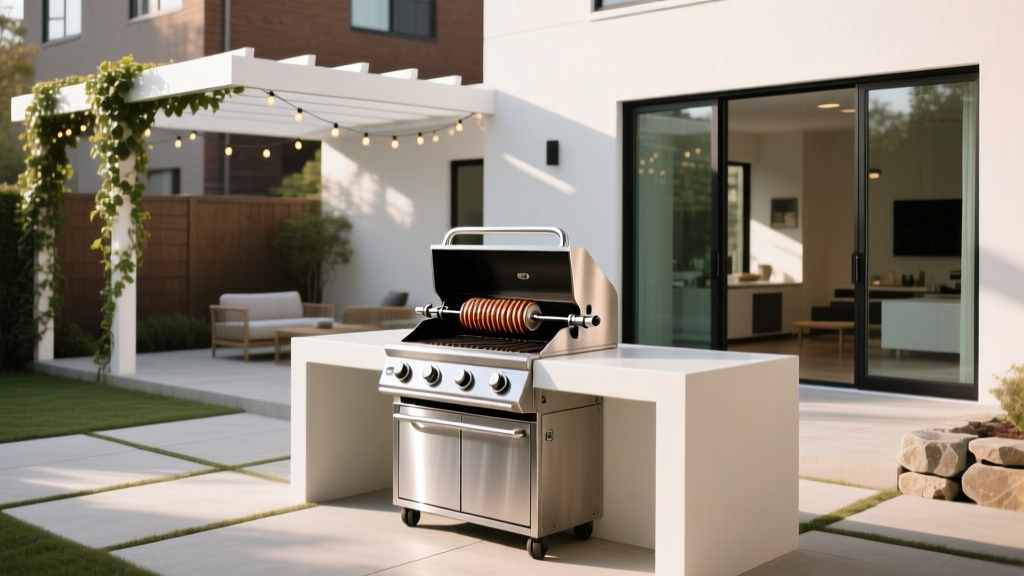
Outdoor Kitchen Rotisserie Attachment Guide - The Decor Mag
A rotisserie has a way of turning a regular backyard cookout into a true outdoor living moment—the kind that draws people out onto the patio, keeps conversation flowing around the grill island, and makes your outdoor kitchen feel like a destination. There’s also something deeply satisfying about slow, even heat: crisp skin, juicy interiors, and that showpiece “spin” that instantly elevates weeknight dinners and weekend gatherings.
For homeowners building or upgrading outdoor kitchens, a rotisserie attachment is one of the smartest add-ons you can make. It doesn’t just expand your menu; it shapes how you use the space. Rotisserie cooking favors lingering, so it pairs perfectly with comfortable patio furniture, layered lighting, wind protection, and thoughtful landscaping that makes your backyard feel inviting long after the sun goes down.
This guide walks you through choosing the right rotisserie attachment, planning an outdoor kitchen layout around it, selecting weather-ready materials, and designing a patio area that supports year-round outdoor living—without the common mistakes that lead to uneven cooking, rusted parts, or smoky seating areas.
Why a Rotisserie Attachment Belongs in a Backyard Outdoor Kitchen
Rotisserie cooking is built for outdoor living: it’s hands-off, social, and incredibly consistent. As the spit turns, meat bastes itself, helping you get even browning and tender results without constantly flipping or hovering. It’s also ideal when you want your grill to do more than burgers and steaks.
What you can cook (beyond chicken)
- Whole chickens with crisp skin and juicy breast meat
- Turkey breast or a small turkey (depending on your grill’s capacity)
- Pork loin, porchetta, or al pastor-style stacked pork
- Prime rib or tri-tip for a special-occasion centerpiece
- Lamb leg with rosemary and garlic
- Vegetables like whole cauliflower or skewered peppers and onions (with a basket accessory)
Outdoor design payoff
- Creates a focal point in your outdoor kitchen design—guests naturally gather near the action.
- Encourages longer hangs, which justifies comfortable seating, layered lighting, and weatherproof textiles.
- Makes the space feel “resort-like”—an upgrade that reads as premium without a full remodel.
Rotisserie Basics: Types, Fit, and What to Look For
Rotisserie attachment vs. built-in rotisserie grill
- Attachment (most common): A motor, spit rod, forks, and brackets that mount to your existing grill. Best for upgrades.
- Built-in rotisserie burner: Some built-in grills include a rear infrared burner designed for rotisserie. Best for frequent rotisserie cooking and higher-end outdoor kitchens.
Compatibility checklist (measure before you buy)
- Grill brand/model: Many rotisserie kits are model-specific.
- Firebox width: Ensure the spit rod clears the sides and lid closes fully.
- Lid height: You need vertical clearance for larger roasts.
- Power: Standard plug-in (120V) is typical; some systems offer battery options.
- Weight capacity: Aim for at least 20–40 lbs for versatility; serious entertainers may want 50+ lbs.
Features worth paying for
- Stainless steel components (304 stainless is ideal outdoors for corrosion resistance)
- Strong motor housing with weather protection and an on/off switch you can reach easily
- Counterbalance to reduce wobble on uneven loads (great for whole birds)
- Meat forks with secure locking so the roast doesn’t slip mid-spin
- Dedicated drip pan or trough to manage grease and reduce flare-ups
Outdoor Kitchen Design: Plan Your Layout Around the Rotisserie
Rotisserie cooking changes your workflow. You need clearance, heat protection, and a nearby landing zone for carving. When homeowners struggle with rotisserie add-ons, it’s often because the outdoor kitchen layout wasn’t designed for the rotation, drip, and dwell time.
Clearances and safety zones
- Side clearance: Keep at least 12–18 inches of clear countertop space on one side of the grill for tools and trays.
- Rear clearance: If you have a rear rotisserie burner, avoid placing combustible materials behind the grill.
- Traffic flow: Keep the “hot zone” out of main walkways; plan a loop that lets guests circulate without bumping the cook.
- Ventilation: For covered patios, consider a vent hood rated for outdoor use or ensure ample open-air cross-ventilation.
Best layout options for rotisserie-friendly outdoor kitchens
- L-shaped island: One leg for cooking, one for serving and bar seating—excellent separation of heat and hangout zones.
- Galley (two parallel runs): Ideal for narrow patios; put grill/rotisserie on one side and prep/serving on the other.
- Straight run + dining zone: Best for smaller yards; pair with a nearby dining table and a rolling cart for flexibility.
Create a dedicated “rotisserie landing station”
This is where outdoor living gets practical. Build or style a spot that makes rotisserie cooking feel effortless:
- Heat-resistant surface: Granite, concrete, or porcelain countertop
- Carving board drawer: A simple pull-out tray keeps clutter off the counter
- Tool rail or hooks: Tongs, gloves, and thermometer within reach
- Task lighting: LED under-counter lights or a directional sconce for evening cooking
Materials That Hold Up: Counters, Surrounds, and Hardware
Outdoor kitchen materials matter even more when you add a rotisserie—grease, heat, and weather all show up fast. Choose finishes that can handle high temps and frequent cleanups.
Countertop recommendations
- Granite: Durable and heat-tolerant; seal annually. Mid to high cost.
- Porcelain slab: UV-stable, stain-resistant, and sleek for modern patio living; great for hot climates. Mid to high cost.
- Concrete: Custom look, strong outdoor vibe; needs sealing and may develop patina. Mid cost.
- Stainless steel counters: Extremely practical for grill zones; can show scratches but cleans easily. Mid cost.
Island cladding and heat-adjacent materials
- Stone veneer: Classic outdoor kitchen design; choose quality mortar/installation for freeze-thaw climates.
- Fiber cement panels: Clean lines, weather resistant, lower maintenance than wood.
- Stucco: Great for Mediterranean and modern desert landscapes; ensure proper expansion joints.
Hardware that survives seasons
- 304 stainless steel doors/drawers for coastal or humid areas
- Sealed soft-close hardware to reduce grit and moisture issues
- Marine-grade fasteners in salt air climates
Furniture and Comfort: Turn Rotisserie Night into a Backyard Ritual
Rotisserie meals reward patience—so design your patio living area to make waiting feel like vacation.
Furniture recommendations for rotisserie-friendly entertaining
- Dining table near (not beside) the grill: Place it 8–12 feet away to avoid smoke drift while keeping the cook included.
- Swivel lounge chairs: Let guests face the fire feature, the garden, or the grill without constantly moving furniture.
- Bar-height seating at the island: Keep a 15–18 inch overhang and use outdoor-rated stools with footrests.
- Weatherproof cushions: Solution-dyed acrylic fabrics (like Sunbrella-type textiles) for fade resistance.
Layout tip: create two zones
- Cook zone: Grill/rotisserie, prep space, cold storage, trash pull-out.
- Relax zone: Dining + lounge seating + lighting + planter borders to soften hardscape.
Landscaping Around an Outdoor Kitchen: Plants That Look Great and Behave
The right plants make an outdoor kitchen feel integrated into the yard, not dropped onto a slab. Prioritize low-litter, heat-tolerant landscaping near the grill and add fragrance and softness a little farther out.
Best plant choices near grills and outdoor kitchens
- Rosemary (upright varieties): Hardy, fragrant, and useful for skewers; great in Mediterranean climates.
- Lavender: Drought-tolerant, pollinator-friendly, and complements stone patios beautifully.
- Ornamental grasses (low-shedding types): Adds movement; keep a safe distance from open flame.
- Boxwood alternatives (like ilex crenata in some regions): Neat structure without heavy leaf drop.
- Succulents and agave: Perfect for hot, dry climates; architectural and low-maintenance.
Planting do’s for patio living
- Use large containers to control mess and simplify seasonal swaps.
- Keep “litter plants” away from prep surfaces (avoid messy seed pods or heavy flower drop right next to counters).
- Create a green buffer to guide traffic: planters can define the kitchen zone without building walls.
Climate and Maintenance: Keep It Working Year-Round
Hot and sunny climates
- UV protection: Choose porcelain, stainless, or UV-stable composites for surfaces and furniture.
- Shade planning: Pergolas, shade sails, or offset umbrellas keep the cook comfortable during long roasts.
- Wind management: Add a side screen or plant a hedge (at a safe distance) to reduce heat loss and flare-ups.
Cold, wet, or freeze-thaw climates
- Cover everything: A fitted grill cover plus a small waterproof cover for the rotisserie motor extends lifespan.
- Winter storage: Bring the motor indoors; store spit rod and forks clean and dry.
- Choose frost-safe materials: Properly installed stone veneer and sealed concrete hold up better.
Coastal and humid climates
- Upgrade to 304 stainless wherever possible (hardware, doors, rotisserie parts).
- Rinse and wipe down metal surfaces regularly to remove salt residue.
Quick maintenance routine (after every rotisserie cook)
- Turn off grill and let parts cool safely.
- Soak forks and spit rod in warm, soapy water.
- Wipe motor housing with a damp cloth (never submerge).
- Empty drip pan and clean grates to prevent grease buildup.
- Dry everything thoroughly and store in a dedicated bin or drawer.
Budget Ranges: What to Expect
- Rotisserie attachment: $100–$250 (basic), $250–$600 (brand-specific stainless kits), $600–$1,200+ (premium systems with enhanced motors and accessories)
- Rotisserie accessories: $25–$80 basket, $30–$100 drip pan upgrade, $15–$60 counterbalance, $15–$50 heat-resistant gloves
- Outdoor kitchen modifications: $300–$1,500 for added counter space, lighting, or a cart solution; $3,000–$15,000+ for expanded islands, new surfaces, and built-in storage
- Patio living upgrades: $500–$2,500 for a dining set; $1,500–$6,000 for a lounge conversation set; $150–$900 for shade solutions
Common Mistakes to Avoid
- Buying a “universal” kit without measuring: A poor fit leads to lid gaps, wobble, and uneven cooking.
- Skipping a drip strategy: Without a proper drip pan, flare-ups and smoke can overwhelm a covered patio.
- Placing seating too close: Your best patio layout keeps guests comfortable and out of heat/smoke.
- Ignoring wind: Wind can cool the cook chamber and push smoke into your lounge area—add a windbreak or rethink orientation.
- Leaving the motor outdoors year-round: Even “weather-resistant” motors last longer with protection.
- Overloading the spit: Exceeding weight capacity strains the motor and causes jerky rotation.
FAQ: Outdoor Kitchen Rotisserie Attachments
Do I need a rear infrared burner to use a rotisserie?
No. Many grills use the main burners set to indirect heat. A rear infrared burner is a performance upgrade—especially for crisp skin and more even browning—but not a requirement.
What’s the best countertop material near a rotisserie grill?
Porcelain slab, granite, and stainless steel all perform well near heat and grease. If you love the look of concrete, choose a high-quality sealer and expect some patina over time.
How far should patio seating be from the grill?
Plan your patio furniture layout so primary seating sits about 8–12 feet from the grill zone. This keeps guests engaged without getting blasted by heat or smoke.
Can I leave my rotisserie attachment outside?
You can store the spit rod and forks in a dry outdoor drawer if they’re fully cleaned and dried, but the motor is best brought indoors—especially in rainy, snowy, or coastal climates.
What plants should I avoid near an outdoor kitchen?
Avoid heavy-litter plants (messy fruit drop, constant petals) and highly resinous or extremely dry plants placed too close to heat sources. Keep anything flammable well away from open flame and hot surfaces.
Is a rotisserie worth it for a small patio?
Yes—especially if you add a compact landing zone like a stainless rolling cart or a small prep counter. A rotisserie can replace multiple cooking tools by expanding what your grill can do.
Next Steps: Make Your Rotisserie Feel Like Part of the Outdoor Living Experience
Start by measuring your grill, choosing a rotisserie attachment that matches your model and climate, then build a simple support system around it: a heat-safe landing station, comfortable seating placed out of the smoke path, and a few well-chosen plants that soften the hardscape without creating extra mess. With the right layout, materials, and maintenance habits, rotisserie nights can become a year-round outdoor living tradition—from breezy spring dinners to crisp fall gatherings under patio lights.
For more outdoor kitchen design ideas, landscaping inspiration, and patio living upgrades, explore the latest guides and trends on thedecormag.com.
More Articles
 Best Outdoor Bar Bread Basket Station - The Decor Mag
 Container Garden Design Inspiration - The Decor Mag
 Outdoor Pergola Fairy Light Draping Guide - The Decor Mag
 Best Outdoor Bar Garnish Tray Ideas - The Decor Mag
 Outdoor Pavilion Fireplace Insert - The Decor Mag
 Outdoor Living Budget Checklist: A Practical, Step-by-Step Planning Tool for Homeowners
 How to Design a Backyard Oasis - The Decor Mag
 How to Design a Kitchen Garden Layout - The Decor Mag
 How to Create a Keyhole Garden - The Decor Mag
 Best Outdoor Bar Serving Shelf Ideas - The Decor Mag