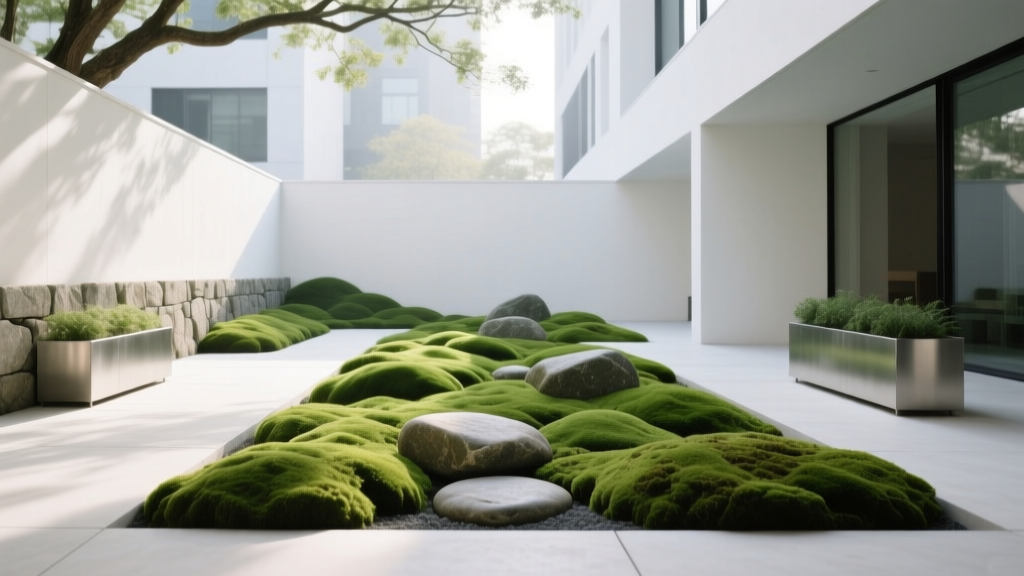
How to Create a Moss Garden - The Decor Mag
A moss garden is one of the most calming upgrades you can make to an outdoor living space. Where traditional lawns demand sun, fertilizer, mowing, and weekly attention, moss offers a lush, velvety green “carpet” that thrives in shade, stays low, and brings a quiet, spa-like mood to patios, pathways, and garden edges. It’s a design move that feels both timeless and modern—perfect for homeowners who want their yard to feel intentional, not overworked.
Beyond beauty, moss gardens make practical sense for real-life landscapes. Many yards have tricky areas: north-facing sides of the house, under mature trees, damp corners, or slopes where grass struggles. Moss can transform those “problem zones” into a feature. Add stepping stones, a small seating nook, and a few sculptural plants, and you’ve created a year-round outdoor living vignette that looks curated in every season.
This guide covers everything you need to plan, build, and maintain a moss garden—from site prep and plant selection to patio-friendly layouts, material recommendations, and common mistakes to avoid.
Why Moss Belongs in Outdoor Living Design
Moss isn’t just a plant choice; it’s a landscape design strategy. It softens hardscapes, makes small yards feel expansive, and creates a seamless transition between patios, walkways, and planting beds.
- Low profile, high impact: Moss stays short, so it looks tidy without mowing.
- Shade-friendly landscaping: Ideal for areas where turf fails.
- Moody, upscale aesthetic: A mossy garden feels like a boutique retreat—especially paired with stone, wood, and simple furniture.
- Quiet curb appeal: A moss pathway or courtyard reads intentional and unique.
- Good for patios and small yards: Moss can edge pavers, fill cracks, or carpet a compact courtyard.
Step 1: Choose the Right Location (Light, Moisture, and Foot Traffic)
Light: Aim for Bright Shade or Dappled Sun
Most moss species prefer shade or filtered light. Morning sun with afternoon shade is often ideal, especially in warmer climates.
- Best: North- or east-facing yards, under deciduous trees, along shaded fences, near downspouts (with proper drainage).
- Trickier: Full sun areas (possible in cool, moist climates with sun-tolerant moss, but requires more watering).
Moisture: Moss Likes Consistency, Not Swamps
Moss thrives with steady moisture and humidity, but it still needs oxygen around its “roots” (really rhizoids). If your soil stays waterlogged, fix drainage before installing moss.
Foot Traffic: Design for “Look, Don’t Trample”
Moss can handle light, occasional foot traffic once established, but it’s not a replacement for a sports lawn. If you want a moss “lawn,” plan hardscape routes.
Layout tip: Use stepping stones, gravel paths, or pavers to direct movement and protect moss.
Step 2: Test and Prep the Site for Moss Success
Target Soil Conditions
Moss is famously adaptable, but it performs best when you remove competition and create a stable surface.
- Soil pH: Many mosses prefer slightly acidic conditions (often around 5.0–6.0), but local species may vary.
- Soil texture: Firm, fine soil helps moss adhere and spread.
Prep Checklist (Do This Before You Buy Moss)
- Clear the area: Remove grass, weeds, and leaf litter. Use a flat shovel for sod removal in thick turf areas.
- Remove competition: Pull weeds by hand and rake out roots and debris.
- Grade and smooth: Fill low spots and remove bumps so water doesn’t pool. Firm the soil with your feet or a hand tamper.
- Address drainage: If water sits for hours, amend with fine gravel under stepping stones or create a shallow swale to redirect runoff.
- Reduce soil fertility: Skip compost-rich topsoil here; moss doesn’t want a high-nitrogen buffet that feeds weeds.
Material recommendation: A simple hand tamper ($20–$40) and a landscape rake ($30–$60) make prep dramatically easier.
Step 3: Select Moss Types (and Companion Plants That Make It Look Designed)
Best Moss Choices for Home Gardens
Moss availability varies by region. The best approach is to buy from reputable growers or transplant small patches from your own property (never from protected land). Look for moss that already thrives in conditions similar to your site.
- Sheet moss (Hypnum spp.): A classic “carpet” look; great for covering larger areas.
- Rock cap moss (Dicranum spp.): Upright texture, adds dimension around stones and tree roots.
- Cushion moss (Leucobryum glaucum): Rounded mounds; gorgeous in Japanese-inspired layouts and around boulders.
- Fern moss (Thuidium spp.): Feathery, delicate texture for shady gardens.
Companion Plants for a Layered, Outdoor-Living Look
Moss gardens shine when paired with a few sculptural plants that read well from a patio or seating area. Choose shade-tolerant plants with clean forms.
- Ferns: Japanese painted fern, autumn fern, lady fern (great for woodland-style landscaping).
- Hostas: Bold leaves for contrast (pick slug-resistant varieties in damp climates).
- Heuchera (coral bells): Adds burgundy, lime, or caramel foliage tones.
- Evergreen structure: Dwarf boxwood (where suitable), small yew, or compact hollies for year-round form.
- Shade-loving groundcovers (use sparingly so they don’t overrun): Sweet woodruff, ajuga, or mondo grass edging.
Design approach: Keep the plant list short. A moss garden looks most elevated with repetition—think 2–4 key companions, repeated in drifts.
Step 4: Plan a Moss Garden Layout That Works with Patios, Paths, and Seating
Layout Ideas Homeowners Love
- Moss + stepping stone path: A practical route from patio to gate or garden shed, with moss between stones for a softened hardscape.
- Shaded courtyard “moss rug”: Moss beneath a small bistro set or bench near a water bowl or container fountain.
- Moss border around pavers: A subtle, upscale upgrade for patio living areas—moss replaces patchy grass at edges.
- Woodland corner retreat: Moss under trees, anchored by boulders, ferns, and a simple seat.
Hardscape Materials That Pair Beautifully with Moss
The best moss gardens blend soft and solid. Choose materials that look good damp and develop character over time.
- Natural stone stepping stones: Bluestone, granite, or basalt. Expect $8–$25 per square foot depending on stone and thickness.
- Decomposed granite (DG) paths: A great patio-adjacent path material for a clean, modern look. Expect $1–$3 per square foot installed DIY (varies by region).
- Pea gravel or crushed stone: Works as a border or transition zone; use edging to keep it tidy. Expect $1–$4 per square foot.
- Corten steel edging: Defines moss areas with a crisp line; excellent for modern outdoor design. Expect $3–$10 per linear foot.
- Weathered wood: Cedar or thermally modified wood for benches or a small platform; looks natural alongside moss.
Furniture Recommendations for a Moss Garden Seating Nook
Moss gardens feel best with furniture that’s simple, low, and natural—pieces that won’t visually compete.
- Bench: Teak, cedar, or powder-coated steel. Budget $150–$800.
- Bistro set for small patios: Metal (rust-resistant) or acacia wood. Budget $200–$900.
- Outdoor lounge chair: Choose quick-dry cushions and a minimal frame. Budget $250–$1,200.
- Accessories: A stone side table, lantern-style path lights, or a small ceramic water bowl for reflection.
Pro tip: Keep furniture legs on pavers, gravel, or a small deck pad—not directly on moss—to prevent compression and bare spots.
Step 5: Install Moss (Two Reliable Methods)
Method A: Transplanting Sheets or Patches
- Water the prepared soil so it’s damp, not muddy.
- Lay moss pieces snugly like puzzle pieces.
- Press firmly with your hands or a clean board to ensure contact.
- Water gently using a mist or shower setting.
Establishment window: Moss typically establishes in 4–8 weeks with consistent moisture.
Method B: Moss “Slurry” for Crevices and Stone Joints
This technique helps moss colonize cracks between stepping stones or on porous rock.
- Blend moss fragments with water and a small amount of yogurt or buttermilk (optional; results vary by climate and can smell briefly).
- Paint into crevices using a brush.
- Mist regularly until you see new growth.
Where it works best: Shady, humid microclimates and textured surfaces.
Climate and Seasonal Considerations for Year-Round Outdoor Living
Cool, Moist Climates (Pacific Northwest, Northeast, parts of the Midwest)
- Moss can thrive with minimal irrigation once established.
- Fall and spring are ideal planting seasons.
- Winter moss often stays green, making patios and paths look alive even in the off-season.
Hot or Dry Climates (Southwest, inland zones)
- Prioritize deep shade and wind protection.
- Plan for supplemental irrigation—drip isn’t ideal for moss; use micro-sprayers or mist emitters.
- Create humidity pockets with stone walls, courtyards, and nearby water features.
Humid, Warm Climates (Southeast)
- Moss can perform well in shade, but weed pressure is higher.
- Focus on sharp edging and regular leaf/weed removal.
- Ensure airflow to reduce fungal issues on nearby companion plants.
Best Time to Start
- Spring: Reliable moisture, active growth—great for establishment.
- Fall: Cooler temps and natural rainfall help moss settle in with less stress.
- Summer: Possible, but only if you can water consistently and provide shade.
- Winter: Mild-winter regions can install; avoid frozen ground and heavy foot traffic.
Maintenance: Keep Your Moss Garden Plush and Clean
Think of moss maintenance like caring for a beautiful outdoor rug: keep it clean, keep it lightly moist, and don’t grind dirt into it.
- Watering: Mist or shower-spray during dry periods. In many regions, 1–3 times per week during summer dry spells is enough once established.
- Leaf removal: Use a soft rake or handheld blower on the lowest setting. Leaves left to mat can smother moss.
- Weed control: Hand-pull intruders early. Avoid granular fertilizers (they feed weeds more than moss).
- Foot traffic management: Reinforce paths with stepping stones where people naturally walk.
- Edge definition: Refresh edging lines once or twice a year for a crisp, designed look.
Budget tip: A basic maintenance kit—soft leaf rake, hand weeder, and a hose nozzle with mist setting—runs $40–$120 and covers most needs.
Budget Ranges: What a Moss Garden Typically Costs
- Small patio-edge moss project (20–60 sq ft): $150–$600 (moss + minimal edging + a few stones)
- Medium moss garden with stepping stones (80–200 sq ft): $600–$2,500 (moss + stone + edging + companion plants)
- Full woodland-style feature area (200–500+ sq ft): $2,500–$10,000+ (moss coverage + boulders + lighting + furniture + irrigation adjustments)
Costs vary widely based on stone choice, whether you add landscape lighting, and if you hire help for site prep or grading.
Common Mistakes to Avoid
- Placing moss in full, hot sun: It may survive, but it rarely looks lush without frequent watering.
- Skipping site prep: Weeds and grass will outcompete moss if the area isn’t cleared and firmed.
- Overwatering soggy soil: Moss likes moisture, but constant puddling can cause rot and algae takeover.
- Using fertilizer: Fertilizer encourages weeds and can damage moss.
- No path plan: People will walk the shortest route—give them stepping stones so the moss stays pristine.
- Letting leaves mat down: A single neglected fall season can thin your moss dramatically.
FAQ: Moss Gardens for Patios, Yards, and Outdoor Living Spaces
Does moss replace grass?
In shaded areas, moss can function as a lawn alternative, but it’s best treated as a soft groundcover with planned paths. For high-traffic yards, use moss as a design feature and keep walkways hardscaped.
Will moss damage my patio or pavers?
Moss won’t damage sound stone or concrete, but it can make surfaces slippery when wet. Use moss between pavers rather than on top of walking surfaces, and choose textured stone for better traction.
Do I need irrigation for a moss garden?
Often, yes—at least during establishment and summer dry spells. In rainy, cool climates you may only water occasionally. In dry climates, micro-sprayers or a mist line makes moss much more reliable.
Can I grow moss in containers?
Absolutely. Use a shallow, wide container with a moisture-retentive base, keep it in shade, and mist regularly. Add a stone or small piece of driftwood for a miniature moss landscape near a seating area.
How long does it take for moss to fill in?
Expect visible establishment in 4–8 weeks with consistent moisture. Filling gaps and spreading can take a full growing season (sometimes longer), depending on species and site conditions.
What’s the best way to keep weeds out of moss?
Start with thorough site prep, avoid fertilizer, remove weeds early by hand, and keep the moss surface free of leaf litter that can turn into weed-friendly soil.
Next Steps: Build Your Moss Garden This Season
Start by identifying one shady area that isn’t living up to its potential—along a fence line, under a tree, beside a north-facing patio, or at the edge of your outdoor seating zone. Clear it, firm the soil, and sketch a simple layout that includes a stepping-stone route. Then add moss in patches, repeat a few shade plants for structure, and finish with crisp edging and a bench or bistro set to turn it into a true outdoor living destination.
- Pick a shade-friendly site with manageable foot traffic.
- Prep the ground for a firm, weed-free base.
- Use stone + moss for a polished, patio-ready look.
- Plan simple maintenance: mist, tidy leaves, pull weeds early.
For more landscaping ideas, patio living inspiration, and outdoor design guides, explore what’s new on thedecormag.com.
More Articles
 Outdoor Kitchen Range Hood Exterior - The Decor Mag
 How to Design a Dragonfly Garden - The Decor Mag
 How to Create a Vegetable Garden Layout - The Decor Mag
 Outdoor Pizza Oven Installation Guide - The Decor Mag
 Best Color Guides for Summer: Science-Backed Palettes for Outdoor Living Spaces
 Cheap vs Premium Precision in Outdoor Living: What Really Matters for Durability, Safety, and Long-Term Value
 Best Outdoor Bar Nut Bowl Collection - The Decor Mag
 Outdoor Pavilion Insect Screen Options - The Decor Mag
 Turn Your Tired Porch into a $100 Summer Oasis (DIY Guide)
 Best Outdoor Bar Cutting Board Station - The Decor Mag