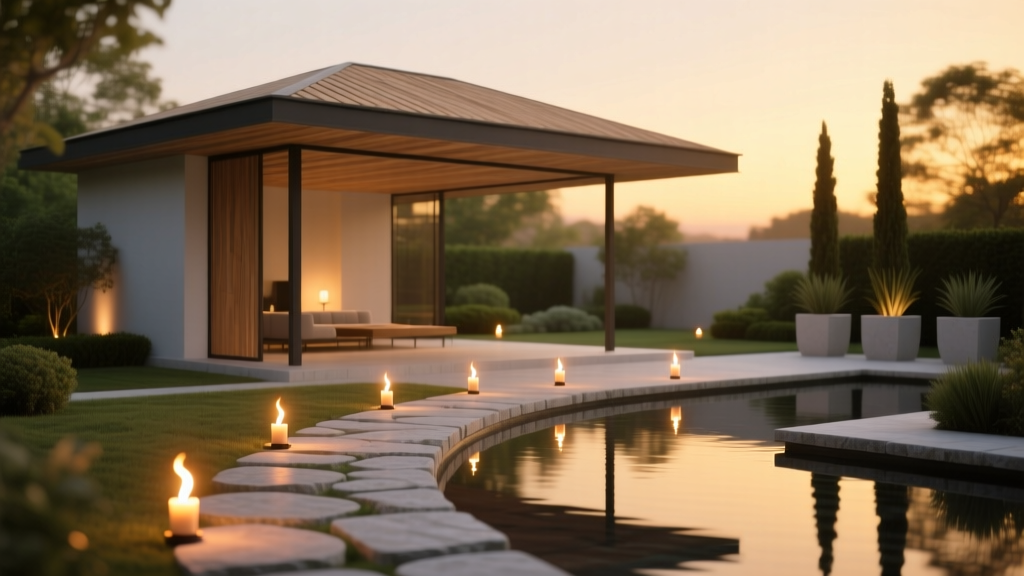
Outdoor Pavilion Torch Light Placement - The Decor Mag
An outdoor pavilion changes the way a backyard feels after sunset. It’s where patio dinners linger longer, where a spa-like lounge becomes a nightly ritual, and where the garden stays “open” even when daylight fades. Torch lighting—when placed thoughtfully—can make a pavilion glow with warmth, guide guests safely through the landscape, and add that resort-level ambiance homeowners crave.
But torch placement isn’t only about atmosphere. It affects circulation, glare, smoke direction, fire safety, and how your outdoor living space functions year-round. The right layout highlights architectural posts and beams, frames seating areas, and connects the pavilion to patios, gardens, and pathways. The wrong layout can feel harsh, smoky, or unbalanced—and can even create safety issues.
This guide walks through expert torch light placement for outdoor pavilions, including design layouts, material recommendations, plant pairings, budget ranges, seasonal tips, and the common mistakes that trip homeowners up.
Start with the Role of Light in Your Pavilion Design
Before buying torches or drilling brackets, decide what the lighting needs to accomplish. A pavilion typically benefits from layered outdoor lighting, where torches provide a warm perimeter glow and visual rhythm, while other fixtures cover task and safety lighting.
The 3 lighting jobs torches do best
- Ambient glow: Soft, flickering light that makes outdoor living spaces feel inviting.
- Perimeter definition: A visible “edge” around the pavilion and nearby patio zones.
- Wayfinding: Visual cues that lead guests from the house to the pavilion, or from pavilion to garden paths.
What torches are not ideal for
- Task lighting: Grilling, dining, and serving usually need overhead fixtures or wall sconces.
- Bright security lighting: Use motion lights or low-glare flood lighting elsewhere.
Design tip: Treat torches like “accent pillars” of light—then layer in string lights, downlights, or warm LED step lights to complete the outdoor lighting plan.
Types of Outdoor Torches (and Where Each Works Best)
Choosing the torch style first helps determine placement options, mounting methods, and clearance requirements.
Freestanding tiki or patio torches
- Best for: Lawn edges, gravel borders, planting beds, and flexible layouts for parties.
- Placement strength: Easy to reposition for wind direction and seasonal use.
- Material picks: Powder-coated steel, stainless steel, or fiberglass for durability.
Mounted wall/post torches
- Best for: Pavilion posts, outdoor kitchen walls, stone columns, and pergola-style pavilions.
- Placement strength: Clean, built-in look that complements pavilion architecture.
- Material picks: Marine-grade stainless steel (coastal), powder-coated aluminum (budget-friendly), copper (premium patina).
Tabletop or bowl-style torches (fire bowls)
- Best for: Dining tables, coffee tables, and conversation areas under a covered pavilion.
- Placement strength: Controlled flame height and elegant ambiance, especially with glass wind guards.
- Material picks: Concrete composite, hammered metal, or ceramic with a stable base.
Fuel note: For the cleanest experience, many homeowners prefer gas torches (propane or natural gas) over citronella oil. Gas typically produces less soot and odor and offers consistent flame height—ideal for patios and covered outdoor living spaces.
Core Placement Principles for a Balanced, Comfortable Glow
1) Define the pavilion perimeter without crowding it
Torches look best when they echo the pavilion’s footprint and emphasize its structure. Think of them as a glowing outline that frames the outdoor room.
- Freestanding torches: Place 2–4 feet outside the pavilion perimeter in adjacent beds or gravel strips.
- Mounted torches: Align them with pavilion posts or columns for a symmetrical, architectural feel.
2) Keep flames out of high-traffic paths
Torches should guide movement, not obstruct it. Avoid putting freestanding torches where people naturally cut across corners.
- Maintain a minimum 36–48 inches of clear walkway width (more if you entertain often).
- Keep torch bases out of chair slide zones and pool towel traffic areas.
3) Aim for “even rhythm,” not runway lighting
Too many torches in a straight line can feel like an airport runway. Instead, create a rhythm that feels natural and layered.
- Use torches in pairs or matched sets of four around a pavilion.
- Stagger them with plants, boulders, or low garden lighting for a softer, landscaped look.
4) Manage wind and smoke direction
Wind determines whether your pavilion feels cozy or smoky. Test your yard at dusk a few times—breezes often shift as temperatures drop.
- Place torches on the downwind perimeter so smoke drifts away from seating.
- Choose torch heads with wind guards or heavier canisters in breezy climates.
Placement Layouts That Work for Real Backyards
Layout A: Classic four-corner framing (best for most pavilions)
This approach highlights the pavilion structure and creates an even glow for patio living.
- Place one torch near each corner, either mounted to posts or freestanding in adjacent beds.
- For pavilions with outdoor dining, keep corner torches 6–10 feet from table edges to reduce flicker distraction.
Best pairing: Add warm LED downlights under pavilion beams to handle dining visibility while torches deliver ambiance.
Layout B: Entry emphasis + perimeter accents (best for entertaining)
Highlight the main approach, then sprinkle torches around the outdoor room.
- Place two torches flanking the primary entry path to the pavilion.
- Add 2–3 more torches around the outer perimeter, ideally near landscape beds.
Design win: Guests intuitively understand where to go, and the pavilion feels “hosted” and welcoming.
Layout C: Garden edge glow (best for pavilions facing landscaping)
If your pavilion overlooks a garden or water feature, keep torches slightly farther out to illuminate the view.
- Place torches along the edge of planting beds or near a low retaining wall.
- Use them to frame focal points: a specimen tree, fountain, or sculptural grasses.
Layout D: Poolside pavilion lighting (best for resort vibe)
Safety and glare control matter near water.
- Keep open flames farther from towel hooks and chaise lounge fabrics—use mounted or bowl-style units near seating.
- Avoid placing torches where reflections cause glare across the waterline.
- Consider combining torches with low-voltage path lights for safer circulation.
Recommended Materials, Finishes, and Complementary Outdoor Decor
Torch materials that hold up outdoors
- Stainless steel (304 or 316): Best for coastal or humid climates; 316 is premium for salt air.
- Powder-coated aluminum: Great for most patios; choose matte black, bronze, or charcoal for a modern pavilion.
- Copper: High-end look that develops a natural patina; pairs beautifully with stone and cedar.
- Fiberglass: Lightweight and resistant to rust; excellent for freestanding torches in damp areas.
Furniture and layout recommendations for torch-lit comfort
- Seating: Deep-cushion outdoor sectionals or lounge chairs in solution-dyed acrylic fabrics (look for Sunbrella-type performance textiles).
- Table surfaces: Stone-look porcelain, concrete composite, or teak—materials that read warm under flickering light.
- Rugs: UV-stable polypropylene rugs anchor the space; keep them away from freestanding torch bases.
- Heat + light pairing: If you use torches in cooler seasons, consider a patio heater or gas fire table centered in the lounge zone for true year-round outdoor living.
Plant Suggestions That Make Torch Lighting Look Intentional
Torches feel most “designed” when they’re integrated with landscaping. Use plants to soften bases, echo the flame color, and create movement in the glow.
Best plants to pair with pavilion torches (by effect)
- Soft, glowing texture: Feather reed grass (Calamagrostis), fountain grass (Pennisetum), muhly grass (Muhlenbergia).
- Evergreen structure: Boxwood, inkberry holly, dwarf yaupon holly, compact junipers (climate-dependent).
- Fragrant evening garden: Lavender (dry climates), gardenia (warm humid climates), jasmine (mild winters), night-blooming plants where appropriate.
- Pollinator-friendly color (placed away from flames): Salvia, coneflower, yarrow—great for daytime beauty while torches shine at night.
Safety planting tip: Keep torches away from dry ornamental grasses in wildfire-prone areas, especially late summer and fall. Choose well-irrigated, low-resin plantings near flames and maintain a tidy, trimmed edge.
Seasonal and Climate Considerations for Year-Round Outdoor Living
Cold climates (freeze/thaw)
- Store oil canisters and removable torches in a shed or garage during deep winter.
- Choose stainless steel or powder-coated aluminum to reduce corrosion from de-icing salts and moisture.
- Use a pavilion wind screen panel or outdoor curtains to reduce flame flicker on gusty nights.
Hot, dry climates (heat + wildfire risk)
- Opt for gas torches with reliable shutoff valves and stable bases.
- Keep a wider clearance from planting beds; avoid placing torches directly in mulch.
- Consider non-flame alternatives during peak fire season: warm LED lanterns, low-voltage landscape lighting, and downlights for a similar ambiance.
Coastal and humid climates (salt + rust)
- Choose marine-grade stainless steel or high-quality powder-coated finishes.
- Rinse fixtures periodically with fresh water to reduce salt buildup.
- Use sealed, weather-rated components if integrating gas lines or electric ignitions.
Maintenance Basics: Keep Torches Clean, Safe, and Beautiful
- Weekly (during heavy use): Check fuel levels, inspect wicks or burners, wipe soot from caps.
- Monthly: Tighten mounting hardware, clean glass wind guards, ensure bases are stable and level.
- Seasonally: Replace worn wicks, deep-clean burner ports (for gas), and touch up scratches on powder-coated finishes.
Material care tip: For copper torches, decide whether you want a polished look or natural patina. Use a copper cleaner to keep it bright, or simply wash with mild soap and let it age gracefully.
Budget Ranges: What Homeowners Can Expect to Spend
- Budget-friendly ($40–$150 per torch): Basic freestanding steel or fiberglass torches; best for flexible placement in beds and lawn edges.
- Mid-range ($150–$400 per torch): Higher-quality finishes, better burners, optional wind guards; ideal for a polished pavilion patio design.
- Premium ($400–$1,200+ per torch): Copper or marine-grade stainless, built-in ignitions, natural gas conversions, designer aesthetics.
Typical project totals: Many pavilion setups look complete with 4–8 torches plus supplemental outdoor lighting. Expect roughly $300–$2,500 for torches alone, depending on quality and fuel type. Hardlined natural gas torches add installation costs, often $500–$2,000+ depending on distance, trenching, and local labor rates.
Common Mistakes to Avoid
- Placing torches too close to seating: Flicker and heat can feel distracting; keep comfortable distance zones.
- Ignoring overhead clearance: Don’t place open flames under low pavilion ceilings or near hanging décor.
- Over-lighting the perimeter: Too many torches make the space feel harsh and busy—use a balanced rhythm.
- Setting torches in mulch without stability: Mulch shifts and can be flammable; use pavers, gravel, or a stable mounting sleeve.
- Skipping layered lighting: Torches alone can leave dark spots; add path lights, step lights, or warm downlights for safety.
- Not planning for wind: If smoke drifts into the pavilion, the space won’t get used—test placement before finalizing.
FAQ: Outdoor Pavilion Torch Light Placement
How far apart should outdoor torches be around a pavilion?
A practical spacing range is 8–12 feet apart for most pavilion perimeters, adjusted for size and wind. Four-corner placement often looks best, with extra torches only if the pavilion is large or you’re lighting connecting pathways.
Can I put torches under a covered pavilion roof?
Open-flame torches generally work best outside the roofline or mounted where there’s ample clearance and ventilation. For under-roof ambiance, consider tabletop fire bowls with wind guards or switch to warm LED lanterns and integrated downlights.
What’s better for a patio living space: citronella or gas torches?
For everyday outdoor living, propane or natural gas is usually cleaner and more consistent. Citronella can add noticeable odor and soot. If mosquitoes are a concern, combine fans, screened zones, and targeted repellents rather than relying on citronella alone.
Do torches help with bugs?
They can help a little, but they’re not a complete solution. The best bug-control approach for pavilion patios is layered: airflow (fans), eliminating standing water, and using landscape choices that don’t attract heavy insect activity near seating.
Should torches match my pavilion style?
Yes—matching finishes helps the entire outdoor design feel intentional. Matte black and bronze suit modern and transitional pavilions; copper complements rustic, farmhouse, and classic stone designs; stainless steel works beautifully with contemporary outdoor kitchens and coastal landscaping.
Next Steps: A Simple Plan for Getting Placement Right
- Sketch your pavilion and traffic flow: Mark entries, seating, dining, and grill zones.
- Choose your torch type: Freestanding for flexibility, mounted for architectural polish, tabletop for controlled flame under cover.
- Mock up the layout: Place temporary stakes or lanterns where torches would go and test at dusk on a windy night.
- Layer the lighting: Add warm LEDs for pathways and tasks, then let torches handle ambiance.
- Integrate landscaping: Use grasses, evergreens, and fragrance plants to soften the edges and make the glow feel garden-driven.
A pavilion deserves lighting that’s as functional as it is beautiful. With smart torch placement, your patio and landscape design will feel welcoming in every season—summer gatherings, crisp fall evenings, even winter nights with a heater and a warm drink.
For more outdoor living ideas, pavilion inspiration, and landscaping tips, explore the latest guides on thedecormag.com.
More Articles
 Best Outdoor Cocktail Cart Picks - The Decor Mag
 How to Create a Container Herb Garden - The Decor Mag
 Outdoor Bar Top Material Comparison - The Decor Mag
 How to Design a Bee Garden - The Decor Mag
 Safety vs Scheme: Balancing Aesthetic Vision with Real-World Outdoor Living Protection
 Best Outdoor Bar Nut Bowl Collection - The Decor Mag
 Practical Aging Safety Tips for Outdoor Living Spaces
 How to Create a Herb Garden Near the Kitchen - The Decor Mag
 How to Create Privacy in Your Yard - The Decor Mag
 Outdoor Living Performance: 7 Costly Mistakes That Sabotage Durability, Comfort, and Value