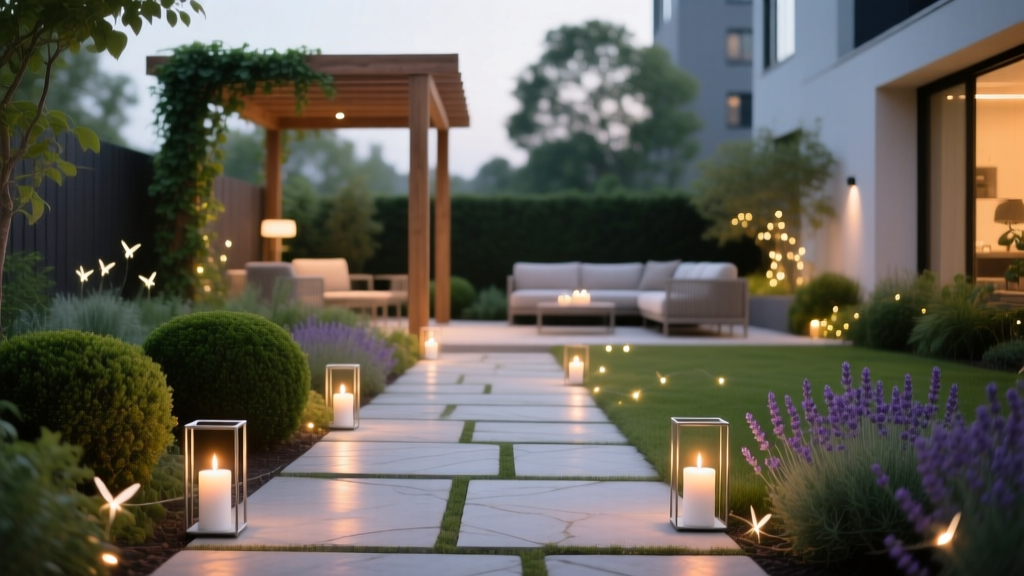
How to Design a Candlelit Garden Path - The Decor Mag
A candlelit garden path changes the way you use your outdoor space. What feels like “just the side yard” during the day becomes a destination at night—a soft, glowing corridor that invites you to linger, slow down, and enjoy the garden like an outdoor room. Whether you’re guiding guests from the patio to a fire pit or creating a quiet route to a back gate, candlelight adds romance and warmth that hardwired lighting can’t always match.
For homeowners focused on outdoor living and patio upgrades, a candlelit path is one of the highest-impact projects you can do without a full renovation. It’s flexible (you can rearrange lights seasonally), budget-friendly (you can start small and build), and design-forward (it highlights plant textures, stonework, and landscaping details). With the right materials and a smart layout, it can also be safe, durable, and low-maintenance—perfect for year-round enjoyment.
Start with the “Why”: Define the Path’s Purpose and Mood
Before buying lanterns or lining up tea lights, decide what your candlelit garden path needs to do. This keeps the design cohesive and prevents the most common mistake: scattering candles randomly and calling it “decor.”
Common goals for a candlelit path
- Wayfinding: guiding people from driveway to front door, patio to dining area, or deck to hot tub.
- Atmosphere: creating a cozy outdoor living zone for evening lounging.
- Highlighting landscaping: emphasizing a stone walkway, a border planting, or a pergola.
- Seasonal entertaining: adding special-occasion charm for parties, holidays, and backyard weddings.
Pick a lighting style that matches your home
- Modern: matte-black lanterns, clean-lined concrete pavers, simple grasses.
- Cottage: brass lanterns, brick edging, lavender, roses, and informal plantings.
- Mediterranean: terracotta pots, gravel paths, olive tones, rosemary, thyme.
- Rustic: weathered wood, stone steps, copper lanterns, ferns, hostas.
Layout: Design a Path That Looks Beautiful and Walks Safely
A candlelit path should feel effortless underfoot. Your goal is a clear route with gentle guidance—not a maze of flickering obstacles.
Ideal dimensions and spacing
- Main garden path width: 36–48 inches for comfortable walking; 48 inches if two people often walk side-by-side.
- Secondary path width: 24–36 inches for a quiet garden route.
- Lantern spacing: every 6–10 feet for a subtle glow; every 3–6 feet for a more dramatic, “event” look.
- Stairs/changes in grade: place lights tighter here—at the top and bottom and alongside the edge for visibility.
Simple layout formulas that always work
- Alternating sides: lanterns staggered left-right for a natural flow.
- One-sided “gallery” style: lights on one edge only, paired with a planting bed or low wall on the other side.
- Clusters at nodes: a few lanterns grouped at transitions (gate, steps, patio edge), with fewer lights between.
Safety checks to build into the design
- Keep open flames 12–18 inches away from dry grasses, mulch, or overhanging foliage.
- Avoid placing lanterns where they narrow the walkway or become tripping hazards.
- Use wind-resistant enclosures (glass hurricanes, lanterns with vented tops) in breezy yards.
- If kids or pets use the path, prioritize flameless LED candles in key areas.
Choose Path Materials That Complement Candlelight
The best candlelit paths don’t rely on candles alone. The hardscape materials reflect and amplify the glow, making the whole scene feel brighter and more intentional.
Top material choices for a candlelit garden path
- Natural stone (flagstone, bluestone, limestone): premium look, beautiful texture, and excellent light play. Works with most landscape design styles.
- Brick: warm color that pairs naturally with flame tones; great for traditional homes and cottage gardens.
- Decomposed granite (DG): budget-friendly, soft underfoot, and luminous at night—excellent for California, Southwest, and Mediterranean-style yards.
- Gravel (pea gravel or crushed stone): affordable and easy to install; candlelight sparkles off light-colored stone.
- Concrete pavers: consistent, modern, and durable; choose mid-tone gray or warm greige for the best nighttime effect.
Edging that elevates the look
- Steel edging: sleek and modern; helps gravel or DG stay crisp.
- Brick soldier course: classic border detail for brick or stone paths.
- Stone cobbles: charming and old-world; great near patios and courtyards.
Practical tip for brighter candlelight
If your path material is very dark (black slate, deep mulch borders), use more reflective accents: light gravel shoulders, pale planters, or a few white-flowering plants near lantern clusters.
Candlelight Options: Real Flame vs. Flameless (and When to Mix)
You can create a candlelit garden path with real candles, LEDs, or a hybrid approach. The best choice depends on wind, maintenance tolerance, and how often you entertain.
Real-flame options (best for special evenings)
- Beeswax pillar candles: longer burn time and less smoke than many paraffin candles.
- Citronella candles: helpful for patios in mosquito seasons, though the scent is noticeable.
- Tea lights in glass holders: affordable but short burn time; best in clusters or sheltered spots.
Flameless options (best for everyday outdoor living)
- LED pillar candles: choose warm white (around 2200K–2700K) and a realistic flicker.
- Timer or remote-controlled sets: ideal for nightly ambiance without constant setup.
- Rechargeable LEDs: great for covered patios and pergolas; fewer disposable batteries.
The hybrid strategy designers love
Use flameless candles for the majority of the path (consistent, safe, reliable), then add real flame at “moment” areas like the patio entry, steps, or a seating nook.
Lanterns, Holders, and Accessories Worth Buying
Lanterns are the furniture of your lighting plan: they add structure and style even when unlit. Invest in a few quality pieces and fill in with budget-friendly basics.
Best lantern materials for outdoor use
- Powder-coated steel: durable and affordable; great for modern outdoor design.
- Copper: ages beautifully; ideal for classic landscaping and high-end patio living spaces.
- Teak or acacia wood lanterns: warm and spa-like; keep them covered in heavy rain seasons.
- Rattan-style lanterns: pretty in covered areas; pair with flameless candles for safety.
Windproofing essentials
- Glass hurricane sleeves: protect flames and visually “upgrade” simple candles.
- Weighted bases: prevent tipping on gravel or uneven stone.
- Cloche-style covers: elegant for table-height candles near seating areas.
Budget ranges (realistic starting points)
- Starter setup ($50–$150): 6–10 glass holders, a few LED pillars, and two medium lanterns for entry points.
- Mid-range ($200–$600): 8–12 lanterns in mixed sizes, quality LED candles with timers, and a few planters to anchor the design.
- Premium ($700–$2,000+): designer lanterns (copper/teak), coordinated planters, upgraded path edging, and layered lighting for multiple outdoor rooms.
Planting Design: Use Foliage and Fragrance to Amplify the Glow
The most memorable candlelit paths pair light with texture and scent. Think of your landscape design as a stage set—candlelight becomes more dramatic when it grazes ornamental grasses, glossy leaves, or blooms that catch the light.
Plants that look amazing in low light
- Ornamental grasses: fountain grass (warm climates), feather reed grass (cooler climates), blue fescue (compact and tidy).
- Silvery foliage: lamb’s ear, artemisia, dusty miller (often grown as annual), Russian sage (sunny spots).
- Glossy greens: boxwood (where appropriate), camellia (mild climates), hellebores (shade and winter interest).
- White or pale blooms: white impatiens (shade), moonflower (seasonal drama), white hydrangea (lush borders), white alyssum (edging).
Fragrant plants for a sensory path
- Lavender: sun-loving, drought-tolerant, and perfect near patios.
- Rosemary and thyme: great along gravel paths; releases scent when brushed.
- Jasmine (climbing varieties): ideal near gates, trellises, and pergolas in warm climates.
- Sweet autumn clematis: seasonal fragrance and a soft, romantic look.
Planting tip for year-round outdoor living
Mix evergreen structure (boxwood alternatives, dwarf conifers, or hardy shrubs) with seasonal color so the candlelit path feels intentional in every season—spring bulbs, summer blooms, fall grasses, and winter greenery.
Create “Pause Points” with Outdoor Furniture and Decor
A garden path feels more luxurious when it leads somewhere worth stopping. Add a small destination that supports outdoor living—morning coffee, evening wine, or quiet reading.
Furniture ideas that pair beautifully with candlelight
- A bistro set: perfect for a patio corner or small courtyard; choose powder-coated metal for durability.
- A garden bench: teak, acacia, or metal; place it at a curve in the path with two lanterns at each end.
- Adirondack chairs near a fire pit: create a layered glow (candlelight + firelight).
- Outdoor side tables: add a safe surface for lanterns; look for stone, concrete, or metal tops.
Design move that looks high-end
Anchor a seating nook with two tall planters (24–36 inches high) and place lanterns at the base. This frames the view and makes the pathway feel like a designed outdoor room.
Seasonal and Climate Considerations
Windy or coastal climates
- Choose lanterns with enclosed glass and heavier bases.
- Use LED candles for exposed areas; reserve real flame for sheltered patios.
- Opt for powder-coated aluminum or marine-grade finishes to reduce corrosion.
Rainy climates
- Use covered lanterns and avoid candles sitting directly on soil or mulch.
- Pick path materials that drain well: DG, gravel, or properly bedded pavers.
- Store candles in a dry bin near the back door to prevent wax sweating and ruined wicks.
Hot, dry climates
- Keep flames away from dry plant debris and consider flameless candles in peak fire season.
- Choose drought-tolerant plants like lavender, rosemary, salvia, agave (where suitable).
- Use light-colored gravel or stone to keep the area cooler underfoot.
Cold winters and freeze-thaw regions
- Choose freeze-thaw-rated pavers and proper base prep for stone paths.
- Store lanterns during heavy snow to avoid rust and cracked glass.
- Keep the path edges clear so snow removal doesn’t scatter lantern placements.
Maintenance: Keep It Beautiful Without Constant Fuss
- Weekly: wipe soot from glass (real flame) and check for tipped lanterns after storms.
- Monthly: trim back plants that encroach on the walkway or touch lanterns.
- Seasonally: refresh gravel/DG top-dressing, clean pavers, and rotate lantern locations for a new look.
- Battery plan: replace batteries on a schedule (every 2–3 months during heavy use) or switch to rechargeable sets.
Common Mistakes to Avoid
- Overcrowding the path: too many lanterns becomes cluttered and can reduce safety. Aim for rhythm, not a runway.
- Ignoring wind: open-top candles will fail on breezy nights; use hurricanes or LED alternatives.
- Placing candles directly on mulch: it looks casual but can be unsafe and messy. Use holders, pavers, or a lantern base.
- Cold-white LEDs: bright bluish light breaks the cozy candlelit vibe. Stick to warm, amber-toned light.
- No destination: a gorgeous path that leads to nowhere feels unfinished. Add a bench, a patio moment, or a focal planter.
FAQ: Designing a Candlelit Garden Path
How many lanterns do I need for a garden path?
For subtle guidance, plan on one lantern every 6–10 feet. For a more dramatic look (great for entertaining), use one every 3–6 feet or cluster lanterns at key transitions like steps, gates, and patio edges.
Are real candles safe for outdoor pathways?
They can be when used in enclosed lanterns or glass hurricanes, placed away from plants, and kept out of high-traffic pinch points. If kids, pets, wind, or fire risk are concerns, use flameless LED candles for most of the path.
What’s the best path surface for candlelight?
Light to mid-tone materials reflect glow best—DG, gravel, limestone, concrete pavers in warm gray, and many sand-colored stones. Dark surfaces can still work; you’ll just want more reflective accents and slightly tighter lantern spacing.
How do I make it look designed, not random?
Repeat a few elements: matching lantern finishes, consistent spacing, and a clear layout pattern (alternating sides or one-sided). Add a “pause point” like a bench or bistro set so the path feels intentional within your outdoor living plan.
How can I keep a candlelit path looking good year-round?
Use evergreen structure (shrubs, conifers, or hardy grasses) plus seasonal layers like spring bulbs and summer annuals. Swap lantern groupings by season and use timers on LED candles for easy nightly ambiance.
Your Next Steps: Plan, Place, Test, Refine
- Sketch the route from your patio, deck, or door to the destination point.
- Choose a path material (or refresh what you have) and tighten edges for a crisp landscape look.
- Buy 2–3 anchor lanterns in larger sizes for entry points, then add smaller lanterns to fill the rhythm.
- Do a nighttime test run before committing—walk it, adjust spacing, and check for glare, shadows, and wind.
- Plant for glow and fragrance with silvery foliage, ornamental grasses, and aromatic edging near seating areas.
A candlelit garden path is one of those outdoor upgrades that feels instantly transformative—better curb appeal, more inviting patio living, and a garden you’ll actually want to step into after dark. For more outdoor design ideas, landscaping tips, and inspiring backyard projects, explore the latest guides on thedecormag.com.
More Articles
 How to Create a Cut Flower Garden - The Decor Mag
 How to Design a Fragrant Garden Path - The Decor Mag
 How to Design a Rooftop Terrace - The Decor Mag
 DIY Summer Porch Makeover: Budget Refresh Under $100
 How to Start Living Rooms: Building Functional, Weather-Resilient Outdoor Living Spaces from the Ground Up
 Outdoor Pergola Integrated Speaker System - The Decor Mag
 How to Design a Tropical Garden Oasis - The Decor Mag
 Outdoor Trellis and Climbing Plant Ideas - The Decor Mag
 Outdoor Pavilion Insect Screen Options - The Decor Mag
 Deck vs Patio Design Comparison - The Decor Mag