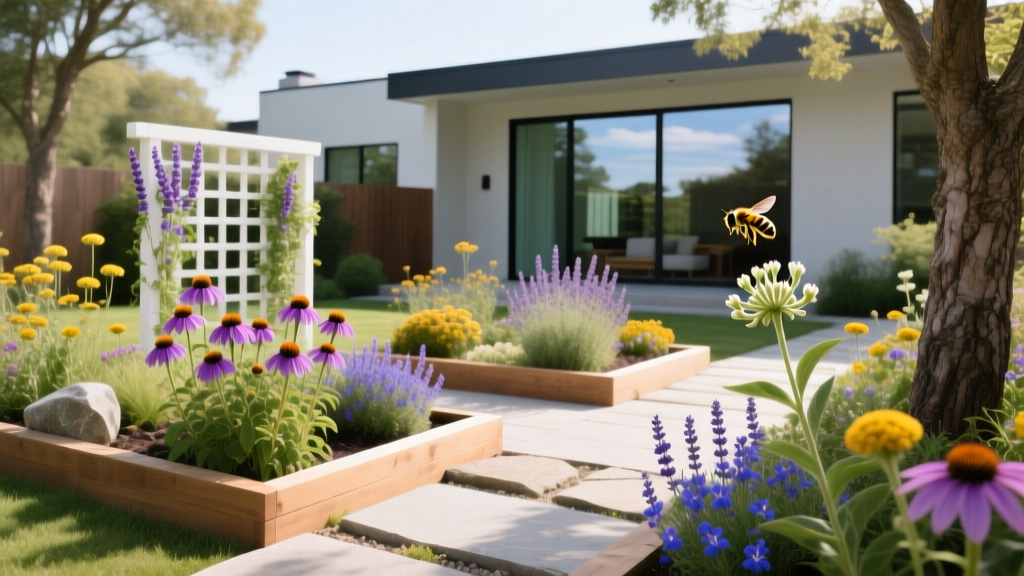
How to Create a Pollinator Garden - The Decor Mag
A beautiful outdoor living space isn’t just about what you see from the patio—it’s about what you hear and feel, too. The gentle buzz of bees in lavender, butterflies drifting between coneflowers, hummingbirds hovering at salvias: that’s the kind of “alive” atmosphere that turns an ordinary yard into a destination. A pollinator garden is one of the most satisfying upgrades you can make to your landscaping because it blends curb appeal, seasonal color, and real ecological impact.
For homeowners, pollinator-friendly landscaping also solves common outdoor design goals: filling awkward side yards, softening hardscapes, framing a deck, or creating privacy near a patio. Better yet, pollinator plantings can be tailored to any style—from modern, architectural beds with ornamental grasses to cottage borders overflowing with blooms—while supporting bees, butterflies, moths, beetles, hummingbirds, and beneficial insects that keep your garden healthier.
Below is a practical, design-forward guide to planning, planting, and maintaining a pollinator garden that enhances patio living year-round—without turning your weekends into endless weeding.
What Makes a Garden “Pollinator-Friendly”?
A pollinator garden provides three essentials: food (nectar and pollen), shelter, and water—delivered in a way that works with your climate and your lifestyle. The most successful designs include a range of flower shapes and bloom times, planted in generous groupings, and supported by low-chemical maintenance practices.
The Core Principles
- Plant for continuous bloom: Aim for flowers from early spring through late fall.
- Use mostly native plants: Native species often offer more nutrition and require less water once established.
- Plant in drifts: Clusters of the same plant help pollinators forage efficiently and look more intentional in landscape design.
- Limit pesticides: Many common lawn and garden chemicals harm bees and butterflies, even when applied “carefully.”
- Create layers: Include groundcovers, perennials, shrubs, and (if space allows) small trees for shelter and nesting.
Start With a Site Plan: Where Your Pollinator Garden Will Thrive
Before shopping for plants, take an honest look at your yard. The best pollinator garden is the one that fits your outdoor living layout and performs well in your specific conditions.
Choose the Right Location
- Sun exposure: Most pollinator plants prefer 6+ hours of sun. Partial shade gardens can still work—choose shade-tolerant bloomers.
- Visibility from living areas: Place beds where you’ll enjoy them—near a patio, along a walkway, or outside a kitchen window.
- Wind and microclimates: A fence, hedge, or pergola can create calmer foraging zones and a more comfortable patio.
- Access to water: Especially for the first year, convenience matters.
Design Around Outdoor Living Spaces
Pollinator beds can be integrated into outdoor design in ways that feel curated, not chaotic:
- Patio border beds: A 3–6 ft deep planting bed around a patio softens edges and boosts privacy.
- Island beds in lawns: Replace a high-maintenance patch of turf with a flowering “destination” that breaks up the yard.
- Entry or driveway planting strips: Great for curb appeal; choose drought-tolerant plants if heat reflects from pavement.
- Courtyard and container gardens: Perfect for small spaces, decks, and balcony-adjacent patios.
Layout and Style: Make It Look Intentional
Pollinator gardens can be wildly colorful, but the most attractive ones use structure. Think like a landscape designer: repeat forms, create rhythm, and anchor the planting with evergreen or architectural elements.
Go-To Layout Formulas
- The “Anchor + Drift” method: Use 2–3 structural plants (ornamental grasses, shrubs, or small evergreens), then fill with repeating drifts of flowering perennials.
- Layered border: Tall plants at the back, medium in the middle, low at the front. Works beautifully along fences and patios.
- Meadow-inspired grid: A modern look: plant perennials and grasses in a loose grid (12–24 in spacing), then let them knit together.
Hardscape and Material Recommendations
Materials can elevate the garden and make maintenance easier:
- Edging: Steel edging (clean modern line), brick soldier course (classic), or natural stone (rustic). Budget: $2–$12 per linear foot depending on material and installation.
- Paths: Decomposed granite (DG) with stabilizer for a patio-adjacent path, gravel with stepping stones, or pavers for a more formal route. Budget: $6–$25 per sq ft.
- Mulch: Shredded bark for slopes, hardwood mulch for beds, or pine straw where appropriate. Keep mulch 2–3 inches deep and away from plant crowns.
- Raised beds: Great for poor soil or accessibility. Use untreated cedar or composite boards. Budget: $200–$1,200+ depending on size and materials.
Plant Selection: A Pollinator Plant Palette That Performs
Choosing plants is where your pollinator garden becomes personal. Prioritize plants adapted to your region, then curate for bloom sequence, height, and color harmony. Whenever possible, buy plants not treated with systemic insecticides (often labeled “neonic-free”).
A Simple Bloom Timeline (Spring to Fall)
- Early season: Support emerging bees and early butterflies.
- Mid-summer peak: Keep the patio garden buzzing during outdoor entertaining season.
- Late season: Fuel migration and overwintering prep with fall nectar sources.
High-Impact Pollinator Plants (Widely Available)
These are common favorites that also look fantastic in residential landscape design:
- For bees: lavender (Lavandula), catmint (Nepeta), bee balm (Monarda), anise hyssop (Agastache), coneflower (Echinacea), black-eyed Susan (Rudbeckia).
- For butterflies: milkweed (Asclepias), butterfly bush (Buddleja; choose sterile varieties where invasive concerns exist), blazing star (Liatris), zinnia (annual), verbena.
- For hummingbirds: salvia (Salvia spp.), cardinal flower (Lobelia cardinalis), trumpet honeysuckle (Lonicera sempervirens), penstemon.
- For beneficial insects: yarrow (Achillea), dill and fennel (herbs), sweet alyssum (annual), goldenrod (Solidago—excellent fall nectar).
Regional-Friendly Plant Ideas (Choose What Fits Your Climate)
- Hot/dry or drought-prone gardens: salvia, agastache, yarrow, lavender, gaillardia, Russian sage (Perovskia/Salvia yangii), ornamental grasses like little bluestem (Schizachyrium).
- Humid or rainier regions: bee balm, joe-pye weed (Eutrochium), coneflower, asters (Symphyotrichum), switchgrass (Panicum), inkberry holly (Ilex glabra).
- Part shade pollinator gardens: coral bells (Heuchera), columbine (Aquilegia), foamflower (Tiarella), woodland phlox (Phlox divaricata), hydrangea (choose pollinator-friendly varieties), ferns for texture.
Design Tip: Use Color to “Pull” the Eye From the Patio
For patio living, color placement matters. Use brighter, warmer colors (yellow, orange, hot pink) closer to seating areas for energy, and cooler colors (purple, blue, white) farther out for depth. Repeat 2–3 key colors throughout the bed so it reads as intentional landscaping, not a plant collection.
Container Pollinator Gardens for Patios, Decks, and Small Yards
No lawn? No problem. A pollinator garden can thrive in containers and still transform a patio into a mini habitat.
Best Container Choices and Soil
- Pots: Large containers (16–24 in wide) reduce watering and support deeper roots. Use frost-resistant ceramic, lightweight composite, or galvanized steel with drainage.
- Soil: Use a quality potting mix; add compost for nutrient support. Avoid “topsoil” in containers (it compacts).
- Budget: Expect $60–$250 per large container, plus $15–$30 for soil and $25–$120 in plants depending on size and quantity.
Easy Patio Container Combos (Sun)
- Combo 1 (purple + silver): lavender + salvia + trailing thyme.
- Combo 2 (butterfly magnet): zinnias + lantana + milkweed (if suitable for your region and container size).
- Combo 3 (soft cottage look): catmint + echinacea + sweet alyssum.
Furniture Recommendations to Enjoy Your Pollinator Garden
To make pollinator gardening part of your outdoor living routine, create a comfortable viewing zone:
- Seating: A pair of weather-resistant lounge chairs or a small bistro set placed 6–10 ft from the most active blooms.
- Materials: Powder-coated aluminum (low maintenance), teak (ages beautifully), or all-weather wicker with UV-stable cushions.
- Shade: A cantilever umbrella or pergola helps you linger longer during peak summer bloom.
- Budget ranges: Bistro sets $150–$600; lounge pairs $400–$2,000+; umbrellas $100–$800.
Add Habitat Features: Water, Shelter, and Nesting Sites
Flowers feed pollinators, but habitat keeps them coming back. These features also add charm and year-round interest to your landscaping.
Simple Habitat Add-Ons
- Water: A shallow birdbath or low bowl with stones for landing. Refresh often, especially in summer.
- Shelter: Dense shrubs, ornamental grasses, and a small brush pile tucked behind a shed or fence line.
- Nesting: Leave some bare soil for ground-nesting bees; avoid covering every inch with mulch or fabric.
- Lighting: Use warm, downcast outdoor lighting near seating areas and avoid bright landscape lighting that disrupts nocturnal pollinators.
Soil Prep and Planting: Get the Foundation Right
Healthy soil equals stronger plants, more blooms, and fewer pest problems. You don’t need perfect soil—just a smart start.
Prep Checklist
- Remove turf: For new beds, sheet-mulch with cardboard plus 3–4 inches of compost and mulch, or use a sod cutter for faster results.
- Loosen soil: Break up compaction to 8–12 inches where possible.
- Add organic matter: Compost improves drainage in clay and water retention in sand.
- Plant in groups: Place 3–7 of each perennial for a cohesive design.
- Water in deeply: Then mulch to conserve moisture.
Budget Expectations
- Starter bed (50–100 sq ft): $150–$600 (DIY) depending on plant size, mulch, and edging.
- Medium bed (150–300 sq ft): $500–$2,000 (DIY), more if adding paths, stone, or premium shrubs.
- Designer look upgrades: Steel edging, lighting, and boulders can add $300–$3,000+.
Seasonal and Climate Considerations for Year-Round Outdoor Living
A pollinator garden should look good in every season, even when you’re not actively gardening.
Spring
- Include early bloomers and bulbs (where appropriate) to kick-start pollinator activity.
- Hold off on aggressive cleanup until temperatures are consistently mild—many beneficial insects overwinter in stems and leaf litter.
Summer
- Plan for irrigation during establishment. Drip irrigation or soaker hoses reduce evaporation and keep foliage dry.
- Deadhead selectively: remove spent blooms on some plants to extend flowering, but allow others to set seed for birds.
Fall
- Prioritize late-season nectar (asters, goldenrod, sedum) to support migrating and preparing pollinators.
- Leave seedheads for winter interest and wildlife value—this also looks stunning against frost.
Winter
- Keep ornamental grasses and sturdy stems standing for structure and habitat.
- If you want a tidier winter patio view, “edit” rather than clear-cut: trim only what flops into paths or seating areas.
Maintenance Made Easy (Without Sacrificing Design)
Pollinator gardens don’t have to be messy or time-consuming. The key is smart plant density, clear edges, and a simple routine.
Low-Stress Maintenance Routine
- Weekly (10–20 minutes): Quick weed patrol, check moisture, snip a few spent blooms.
- Monthly: Light reshaping, stake tall plants if needed, top up mulch where thin.
- Seasonally: Divide overgrown perennials in spring or fall, refresh compost, and evaluate bloom gaps.
Irrigation Tips
- First year: Water deeply 1–2 times per week (more in heat waves) to build roots.
- After establishment: Many native plants need far less supplemental water.
- Best setup: Drip irrigation with a simple timer. Budget: $50–$300 DIY for small to medium beds.
Common Mistakes to Avoid
- Planting single specimens: One coneflower won’t create the impact (or the food source) that a drift of five will.
- Choosing only summer bloomers: A pollinator garden without spring and fall flowers leaves big gaps.
- Over-mulching and using landscape fabric everywhere: Fabric can hinder beneficial ground-nesting bees and makes future planting harder.
- Relying on pesticides for quick fixes: Focus on plant health, diversity, and beneficial insects instead.
- Ignoring mature size: Crowding leads to airflow issues and flopping—read plant tags and plan spacing.
- All flowers, no structure: Add grasses or shrubs so the bed looks designed even between bloom waves.
FAQ: Pollinator Gardening for Home Landscapes
Do I need to plant only native species?
No. A mostly-native pollinator garden is ideal, but non-invasive, pollinator-friendly ornamentals can complement natives and extend bloom time. Avoid invasive species and prioritize plants adapted to your region.
How big should a pollinator garden be to make a difference?
Even a few containers on a patio help. If you have yard space, a 50–100 sq ft bed planted densely can provide meaningful habitat while still feeling manageable for a homeowner.
What’s the best way to keep a pollinator garden looking neat?
Use crisp edging, repeat plants in groups, and include structural elements like ornamental grasses or shrubs. A narrow mulch strip along paths also creates a tidy “frame” that makes the planting feel intentional.
Can I create a pollinator garden if I have a dog or kids?
Yes—designate a path or play zone and keep the densest planting slightly set back. Choose tough, non-toxic groundcovers where traffic happens, and avoid placing stinging insect-attracting blooms directly beside doorways or tight walkways.
Will a pollinator garden attract too many bees near my patio?
It will attract bees, but smart placement helps. Position the most nectar-rich plants a few feet away from seating, and provide water away from dining areas. Most pollinators are focused on foraging, not people.
When is the best time to start?
Spring and early fall are ideal for planting in many climates. If summers are hot where you live, fall planting often leads to stronger root systems and easier establishment with less watering.
Your Next Steps: Build a Garden That Brings Your Outdoor Space to Life
Start small, start smart, and design for the way you actually live outdoors. Pick a sunny spot near your patio or along a main walkway, choose a simple layout with clear edging, and plant in repeating drifts so it feels like polished landscaping—not a science project. Add a water source, skip the chemicals, and let the garden evolve as you notice which plants bring the most butterflies and bees to your outdoor living space.
- This week: Identify a location and measure your bed area.
- Next: Choose 8–12 plant varieties with staggered bloom times.
- Planting day: Group plants in 3s and 5s, mulch lightly, and set up simple drip irrigation.
- After 30 days: Note bloom gaps and add one or two fall-focused plants for season-long color.
For more patio design ideas, landscaping inspiration, and outdoor living upgrades that look great in every season, explore the latest guides and trends on thedecormag.com.
More Articles
 Outdoor Pergola Solar Light Integration - The Decor Mag
 Practical and Aging-Resilient Outdoor Living: Designing Spaces That Serve Today and Endure Tomorrow
 Outdoor Pergola Climbing Vine Selection - The Decor Mag
 How to Design a Gravel Garden - The Decor Mag
 Outdoor Refrigerator and Ice Maker Setup - The Decor Mag
 Outdoor Pergola Integrated Speaker System - The Decor Mag
 How to Create a Rock Garden - The Decor Mag
 Deck vs Patio Design Comparison - The Decor Mag
 Best Color Guides for Summer: Science-Backed Palettes for Outdoor Living Spaces
 Outdoor Kitchen Ideas: Budget & Space Solutions