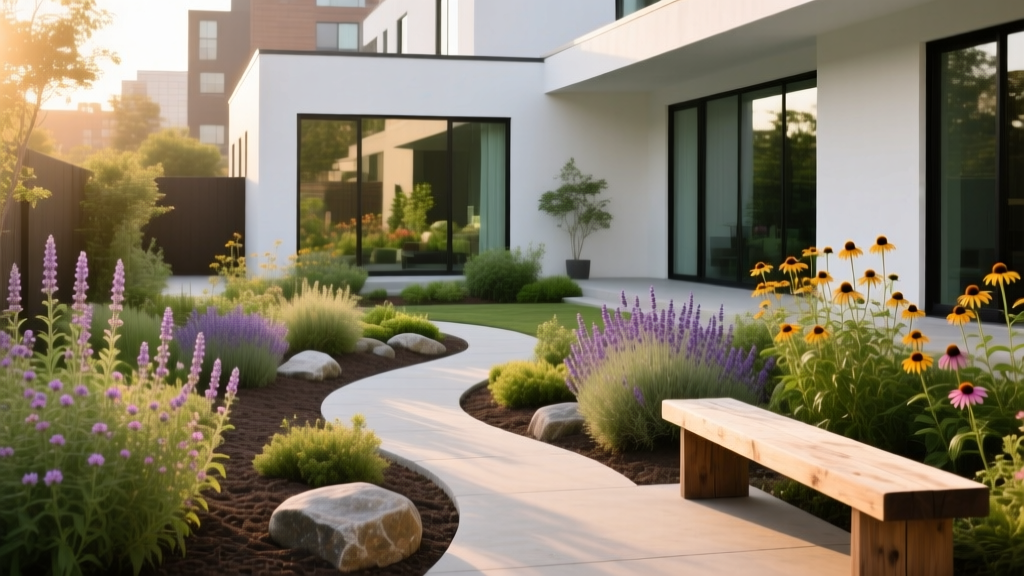
How to Design a Pollinator Pathway - The Decor Mag
A beautiful backyard isn’t just something you look at—it’s a place you live in. When your patio, garden beds, and walkways are designed to welcome butterflies, bees, hummingbirds, and beneficial insects, your outdoor living space becomes more colorful, more dynamic, and surprisingly more relaxing. A pollinator pathway is a design approach that connects pollinator-friendly plants and habitat features so pollinators can feed, rest, and move safely through your yard.
Beyond the environmental benefits, pollinator landscaping pays you back with better blooms, healthier vegetable gardens, more birdsong, and a landscape that feels alive from spring through fall. Done well, it also looks intentional and upscale—think layered planting beds, fragrant borders, and patio-side planters that glow with continuous color.
This guide walks you through designing a pollinator pathway that feels like a curated outdoor room: practical layout ideas, specific plant suggestions, furniture and material recommendations, maintenance tips, and a few common mistakes to avoid—so your patio living and garden design work together beautifully.
What a Pollinator Pathway Is (and Why It’s Perfect for Outdoor Living)
A pollinator pathway is a connected “route” of nectar, pollen, and shelter that helps pollinators travel through your landscape. It can be as simple as a sequence of container planters from patio to garden bed, or as ambitious as a layered perimeter border that links the front yard to the backyard.
Benefits you’ll actually notice at home
- More flowers, more often: Pollinators improve fruit set and flowering performance in many plants.
- A more inviting patio experience: Butterflies and songbirds create movement and interest without extra decor.
- Better edible garden yields: If you grow tomatoes, squash, cucumbers, berries, or herbs, pollinators are your secret weapon.
- Four-season structure: Pollinator-friendly landscapes rely on layered plants, seed heads, and shrubs—great for year-round outdoor living and winter interest.
Start with a Simple Plan: Map Your Pathway
Great landscape design starts with circulation—where people walk and where the eye travels. Your pollinator pathway should follow that same logic, tying your patio, pathways, and garden beds into one cohesive outdoor design.
Step-by-step layout process
- Sketch your yard’s “living zones”: patio/dining area, grill zone, fire pit seating, veggie garden, side yard access, shed, play area.
- Mark sunny vs. shady areas: Most nectar plants prefer 6+ hours of sun, but there are excellent shade pollinator plants too.
- Choose your pathway spine: This might be a side-yard path, a stepping-stone trail from patio to raised beds, or a planted border that frames a lawn.
- Place “pollinator hubs” every 10–20 feet: Clusters of blooms (or containers) where pollinators can refuel without searching.
- Connect hubs with repeating plants: Repetition looks designed and helps pollinators recognize food sources.
Design tip: Make it look intentional
- Plant in drifts (groups of 3, 5, or 7 of the same plant) instead of one-off specimens.
- Use edging—steel edging, brick, or stone—to keep beds crisp and patio living areas tidy.
- Repeat two to three “signature plants” throughout the route for a cohesive landscape style.
Choose Plants That Bloom in Sequence (Spring Through Fall)
The secret to a thriving pollinator garden is continuous bloom. Aim for at least three strong flowering periods—spring, summer, and fall—so pollinators always have something to eat. Native plants are often the best performers for local pollinators, but a mix of natives and well-behaved ornamentals can still be highly effective and beautiful.
Core planting formula for pollinator landscaping
- 60–70% flowering perennials (nectar + pollen)
- 15–25% shrubs and small trees (structure + early blooms)
- 10–20% grasses/groundcovers (shelter + overwintering habitat)
Spring bloomers (March–May in many climates)
- Eastern redbud (Cercis canadensis): small tree, early nectar; great near patios for light shade.
- Serviceberry (Amelanchier): spring flowers, edible berries, strong multi-season interest.
- Penstemon: hummingbird favorite; thrives in well-drained soil.
- Wild columbine (Aquilegia canadensis): excellent for part shade.
- Creeping phlox (Phlox subulata): colorful groundcover along walkway edges.
Summer bloomers (June–August)
- Bee balm (Monarda): bold color; choose mildew-resistant varieties and give airflow.
- Coneflower (Echinacea): reliable, drought-tolerant once established; seed heads feed birds in winter.
- Black-eyed Susan (Rudbeckia): long bloom, sunny “meadow” feel.
- Blazing star (Liatris): vertical spikes that look fantastic in modern landscape designs.
- Lavender (Lavandula): perfect near patios—fragrant, tidy, and pollinator-loved.
- Catmint (Nepeta): low, billowy, long-blooming; great bed edge plant.
Fall bloomers (September–November)
- Asters (Symphyotrichum): crucial late-season nectar, especially for migrating species.
- Goldenrod (Solidago): not a major allergy culprit (ragweed is); fantastic for late pollinators.
- Sedum/stonecrop (Hylotelephium): sturdy and architectural; pairs well with contemporary patios.
- Joe-Pye weed (Eutrochium): tall, dramatic, best for back-of-bed and rain garden edges.
Shade and part-shade pollinator picks
- Heuchera (coral bells): hummingbirds love the flowers; foliage adds year-round color.
- Solomon’s seal (Polygonatum): graceful form, spring blooms, low maintenance.
- Hydrangea (choose pollinator-friendlier types): look for lacecap forms with accessible florets.
- Foamflower (Tiarella): woodland charm and spring nectar.
Design the Pathway Like an Outdoor Room
A pollinator pathway should feel comfortable for people too. The best outdoor living spaces invite you to linger—morning coffee, weekend grilling, autumn evenings by the fire pit—while the planting design provides a living backdrop.
Layouts that work in real yards
- Patio-to-garden container chain: Use large planters near seating, then repeat the same plants in beds to “lead” the eye outward.
- Border loop around the lawn: A 4–8 foot deep perimeter bed creates a clear pathway for pollinators and a strong landscape frame.
- Side-yard passage: Transform a utilitarian corridor with stepping stones, trellises, and narrow pollinator beds (18–30 inches wide).
- Meadow pocket: Convert a sunny corner into a mini-meadow with mown edges for a polished look.
Hardscape and material recommendations
- Paths: decomposed granite (DG) for a natural look; crushed stone for budget-friendly drainage; large-format pavers for modern patio design.
- Edging: powder-coated steel edging for clean lines; brick for traditional charm; natural stone for organic landscapes.
- Mulch: shredded hardwood mulch for beds; avoid dyed mulches if you’re aiming for a more natural, pollinator-friendly landscape.
- Raised beds: cedar or composite lumber; pair with gravel or pavers to keep mud off patio transitions.
Furniture that supports the experience (and the design)
- Seating: a weather-resistant lounge chair or small bistro set placed near fragrance plants like lavender, thyme, or night-blooming nicotiana.
- Dining area: choose easy-clean materials (powder-coated aluminum, teak, or HDPE) if flowering plants drop petals or attract happy buzzing visitors.
- Shade: patio umbrellas, pergolas, or shade sails help you enjoy peak bloom season without baking in full sun.
- Lighting: warm, low-glare path lights or string lights; reduce harsh nighttime lighting that can disrupt beneficial insects.
Add Habitat Features: Water, Shelter, and Nesting Spots
Pollinators need more than flowers. A complete pollinator pathway includes micro-habitats that are easy to integrate into patio and garden design.
Easy habitat upgrades
- Water source: a shallow dish with stones for landing, refreshed daily in summer; or a small recirculating fountain near the patio for ambiance.
- Bee nesting areas: leave a small patch of bare, well-drained soil for ground-nesting bees; avoid heavy mulch everywhere.
- Overwintering habitat: let some stems and seed heads remain through winter for beneficial insects and birds.
- Windbreak: shrubs or a trellis help pollinators forage more comfortably and create privacy for outdoor living spaces.
Climate, Seasonal Timing, and Maintenance That Fits Real Life
A pollinator-friendly garden should be manageable. The smartest approach is matching plants to your climate zone and creating a maintenance rhythm that aligns with the seasons.
Climate considerations
- Hot/dry regions: prioritize drought-tolerant pollinator plants like lavender, salvia, yarrow, penstemon, and native grasses; install drip irrigation for deep, efficient watering.
- Humid climates: space plants for airflow, choose disease-resistant varieties (especially monarda), and use mulch to prevent soil splash.
- Cold winters: focus on hardy perennials and shrubs; keep seed heads for winter interest and wildlife support.
- Coastal/windy sites: add salt-tolerant natives and sturdy shrubs; use windbreak plantings to protect patio seating areas.
Seasonal maintenance plan
- Spring: cut back perennials after temperatures consistently warm (many beneficial insects overwinter in stems); top-dress compost; refresh mulch lightly.
- Summer: deadhead select plants for continuous bloom; water deeply 1–2x/week (more for containers); watch for aphids and treat gently (hose spray, insecticidal soap if needed).
- Fall: plant perennials and shrubs for strong root establishment; add asters/sedum for late nectar; reduce cleanup to keep habitat.
- Winter: leave structure; evaluate what bloomed when; plan additions for early spring nectar next year.
Budget ranges: what to expect
- Starter pathway ($150–$500): 3–6 large containers, potting mix, a curated set of nectar plants, and a shallow water dish.
- Mid-range yard upgrade ($600–$2,000): new bed edging, 20–40 perennials, 3–7 shrubs, mulch, and a simple gravel/DG path extension.
- Full outdoor living integration ($2,500–$10,000+): expanded patio or paver walkway, lighting, irrigation upgrades, layered planting design, and feature elements like a fountain or pergola.
Common Mistakes to Avoid
- Planting single “specimens” everywhere: Pollinators find clusters more efficiently, and drifts look more professional in landscape design.
- Only planting summer bloomers: Skipping spring and fall blooms creates a feast-or-famine cycle.
- Overmulching every inch: Ground-nesting bees need access to soil; leave small open patches.
- Relying on double-flowered varieties: Many have less accessible nectar/pollen. Mix in single-flower forms.
- Using broad-spectrum pesticides: Even “quick fixes” can harm beneficial insects. Start with cultural controls and targeted treatments.
- Ignoring scale near the patio: Tall plants can block views or crowd seating; place big growers at the back or along fences.
FAQ: Designing a Pollinator Pathway
How big does a pollinator pathway need to be?
It can be small. A sequence of 3–5 planters on a patio plus one border bed is enough to create a functional “route.” Consistent blooms and plant repetition matter more than total size.
Do I have to use only native plants?
No, but natives are often the easiest way to support local pollinators. A practical approach is mostly native perennials and shrubs, with a few ornamental favorites (like lavender) that behave well and provide nectar.
What are the best plants for pollinators near a patio?
Look for tidy, fragrant, long-blooming options: lavender, catmint, salvia, coneflower, and sedum. Add herbs like thyme, oregano, and basil in containers for patio living that’s both beautiful and useful.
How do I keep the space looking neat and not “wild”?
Use clear edges, defined paths, and repetition. A mown border around meadow-style planting, steel edging, and consistent mulch instantly makes pollinator landscaping look intentional.
Will attracting pollinators bring more stinging insects?
You may see more bees, but they’re typically focused on foraging, not bothering people. Place the highest-bloom clusters a few feet away from high-traffic doorways, and keep sugary drinks covered during peak activity.
What’s the lowest-maintenance way to start?
Choose 6–10 tough perennials suited to your sun exposure, plant in drifts, mulch lightly, and add a simple water dish. Expand season by season as you learn what thrives in your yard.
Next Steps: Build Your Pathway One “Hub” at a Time
Start where you already spend time—right outside the door. Add a pair of large planters with long-blooming pollinator favorites, then extend the route with a border bed or stepping-stone path leading to a second planting hub. Within a season, you’ll notice more color, more movement, and a backyard that feels designed for both people and nature.
- Pick your pathway spine (patio edge, side-yard path, or perimeter bed)
- Select plants for spring + summer + fall bloom
- Plant in clusters and repeat signature plants for a cohesive landscape design
- Add water and a little shelter for a complete habitat
- Keep it livable: define edges, manage height near seating, and plan for year-round outdoor living
For more inspiring, practical ideas to elevate your patio living, garden design, and outdoor spaces, explore more guides and trends on thedecormag.com.
More Articles
 How to Create a Potager Garden - The Decor Mag
 How to Design a Rooftop Terrace - The Decor Mag
 Outdoor Kitchen Electrical Planning Guide - The Decor Mag
 Outdoor Kitchen Storage Cabinet Guide - The Decor Mag
 Pergola vs Awning vs Sail Shade: Best Patio Shade (2026)
 Garden Room and Greenhouse Design - The Decor Mag
 Outdoor Pavilion and Cabana Structures - The Decor Mag
 Best Outdoor Bar Chip and Dip Station - The Decor Mag
 Outdoor Sink and Prep Station Ideas - The Decor Mag
 Best Outdoor Serving Cart Options - The Decor Mag