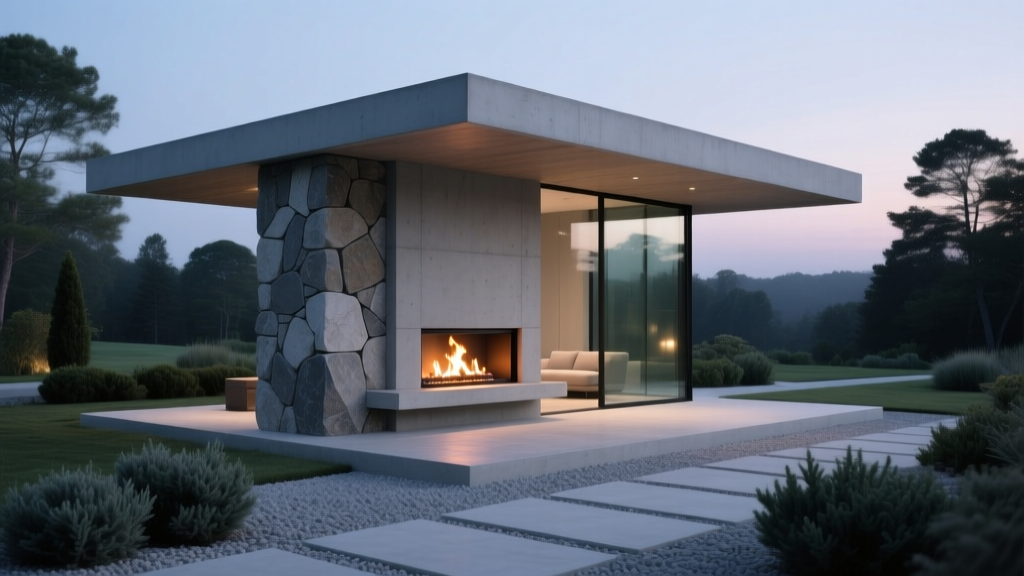
Outdoor Pavilion Fireplace Insert - The Decor Mag
An outdoor pavilion is already a strong move for better patio living—instant shelter, structure, and a “destination” feeling in the yard. Add a fireplace insert, and the space shifts from occasional hangout to true year-round outdoor living. A well-planned pavilion fireplace becomes the anchor for seating, lighting, and landscaping, turning your backyard into a place you’ll actually use on chilly evenings, windy days, and shoulder seasons when patios often sit empty.
Beyond warmth, a fireplace insert adds architecture. It creates a focal point that helps organize layout, improves flow from the house, and elevates the whole outdoor living space with cozy ambiance. It also increases the sense of permanence—more like an outdoor room than a temporary setup—while offering a safer, cleaner alternative to open fire pits when installed correctly.
This guide breaks down how to choose the right outdoor fireplace insert, how to design your pavilion around it, what materials last outdoors, which plants work nearby, and what homeowners typically get wrong. You’ll walk away with practical layouts, product-level material ideas, and budget ranges that fit everything from a simple patio upgrade to a fully built outdoor kitchen + pavilion combo.
Why Choose a Fireplace Insert for an Outdoor Pavilion?
A fireplace insert (gas, electric, or wood-burning insert designed for outdoor use) gives you a built-in, controlled fire feature that feels integrated—unlike a freestanding fire bowl that can look like an afterthought.
Key benefits for outdoor living spaces
- Extended seasons: Enjoy spring and fall evenings, plus winter days in mild climates.
- Defined focal point: Improves furniture placement and makes your pavilion feel intentional.
- Cleaner, more controllable fire: Especially with gas inserts—less smoke, fewer sparks, easier start/stop.
- Elevated resale appeal: Built-in outdoor fireplaces are a high-value patio upgrade in many markets.
- Better wind performance: A properly designed fireplace wall blocks wind and traps warmth more effectively than open fire pits.
Choosing the Right Outdoor Fireplace Insert
The best insert depends on how you live outside: Do you want quick ambiance, serious heat, or a traditional crackle? Also consider local building codes, fuel access, and how “hands-on” you want to be with maintenance.
Fuel types: gas vs. wood vs. electric
Gas fireplace inserts (natural gas or propane)
- Best for: Frequent use, easy operation, clean burning, modern outdoor pavilions.
- Pros: Instant ignition, adjustable flame, minimal smoke/ash, compatible with TV/lounge setups.
- Cons: Requires gas line or propane storage; professional installation strongly recommended.
- Design tip: Choose a burner with realistic media (ceramic logs or high-quality fire glass) for a premium look.
Wood-burning outdoor inserts
- Best for: Traditionalists, rustic landscaping, cabins, and homeowners who love real wood fires.
- Pros: Authentic sound and aroma, high heat output in the right design.
- Cons: More smoke management, ash cleanup, wood storage, and stricter clearance rules.
- Design tip: Plan a dedicated wood nook (dry, elevated, and covered) integrated into the fireplace base.
Electric inserts (outdoor-rated)
- Best for: Covered pavilions where flames are more about ambiance than heat, or where gas/wood isn’t feasible.
- Pros: Easy installation, low maintenance, no venting in many models, consistent performance.
- Cons: Less heat output; requires weather-protected power and a properly rated unit.
- Design tip: Pair with infrared overhead heaters if you want true cold-weather comfort.
Size, heat output, and proportion
Scale matters. A fireplace that’s too small looks lost on a pavilion wall; too large overwhelms seating and can create uncomfortable radiant heat at close range.
- Typical insert widths: 30"–60" for most residential pavilions.
- General rule: The fireplace opening (or visible flame area) should feel centered and proportional to the main seating zone—not the whole pavilion footprint.
- Heat planning: For chilly climates, prioritize a setup that blocks wind and positions seating 6–10 feet from the fire (depending on output and comfort).
Outdoor safety and code essentials
Local codes vary, so consult a licensed contractor and confirm requirements for setbacks, chimney height, venting, and combustible clearances.
- Use outdoor-rated inserts and components (including venting/chase materials where applicable).
- Confirm clearances from pavilion posts, beams, and ceiling materials.
- Plan for spark protection and ember control with wood-burning units.
- Integrate carbon monoxide awareness for covered structures—especially in tighter pavilions.
Designing Your Pavilion Around the Fireplace
The insert is the anchor, but the layout determines whether the space feels inviting or awkward. Treat the pavilion like an outdoor living room: focal point, conversation zone, lighting, and circulation.
Best layouts for comfort and flow
- Classic lounge layout (most popular): Fireplace on the back wall, sofa facing it, two lounge chairs angled in, coffee table centered.
- U-shaped conversation pit: Sectional + two chairs for larger pavilions; keeps sightlines to the fire while seating 6–10.
- Dining + fire combo: Fireplace on a side wall with a dining table centered; great for fall dinners and holiday gatherings.
- Outdoor kitchen pavilion: Fireplace on a “soft seating” end to balance grills and appliances; use the fire feature to soften the utility feel.
Furniture recommendations that pair well with a fireplace
Choose materials that handle heat, ash (for wood), and seasonal moisture. For outdoor design longevity, avoid indoor fabrics and untreated metals.
- Seating frames: Powder-coated aluminum (low maintenance), teak (weathers beautifully), or high-quality all-weather wicker (in shaded pavilions).
- Cushions: Solution-dyed acrylic fabrics (look for outdoor performance lines similar to Sunbrella-type textiles).
- Tables: Concrete composite, stone-top, or powder-coated metal coffee tables; avoid cheap painted steel near heat.
- Rugs: Polypropylene outdoor rugs to define the seating zone—easy to hose off after soot or pollen season.
Comfort tip: For true year-round patio living, add a storage bench or deck box nearby for throws, fire tools, and cushion covers.
Material palette: what holds up outdoors
Your fireplace surround and pavilion finishes should be selected like exterior architecture—UV, freeze-thaw cycles, and water management all matter.
- Fireplace surround: Natural stone (granite, bluestone, limestone), manufactured stone veneer (rated for exterior), or brick for timeless style.
- Hearth and floor: Porcelain pavers (low absorption), natural stone, or broom-finished concrete; consider a darker tone to hide soot.
- Mantel options: Stone slab, concrete mantel, or steel; if using wood, choose rot-resistant species (teak, ipe) and keep it outside required clearances.
- Pavilion ceiling: Tongue-and-groove cedar or fiber cement panels; keep finishes vent-friendly if required by your fireplace design.
Landscaping Around an Outdoor Pavilion Fireplace
Great landscaping makes your pavilion feel “placed” rather than dropped onto a patio. Around fireplaces, the trick is choosing plants that can handle heat, occasional dryness, and foot traffic while staying safe and low-litter.
Plant choices that complement outdoor fireplaces
Use these as a starting point; match selections to your hardiness zone and sun exposure.
- Evergreen structure: Boxwood (in milder climates), inkberry holly, or dwarf yaupon holly for clean lines and year-round greenery.
- Ornamental grasses: Blue fescue, little bluestem, or feather reed grass for movement (place away from direct flame and manage seasonal cutback).
- Pollinator-friendly perennials: Lavender, salvia, catmint, and coneflower (great for sunny patios and drought tolerance).
- Shade-friendly options near covered edges: Hostas, heuchera (coral bells), and ferns for softer woodland styling.
- Low-litter groundcovers: Creeping thyme (sun), liriope (partial shade), or sedum for edges and joints.
Placement tip: Keep plants that dry out into “fuel” (like some grasses) away from the firebox and ember zones, and use gravel or stone mulch near the hearth for cleaner maintenance.
Hardscape edges, lighting, and ambiance
- Pathways: A 36"–48" wide path from the house to the pavilion helps it feel like a true outdoor room.
- Lighting layers: Combine dimmable overhead lights, wall sconces on the fireplace wall, and low-voltage landscape lights along beds and paths.
- Wind comfort: Add a low stone garden wall or hedging on the windward side for a calmer, warmer seating zone.
Climate & Seasonal Considerations for Year-Round Use
A pavilion fireplace insert can be a four-season upgrade—if you plan for weather reality where you live.
Cold and snowy climates
- Use freeze-thaw durable materials (porcelain pavers, properly installed natural stone, exterior-rated mortar and grout).
- Plan for snow shedding and drainage so meltwater doesn’t pool at the hearth.
- Consider wind blocking (partial walls, outdoor curtains rated for weather, or strategic evergreen planting).
- Store cushions and throws in weather-tight storage to prevent mildew.
Hot, sunny climates
- Choose UV-stable fabrics and lighter color palettes to reduce heat gain.
- Use heat-reflective surfaces for surrounding hardscape (light porcelain pavers, pale stone) to avoid a “heat island.”
- Consider a ceiling fan (outdoor-rated) and cross-breezes; you’ll use the pavilion more even without the fireplace.
Coastal or humid regions
- Prioritize stainless steel hardware and marine-grade fasteners.
- Avoid cheap steel furniture; choose powder-coated aluminum and quick-dry cushions.
- Use mildew-resistant outdoor textiles and ventilated storage solutions.
Maintenance Checklist: Keep It Beautiful and Safe
A little routine care protects your investment and keeps your outdoor fireplace performing properly.
- Weekly (during peak season): Wipe soot/dust, shake out rugs, and check ignition performance (gas).
- Monthly: Inspect surround joints, clean fire media (gas), and remove debris from around vents and air intakes.
- Seasonally: Deep clean hardscape, seal stone if recommended, wash cushions, and touch up finish on exposed metal.
- Annually: Professional inspection for gas lines/valves or chimney/venting (especially for wood-burning setups).
Pro tip: Install a dedicated, outdoor-rated outlet and a discreet service access panel for the insert. Future repairs become far simpler.
Budget Ranges: What an Outdoor Pavilion Fireplace Insert Project Costs
Costs vary widely based on pavilion size, fuel type, finishes, and whether you’re building new or retrofitting an existing structure.
- Budget-friendly upgrade ($2,500–$7,500): Small outdoor-rated insert (often propane or electric), simple surround, minimal stonework, existing pavilion or covered patio.
- Mid-range build ($8,000–$20,000): Gas insert with professional line install, stone veneer surround, upgraded hearth, quality seating, and basic landscape lighting.
- High-end outdoor room ($20,000–$60,000+): Large custom pavilion + premium insert, full masonry chimney or venting system, built-ins, outdoor kitchen elements, layered landscaping, and integrated audio/lighting.
Common Mistakes to Avoid
- Ignoring clearances and ventilation: A pavilion is a structure—treat fire features with real engineering and code compliance.
- Placing seating too close: A fireplace should invite people in, not force them to back away from heat.
- Skipping wind planning: Wind steals warmth and blows smoke; add a wall, hedge, or screens on the prevailing wind side.
- Choosing indoor materials outdoors: Interior drywall, non-rated adhesives, and cheap metals fail quickly in weather.
- Overloading the space: A pavilion needs circulation. Keep at least 30"–36" pathways around main seating.
- No storage strategy: Without cushion and tool storage, the space looks messy and gets used less.
FAQ: Outdoor Pavilion Fireplace Inserts
Do I need a chimney for an outdoor fireplace insert?
It depends on the insert type and manufacturer requirements. Many gas inserts use specific venting systems, while wood-burning inserts typically require a properly designed chimney. Electric inserts generally don’t require a chimney, but must be outdoor-rated and installed with weather-safe electrical provisions.
Can I put a TV above an outdoor pavilion fireplace?
Often yes, but it requires careful planning for heat and moisture. Use a non-combustible surround, follow the fireplace manufacturer’s clearance specs, and consider a mantel or heat deflector. Choose an outdoor-rated TV cabinet or a weatherproof cover for year-round protection.
What’s the best surround material for an outdoor fireplace?
Natural stone, exterior-rated manufactured stone veneer, and brick are reliable choices for outdoor design durability. For a cleaner modern look, consider large-format porcelain slabs or smooth stucco over an exterior-rated substrate—installed by a pro who understands expansion and moisture management.
Is gas or wood better for an outdoor pavilion fireplace?
Gas is typically best for convenience, cleanliness, and frequent use. Wood is best for traditional ambiance and high-heat fires—if you’re willing to manage smoke, ash, and wood storage. Your climate, neighbors, and local burn regulations should guide the decision.
How far should furniture be from an outdoor fireplace?
Aim for a comfortable “warmth zone” of roughly 6–10 feet from the fire area for most setups, adjusting based on heat output, wind, and seating height. Always maintain manufacturer-required clearances and keep traffic paths out of the hottest radiant zone.
What plants should I avoid near an outdoor fireplace?
Avoid highly resinous, very dry, or overly flammable plantings right next to the hearth area. Keep ornamental grasses, dry mulch, and low-branching shrubs away from ember zones, and use gravel or stone mulch closest to fire features for cleaner, safer landscaping.
Next Steps: Plan Your Pavilion Fireplace Like a Pro
Start by measuring your pavilion and sketching a simple layout with the fireplace as the focal point. Decide on fuel type based on your lifestyle, then choose a durable surround material that matches your home’s exterior and your patio design. Finish the space with weather-ready furniture, layered lighting, and landscaping that adds softness without creating extra maintenance.
If you’re ready to move forward, your best next action is to:
- Confirm local codes and consult a licensed installer for the insert type you want.
- Choose your layout (lounge, dining, or combo) and map clear walking paths.
- Select exterior-rated materials and a plant palette that looks great in every season.
For more outdoor living ideas, patio inspiration, and expert landscaping tips, explore the latest guides and design features on thedecormag.com.
More Articles
 Best Outdoor Ceiling Fan for Covered Patios - The Decor Mag
 Outdoor Living Essentials on a Budget: Smart, Stylish, and Sustainable Solutions
 How to Design a Hummingbird Garden - The Decor Mag
 How to Incorporate Water Features Outdoors - The Decor Mag
 Best Outdoor Bar Garnish Tray Ideas - The Decor Mag
 How to Create a Bat Friendly Garden - The Decor Mag
 How to Design a Cottage Core Garden - The Decor Mag
 Best Outdoor Loveseat Options - The Decor Mag
 Best Outdoor Nesting Chair Sets - The Decor Mag
 Best Outdoor Bar Tool Storage Ideas - The Decor Mag