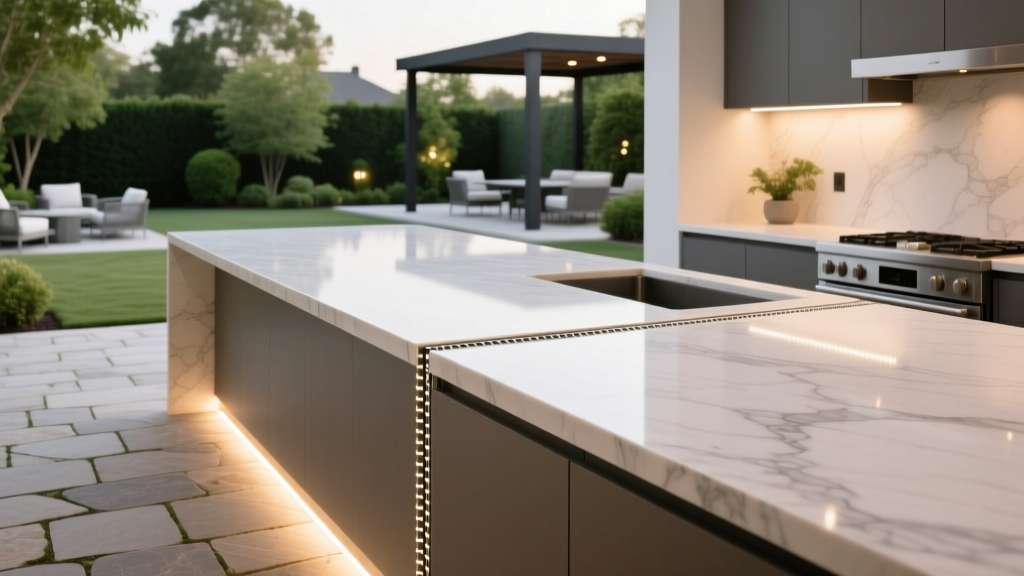
Outdoor Kitchen Countertop Expansion Joints - The Decor Mag
An outdoor kitchen is one of the most satisfying upgrades you can make to a patio or backyard: it turns casual grilling into a true outdoor living room, extends entertaining season, and adds real value to your home. But nothing disrupts that “resort-at-home” feeling faster than a cracked countertop, a separated seam, or tiles popping loose after the first freeze or heat wave.
That’s where outdoor kitchen countertop expansion joints come in. They’re not the flashy part of a patio design, yet they’re one of the most powerful details for protecting your investment—especially when your outdoor kitchen sits in full sun, near a fire feature, or on a slab that moves with seasonal moisture changes. Done well, expansion joints are nearly invisible, easy to maintain, and they help your countertop look flawless year after year.
If you’re planning a new outdoor kitchen, upgrading an existing BBQ island, or troubleshooting cracks, this guide breaks down what expansion joints do, where they belong, which materials work best outdoors, and how to coordinate the detail with your layout, finishes, and landscaping for a polished, durable backyard cooking zone.
What Expansion Joints Do (and Why Outdoor Countertops Need Them)
Outdoor countertops expand and contract with temperature swings, UV exposure, and moisture. Concrete grows and shrinks; tile assemblies shift; metal frames move; even natural stone can transmit stress when it’s locked tightly against a wall or another slab. An expansion joint is a planned flexible gap that absorbs movement so the countertop doesn’t crack, tent, or shear at weak points.
Typical signs your outdoor kitchen needs better movement control
- Hairline cracks radiating from corners, sink cutouts, or appliance openings
- Cracked grout lines, especially where the counter meets a vertical surface (backsplash, stucco wall, stone veneer)
- Tile “tenting” (tiles lifting at seams) after freeze-thaw cycles
- Separated seams in concrete or stone, or a persistent gap that collects water
- Caulk splitting repeatedly at the same location
Where Expansion Joints Belong in an Outdoor Kitchen Countertop
Every outdoor kitchen layout is different, but movement tends to concentrate at specific stress points. Planning joints early also helps you place seams where they look intentional—aligned with appliance edges, modular cabinet breaks, or changes in countertop depth.
High-priority locations for expansion joints
- Where the countertop meets a house wall, stucco, brick, or outdoor fireplace surround (a “perimeter” or “isolation” joint)
- At inside corners (L-shapes, U-shapes, and wrap-around bars are classic crack zones)
- Between separate slabs or pours (concrete countertops and large-format stone pieces)
- Near heat sources such as built-in grills, pizza ovens, and side burners
- At transitions between materials (stone-to-tile, granite-to-concrete, counter-to-vertical backsplash)
- Over long runs (a lengthy straight counter in full sun benefits from planned breaks)
Layout tip: design the joint to “disappear”
For a clean, designer look, align joints with:
- Edges of a grill or sink cutout
- Cabinet module boundaries
- A change in counter height (prep area to bar top)
- A deliberate decorative inlay strip (stainless, brass, or contrasting stone)
Best Expansion Joint Materials for Outdoor Countertops
Outdoor conditions demand flexibility plus UV and weather resistance. The wrong product may look good for one season and then crack, peel, or trap water.
1) High-performance exterior silicone (the go-to choice)
For most outdoor countertop-to-wall joints and countertop seams, a 100% exterior-grade silicone sealant is the most reliable. It stays flexible through hot summers and cold winters, resists UV better than many acrylic caulks, and sheds water.
- Best for: countertop-to-backsplash joints, perimeter joints, changes of plane
- Look: available in clear and colors; can be kept subtle with color matching
- Budget: $10–$25 per tube; most outdoor kitchens use 2–6 tubes depending on layout
2) Polyurethane sealants (tough and flexible, but watch UV exposure)
Polyurethane is durable and sticks well, especially on masonry and concrete. Some formulas can discolor with UV exposure if left fully exposed—choose a product rated for exterior sunlight or place it where it’s shaded.
- Best for: concrete-to-masonry joints, underside seams, sheltered joints
- Budget: $12–$30 per tube
3) Preformed expansion joint strips (professional finish for tile and long runs)
If your outdoor kitchen uses tile or you want a crisp “architectural” line, preformed joint profiles (often used in commercial tile work) deliver consistent spacing and clean edges.
- Best for: tile countertops, long linear joints, contemporary designs
- Look: neat, straight lines; available in metal or PVC profiles
- Budget: $30–$120+ depending on length and finish
4) Flexible grout and “caulked grout lines” (use carefully outdoors)
In wet zones or freeze-thaw climates, standard grout at a change of plane is a common failure point. If you love the uniform look of grout, consider a color-matched flexible sealant made to mimic grout (and confirm it’s exterior-rated).
- Best for: small visual joints in tile work when you want seamless color
- Budget: $12–$30 per tube
Countertop Material Choices That Pair Well with Expansion Joints
Your countertop material affects how many joints you’ll need, where they go, and what they should look like. Here are practical pairings homeowners love for patio living.
Concrete countertops (modern, customizable, movement-sensitive)
- Design approach: plan intentional seams at corners and long spans; avoid trapping concrete against rigid walls
- Best joint style: color-matched silicone in a clean, minimal line; consider a neat reveal detail
- Outdoor tip: use a quality sealer and re-seal as recommended for stain protection and easier cleaning
- Budget range: $70–$140 per sq. ft. installed (varies by finish, thickness, reinforcement, and region)
Porcelain slab or porcelain tile (sleek and durable for year-round outdoor living)
- Design approach: porcelain is stable, but the assembly moves—joints at changes of plane are essential
- Best joint style: preformed profiles for long runs, flexible sealant at corners and perimeter
- Outdoor tip: choose frost-rated porcelain and exterior-rated setting materials
- Budget range: $60–$150 per sq. ft. installed (slabs tend higher)
Natural stone (granite, quartzite, soapstone)
- Design approach: fewer seams if you use larger pieces; still plan isolation joints at walls and around heat sources
- Best joint style: color-matched exterior silicone; keep water from sitting in seams
- Outdoor tip: consider honed finishes for a relaxed patio aesthetic and better scratch camouflage
- Budget range: $50–$120 per sq. ft. installed
Stainless steel (great near the grill; hides movement smartly)
- Design approach: ideal as an insert around the grill zone paired with stone or concrete elsewhere
- Best joint style: gasketed edges or discreet silicone joints; allow metal to expand freely
- Outdoor tip: choose marine-grade or high-quality stainless for coastal climates
- Budget range: $80–$200+ per sq. ft. installed
Climate Considerations: Designing for Heat, Freeze-Thaw, and Coastal Air
Outdoor kitchens live at the mercy of weather. The right expansion joint strategy depends on your climate as much as your design taste.
Hot, sunny climates
- Prioritize UV-resistant silicone to prevent cracking and chalking.
- Add shade with a pergola, shade sail, or roof extension to reduce thermal stress on counters.
- Consider lighter countertop colors to reduce heat absorption (also more comfortable for bare forearms while prepping).
Freeze-thaw climates
- Keep water out of seams: use a properly tooled sealant joint and maintain it annually.
- Choose frost-rated porcelain and exterior adhesives if tiling.
- Avoid “flat” seams that become tiny gutters—detail joints so water sheds away.
Coastal and high-humidity areas
- Use corrosion-resistant materials (high-grade stainless, sealed stone).
- Pick sealants rated for humid conditions and mold resistance.
- Rinse counters periodically to remove salt residue and reduce surface wear.
Design Recommendations: Make Expansion Joints Look Intentional
Expansion joints don’t have to read as “construction.” With a few design moves, they become part of a refined outdoor kitchen aesthetic.
Furniture and layout pairings for a polished patio
- Modular seating: Place a lounge set perpendicular to the kitchen run to keep traffic from brushing the joint line near corners.
- Bar seating: If you have a raised bar top, use the height change as a natural break line for an expansion joint seam.
- Prep-to-grill triangle: Keep your sink and prep zone on one run, grill on another; place a joint at the corner transition to manage stress.
Planting ideas to soften hardscape and protect finishes
Landscaping can help your outdoor kitchen feel integrated while also improving comfort and reducing temperature extremes.
- Near a pergola: Train vines like star jasmine (warm climates) or clematis (many regions) to create dappled shade over counters.
- Fragrant, functional herb planters: rosemary, thyme, basil, and chives in raised containers near the prep zone (great for year-round outdoor living in mild climates).
- Heat-tolerant border plants: lavender, salvia, or ornamental grasses to soften the edge of a patio kitchen and visually downplay seams.
- Freeze-thaw friendly options: boxwood, dwarf conifers, sedum, and hardy grasses to keep structure in winter.
Material coordination tips
- Match sealant color to the dominant countertop tone for an invisible joint.
- For modern designs, choose a deliberate contrast (charcoal joint line on pale concrete) and align it with appliances for a crisp grid.
- If your outdoor kitchen has stone veneer, keep a consistent reveal line between counter and veneer rather than forcing tight contact.
Maintenance: Keep Joints Clean, Flexible, and Leak-Free
Expansion joints are low-maintenance, not no-maintenance. A little seasonal care prevents water intrusion and extends the life of your patio kitchen.
Simple seasonal maintenance checklist
- Spring: Wash counters with a gentle cleaner; inspect joints for splits, gaps, or peeling at edges.
- Summer: Check joints on sun-baked sides; confirm sealant hasn’t shrunk or pulled away.
- Fall: Clear leaves and debris that trap moisture at seams; reseal small areas before winter rain.
- Winter: Avoid harsh de-icers near the kitchen base; keep standing water from pooling at seams.
Cleaning tips that won’t damage joints
- Use pH-neutral cleaners for stone and sealed concrete.
- Avoid stiff metal brushes on sealant lines.
- Rinse thoroughly after using any soap to reduce residue buildup near seams.
Common Mistakes to Avoid
- Grouting changes of plane: Grout at the countertop-to-backsplash seam often cracks outdoors. Use a flexible joint instead.
- No backer rod in deep joints: Overfilling sealant can lead to premature failure. Use backer rod to control joint depth and improve flexibility.
- Sealing over wet surfaces: Moisture trapped under sealant can cause adhesion loss and mold staining.
- Placing seams randomly: A poorly placed joint looks like a mistake. Align joints with appliance edges or module breaks for a built-in look.
- Ignoring heat zones: Counters tight to grills and pizza ovens need extra movement planning to prevent cracking and discoloration.
- Skipping annual inspections: Tiny gaps become water pathways—especially in freeze-thaw regions—leading to bigger repairs.
Budget Ranges: What to Expect for Expansion Joint Work
Costs vary by region, countertop material, and whether you’re building new or repairing an existing outdoor kitchen.
- DIY refresh (re-caulking a few seams): $30–$150 for materials and tools
- Professional reseal and joint repair (average outdoor kitchen): $250–$900 depending on access and condition
- Tile assembly repairs (resetting loose tiles + new movement joints): $600–$2,500+
- Major countertop repair or replacement due to cracking/water damage: $2,000–$10,000+ depending on size and material
FAQ: Outdoor Kitchen Countertop Expansion Joints
How wide should an outdoor countertop expansion joint be?
Many outdoor countertop joints land in the 1/8-inch to 3/8-inch range depending on the materials and the size of the run. The best width for your project depends on expected movement, exposure (full sun vs. covered patio), and whether the joint is a perimeter joint or a seam between slabs.
Can I use regular interior caulk for my outdoor kitchen countertop?
No—interior acrylic caulks tend to shrink, crack, and break down in UV and weather. Choose an exterior-rated 100% silicone or another sealant specifically approved for outdoor exposure, temperature swings, and moisture.
Do concrete outdoor countertops always need expansion joints?
Concrete moves and can crack, so movement planning is smart on nearly every outdoor kitchen. Whether that’s a true expansion joint, a control joint, or a planned seam depends on the design. Corners, long runs, and countertop-to-wall transitions are the most critical areas.
What’s the difference between a control joint and an expansion joint?
A control joint encourages cracking to occur in a planned line (common in slabs). An expansion joint is a flexible separation that allows movement between two elements without cracking. Outdoor kitchens often use flexible expansion/isolation joints at perimeters and changes of plane.
How often should I replace the sealant in outdoor countertop joints?
Many homeowners get 3–10 years depending on sun exposure, climate, and product quality. Inspect yearly. If you see gaps, splitting, or peeling edges, it’s time to replace that section before water gets underneath.
Will expansion joints ruin the look of my outdoor kitchen?
Not when they’re planned. Color-matched sealants and clean joint lines can be nearly invisible, and modern designs often use joints as intentional “reveal” details aligned with grills, sinks, or bar-top transitions.
Next Steps: Build a Countertop That Survives Real Outdoor Living
If you’re designing or renovating an outdoor kitchen, walk your layout and mark the likely stress points: corners, long runs, wall connections, and heat zones. Choose a countertop material that fits your cooking style and climate, then specify exterior-rated expansion joint products that will stay flexible through summer heat, winter freezes, and everything in between. For existing kitchens, start with a joint inspection this weekend—small repairs now can prevent major countertop replacement later.
For more expert ideas on outdoor kitchens, patio living, landscaping, and year-round backyard upgrades, explore the latest inspiration at thedecormag.com.
More Articles
 How to Design a Shade Tolerant Border - The Decor Mag
 Best Outdoor Side Car Cart Bar Ideas - The Decor Mag
 Best Outdoor Ice Bucket Station Ideas - The Decor Mag
 Outdoor Pavilion Fireplace Insert - The Decor Mag
 How to Create a Cut Flower Garden - The Decor Mag
 Outdoor Pergola Integrated Speaker System - The Decor Mag
 Outdoor Shower Design Ideas - The Decor Mag
 Best Bedroom Inspiration for Cozy: Science-Backed Design Strategies That Warm Your Space and Improve Sleep
 Best Outdoor Serving Cart Options - The Decor Mag
 How To Clean Living: A Practical Guide to Healthier Outdoor Spaces and Sustainable Habits