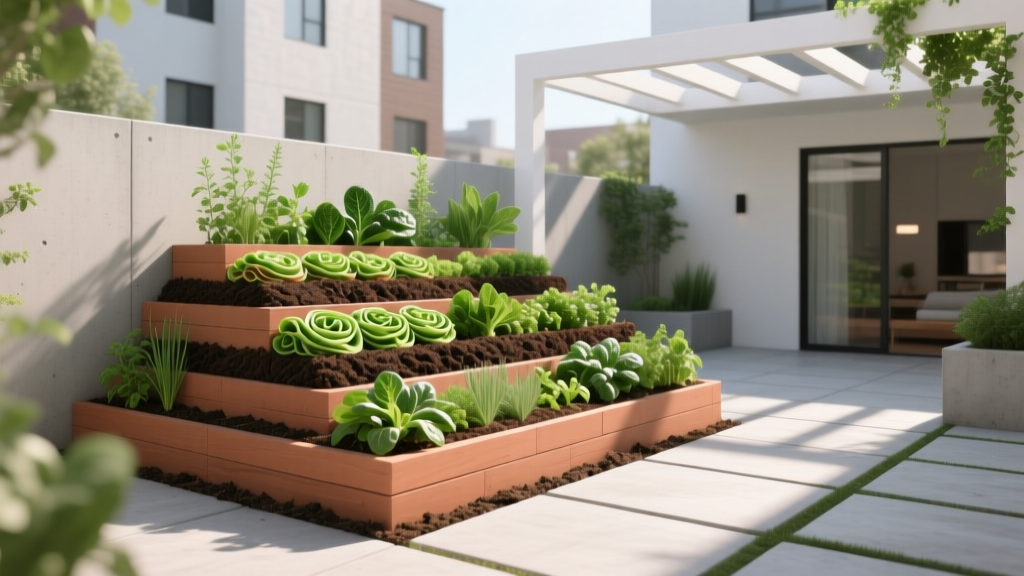
How to Create a Lasagna Garden Bed - The Decor Mag
A great outdoor living space isn’t just about the patio furniture or the fire pit—it's about the feeling you get when you step outside. A lush, productive garden bed can turn an ordinary yard into a layered, sensory retreat: fragrance, color, pollinators, and the satisfaction of harvesting something you grew yourself. If you’ve been craving a more vibrant landscape but feel intimidated by digging, soil testing, or expensive amendments, a lasagna garden bed is your shortcut to a healthier, more beautiful yard.
Also called “sheet mulching,” lasagna gardening builds soil the same way a forest floor does—layer by layer. You stack browns (carbon) and greens (nitrogen), top it off with compost, and let nature do the heavy lifting. The result is a deep, moisture-retentive, nutrient-rich bed that can elevate everything from a kitchen garden near the patio to a pollinator border framing your outdoor dining zone.
Whether you want a low-maintenance landscaping upgrade, a more sustainable outdoor design approach, or a budget-friendly way to improve poor soil, this method checks all the boxes. Let’s build a bed that looks intentional, performs beautifully, and supports year-round outdoor living.
What Is a Lasagna Garden Bed (and Why Homeowners Love It)
A lasagna garden bed is made by layering organic materials—like cardboard, leaves, grass clippings, compost, and straw—into a planting area. Over time, these layers break down into rich soil. You can build directly on top of lawn, compacted dirt, or an existing garden area.
Key benefits for outdoor living and landscaping
- No digging required: Ideal for homeowners who want a quick landscape refresh without heavy labor.
- Better moisture retention: Less watering—especially helpful for sunny patios and heat-reflective hardscapes.
- Fewer weeds: Cardboard and thick mulch suppress weed growth naturally.
- Healthier plants: Gradually decomposing layers feed your garden over time.
- Budget-friendly: Many materials can be sourced from your yard, neighbors, or local arborists.
Plan Your Bed Like a Designer: Location, Shape, and Layout
Before you gather materials, treat your lasagna bed as part of your overall outdoor design. The best gardens feel integrated with the patio, pathways, lighting, and seating—not like an afterthought.
Choose the right location
- Sunlight: Most vegetables and flowering annuals need 6–8 hours of sun. Herbs can handle 4–6 hours.
- Convenience: Place edible beds near the kitchen door, grill area, or outdoor dining space so you’ll actually use them.
- Water access: Keep the bed within reach of a hose bib or plan for drip irrigation.
- Drainage: Avoid low spots where water collects; raised edges help in heavy-rain climates.
Size and shape recommendations
- Beginner-friendly size: 4 ft x 8 ft is a classic, manageable footprint.
- Easy reach: Keep beds 3–4 feet wide so you can reach the center from either side.
- Design-forward shapes: Curved beds soften hard patio lines; rectangular beds look crisp and modern.
Edging that elevates your landscape
Edging makes a lasagna bed look intentional and keeps materials tidy—especially important near patios and outdoor seating.
- Steel edging (modern): Clean lines, long-lasting. Great for contemporary patio living.
- Natural stone (timeless): Complements outdoor fireplaces and paver patios.
- Cedar boards (warm, classic): Naturally rot-resistant and easy to DIY.
- Composite edging (low-maintenance): Stands up well in wet climates.
Budget range: $0–$50 for simple cardboard + mulch with minimal edging; $150–$600 for a defined, finished look with quality edging and delivered compost.
Materials Checklist: What You Need (and What to Avoid)
Lasagna gardening is all about the right mix of “browns” and “greens.” Aim for roughly 2 parts browns to 1 part greens by volume.
Browns (carbon-rich layers)
- Plain cardboard (remove tape and labels as much as possible)
- Shredded non-glossy paper
- Dried leaves
- Straw (not hay—hay contains seeds)
- Untreated wood chips (best as a top layer or path material)
Greens (nitrogen-rich layers)
- Fresh grass clippings (thin layers only)
- Vegetable scraps (bury well to deter pests)
- Coffee grounds
- Manure from herbivores (aged; avoid fresh)
- Green garden trimmings (chopped)
“Finishing” materials for a strong start
- Compost: 2–4 inches on top for planting success.
- Quality topsoil (optional): Helpful if you want to plant immediately.
- Mulch: Straw, shredded leaves, or bark mulch to control moisture and weeds.
Materials to skip
- Glossy magazines or coated paper
- Pet waste (cat/dog)
- Weeds with seed heads or aggressive roots
- Diseased plants
- Black walnut leaves/wood (can inhibit some plants)
Step-by-Step: How to Build a Lasagna Garden Bed
This method works whether you’re building in fall for spring planting (ideal) or building in spring for same-season gardening (still doable with a compost-rich top layer).
1) Mark your bed and prep the site (10–20 minutes)
- Outline the bed using a hose, landscape paint, or stakes and string.
- Mow the area as short as possible.
- If the ground is dry, water lightly to help decomposition begin.
2) Add the weed barrier layer: cardboard
- Lay cardboard over the entire area, overlapping seams by 6–8 inches.
- Wet the cardboard thoroughly so it molds to the ground and stays in place.
Pro tip: Cardboard is the “secret sauce” for a cleaner, more patio-friendly garden because it dramatically reduces weeds without chemicals.
3) Build your layers (the “lasagna”)
Repeat layers until your bed is roughly 12–18 inches tall (it will shrink as it breaks down).
- Layer A (browns): 3–4 inches dried leaves or straw
- Layer B (greens): 1–2 inches grass clippings, chopped greens, or aged manure
- Layer C (compost): 1 inch compost to inoculate with microbes
- Water: Lightly moisten each round of layers like a wrung-out sponge
4) Top with compost (and optional soil) for planting
- Finish with 2–4 inches of compost.
- If planting immediately, add 1–2 inches of topsoil mixed with compost to create a stable seedbed.
5) Mulch and tidy edges
- Add 2–3 inches of straw or shredded leaves for a soft, cohesive look.
- Define the edge with stone, steel, or wood to keep the bed crisp alongside patios and walkways.
Planting Ideas: Make It Beautiful and Useful
Lasagna beds are perfect for “edible landscaping”—a style that blends ornamentals and food plants so the garden looks great from the patio and performs in the kitchen.
Easy, high-impact plants for new lasagna beds
- Herbs: Basil, parsley, cilantro (cool-season), thyme, oregano, chives
- Leafy greens: Lettuce, kale, Swiss chard, spinach
- Fast veggies: Radishes, bush beans, cucumbers on a trellis
- Pollinator favorites: Zinnias, calendula, nasturtiums, lavender (best in well-drained spots)
- Perennial anchors: Rosemary (warm climates), sage, strawberries, asparagus (dedicated bed)
Design layouts that look intentional from the patio
- Kitchen garden grid: Divide a 4x8 bed into 8 squares for a clean, modern raised-bed feel.
- Layered border bed: Tall plants at the back (tomatoes on trellis), midsize herbs in the middle, trailing nasturtiums at the front edge.
- Potager style: Mix flowers and edibles in repeating patterns for a magazine-worthy look.
Recommended garden supports that double as decor
- Black metal trellis panels: Sleek near contemporary patios; great for cucumbers and peas.
- Cedar obelisks: Beautiful focal points for beans or flowering vines.
- Cattle panel arch: Creates a dramatic garden “gateway” near a path or seating nook.
Outdoor Living Add-Ons: Furniture and Lighting Near the Bed
If your lasagna bed sits near a patio or deck, a few thoughtful additions make it feel like a cohesive outdoor room.
- Bench or bistro set: Place a small bench 3–5 feet from the bed so you can enjoy morning coffee among the greenery.
- Weather-resistant materials: Teak, powder-coated aluminum, or all-weather wicker handle splash and soil better than untreated wood.
- Path surfaces: Decomposed granite, pea gravel, or mulch paths keep shoes clean and reduce mud near the patio.
- Low-voltage lighting: Use path lights or warm string lights on a trellis for evening ambiance and safer nighttime harvesting.
Budget range: $100–$300 for a simple bistro set; $300–$900 for a quality bench + lighting + path materials that elevate the entire backyard design.
Seasonal Timing: When to Build for Best Results
Fall (best for low-maintenance success)
- Build after leaf drop using free yard materials.
- By spring, layers are partially decomposed and ready for planting.
- Top with compost again in early spring for a boost.
Spring (works well with a compost-rich top)
- Use finer materials (chopped leaves, finished compost) so the bed settles evenly.
- Plant transplants (tomatoes, peppers, herbs) more easily than tiny seeds.
Summer (possible, but manage heat)
- Build in the evening and water thoroughly.
- Mulch heavily to prevent drying—especially near heat-reflective patios.
Winter (mild climates)
- In warmer regions, winter building sets you up for early spring planting.
- Cover with a tarp during heavy rain if erosion is a concern.
Climate Considerations: Adjust for Your Region
- Hot/dry climates: Use extra browns and a thicker mulch layer (3–4 inches). Consider drip irrigation under mulch for efficient watering.
- Humid/rainy climates: Avoid overly thick green layers that can turn slimy. Add more straw/leaves to improve airflow.
- Cold climates: Build higher (18 inches) to account for settling. Fall building is ideal for spring readiness.
- Coastal areas: Choose salt-tolerant ornamentals near windy patios; use heavier mulch (bark + compost) to prevent blow-away straw.
Maintenance: Keep Your Lasagna Bed Thriving Year-Round
The payoff of sheet mulching is lower maintenance, but a few routines keep the bed productive and attractive.
Simple monthly care
- Check mulch depth and refresh as needed (especially after heavy rain).
- Water deeply, less often—aim for moist, not soggy.
- Pull small weeds early (they’ll be minimal if cardboard coverage was solid).
Seasonal care checklist
- Spring: Add 1–2 inches compost; plant cool-season crops; inspect edges.
- Summer: Mulch again; consider shade cloth for tender greens; keep pathways tidy for clean patio living.
- Fall: Add chopped leaves; plant garlic and cool-season greens; cover bare soil with straw.
- Winter: Leave roots in place; top-dress with compost and leaves; protect with mulch to reduce erosion.
Common Mistakes to Avoid
- Using hay instead of straw: Hay often introduces weeds that quickly take over.
- Skipping water between layers: Dry layers won’t break down efficiently, especially in hot climates.
- Too many greens at once: Thick grass clippings can mat, smell, and slow decomposition. Keep green layers thin and mixed.
- Not overlapping cardboard: Gaps become weed “highways,” especially along edges.
- Planting into unfinished layers without compost: Seeds struggle in chunky material; give them a stable compost/soil top.
- Placing the bed far from where you live outdoors: A garden you don’t see from the patio or kitchen is easy to forget.
FAQ: Lasagna Gardening Questions Homeowners Ask
Do I need to remove grass before building a lasagna garden bed?
No. Mow it low, lay overlapping cardboard, and build layers on top. The grass will break down underneath and feed the bed.
How long does it take for a lasagna bed to turn into soil?
You’ll see noticeable breakdown in 6–12 weeks during warm weather, but full decomposition can take 6–12 months depending on materials, moisture, and climate. Fall-built beds are usually prime by spring.
Can I plant right away?
Yes—top the bed with 3–6 inches of finished compost (or compost + topsoil) and plant transplants. For direct seeding, use a finer compost layer and keep it consistently moist.
Will lasagna gardening attract pests?
If you bury kitchen scraps properly and avoid meat/dairy, pest issues are usually minimal. Use a thick compost cap and mulch, and keep the bed edges tidy near patios.
What’s the best mulch for a lasagna garden bed?
Straw (seed-free) is excellent for vegetable beds; shredded leaves are a great free option; bark mulch looks polished in ornamental beds near outdoor living areas.
How do I keep the bed looking neat next to a patio?
Add defined edging (steel, stone, or cedar), keep mulch even, and install a simple path material (gravel or decomposed granite). A trellis or obelisk also adds structure and makes the bed feel designed.
Next Steps: Build Your Bed, Then Style Your Outdoor Space Around It
Choose a sunny spot, outline a bed shape that complements your patio layout, and gather a balanced mix of browns and greens. Build your layers, top with compost, and plant a blend of herbs, flowers, and easy vegetables that look beautiful from your outdoor seating area. Within a season, you’ll have richer soil, fewer weeds, and a garden that makes your backyard feel more alive.
For more landscaping ideas, patio living inspiration, and outdoor design guides that help you create a yard you’ll love in every season, explore more articles on thedecormag.com.
More Articles
 Best Outdoor Bar Herb Garden Planter - The Decor Mag
 Outdoor Kitchen Design and Planning Guide - The Decor Mag
 Best Outdoor Nesting Chair Sets - The Decor Mag
 Kid-Safe Outdoor Furniture: Materials That Survive Play
 How To Choose Outdoor Decor: A Practical, Climate-Smart Guide for Patios, Decks, and Gardens
 How to Create a Keyhole Garden - The Decor Mag
 Best Outdoor Bar Cheese Board Display - The Decor Mag
 Deck vs Patio Design Comparison - The Decor Mag
 How to Create a Butterfly Garden - The Decor Mag
 Best Outdoor Bar Trash Bin Hideaway - The Decor Mag