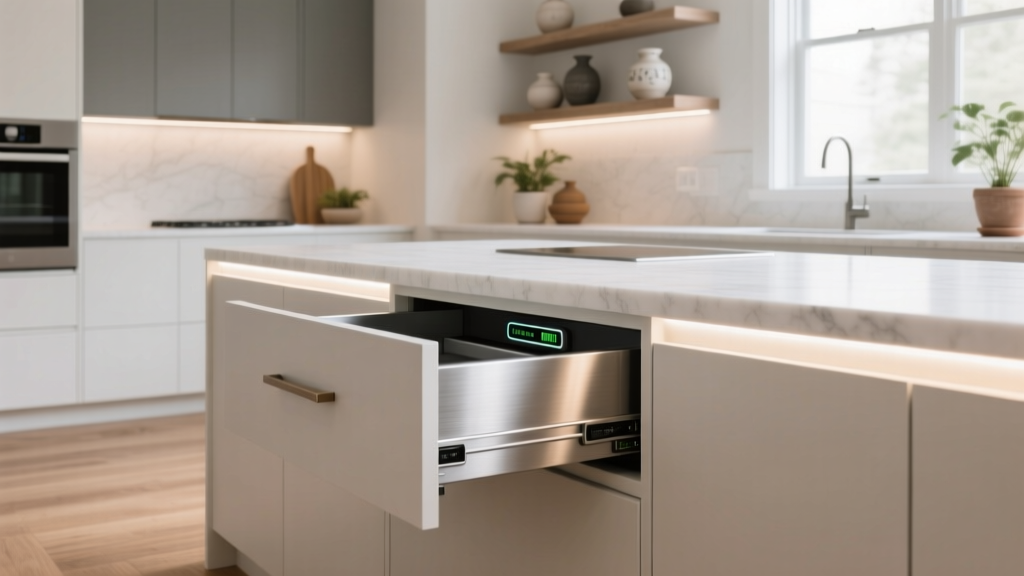
Best Kitchen Charging Drawer Solutions - The Decor Mag
Between phones, tablets, smartwatches, earbuds, and cordless kitchen tools, modern kitchens have quietly become the command center for charging. Yet the typical reality—cords draped across countertops, devices stacked near outlets, and clutter around the “charging corner”—works against what most homeowners want from a renovation: clean sightlines, easy cleaning, and a kitchen that feels calm and intentional.
A well-designed kitchen charging drawer solves the problem at its source. It hides visual noise, protects devices from spills, and keeps everyday tech accessible without stealing valuable counter space. Done right, it also adds resale-friendly functionality that feels custom and high-end, even on a modest budget.
This guide breaks down the best charging drawer solutions for kitchen renovation and organization—layouts that actually work, product-style options, wiring and ventilation essentials, realistic cost ranges, and common mistakes to avoid—so your charging setup feels as thoughtfully designed as your cabinets and lighting.
Why a Kitchen Charging Drawer Works Better Than Countertop Charging
- Clutter control: Devices and cables disappear behind a closed drawer front.
- Safer surfaces: Fewer cords and electronics near sinks, cooktops, and hot pans.
- Faster cleanup: Clear counters make daily wiping and deep cleaning easier.
- Family-friendly organization: A dedicated place reduces lost chargers and “where’s my tablet?” chaos.
- Renovation-ready upgrade: Integrates seamlessly with modern kitchen cabinetry and storage planning.
Plan First: Choosing the Best Location for Your Charging Drawer
Before buying a power strip or cutting holes, decide where the drawer should live. The best charging drawer location balances convenience, safety, and cable routing.
Top Location Options
- Island drawer near seating: Great for families; keep devices close to homework and casual use. Avoid drawers directly under the sink or near a beverage fridge that can create condensation.
- Base cabinet near a pantry or coffee station: Keeps charging away from the primary prep zone while still central.
- Desk niche or “drop zone” cabinet: Ideal in open-plan kitchens where mail, keys, and devices gather.
- Appliance garage adjacent drawer: Creates a full “tech + small appliance” storage zone, but be mindful of heat from appliances.
Location Rules of Thumb
- Avoid water and heat: Keep at least 24 inches from sinks and cooktops when possible.
- Choose a low-traffic drawer: A charging drawer shouldn’t be the one everyone opens every 5 minutes for utensils.
- Prioritize outlet access: The easiest installs use a nearby wall outlet inside an adjacent cabinet or on an island with proper electrical rough-in.
Core Components of a Great Charging Drawer
The best kitchen charging drawer solutions share a few fundamentals: safe power management, smart cable routing, enough clearance for modern devices, and airflow to prevent overheating.
Recommended Drawer Size and Clearances
- Minimum internal depth: 18 inches (better: 21 inches) to fit tablets and power bricks comfortably.
- Minimum internal height: 3 inches clear (better: 4 inches) depending on device stands and plugs.
- Recommended width: 15–24 inches for a household charging hub; 12 inches can work for a smaller “phone-only” drawer.
- Leave cable slack: Plan 2–3 inches of extra cable length so devices can be removed easily without tugging.
Power Options: What to Use and Why
Most homeowners choose one of these approaches:
- UL-listed power strip mounted inside the cabinet: The most cost-effective and flexible. Look for surge protection and a flat plug.
- In-drawer outlet/USB module: A cleaner, more built-in look. Great for new cabinetry or full kitchen renovation projects.
- USB-C charging hubs: Best for fast charging modern devices (phones, tablets, laptops). Choose a hub with sufficient wattage per port.
Practical tip: For 2026-ready functionality, prioritize USB-C PD (Power Delivery) ports. Many households now rely on USB-C for phones, tablets, and some laptops, reducing the number of bulky power bricks.
Cable Management and Device Separation
- Drawer inserts/dividers: Keep devices from stacking, which can trap heat and scratch screens.
- Grommets and pass-throughs: Use a 2-inch grommet hole (common size) to route cords from the drawer to the power source.
- Labeling: Small tags on cables prevent mix-ups and reduce “charger clutter creep.”
Best Kitchen Charging Drawer Design Approaches (With Pros, Cons, and Costs)
1) Simple Retrofit: Power Strip + Cable Grommet
This is the most common solution for homeowners who want a practical upgrade without replacing cabinetry.
- How it works: Mount a slim surge-protected power strip to the back or side of the cabinet. Drill a grommet hole from the drawer to the cabinet cavity to pass charging cables.
- Best for: Quick kitchen organization improvements; renters (with owner approval); budget-conscious renovations.
- Pros: Low cost, easy to update as charging standards change.
- Cons: Cables can look messy inside the drawer unless you add dividers; depends on nearby outlet access.
Cost range: $30–$150 DIY (power strip, grommet, basic organizer). If hiring a handyman: $150–$400 depending on drilling and access.
2) Purpose-Built In-Drawer Outlet/USB Modules
For a more “designed” look, in-drawer power modules combine outlets and USB ports in a compact housing.
- How it works: A module mounts to the drawer back or side, with wiring routed to a protected power source (often via an electrician during a kitchen remodel).
- Best for: Full kitchen renovation, custom cabinets, homeowners who want a clean, integrated charging station.
- Pros: Streamlined appearance; fewer loose adapters; often includes USB-C options.
- Cons: Higher upfront cost; may need electrical work; can become outdated if port standards change.
Cost range: $120–$350 for the module; $200–$800 for electrical labor if a new outlet or island wiring is required (varies by region and access).
3) Dedicated Charging Drawer Inserts (Device “Parking” Systems)
These systems use angled dividers or slots so devices stand upright, improving airflow and making it easier to grab the right item.
- How it works: Install an insert designed for phones/tablets, then route cables through hidden channels.
- Best for: Busy households; shared family charging; homeowners who want a premium organized look.
- Pros: Excellent organization; less heat buildup; visually tidy even when open.
- Cons: More expensive; sizing must match device mix; may reduce flexibility for other drawer uses.
Cost range: $80–$300 for inserts; $30–$150 additional for power/cable parts.
4) Wireless Charging Drawer Solutions (Qi Pads Under the Surface)
Wireless charging can be sleek, but it’s best treated as a supplement rather than the only charging method—especially for tablets and higher-wattage needs.
- How it works: A wireless charging pad is installed under a thin drawer liner or integrated into a charging zone.
- Best for: Phone-forward households; minimalist kitchens; quick drop-and-charge habits.
- Pros: Fewer cords; fast daily convenience.
- Cons: Alignment sensitive; slower than wired USB-C for many devices; thicker cases can reduce performance; still requires power routing.
Cost range: $60–$250 for a quality wireless pad setup; add $150–$500 if electrical work is needed.
Materials and Finishes: What Holds Up Best in a Kitchen
Charging drawers combine electronics and a high-use environment, so durability and cleanability matter.
Best Drawer Box Materials
- Hardwood (maple, birch): Strong and stable; classic choice for quality cabinetry. Higher cost, excellent longevity.
- Plywood with durable finish: Great stability and value; less prone to sagging than particleboard.
- Particleboard/MDF (budget cabinets): Works, but avoid overloading with heavy power bricks; protect surfaces from heat and moisture.
Best Liners and Inserts
- Non-slip, heat-resistant drawer liner: Helps devices stay put and protects the finish.
- Bamboo organizers: Popular in current kitchen design trends; warm, modern, and easy to wipe.
- Plastic modular dividers: Affordable and customizable; choose BPA-free options and avoid overly soft plastics that warp.
Hardware Upgrades That Improve Everyday Use
- Soft-close, full-extension slides: Keeps cords from snagging and makes the back of the drawer reachable.
- Handle style: Choose easy-grip pulls for a drawer you’ll open daily; timeless bar pulls work in both modern and transitional kitchens.
Ventilation and Heat Management (Often Overlooked)
Heat is the hidden enemy of charging drawers. Phones and tablets generate warmth during charging, and stacked devices can trap it.
- Don’t stack devices: Use dividers or upright slots to create space.
- Leave breathing room: Aim for at least 1/2 inch between devices where possible.
- Add ventilation holes: If you’re charging multiple devices daily, consider drilling a discreet row of 1/2-inch holes in the drawer back or cabinet panel (placed where they won’t be visible). Sand edges smooth.
- Avoid charging overheat-prone items together: Don’t store power banks, spare lithium batteries, or heat-sensitive items in the same tight compartment.
Layouts That Work: Real-World Charging Drawer Configurations
Family Hub Drawer (15–24 inches wide)
- Left zone: 3–4 phone slots with short USB-C cables
- Center zone: 1–2 tablet slots (upright) with longer cables
- Right zone: smartwatch charger, earbuds dock, spare cable pouch
- Back edge: Cable channel or clip system to keep cords separated
Small Kitchen “Essentials Only” Drawer (12–15 inches wide)
- Two-phone zone plus one multipurpose outlet for a tablet or handheld vacuum battery
- One slim organizer tray for spare charging cables and SIM tools
Island Charging + Work Zone Combo
- Top drawer: Charging (keeps devices away from crumbs in lower drawers)
- Second drawer: Paperwork, pens, school supplies (a true kitchen drop zone)
- Tip: If the island is a prep area, choose a drawer not directly under the main prep counter section.
Budgeting: What a Charging Drawer Typically Costs
Costs depend on whether you’re retrofitting, upgrading cabinet hardware, or doing a full kitchen renovation with an electrician.
- Budget DIY retrofit: $30–$150
- Mid-range organized retrofit (dividers + better power + cable management): $150–$400
- Renovation-grade integrated solution (module + electrician + upgraded drawer slides): $400–$1,200+
- Custom cabinetry with built-in charging drawer design: $800–$2,500+ depending on cabinet line and electrical scope
Where to spend: Prioritize safe power components (UL-listed), full-extension slides, and durable inserts. Wireless charging is nice, but organization and ventilation deliver the most daily value.
Common Mistakes to Avoid
- Installing too close to the sink: Splashes and wet hands are real-world risks.
- Overfilling the drawer: Packed devices charge hotter and are more likely to get damaged.
- Using cheap, non-certified charging gear: Stick to UL-listed strips and reputable chargers to reduce fire risk.
- No plan for bulky plugs: Power bricks can block outlets and prevent the drawer from closing; measure plug depth and choose low-profile adapters.
- Forgetting future needs: Leave at least one extra outlet/port for a new device or guest charging.
- Skipping strain relief: Cables pulled sharply through a hole will fray; always use a grommet and gentle routing.
Maintenance and Cleaning Tips
- Monthly cord check: Replace frayed or overheating cables immediately.
- Vacuum crumbs and dust: Use a small handheld vacuum or brush attachment to keep ports clean.
- Wipe liners and inserts: Mild soap and water; dry fully before reloading electronics.
- Audit twice a year: Remove unused cords, outdated adapters, and mystery cables to keep the drawer functional.
FAQ: Kitchen Charging Drawers
Do I need an electrician to add a charging drawer?
If you’re plugging a power strip into an existing nearby outlet (inside a cabinet) and routing cables through a grommet, you may not. If you need a new outlet, island power, or hardwired in-drawer power, hire a licensed electrician—especially during a kitchen remodel.
How do I prevent devices from overheating in a closed drawer?
Use dividers so devices don’t stack, avoid charging multiple high-watt items at once, and add subtle ventilation holes if the drawer runs warm. Full-extension slides also help you spread items out evenly.
What’s the best drawer insert for organizing phones and tablets?
Look for adjustable dividers or upright slot-style inserts that keep screens separated. Bamboo inserts are popular for modern kitchens, while modular plastic dividers offer the most customization for mixed device sizes.
Can I put a wireless charger inside a drawer?
Yes, if the charging pad is designed for through-surface use and the drawer liner isn’t too thick. Expect more finicky alignment than countertop charging, and keep a wired USB-C option available for faster, more reliable charging.
Where should I place a charging drawer in an open-concept kitchen?
A drawer near the family drop zone (island seating side, desk niche, or pantry wall) usually works best. Keep it out of the main prep triangle so devices don’t compete with cooking workflow.
What measurements should I double-check before installing?
Confirm internal drawer depth (aim for 18–21 inches), plug/adapter depth (to ensure the drawer closes), and the path for cable routing (a clean 2-inch grommet hole is common). Also check that the drawer box material can handle mounting hardware securely.
Next Steps: Build a Charging Drawer That Fits Your Kitchen
Start by listing what you actually charge daily (and where it currently piles up). Measure a candidate drawer’s interior dimensions, confirm outlet access, then choose a solution level—simple retrofit, integrated module, or a fully organized insert system. If you’re in the middle of a kitchen renovation, ask your designer or cabinet supplier to plan a dedicated charging drawer with full-extension slides, USB-C-friendly power, and ventilation from the beginning.
For more practical kitchen renovation guidance, cabinet layout ideas, and organization upgrades that make daily life easier, explore more inspiration at thedecormag.com.
More Articles
 Best Kitchen Towel Storage Ideas - The Decor Mag
 Kitchen Wood Beams Ceiling Design - The Decor Mag
 Kitchen Cabinet Finish Durability (2026)
 Walk-In Pantry Kitchen Design Ideas (2026)
 Kitchen Leaded Glass Cabinet Doors - The Decor Mag
 How to Choose the Right Kitchen Hood Vent - The Decor Mag
 How to Design a Kitchen with an Eat-In Area - The Decor Mag
 Kitchen Integrated Drainboard Sink Guide - The Decor Mag
 Kitchen Pantry Organization: Pro Tips (2026)
 Kitchen Brass Hardware Renaissance - The Decor Mag