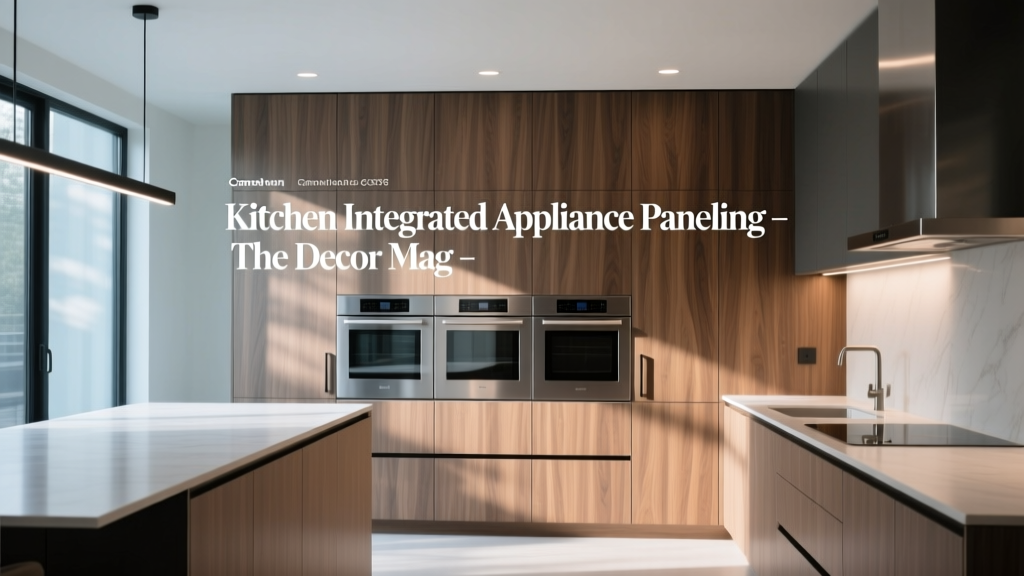
Kitchen Integrated Appliance Paneling - The Decor Mag
Few design moves change the feel of a kitchen as quickly as integrated appliance paneling. When refrigerators, dishwashers, and even beverage centers disappear behind cabinet-matched fronts, the room reads calmer, more intentional, and often more spacious. For homeowners planning a kitchen renovation, it’s one of the most effective ways to achieve that “custom kitchen” look without adding extra square footage.
Integrated panel-ready appliances also support today’s most popular kitchen design trends—warm wood tones, quiet luxury, slim-shaker doors, and clutter-free walls—while still delivering the everyday performance you need. Done well, appliance paneling isn’t just about aesthetics; it improves layout flow, reduces visual noise, and helps the kitchen feel connected to adjacent living spaces.
This guide breaks down the practical side: which appliances can be panel-ready, the best materials, key measurements and clearances, realistic cost ranges, and the most common mistakes that can derail a project.
What Is Integrated Appliance Paneling?
Integrated appliance paneling (also called “appliance paneling” or “panel-ready appliances”) means fitting a custom cabinet panel to the front of an appliance so it visually blends with surrounding cabinetry. The appliance remains fully functional; it’s simply concealed behind a door front designed to match your kitchen cabinets.
Common appliances that can be paneled
- Dishwashers (most common; relatively straightforward)
- Refrigerators (column units, bottom-freezer, French door panel-ready models)
- Freezers (often paired with fridge columns)
- Wine and beverage refrigerators (some panel-ready options)
- Trash compactors (less common, but possible in certain lines)
Integrated vs. built-in vs. counter-depth
- Panel-ready integrated: The door face matches cabinetry; hardware may be cabinet pulls or integrated handles.
- Built-in: Appliance is designed to sit flush with cabinetry (often 24" deep boxes for refrigeration columns), but may still have stainless fronts.
- Counter-depth: Shallower than standard appliances, but not necessarily flush and not necessarily panel-ready.
Why Homeowners Choose Appliance Paneling
Design benefits
- Streamlined sightlines in open-plan homes where the kitchen is always visible
- Luxury, custom look even in modest-sized kitchens
- Better visual balance when mixing materials (wood + stone + metal) without a “stainless wall” effect
- Timelessness: cabinetry styles evolve more gracefully than shiny appliance finishes
Functional benefits
- Improved layout cohesion (especially when the fridge is near tall pantry cabinets)
- Reduced fingerprint visibility compared to stainless fronts
- Potential resale appeal in markets where integrated kitchens are seen as premium upgrades
Which Appliances Are Best to Panel (and When It’s Not Worth It)
Dishwasher paneling: the best “bang for the buck”
A panel-ready dishwasher is usually the most cost-effective way to test integrated appliance design. Since dishwashers sit in base cabinetry runs, a matching panel can make the entire lower line feel uninterrupted—especially valuable in galley kitchens and modern layouts.
Practical tip: If you’re keeping a standard dishwasher, you can still reduce contrast by choosing a stainless or black stainless model and using hardware that ties into nearby pulls and faucets.
Refrigerator paneling: biggest impact, biggest planning needs
A paneled refrigerator creates a true built-in look, particularly when it’s flanked by tall pantry cabinets. It’s also where clearances and ventilation matter most.
- Best for: open-concept kitchens, minimalist design, “kitchen-as-furniture” aesthetics, high-end renovations
- Consider carefully if: you need maximum interior capacity for the footprint, or your budget is tight
Panel-ready columns vs. single fridge units
- Columns (24" wide): can be paired side-by-side (24" + 24" = 48") for a seamless look; strong trend in luxury kitchen design.
- Single units (36" or 42"): fewer seams and generally lower total cost than two columns, but less flexible.
Key Measurements, Clearances, and Layout Rules
Integrated appliance paneling looks effortless only when the details are right. These measurement checkpoints prevent the most common installation issues.
Panel thickness and door weight
- Typical panel thickness: 3/4" is standard for most cabinetry and panel-ready appliances.
- Weight limits: Always verify the manufacturer’s maximum door/panel weight. Oversized or heavy panels can cause door sag, hinge strain, or poor sealing.
- Material choice matters: Solid wood and thick MDF panels can become heavy quickly on tall refrigerator doors.
Toe-kick and base alignment
- Standard toe-kick height: commonly 3 1/2" to 4".
- Goal: align appliance toe-kicks with cabinet toe-kicks for a continuous base line.
- Tip: Many integrated refrigerators have dedicated toe-kick kits—order the correct one for your cabinet depth and finish.
Refrigerator depth and flush installation
- Cabinet depth standard: 24" deep boxes (not including doors).
- True flush look: often requires a built-in or integrated refrigerator designed for flush installation, plus correct side panels and top clearance for ventilation.
- Door swing clearance: ensure the door can open wide enough to pull drawers fully. This can affect where you place islands and adjacent walls.
Ventilation and service access
- Vent paths: Integrated refrigeration typically vents through the toe-kick or top grille depending on model.
- Serviceability: plan for access to water lines, shutoff valves, and electrical connections. A perfectly sealed surround that can’t be serviced becomes a costly headache.
Material Recommendations: What Works Best for Appliance Panels
Your appliance panels should match your cabinet door material and finish as closely as possible. Here’s how the most common options compare for durability, cost, and long-term maintenance.
MDF (paint-grade) panels
- Best for: painted kitchens (classic white, warm off-white, greige, deep green, navy)
- Pros: smooth finish, stable, cost-effective, resists warping better than some solid woods
- Cons: edges can swell if exposed to water; needs quality priming and paint
- Maintenance: wipe with damp microfiber; touch up chips promptly to prevent moisture intrusion
Plywood with veneer (stain-grade)
- Best for: natural wood kitchens (white oak, walnut, ash) aligned with current trends
- Pros: lighter than some solid wood options; stable; beautiful grain consistency
- Cons: veneer can be damaged by harsh abrasives; finish quality is critical
- Maintenance: use pH-neutral cleaners; avoid ammonia and aggressive degreasers
Solid wood panels
- Best for: traditional cabinetry styles where authentic wood construction is desired
- Pros: strong, repairable, classic feel
- Cons: heavier; can move with humidity; may stress hinges on tall integrated doors
Laminate or thermofoil fronts
- Best for: budget-conscious renovations, rental upgrades, contemporary slab-door looks
- Pros: easy to clean, consistent finish, often lower cost
- Cons: heat and edge lifting can be issues near ovens or if quality is poor
- Maintenance: gentle soap and water; don’t steam-clean edges
Design Approaches That Look High-End (Without Overcomplicating the Build)
Match panels exactly—or intentionally contrast
- Full match: seamless cabinetry run; best for minimalist and transitional kitchens.
- Intentional contrast: paneled fridge in a different wood tone (like walnut) within a painted kitchen can feel like furniture—just keep it deliberate and repeat the tone elsewhere (open shelves, island, or a range hood trim).
Choose hardware that supports the illusion
- Long pulls (12" to 18") often look proportional on integrated refrigerator doors.
- Knobs can look too small on tall panels unless your style is distinctly traditional.
- Appliance pulls add a professional look, but confirm compatibility and door thickness requirements.
Use panels to simplify a busy wall
One of the smartest layout moves in kitchen renovation planning is to place integrated refrigeration alongside tall pantry cabinets. The whole zone reads as “storage” rather than “appliances,” improving visual organization.
Trending now: warm woods and quiet luxury
Current kitchen design trends lean toward white oak cabinetry, softer painted neutrals, and minimal upper cabinetry. Integrated appliance paneling fits naturally with these trends by reducing reflective surfaces and highlighting the craftsmanship of millwork.
Cost Ranges and Budget Considerations
Costs vary widely by appliance brand, panel material, and installation complexity. Use these ranges as planning guidelines.
Typical cost ranges (USD)
- Panel-ready dishwasher: $800–$2,500 (appliance) + $150–$600 (custom panel) + $150–$400 (installation)
- Integrated refrigerator (single unit): $4,000–$12,000+ (appliance) + $500–$2,000 (panels) + $500–$2,500 (cabinet modifications/installation)
- Refrigeration columns (pair): $8,000–$20,000+ (appliances) + $1,000–$3,000 (panels) + $800–$3,000 (install/cabinet work)
- Side panels, fillers, and trim: $200–$1,500 depending on finish and complexity
Where to spend—and where to save
- Spend on: correct appliance model for flush installation, proper ventilation kits, quality hinges/hardware, and professional installation.
- Save on: paneling only the dishwasher first, using paint-grade MDF for painted kitchens, choosing a single integrated fridge instead of columns.
Product and Specification Tips (What to Look for When Shopping)
- “Panel-ready” labeling: confirm the exact model number is designed to accept custom panels (not all counter-depth units are).
- Hinge system: look for robust hinges rated for your panel weight and door height.
- Soft-close feel: premium integrated appliances often close more smoothly and seal better with heavier panels.
- Water and ice: if you want an internal dispenser for a cleaner exterior, verify the interior layout still meets your storage needs.
- Noise ratings: for dishwashers, target 44 dBA or lower for a noticeably quieter kitchen—especially in open layouts.
Maintenance and Longevity: Keeping Integrated Panels Looking New
- Use gentle cleaning: a damp microfiber cloth and mild dish soap is usually enough.
- Avoid harsh chemicals: ammonia and abrasive powders can dull paint and damage wood finishes.
- Watch edges and seams: integrated panels have tight reveals; wipe spills quickly to prevent swelling (especially on MDF).
- Check hinges annually: if doors feel heavy or misaligned, adjust early to prevent long-term wear.
- Protect high-touch zones: consider a slightly more durable finish (conversion varnish for wood, high-quality enamel for paint) near handles.
Common Mistakes to Avoid
- Assuming any appliance can be paneled: panel-ready appliances are engineered differently. Verify before ordering cabinets.
- Ignoring panel weight limits: a gorgeous thick panel can cause sagging doors and sealing issues.
- Misaligned reveals: poor filler sizing or uneven cabinet floors can lead to crooked panel lines that stand out immediately.
- Forgetting ventilation requirements: inadequate airflow can shorten appliance life and void warranties.
- Not planning for door swing: especially with refrigerators near walls or islands—ensure drawers can fully extend.
- Ordering panels too early: if appliance specs change or the cabinet shop adjusts door sizes, you may end up rebuilding panels.
FAQ: Kitchen Integrated Appliance Paneling
Is integrated appliance paneling worth it for a mid-range kitchen renovation?
Often, yes—especially for the dishwasher, which offers a strong visual upgrade at a manageable cost. For refrigerators, it depends on your budget and whether the kitchen is visible from main living areas. If you want a clean, cohesive look, paneling can deliver a “custom” feel even with mid-range cabinets.
Can I add a panel to my existing dishwasher?
Only if the dishwasher is a panel-ready model. Standard dishwashers aren’t designed to accept a full cabinet panel and may not have the correct mounting points or hinge support. Check your model number and manual before attempting a retrofit.
Do paneled appliances reduce interior space?
The panel itself doesn’t reduce interior space, but many integrated or built-in refrigerators have different proportions than freestanding units. If maximum capacity is your priority, compare total cubic feet and shelf layouts carefully before committing.
What panel material is best for durability?
For painted kitchens, high-quality MDF with a durable enamel finish performs well. For stain-grade kitchens, plywood with a quality veneer and protective topcoat offers a strong balance of stability and appearance. Solid wood can be durable but may move with seasonal humidity.
How do I keep an integrated refrigerator from looking “too plain”?
Use statement hardware (like longer pulls), add a furniture-style surround with a top cabinet, or choose a subtle contrast finish (for example, a warmer wood tone on the fridge wall). The goal is calm, not blank.
Will appliance paneling make my kitchen feel bigger?
Visually, yes—especially in smaller kitchens. When large reflective surfaces disappear and cabinetry lines run uninterrupted, the space tends to feel less cluttered and more expansive.
Next Steps: Plan Your Paneling Like a Pro
- Start with your layout: decide which appliance wall benefits most from a seamless cabinet run.
- Confirm appliance specs early: choose panel-ready models before finalizing cabinet drawings.
- Review measurements carefully: panel thickness, toe-kick alignment, door swing, and ventilation paths.
- Choose materials that match your lifestyle: painted MDF for cleanability, veneer for warmth, durable finishes for high-touch areas.
- Work with experienced installers: integrated appliance paneling rewards precision.
If you’re mapping out a kitchen renovation and want more practical guidance on kitchen design, storage planning, and timeless finishes, explore more kitchen ideas and inspiration at thedecormag.com.
More Articles
 Kitchen That Inspires Cooking: Design Ideas (2026)
 Kitchen Plaster Walls Organic Feel - The Decor Mag
 Kitchen Fluted Range Hood Cover Ideas - The Decor Mag
 Kitchen Checkerboard Floor Revival - The Decor Mag
 Kitchen Fluted Cabinet Door Trends - The Decor Mag
 Kitchen Limewash Paint Cabinet Finish - The Decor Mag
 Kitchen Backsplash Pattern Scale: How to Choose (2026)
 Best Kitchen Trash and Recycling Drawer - The Decor Mag
 Kitchen Shaker Cabinet Timeless Appeal - The Decor Mag
 Best Kitchen Counter Appliance Rotation - The Decor Mag