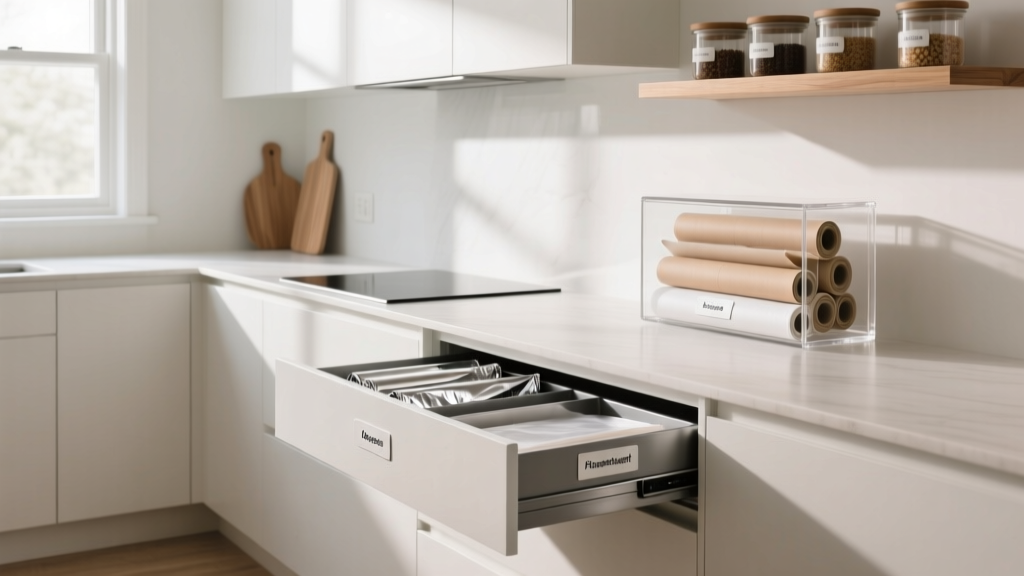
Best Kitchen Wrap Storage Solutions - The Decor Mag
Plastic wrap, aluminum foil, parchment paper, freezer paper, and sandwich bags are small items that create outsized mess. They slide behind drawers, crowd countertops, and turn “quick prep” into a scavenger hunt. When you’re planning a kitchen renovation—or simply trying to make your current layout work better—wrap storage is one of the simplest ways to upgrade daily function.
Smart kitchen wrap storage also protects your investment. Rolls that rattle around get dented, tear unevenly, and waste product. Boxes left near the stove or sink absorb grease and moisture, which shortens their lifespan and makes cutting edges dull. A dedicated storage zone improves workflow, keeps the kitchen looking intentional, and aligns with today’s most practical kitchen design trend: hidden, well-organized storage that supports how you actually cook.
Below are the best kitchen wrap storage solutions, from budget-friendly organizers to renovation-level built-ins—plus measurements, materials, cost ranges, and common mistakes to avoid.
Start With a Wrap Inventory and the “Prep Zone” Location
Before buying organizers or designing cabinetry, take five minutes to define what you store and where you use it. The ideal location is usually close to your primary prep surface (often between the sink and cooktop), because that’s where wrapping leftovers, lining trays, and covering dough happens.
Quick inventory checklist
- Plastic wrap (standard and/or commercial width)
- Aluminum foil (regular and heavy duty)
- Parchment paper
- Wax paper / freezer paper (optional)
- Zip-top bags (multiple sizes)
- Food storage labels, tape, or markers
Recommended clearances and measurements
- Standard roll box length: typically 12–13 inches
- Commercial roll length: often 15 inches (sometimes longer)
- Minimum interior cabinet width: 13.5 inches for standard; 16.5 inches for commercial
- Ideal drawer depth: 18–21 inches (gives room for rolls plus a cutter or organizer)
- Ideal vertical clearance for upright storage: 4–6 inches per roll (depending on holder design)
If you’re renovating, share these dimensions with your kitchen designer so your cabinetry supports your preferred wrap sizes.
Top Kitchen Wrap Storage Solutions (Ranked by Practicality)
1) Dedicated Drawer Insert (Best All-Around for Most Kitchens)
A purpose-built drawer insert turns a “junk drawer” into a reliable wrap station. It’s one of the most timeless kitchen organization upgrades because it works in any style—shaker, modern, transitional—and keeps countertops clean.
Best for: Homeowners who want fast access and a tidy look without changing cabinetry.
Recommended layout: One 18-inch or 24-inch base drawer near the prep zone, ideally with 2–3 drawer tiers or a deep drawer with inserts.
Materials to consider:
- Bamboo: warm, durable, easy to wipe; can swell if soaked (avoid standing water)
- Solid wood (maple, birch): premium feel; best sealed with a wipeable finish
- ABS or high-impact plastic: budget-friendly; easy maintenance; less “built-in” look
- Powder-coated steel: sleek and sturdy; pairs well with modern kitchens
Cost range:
- Basic adjustable inserts: $20–$60
- Mid-range bamboo/wood inserts: $50–$150
- Custom drawer organizers (cabinet shop add-on): $250–$900+ depending on materials and complexity
Practical tip: Choose an insert that stores rolls without relying on the cardboard box cutting edge. Inserts with built-in sliding cutters reduce tearing and improve safety.
2) Under-Cabinet Wrap Dispenser (Best for Small Kitchens)
If drawer space is limited, an under-cabinet dispenser keeps wraps accessible but off the countertop. It’s also a good fit for renters or homeowners who want a quick organization win without a full kitchen renovation.
Placement: Mount under an upper cabinet near the prep area, but not directly above the cooktop (heat and grease shorten product life).
Cost range: $25–$120 depending on whether it’s a single-roll unit or a multi-roll system with cutters.
Materials and maintenance:
- Choose stainless or powder-coated steel for easier cleaning (wipe with mild degreaser).
- Plastic models are fine, but avoid thin housings that flex—cutting becomes frustrating.
Design note: This solution pairs well with current kitchen design trends focused on “appliance garages” and decluttered counters. It keeps tools at hand while preserving visual calm.
3) Cabinet Door-Mounted Rack (Best for Maximizing Dead Space)
Inside cabinet doors are prime real estate. Door-mounted wrap racks can hold 2–4 rolls and keep them contained. Look for adjustable brackets to accommodate different roll lengths.
Best cabinet locations:
- Sink-base adjacent cabinet (not inside the sink base—humidity and leaks are a risk)
- Pantry side cabinet near prep
- End cabinet near refrigerator (useful for packing lunches)
Installation guidance:
- Confirm door clearance: you typically need 2.5–4 inches between the door interior and shelves inside the cabinet.
- Use short screws or included hardware to avoid poking through the cabinet face.
Cost range: $15–$80
4) Pull-Out Narrow Base Cabinet (Best Renovation Upgrade)
For homeowners planning a kitchen remodel, a narrow pull-out base cabinet (often 6–9 inches wide) can become a dedicated vertical wrap and bag station. It’s a high-function, low-visual-impact solution that feels custom and keeps the prep zone streamlined.
Ideal widths: 6 inches (tight but workable) to 9 inches (comfortable for wraps plus small bins).
What to store inside:
- Wrap rolls in vertical or horizontal slots
- Zip-top bags in labeled bins
- Clips, labels, markers, and spare cutters
Cost range:
- Cabinet and hardware (mid-range): $300–$900
- Premium pull-out system with soft-close and custom inserts: $800–$2,000+
Trend + function: Narrow pull-outs are a staple in modern kitchen renovation plans because they capitalize on spaces that would otherwise become filler panels.
5) Pantry “Wrap Zone” with Bins and Labels (Best for Bulk Buyers)
If you buy in bulk or keep backstock (extra rolls, party supplies), a pantry-based system prevents overcrowded drawers. The key is to keep a small “active” supply near prep and store extras in the pantry.
Recommended setup:
- One shelf at eye level for daily-use wraps
- One shelf below for backstock
- Clear bins sized 12–16 inches wide for rolls and boxes
- Label by use: “Baking,” “Storage,” “Freezer,” “Lunch”
Cost range: $30–$200 depending on bin quality and quantity.
Material comparison for bins:
- Clear PET plastic: crisp look, easy to wipe; avoid abrasive scrubbers to prevent haze
- Wire bins: breathable and durable; items can snag if edges are rough
- Acrylic: premium clarity; higher cost; scratches more visibly
Product and Design Features That Make Wrap Storage Actually Work
Built-in cutters vs. box serrations
- Built-in sliding cutters: cleaner cuts, less waste, safer than serrated edges; great for households with kids
- Box serrations: cheap and familiar, but prone to uneven tearing and crushed boxes
Horizontal vs. vertical storage
- Horizontal (drawer or shelf): easiest to see everything at once; best for daily use
- Vertical (pull-out or divider): saves space; best for narrow cabinets
Dividers and spacing guidelines
- Allocate 3.5–4 inches of width per roll in a drawer if stored side-by-side.
- Use dividers at least 2.5 inches tall to keep rolls from drifting during drawer movement.
- For drawers with multiple items, separate wraps from utensils to prevent punctures and crushed boxes.
Budget Considerations: What to Spend (and Where to Save)
- Under $50: Basic drawer organizers, door racks, simple bins. Best for quick organization without tools or renovations.
- $50–$200: Higher-quality bamboo inserts, multi-roll dispensers with cutters, cohesive pantry bin systems.
- $200–$900: Semi-custom drawer inserts through cabinet lines, upgraded drawer boxes, soft-close retrofits.
- $900–$2,000+: Renovation-level pull-outs, custom cabinetry solutions, premium hardware and integrated organizers.
Where to invest: If wraps are used daily, prioritize a drawer insert with good cutters and stable compartments. It saves product over time and reduces frustration.
Where to save: Pantry backstock can live in simple, labeled bins—no need for premium organizers where daily ergonomics matter less.
Common Mistakes to Avoid
- Storing wraps above the cooktop: Heat and grease degrade boxes, warp plastics, and make cutters sticky.
- Choosing organizers without measuring roll length: Commercial rolls won’t fit standard inserts—measure first.
- Overstuffing one drawer: Wraps plus foil plus bags plus random tools leads to jammed drawers and crushed boxes.
- Ignoring moisture zones: Avoid the sink base and areas prone to leaks; dampness ruins cardboard packaging.
- Relying on flimsy adhesive mounts: Under-cabinet dispensers and door racks perform better with screws or heavy-duty mounting designed for weight.
- No system for backstock: Without a pantry bin for extras, you’ll end up with duplicates and clutter.
Maintenance and Longevity Tips
- Wipe organizers monthly: Use warm water with mild dish soap; dry fully before reloading to prevent swelling (especially bamboo).
- Degrease near prep areas: For dispensers, use a gentle kitchen degreaser and a microfiber cloth to keep cutters clean.
- Replace dented rolls: If a roll is crushed, it will never dispense smoothly; move it to “messy jobs” (grill cleanup, paint protection).
- Label and date bulk purchases: Especially for parchment and specialty wraps—older boxes get brittle and tear unevenly.
FAQ: Kitchen Wrap Storage Solutions
What’s the best place to store plastic wrap and foil in a kitchen layout?
Store them within one step of your main prep surface—often the base cabinet or drawer run between the sink and cooktop. Avoid placing wraps directly next to the range to reduce heat and grease exposure.
Should I store wraps in their original boxes or transfer them to dispensers?
If you want cleaner cuts and fewer crushed boxes, transfer to dispensers with sliding cutters. Keeping items in their original boxes is fine for pantry backstock, but for daily use, dispensers usually perform better.
How wide should a drawer be for a wrap organizer?
Most homeowners find an 18-inch drawer works well for 2–4 rolls plus bags. If you use commercial-size wraps, plan for at least 16.5 inches of interior width (or choose a system designed for 15-inch rolls).
Are door-mounted wrap racks safe for cabinet doors?
Yes, when properly installed with the right screws and positioned so items don’t hit shelves. Confirm you have 2.5–4 inches of interior clearance before mounting.
What’s the most renovation-friendly solution for a new kitchen design?
A narrow pull-out (6–9 inches) or a dedicated prep drawer with custom inserts delivers the most seamless, high-end functionality while keeping counters clear—ideal for modern kitchen renovation plans.
How do I keep wrap organizers from sliding around in drawers?
Choose inserts with non-slip feet or add a thin, cut-to-fit drawer liner underneath. For custom wood inserts, request a snug fit with minimal gaps (about 1/8 inch) around the perimeter.
Actionable Next Steps for a More Organized Kitchen
- Measure your wraps (length and diameter) and your intended drawer/cabinet interior width.
- Pick your “active storage” zone within one step of the main prep surface.
- Choose a solution tier:
- Quick upgrade: door rack or drawer insert
- Space-saver: under-cabinet dispenser
- Remodel upgrade: pull-out wrap cabinet or custom drawer organizer
- Create a backstock bin in the pantry so daily storage stays calm and uncluttered.
- Set a 10-minute reset routine once a month to wipe organizers and toss crushed boxes.
Thoughtful kitchen wrap storage is a small change that delivers a big return: smoother prep, cleaner counters, and a kitchen that feels designed around real life. Explore more kitchen renovation ideas, organization guides, and layout inspiration at thedecormag.com.
More Articles
 Kitchen Patina Brass Faucet Beauty - The Decor Mag
 Kitchen Stainless Steel Appliance Guide - The Decor Mag
 Kitchen Arched Range Hood Design Ideas - The Decor Mag
 Kitchen Waterfall Island Design Ideas - The Decor Mag
 Best Kitchen Baking Supply Organization - The Decor Mag
 Best Kitchen Serving Tray Storage - The Decor Mag
 How to Choose Kitchen Sink Configuration - The Decor Mag
 Kitchen Reeded Glass Cabinet Ideas - The Decor Mag
 How To Match Nightstand With Lighting: A Practical, Design-Forward Guide
 Kitchen Backsplash Ideas That Stand Out - The Decor Mag