Kitchen Countertop Seam Placement: Pro Tips (2026)
A beautiful kitchen countertop can make an entire renovation feel high-end, even if the rest of the room stays relatively simple. Yet one small detail often determines whether your new surface looks seamless and luxurious or busy and patched together: where the seams land.
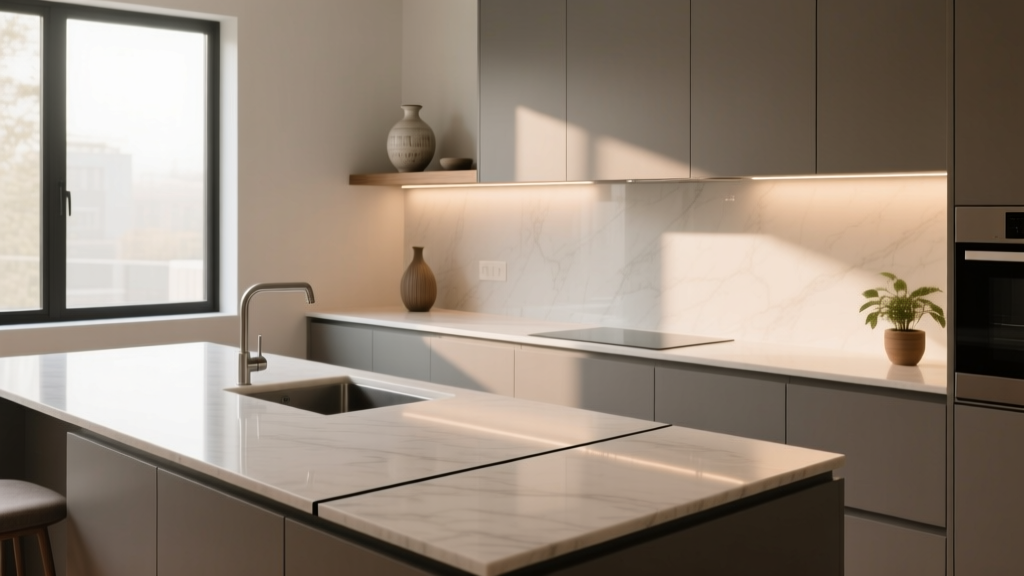
Countertop seam placement is both a design decision and a performance decision. A seam in the wrong spot can visually interrupt a dramatic marble-look veining pattern, catch crumbs at a prep zone, or become the weak point near a sink cutout. Planned well, seams practically disappear, support heavy use, and keep your kitchen renovation on budget.
This guide breaks down how pros choose seam locations for quartz, granite, marble, solid surface, laminate, and butcher block—plus layout strategies for popular kitchen shapes, cost ranges, and common mistakes to avoid. If you’re planning a kitchen remodel, this is one of those “measure twice, cut once” topics that pays off every day.
What Is a Countertop Seam—and Why Placement Matters
A countertop seam is the joined line where two separate pieces of countertop material meet. Seams are usually bonded with color-matched epoxy or adhesive and mechanically tightened during installation. Even with excellent fabrication, seams are never as invisible as a single slab—so the goal is to make them less noticeable and less vulnerable.
Seam placement affects:
- Visual flow: especially with veined quartz, marble, and granite where patterns can be disrupted.
- Durability: seams near high-stress areas (sink corners, cooktop cutouts) can be more prone to failure over time.
- Maintenance: seams can collect residue if placed in wet zones or food-prep zones.
- Budget: fewer seams often requires larger slabs, more material, and more careful templating.
- Function: a well-placed seam avoids landing exactly where you knead dough, chop, or set hot pans.
The Biggest Factors That Determine Seam Placement
1) Slab size, direction, and availability
Natural stone and quartz slabs come in standard-ish sizes, but actual dimensions vary by brand and lot. Many quartz slabs are roughly 63" x 126" (sometimes slightly smaller or larger), while natural stone can vary widely. Your fabricator uses the slab size to “nest” pieces and decide where seams must occur.
- Long runs: Any countertop run longer than the slab length will require at least one seam.
- Depth: Standard countertop depth is 25 1/2" (24" cabinets + overhang). Islands are often deeper (36"–48"), which may require seaming or a different slab orientation.
- Pattern direction: Veining direction (lengthwise vs crosswise) can force certain seam locations if you want a consistent look.
2) Kitchen layout: L-shape, U-shape, galley, island
Seams often appear at corners and junctions simply because that’s where pieces naturally break. The trick is to choose which corners and how the seam line is oriented.
3) Cutouts and stress points (sink and cooktop)
Sink and cooktop openings remove material and can create weak areas. A seam too close to a cutout corner is a common cause of future problems, especially with heavy undermount sinks or thin countertop profiles.
As a practical rule, many fabricators aim to keep seams at least 6"–12" away from sink and cooktop cutout corners when possible, and to avoid seams that intersect narrow “bridges” of stone behind a sink.
4) Edge profiles and thickness
Waterfall edges, thickened (mitered) edges, and decorative profiles can affect seam placement and visibility.
- Mitered edges (2"–3" thick look): may add seams at corners where the miter wraps.
- Waterfall islands: require additional seams where the vertical legs meet the horizontal top.
5) Your priorities: “least visible” vs “lowest cost”
You can often reduce seams by ordering extra material or selecting jumbo slabs—at a premium. If your budget is tight, a smart seam placement plan can still look polished without paying for oversized slabs.
Best-Practice Rules for Seam Placement (Used by Pros)
Place seams where the eye won’t linger
Countertop seams are least noticeable when they fall in visually busy or naturally segmented zones.
- Near a corner rather than centered in a long run
- At a cabinet break (like between a base cabinet and dishwasher)
- In a less-used landing area instead of your primary prep zone
Avoid seams at high-use prep and plating zones
Think about how you actually use the kitchen. Many homeowners consistently prep between the sink and cooktop or near a designated “coffee station.” Keep seams away from these zones if you can.
Keep seams out of standing water and heavy scrubbing areas
While well-made seams are strong, water, cleaner residue, and constant wiping can highlight seam lines over time—especially in lighter colors.
- Prefer seams that are not directly behind the faucet or at the sink rim.
- On perimeter counters, seams closer to the backsplash line can be slightly less noticeable than seams in the center of the deck.
Use seam orientation to your advantage
- Straight seams are easier to align and disguise than jagged or step seams.
- Diagonal seams are occasionally used to follow veining, but they’re harder to execute cleanly and can look “intentional” in the wrong way.
Material-by-Material Seam Recommendations
Quartz (engineered stone)
Quartz is a top kitchen design trend because it’s low-maintenance, consistent in color, and available in marble-look patterns. Seams can be quite subtle, but dramatic veining can make mismatches stand out.
- Best seam strategy: Place seams where the pattern looks most continuous; request a digital or physical slab layout during templating.
- What to watch: White quartz with minimal patterning can show seams if the adhesive tone is off. Choose a fabricator skilled in color-matching epoxy.
- Maintenance: Clean with mild soap and water; avoid harsh abrasives that can dull the finish along seam lines.
Typical installed cost range: $60–$120 per sq ft (higher for premium brands, jumbo slabs, and complex edges).
Granite
Granite remains a timeless choice for natural variation and durability. Seams can blend well in speckled patterns, but some granites have directional movement that complicates matching.
- Best seam strategy: Put seams where natural pattern shifts already occur; choose busier granites if you’re worried about seam visibility.
- What to watch: Some darker granites show seam adhesive as a reflective line if polishing is inconsistent.
- Maintenance: Seal as recommended (often annually, depending on stone). Seams may need extra attention to prevent discoloration.
Typical installed cost range: $50–$120 per sq ft (rarer stones and thicker/mitered edges can push higher).
Marble
Marble is unmatched for classic elegance, and it’s trending again in statement islands and baker-friendly kitchens. It’s also softer and more stain-prone, which makes seam placement and sealing especially relevant.
- Best seam strategy: Avoid seams in acidic spill zones (near coffee machines, citrus prep, wine) when possible; align veining intentionally for a “bookmatched” look on islands.
- What to watch: Marble can etch; seam lines may become more visible if the surrounding area develops patina at different rates.
- Maintenance: Seal regularly and wipe spills fast. Use cutting boards and trays in daily prep.
Typical installed cost range: $80–$200+ per sq ft depending on slab selection and fabrication complexity.
Solid surface (Corian-style)
Solid surface is a practical, design-forward option with a major advantage: seams can be sanded and blended to become nearly invisible.
- Best seam strategy: Use solid surface when you want long, clean runs with minimal visible joints—great for contemporary kitchens and integrated sinks.
- What to watch: Heat resistance is lower than stone; don’t place hot pans directly on it, especially near seams.
- Maintenance: Easy to clean; light scratches can often be buffed out.
Typical installed cost range: $45–$90 per sq ft.
Laminate
Modern laminate has come a long way and can be a smart budget-friendly kitchen renovation move, particularly for rental properties, basements, or quick updates. Seams are usually more visible than stone, but careful planning helps.
- Best seam strategy: Use post-formed or tight-radius edges when possible; place seams at corners or appliance breaks.
- What to watch: Water at seams can cause swelling over time; prioritize clean caulking at sinks.
- Maintenance: Gentle cleaners; avoid soaking seams and wiping standing water.
Typical installed cost range: $20–$50 per sq ft.
Butcher block
Butcher block adds warmth—one of today’s most popular kitchen design trends when paired with painted cabinets and mixed materials. Seams depend on whether you use one thick top, multiple sections, or an island top with a waterfall look.
- Best seam strategy: Keep seams away from sink cutouts; use a single piece for the sink run if possible.
- What to watch: Wood movement; seams can open slightly with seasonal humidity changes if not properly installed and acclimated.
- Maintenance: Oil regularly (every 3–6 weeks at first, then as needed). Use water-resistant finishes around sinks if you’re set on that layout.
Typical installed cost range: $35–$100 per sq ft depending on species and thickness (common thickness: 1 1/2" to 2").
Seam Placement by Kitchen Layout
L-shaped kitchens
- Best approach: Place a seam at the inside corner where the two runs meet, rather than forcing a single L-shaped piece.
- Tip: If your corner is a major prep zone, consider shifting the seam a few inches away from the corner so it’s not exactly where you chop and wipe repeatedly.
U-shaped kitchens
- Best approach: Plan seams at corners and keep the sink run as intact as possible.
- Tip: If your sink must be on a corner run, ask your fabricator about reinforcing rails and keeping seams 12"+ away from the sink cutout corners.
Galley kitchens
- Best approach: Long straight runs often require seams; place them near appliance breaks (dishwasher, range) rather than centered between cabinets.
- Tip: Align seams across from each other only if it helps symmetry—otherwise stagger them so the eye doesn’t track a “line” down the kitchen.
Islands and peninsulas
- Best approach: Aim for a single slab on top whenever possible—especially for waterfall islands or statement veining.
- Typical island sizes: Many islands are 72"–96" long and 36"–48" deep. Depth often drives slab planning and seam needs.
- Tip: If an island seam is unavoidable, place it closer to the sink or cooktop cutout (only if structurally safe) so the seam reads as part of the functional zone rather than a random split in the middle.
Design Approaches That Make Seams Look Better
Request a seam plan during templating
Ask your countertop fabricator to show you a drawing indicating seam locations, slab orientation, and how the pattern will flow. For marble-look quartz, request confirmation of the vein direction on every run and on the island.
Consider a full-height backsplash or slab backsplash
A slab backsplash can reduce the visual noise of tile lines and make countertop seams feel less prominent, especially in modern kitchens. It may increase material cost but can elevate the entire kitchen design.
Use mixed materials strategically
One of the most timeless, functional trends is mixing surfaces:
- Quartz or granite on perimeter counters (durable, easy to clean)
- Butcher block on a baking/prep nook (warm, forgiving)
- A statement stone on the island (visual centerpiece)
This can reduce seam challenges because each area can be fabricated from smaller, better-oriented pieces.
Budget Considerations and Where Costs Can Jump
- Jumbo slabs: Often add 10%–30% to material cost but can eliminate a seam on long runs or deep islands.
- More seams = more labor: Extra seaming can add a few hundred dollars, especially with complex layouts.
- Waterfalls and mitered edges: Increase fabrication time and can require additional slab material for grain/vein continuity.
- Premium seam matching: For high-movement patterns, choosing a top-tier fabricator can be worth it. Paying more for craftsmanship is often cheaper than “fixing” a seam later.
Common Mistakes to Avoid
- Letting seams land at the sink cutout corner. This is one of the most common structural weak points, especially with heavy undermount sinks.
- Centering a seam on the most visible run. A seam in the middle of the main sightline (from the kitchen entry) draws attention.
- Ignoring veining direction. Vein mismatches can look like a “mistake” rather than natural variation—especially in marble-look quartz.
- Assuming all fabricators seam the same way. Ask to see photos of previous seam work and reviews related to stone fabrication.
- Not planning for support. Overhangs (often 10"–12" without brackets, depending on material) and dishwashers need proper support; seam placement should respect those structural needs.
- Skipping maintenance planning. Seams in wet zones demand disciplined wipe-down habits and correct sealing (for natural stone).
Maintenance Tips to Keep Seams Clean and Strong
- Daily: Wipe with a soft cloth and mild soap; dry around seams near sinks.
- Weekly: Use a non-abrasive cleaner appropriate for your material (avoid vinegar on marble and limestone).
- Seasonally: Inspect seam lines for discoloration or separation, especially near the sink and dishwasher.
- For natural stone: Reseal as recommended by your installer; high-use kitchens may need sealing more often than “once a year.”
FAQ: Kitchen Countertop Seam Placement
How noticeable are countertop seams?
It depends on the material, pattern, and installer skill. Solid surface can have nearly invisible seams, while marble-look quartz and high-contrast stones can show seams if veining isn’t aligned. A good seam plan and color-matched epoxy make a big difference.
Is it better to have fewer seams?
Usually yes for aesthetics, but not at the expense of structural integrity. A well-placed seam near a corner is often better than forcing a large, fragile piece around a sink or tight opening.
Can seams be placed over a dishwasher?
They can, but it’s not always ideal. Dishwashers release heat and steam; over time, that environment can stress adhesives or cause discoloration in some materials. If a seam must be near a dishwasher, proper support and sealing are key, and some homeowners choose to shift the seam to an adjacent cabinet break.
What’s the best seam placement for an undermount sink?
Aim for a single piece across the sink run when possible. If a seam is unavoidable, keep it at least 6"–12" away from sink cutout corners and ensure the sink is properly supported (especially for farmhouse and heavy composite sinks).
Do waterfall islands always have seams?
Nearly always. A waterfall edge typically requires seams where the vertical panels meet the horizontal top. The goal becomes matching the pattern (especially veining) and placing seams where they read like intentional architecture.
Should the homeowner decide seam placement or the fabricator?
It’s collaborative. The fabricator understands structural and slab constraints; you understand how you use the kitchen and what you’ll see every day. Ask for a seam plan and request adjustments before fabrication begins.
Next Steps: How to Get the Seam Plan You’ll Be Happy With
- Measure your key runs: note lengths, island depth, and any unusual angles.
- Identify your “hero view”: the first sightline into the kitchen—keep seams subtle there.
- Mark your work zones: prep zone, coffee station, baking area, kids’ snack zone—avoid seams in the most-used spots.
- Ask for a slab layout preview: especially for veined quartz or marble.
- Choose the right material: prioritize solid surface for minimal seams, quartz for easy maintenance, granite for natural variation, and butcher block for warmth (with realistic expectations near water).
- Confirm maintenance needs: sealing schedules, cleaning do’s and don’ts, and what warranty covers seam issues.
A thoughtful seam placement plan makes your kitchen countertop look cleaner, function better, and feel more custom—without necessarily increasing your renovation budget.
For more kitchen renovation ideas, countertop inspiration, and practical organization tips, explore the latest guides on thedecormag.com.
More Articles
 Kitchen Layered Materials Design Guide - The Decor Mag
 Kitchen That Grows With Your Family (2026)
 Best Kitchen Cutting Board Care Products - The Decor Mag
 How to Choose Kitchen Backsplash Height - The Decor Mag
 Kitchen Soapstone Countertop Guide - The Decor Mag
 Best Kitchen Cutting Board Display | The Decor Mag
 Kitchen Fluted Wood Island Paneling - The Decor Mag
 Kitchen Leathered Quartzite Countertops - The Decor Mag
 Open Shelf Kitchen Styling Tips - The Decor Mag
 How to Choose Kitchen Cabinet Hinge Quality - The Decor Mag