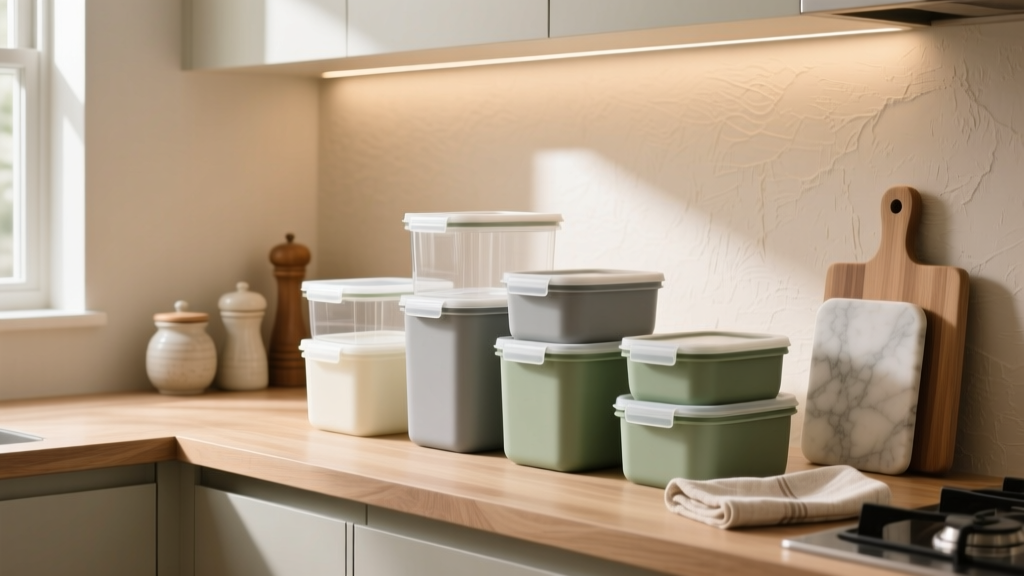
Best Kitchen Food Storage Container Systems - The Decor Mag
A well-designed kitchen isn’t just about beautiful cabinetry and the right countertops—it’s also about how efficiently you can store, find, and use what you buy. Food storage container systems sit at the center of daily kitchen life: they reduce waste, keep pantry staples fresh, streamline meal prep, and make leftovers feel like a plan instead of a chore.
For homeowners renovating a kitchen (or simply upgrading organization), choosing the right container system is a high-impact, relatively low-cost improvement. The best systems combine airtight performance, stackable footprints, clear labeling, and a layout that matches your cabinets, pantry shelves, and drawers. When containers “fit” your kitchen—literally and visually—your whole space feels calmer and more intentional.
This guide breaks down the best kitchen food storage container systems by material, layout, and use case, with practical measurements, cost ranges, maintenance tips, and the most common mistakes to avoid. You’ll also find design-forward recommendations that align with current kitchen design trends—without sacrificing timeless functionality.
What Makes a Great Food Storage Container System?
A “system” is more than a random set of tubs. The most effective kitchen organization solutions share a few essentials:
- Standardized footprints: A small number of base sizes that nest and stack cleanly (less cabinet chaos).
- Airtight seals: Especially for pantry storage containers holding flour, sugar, cereal, grains, nuts, coffee, and snacks.
- Clear visibility: Transparent sides or lids so you can spot ingredients at a glance.
- Interchangeable lids: Fewer lid types means fewer lost matches.
- Label-friendly surfaces: Flat faces that work with chalk markers, label tape, or a label maker.
- Right-sizing for your layout: Containers that fit shelf heights, drawer depths, and pull-outs.
Quick Measurement Checklist (Before You Buy)
Spend five minutes measuring your storage zones—this prevents the classic “beautiful containers that don’t fit anywhere” problem.
- Pantry shelf depth: Commonly 12–16 inches; deep shelves may need bins or turntables to avoid lost items.
- Vertical clearance between shelves: Often 10–14 inches; tall canisters may require 14–18 inches.
- Base cabinet interior depth: Commonly 22–24 inches; pull-outs are typically 18–21 inches deep.
- Drawer interior depth: Many drawers are 15–21 inches front to back; measure usable depth after accounting for drawer hardware.
- Recommended headspace: Leave 1/2–1 inch above tall containers for easy lift-out.
Best Materials for Kitchen Food Storage Containers (Pros, Cons, and Best Uses)
Glass Containers
Best for: leftovers, meal prep, oven-safe reheating (if rated), fridge organization, stain resistance.
- Pros: Doesn’t absorb odors; resists staining; feels premium; often dishwasher safe; many are microwave-safe (without lid).
- Cons: Heavier; can chip/break; typically higher cost; not ideal for high shelves if you want easy lifting.
- Design tip: Glass looks clean and elevated in open shelving or glass-front cabinets—ideal for modern kitchens and transitional renovations.
Cost range: $25–$80 for a 6–10 piece starter set; $80–$180 for a larger matched set with multiple sizes and airtight lids.
High-Quality Plastic (Tritan, BPA-Free Polypropylene)
Best for: everyday leftovers, kids’ lunches, lightweight stacking, large sets on a budget.
- Pros: Lightweight; shatter-resistant; often lower cost; good for cabinets and daily use.
- Cons: Can stain (tomato sauce, turmeric); may absorb odors; can warp over time depending on quality and heat exposure.
- Maintenance tip: Avoid high-heat drying cycles if your plastic is prone to warping; store lids loosely to prevent lingering odors.
Cost range: $15–$50 for a multi-piece set; $50–$120 for a premium modular system.
Stainless Steel Containers
Best for: lunches, on-the-go storage, odor resistance, durability.
- Pros: Extremely durable; doesn’t stain; great for travel; often lighter than glass.
- Cons: Not microwave-safe; contents aren’t visible; can feel less “organized” visually unless labeled well.
Cost range: $20–$60 per container set (varies widely by brand and leakproof features).
Silicone Bags and Collapsible Containers
Best for: freezer storage, flexible organization, small kitchens, reducing disposable bag use.
- Pros: Space-saving; freezer friendly; reusable; great for marinating and portioning.
- Cons: Can be harder to dry thoroughly; may hold odors if not cleaned well; less stackable than rigid containers.
Cost range: $10–$25 per bag; $40–$120 for a mixed bundle.
Top Kitchen Layout Approaches for Container Systems
The best container system supports your kitchen layout—not the other way around. These design approaches work especially well in kitchen renovations and organization upgrades.
1) The Pantry “Modular Grid” System (Most Renovation-Friendly)
For pantry organization, a modular grid uses a small number of container footprints that stack cleanly and align in rows. This creates a built-in look even in existing cabinetry.
Recommended container sizes (practical staples):
- Tall (2–4 qt / ~1.9–3.8 L): cereal, pasta, rice
- Medium (1–2 qt / ~0.95–1.9 L): oats, sugar, baking mixes
- Small (0.5–1 qt / ~0.47–0.95 L): nuts, chocolate chips, snacks, dried fruit
Shelf spacing tip: If you’re renovating, aim for 12–14 inches vertical clearance on at least one pantry shelf to accommodate tall canisters without wasted air above.
2) The “Fridge Zones” System for Freshness and Visibility
Current kitchen design trends favor high-function fridges: clear bins, dedicated zones, and consistent container shapes. The goal is fast inventory checks and less food waste.
- Prep zone: stackable glass containers on a middle shelf for cooked grains, chopped veg, proteins
- Snack zone: shallow clear bins (easy grab for kids and guests)
- Leftovers zone: uniform containers (same lid style) to avoid mismatched clutter
Measurement tip: Many fridge shelves comfortably hold containers up to 4–5 inches tall; reserve taller containers for door storage or lower shelves.
3) The “Drawer-First” Container System (Ideal for Modern Kitchens)
Deep drawers are a hallmark of modern kitchen renovations. They’re perfect for storing containers and lids in a way that stays neat.
- Use a peg system or adjustable drawer dividers to prevent sliding.
- Store lids vertically in a divider slot (like a file folder) for instant access.
- Choose containers designed to nest tightly to reduce drawer volume.
Recommended drawer dimensions: A drawer with 18–21 inches of usable depth and 6–10 inches height is typically ideal for container bases; shallow top drawers (3–4 inches) work best for lids only.
Product and System Recommendations (Practical, Design-Friendly Picks)
Rather than chasing dozens of niche containers, build a system around how you cook: pantry staples, leftovers, meal prep, lunches, and freezer storage. These categories consistently perform well in real kitchens.
Best for Pantry Storage: Airtight, Stackable Canisters
- Square/rectangular canisters maximize shelf space compared to round.
- Look for gasketed lids with a positive “click” or lever-lock seal.
- Choose 2–3 footprints and repeat them for a built-in, designer-organized look.
Budget guide:
- Starter pantry refresh: $40–$100 (8–12 canisters + labels)
- Full pantry reset: $150–$350 (20–30 canisters, bins, turntables, label system)
Best for Leftovers and Meal Prep: Glass with Leak-Resistant Lids
- Two-compartment containers are useful for lunches and portion control.
- Flat lids stack better in the fridge and reduce wobble.
- Choose a single lid style for most containers to eliminate mismatch.
Practical set builder:
- 4 x 3-cup containers (everyday leftovers)
- 4 x 1–2 cup containers (sauces, sides, snacks)
- 2 x 6–8 cup containers (batch cooking)
Budget guide: $60–$180 depending on brand, lid quality, and whether pieces are oven-safe.
Best for Freezer Organization: Flat, Stackable, and Label-Ready
- Use uniform rectangular containers for stacking stability.
- Consider silicone freezer bags for soups and sauces; freeze flat for space efficiency.
- Pick containers with frost-resistant clarity (some plastics cloud in the freezer).
Freezer labeling tip: Write the item + date + portion size. For example: “Chili 5/12 — 2 servings.” This small habit prevents forgotten freezer science projects.
Best for Small Kitchens: A Hybrid System
If you’re short on cabinet space, a hybrid system offers the most flexibility.
- Pantry: 8–12 airtight canisters in two sizes
- Fridge/leftovers: 8–10 glass containers with interchangeable lids
- Freezer: 6–10 silicone bags + a few rigid stackable containers
Budget guide: $100–$250 for a complete, cohesive system that won’t overwhelm limited storage.
Design Details That Make Containers Look Built-In (Not Busy)
Kitchen design trends lean toward calm, curated spaces—think warm neutrals, concealed storage, and “appliance garage” zones. Your container system can support that same aesthetic.
- Label consistently: Choose one label style (clear, white, or kraft) and one font style for a streamlined look.
- Decant strategically: Decant only the items you use weekly (flour, sugar, oats, rice, pasta). Leave rarely used items in original packaging inside bins.
- Use matching bins for packets: Tea, seasoning packets, and snack bars look intentional when grouped in identical bins.
- Keep a “backstock” zone: One bin for extras prevents duplicates and overbuying.
Maintenance and Longevity: How to Keep Your System Working
- Wash and dry lids thoroughly: Gaskets trap moisture. Air-dry fully to prevent odors or mildew.
- Remove seals occasionally: If your lids have removable silicone rings, pull and wash them every few weeks.
- Avoid abrasive scrubbers on clear plastic: They cause clouding and scratches that hold odors.
- Stain control for plastic: A baking soda paste or a brief soak with diluted vinegar can help; avoid harsh chemicals that degrade plastic.
- Replace strategically: If lids stop sealing or warp, replace lids (if available) rather than the whole system.
Budget Planning for Kitchen Renovation and Organization Upgrades
Food storage container systems are an easy win during a kitchen renovation because they improve daily function without requiring construction. Match your spending to your goals:
- Under $75: Focus on one pain point (pantry canisters OR leftovers). Add basic labels.
- $75–$200: Build a cohesive system for pantry + leftovers with interchangeable lids.
- $200–$500: Full pantry decanting, fridge bins, matching containers, label maker setup, turntables, and pull-out-friendly bins.
Where to spend more: airtight pantry lids and leak-resistant leftover containers. These are the pieces you use daily, and quality shows quickly.
Common Mistakes to Avoid
- Buying a huge set before measuring: Always measure shelves and drawers first—especially in older kitchens.
- Too many shapes and lid types: Systems fail when lids don’t match. Standardize early.
- Over-decanting everything: Decanting is beautiful, but it’s also maintenance. Prioritize high-use staples.
- Ignoring how you actually cook: Bakers need more airtight volume; frequent leftover eaters need stackable fridge containers.
- Choosing round containers for tight shelves: Round can waste up to 20–30% of shelf area compared to square/rectangular footprints.
- Storing heavy glass on high shelves: Keep heavy items at waist height for safety and easy access.
FAQ: Kitchen Food Storage Container Systems
How do I choose the right container sizes for my pantry?
Start with your weekly staples. A practical baseline is 2–4 tall canisters (pasta, rice, cereal), 6–10 medium canisters (oats, sugar, flour, snacks), and 6–10 small canisters (nuts, baking add-ins). Measure shelf height first—many tall canisters need 12–14 inches of clearance.
Are glass containers worth the higher cost?
For many homeowners, yes—especially for leftovers and meal prep. Glass resists staining and odors, feels more premium, and often lasts longer. A hybrid approach (glass for fridge, airtight plastic for pantry) balances cost and performance.
What’s the most space-efficient shape: round or square?
Square or rectangular containers are typically the most space-efficient for cabinets and pantry shelves because they align in rows with minimal wasted space. Round containers can work well for turntables or corner storage.
How can I stop plastic containers from smelling like old food?
Wash promptly, avoid high-heat drying if the plastic is sensitive, and let containers and lids fully air-dry. For lingering odors, soak with warm water and baking soda, and wash silicone gaskets separately if removable.
Should I store container lids on or off?
Store lids off when possible if containers are clean and dry—this prevents trapped moisture and odors. In drawers, store lids vertically in dividers. In cabinets, stack lids by type in a bin.
What’s the best approach during a kitchen renovation?
Plan storage from the inside out. Measure pantry shelves and drawer interiors, then choose a container system that matches those dimensions. If you’re updating cabinetry, prioritize deep drawers and pull-out pantry shelves—both make container systems significantly easier to maintain.
Next Steps: Build a System That Fits Your Kitchen
Start by measuring your pantry shelves and drawers, then choose one primary material for each job: airtight canisters for pantry staples, stackable glass for leftovers and meal prep, and freezer-friendly bags or containers for bulk storage. Standardize shapes and lid types, label consistently, and keep your most-used items at eye level for a kitchen that functions as beautifully as it looks.
For more kitchen renovation ideas, smart organization strategies, and timeless home decor inspiration, explore the latest guides and real-home features on thedecormag.com.
More Articles
 Kitchen Cabinet Color for Resale (2026)
 Kitchen That Inspires Cooking: Design Ideas (2026)
 Kitchen Glass Front Cabinet Styling - The Decor Mag
 How to Design a Kitchen for Entertaining - The Decor Mag
 How to Choose Kitchen Cabinet Pull Length - The Decor Mag
 Best Kitchen Cutting Board Wall Mount Ideas - The Decor Mag
 Friendly vs. Solutions: A Practical, Kitchen-Tested Comparison of Two Leading Countertop Materials
 Pantry Organization: Fresh Produce & BBQ Storage (2026)
 Create Care and Maintenance: A Practical, Brand-Specific Guide for Modern Kitchens
 Kitchen Ribbed Glass Front Cabinet Trend - The Decor Mag