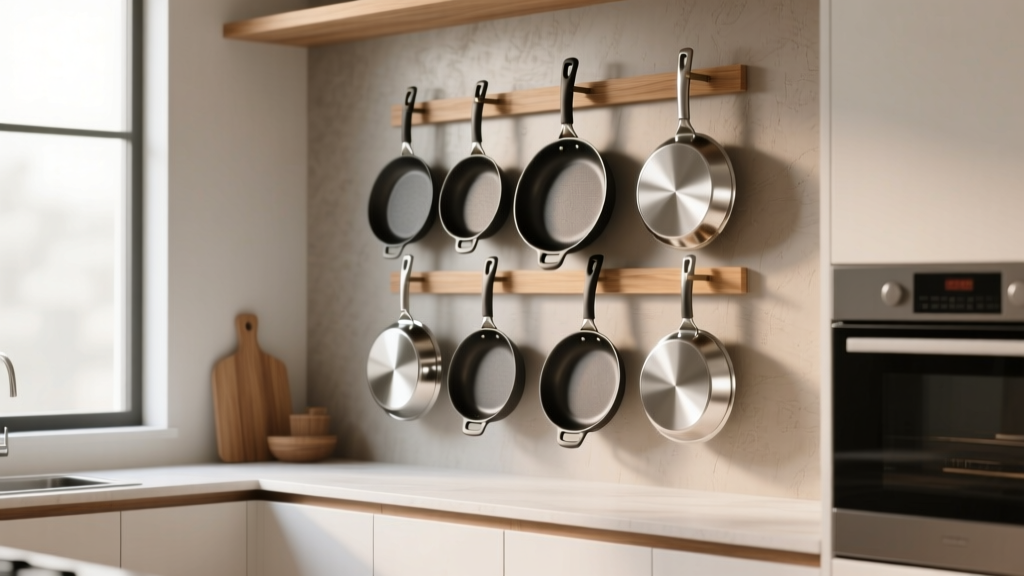
Best Kitchen Specialty Pan Storage - The Decor Mag
Specialty pans are the quiet workhorses of a well-loved kitchen—sheet pans that live in constant rotation, a cast-iron skillet that sears like a dream, a Dutch oven that anchors winter cooking, and the occasional bundt pan or roasting rack that appears when holidays roll around. The challenge? These pieces are bulky, heavy, and rarely stack neatly. When they’re shoved into a deep base cabinet, they scratch, clang, and become the reason you avoid using the pan you actually own.
Thoughtful specialty pan storage solves more than clutter. It protects finishes, reduces noise, improves kitchen workflow, and makes everyday cooking easier—especially in renovated kitchens where cabinetry is a major investment. The best solutions are equal parts layout, hardware, and habits: choosing the right cabinet sizes, reinforcing heavy-duty areas, and using organizers that match how you cook.
This guide covers practical, renovation-ready ideas and renter-friendly upgrades, with specific measurements, material comparisons, cost ranges, and common mistakes to avoid. Whether you’re redesigning your kitchen or refining what you already have, these strategies help you store specialty cookware like a pro.
What Counts as “Specialty Pans” (and Why They’re Tricky)
Specialty pans generally include anything beyond standard nesting saucepans:
- Sheet pans (half sheet 18" x 13", quarter sheet 13" x 9")
- Cast iron (10"–12" skillets; griddles; enameled cast-iron)
- Dutch ovens (5–7 qt; often 12"+ diameter including handles)
- Roasting pans (often 16"–18" long with racks)
- Grill pans, pizza stones/steels, baking stones
- Bundt, springform, tart, loaf pans
- Woks, paella pans, specialty lids
They’re tricky to store because they’re:
- Wide (need clearance at the cabinet opening, not just inside the box)
- Heavy (require reinforced shelves, strong drawer slides, and smart placement)
- Awkwardly shaped (handles, racks, domed lids, ridges)
- Finish-sensitive (nonstick and enameled surfaces scratch easily)
Plan Storage Around How You Cook (Workflow First)
Current kitchen design trends favor “zones” over one-size-fits-all cabinets. Specialty pan storage works best when it supports the cooking zone:
- Near the range: cast iron, everyday skillets, griddles, sauté pans
- Near the oven: sheet pans, roasting pans, muffin tins, baking sheets
- Near prep space: mixing bowls, cutting boards, colanders (so pans aren’t fighting for the same cabinet)
Practical placement rule
Put the heaviest items between knee and waist height (roughly 18"–48" from the floor) to reduce strain and protect cabinetry. Avoid storing cast iron on high shelves unless you have a strong reason and safe access.
Best Cabinet Layouts for Specialty Pan Storage
1) Vertical tray dividers (the gold standard for sheet pans)
Vertical storage keeps pans separated, visible, and easy to pull out. This is one of the most timeless, high-function kitchen organization upgrades you can add during a renovation.
Where it works best: a narrow base cabinet near the oven or a tall pantry section.
Recommended dimensions:
- Cabinet width: 9"–12" (great for baking sheets), 15"–18" (fits more, but dividers become more important)
- Interior depth: 21"–24" (fits half-sheet pans front-to-back in most base cabinets)
- Opening height: 18"+ gives comfortable clearance for tall stacks
- Divider spacing: 1"–2" per slot (wider slots for roasting pans and racks)
Material recommendations:
- Stainless steel dividers: durable, wipe-clean, best for heavy use
- Hardwood (maple, birch): warm look, sturdy, can be refinished
- Powder-coated steel: budget-friendly, good corrosion resistance
Cost range: $30–$120 for add-on organizers; $200–$600+ if integrated into custom cabinetry with matching face frames.
2) Deep drawers with heavy-duty slides (best for cast iron and Dutch ovens)
Deep base drawers are a modern kitchen design staple for a reason: they turn “digging” into “gliding.” For specialty pans, drawers protect your back and make cookware easier to access than deep cabinets with shelves.
Recommended specs:
- Drawer depth: 21"–24" (typical base depth)
- Drawer height: 10"–12" for stacked skillets; 12"–15" for Dutch ovens
- Slide rating: 90–100 lb minimum; 110 lb+ for cast-iron-heavy households
- Full extension: yes (so you can reach the back without pulling everything out)
Interior accessories that actually help:
- Low-profile peg systems (wood or composite) to prevent pans from sliding
- Non-slip drawer liners (choose heat- and oil-resistant options)
- Upright lid organizers at the back of the drawer to corral lids
Cost range: $150–$350 per drawer for quality slides and a sturdy drawer box in a renovation; $20–$80 for liners/peg kits in an existing drawer.
3) Pull-out base cabinets (great when drawers aren’t possible)
If your kitchen renovation layout calls for doors (or you’re upgrading existing cabinets), pull-outs can mimic drawer convenience. Look for solid sidewalls and full-extension slides.
Best uses:
- Storing medium-heavy stacks of pans
- Creating a dedicated “bakeware pull-out” near the oven
What to buy:
- Solid plywood pull-out boxes over thin wire baskets for heavier loads
- Soft-close, full-extension slides rated for 75–100 lb+
Cost range: $80–$250 per pull-out retrofit; $250–$700+ for higher-end systems and professional installation.
4) Appliance garage or tall pantry “pan zone” (best for bakers)
If you bake often, a tall pantry can store sheet pans, cooling racks, cake pans, and baking stones in one place. This is a trend-forward approach that still feels timeless because it’s about function and zoning.
Design details that matter:
- Use vertical slots for sheets and racks
- Include one adjustable shelf for bulky items (bundt pan, springform sets)
- Add a shallow drawer for piping tips, parchment, and pastry tools
Cost range: $500–$2,500+ depending on whether you’re adding a new pantry cabinet, customizing internals, or renovating a wall section.
Best Storage Products and Organizers (Renovation-Friendly and Easy Upgrades)
Vertical pan organizer racks
Look for adjustable dividers and a stable base. These are ideal inside a cabinet or pantry shelf.
- Best for: sheet pans, muffin tins, cooling racks
- Materials: stainless steel (premium), powder-coated steel (mid-range)
- Typical cost: $25–$80
Expandable bakeware dividers for drawers
These keep lids and pans upright, especially when you prefer drawers but don’t want a full peg system.
- Best for: lids, griddles, cutting boards, pizza stones
- Typical cost: $20–$60
Under-shelf racks (use with caution)
Under-shelf clip-on racks can hold light items, but they can sag under weight.
- Best for: lightweight baking trays, cooling racks
- Avoid for: cast iron, Dutch ovens, heavy roasting pans
- Typical cost: $15–$40
Pan protectors and separators
Simple felt or silicone separators prevent scratches and extend the life of nonstick and enameled finishes.
- Best for: stacking nonstick skillets, enameled Dutch ovens (lid-to-pot contact)
- Typical cost: $10–$25 per set
Materials That Hold Up: What to Choose (and Why)
Plywood vs. particleboard for heavy cookware storage
- Plywood (recommended): strong, screw-holding, less prone to sag; best for pull-outs and drawer boxes holding cast iron
- Particleboard: budget-friendly but can sag under heavy loads and is vulnerable to moisture; acceptable for lighter bakeware if properly supported
Drawer slide types
- Undermount soft-close slides: sleek, quiet, premium feel; verify weight rating
- Side-mount ball-bearing slides: very durable and often higher load-rated; slightly more visible
Finishes and maintenance
- Powder-coated metal: wipe with mild soap; avoid abrasive cleaners
- Stainless steel: use a microfiber cloth; clean fingerprints with a diluted vinegar solution
- Wood dividers: dust regularly; spot-clean and re-seal if exposed to moisture
Smart Measurements and Clearances (So Everything Actually Fits)
Cabinet design mistakes often happen because homeowners measure the pan but forget the handles, the cabinet opening, or the door hinges. Use these practical guidelines during a kitchen remodel:
- Measure your largest item first (often a roasting pan with handles or a pizza stone/steel).
- Add clearance: plan for at least 1"–2" extra around the widest point for easy in/out.
- Account for hinges and face frames: they reduce the usable opening width.
- Avoid shelf sag: for heavy stacks, use 3/4" plywood shelves or add center support if spans exceed ~30".
Quick fit checks:
- Half-sheet pan (18" x 13") typically fits in standard 24" deep base cabinets, but may not fit in shallow pantries.
- Dutch oven often needs 12"–15" vertical clearance if stored with lid on.
- Wide handles can require more opening space than the cabinet interior suggests.
Budget Considerations: Where to Spend and Where to Save
Kitchen renovation budgets add up quickly, so prioritize upgrades that improve daily use and protect cabinetry.
Spend here (high ROI for organization)
- Heavy-duty drawer slides for cookware drawers (especially cast iron)
- Full-extension functionality (drawers or pull-outs) in base cabinets
- Dedicated vertical tray storage near the oven
Save here (without sacrificing function)
- Use retrofit organizers instead of custom dividers if cabinets are in good condition
- Add felt/silicone pan protectors instead of replacing scratched cookware
- Choose powder-coated steel organizers over premium stainless where it’s hidden in cabinets
Typical cost tiers:
- Budget ($50–$200): pan separators, one vertical rack, liners, basic lid organizer
- Mid-range ($200–$800): 1–2 pull-outs, upgraded slides, a dedicated tray-divider cabinet insert
- Renovation-level ($800–$3,000+): multiple deep drawers with high load ratings, custom tray divider cabinet, pantry bakeware zone
Common Mistakes to Avoid
- Storing heavy pans on high shelves: safety risk and inconvenient; keep them low and accessible.
- Buying organizers before measuring: check cabinet opening width, interior depth, and hinge interference.
- Overstacking without protection: nonstick and enamel scratch quickly; use separators or store vertically.
- Ignoring weight ratings: weak slides and thin shelves fail faster under cast iron and stacks of sheet pans.
- Mixing “everyday” and “occasional” pans together: keep daily cookware closest to the range/oven; store holiday-only items higher or deeper.
- Wasting corner cabinets: consider a blind-corner pull-out system if pans end up lost and unused (often $400–$1,200 installed).
Maintenance and Longevity Tips (Protect Your Investment)
- Clean crumbs and grit monthly from tray-divider bases and drawer corners; grit causes scratches and makes drawers feel rough.
- Check and tighten hardware every 6–12 months (drawer fronts and pull-out mounting screws can loosen with heavy use).
- Use liners strategically: non-slip liners reduce shifting but should be removed occasionally to clean trapped moisture.
- Prevent rust transfer: fully dry cast iron before storing; consider a thin paper towel barrier if humidity is high.
FAQ: Kitchen Specialty Pan Storage
What’s the best way to store sheet pans in a renovated kitchen?
A vertical tray divider cabinet (9"–12" wide) near the oven is the most efficient and renovation-friendly solution. Aim for 1"–2" spacing per slot and enough depth to accommodate a half-sheet pan.
Are drawers really better than cabinets for heavy cookware?
Yes, when built correctly. Deep drawers with full-extension, high load-rated slides (90–110 lb+) offer safer access and better visibility than cabinet shelves, especially for cast iron and Dutch ovens.
How do I prevent nonstick pans from scratching when stacked?
Use felt or silicone pan protectors between pieces and avoid storing heavy pans on top of nonstick. If space allows, store nonstick vertically or in a dedicated drawer section.
What cabinet size is ideal for a pull-out bakeware organizer?
A 12"–18" base cabinet works well for pull-outs. Ensure the organizer is sized for your cabinet opening (not just interior width) and choose full-extension slides for easy access.
Can I store a Dutch oven with the lid on?
You can, but it often wastes vertical space. For tighter storage, store the lid slightly ajar or upside down with a soft protector in between. Make sure the shelf or drawer height is at least 12"–15" for many models.
What’s a simple upgrade if I’m not renovating?
Add a vertical rack inside a base cabinet for sheet pans and a non-slip liner/peg system in an existing deep drawer. These are low-cost kitchen organization improvements with immediate impact.
Next Steps: A Storage Plan You’ll Feel Every Day
Start by pulling every specialty pan out and sorting into two groups: weekly use and seasonal/occasional use. Measure the biggest items (including handles), then choose one primary solution for each zone:
- Near the oven: vertical tray dividers for sheets and roasting pans
- Near the range: deep drawers with heavy-duty slides for cast iron and Dutch ovens
- Elsewhere: a pantry bakeware zone or a pull-out cabinet for overflow
When specialty pans are stored with intention, cooking feels smoother, cabinets stay quieter, and your kitchen renovation delivers daily convenience—not just good looks. For more kitchen design, renovation, and organization ideas tailored to real homes, explore the latest guides at thedecormag.com.
More Articles
 Kitchen Mixed Material Countertop Design - The Decor Mag
 Farmhouse Kitchen Decor Inspiration - The Decor Mag
 Best Kitchen Charging Drawer Solutions - The Decor Mag
 Best Kitchen Oil and Vinegar Storage - The Decor Mag
 How to Design a Kitchen with a Scullery - The Decor Mag
 Kitchen Textured Backsplash Tile Trends - The Decor Mag
 Kitchen Backsplash Ideas That Stand Out - The Decor Mag
 Kitchen Statement Ceiling Design Ideas - The Decor Mag
 How to Choose Kitchen Cabinet Door Styles - The Decor Mag
 Kitchen Natural Light Design Tips (2026)