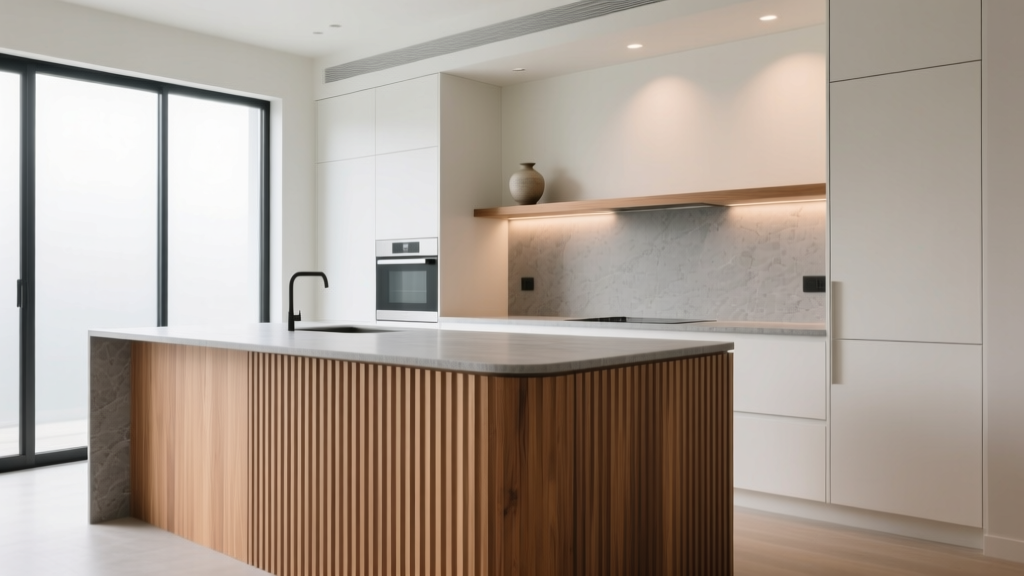
Kitchen Fluted Wood Island Paneling - The Decor Mag
A kitchen island does more than add prep space—it anchors the room. If your kitchen feels builder-basic or visually flat, fluted wood island paneling is one of the most effective ways to introduce texture, warmth, and “custom” character without a full gut renovation. The subtle rhythm of vertical or curved grooves catches light beautifully, making an island look like a furniture piece rather than another box of cabinetry.
Fluted paneling is also showing up everywhere in current kitchen design trends: warm woods, mixed materials, and islands that feel more like curated décor than purely utilitarian cabinetry. When done well, it’s not just a style move—it helps the island wear everyday life better by disguising minor dings, scuffs, and fingerprints that tend to show on flat, glossy surfaces.
This guide covers what fluted wood paneling is, how to choose materials, where it works best, real-world measurements, cost ranges, and how to avoid the mistakes that can turn a beautiful idea into a maintenance headache.
What Is Fluted Wood Island Paneling (and Why It Works)
Fluted paneling refers to a surface treatment with repeating grooves—usually vertical—built from routed wood/MDF panels, applied slat systems, or flexible reeded sheets that wrap around island ends and faces. It’s often called reeded wood or slatted paneling, though true fluting typically has rounded channels while slats read as sharper ribs.
Design benefits homeowners notice immediately
- Instant depth: Adds shadow lines and dimension, making the island look more expensive.
- Warmth and softness: Helps balance stone countertops, stainless appliances, and large expanses of white cabinetry.
- Trend-friendly but not trendy: Fluting appears in classic architecture and furniture, so it can feel timeless when paired with simple finishes.
- Camouflage factor: Minor wear blends into the texture more than it does on flat painted panels.
Where Fluted Paneling Makes the Most Sense on an Island
Not every side of the island needs fluting. Strategic placement keeps the look clean and prevents the kitchen from feeling overly busy.
Best applications
- Back (seating) side: The most visible face in open-concept kitchens—ideal for statement texture.
- End panels: Great for adding detail without committing to a fully fluted island.
- Waterfall look alternative: If you love a stone waterfall but want a warmer budget, fluted wood on the ends can deliver drama at a lower cost.
When to be cautious
- High-splash zones: If the island houses a prep sink, keep fluting away from where water drips repeatedly.
- Tight walkways: Deep grooves can catch bags, belt loops, and chair corners if clearance is already tight.
Key Measurements and Layout Rules (So It Looks Built-In)
Fluted paneling looks best when it aligns with your island’s proportions and the kitchen’s circulation. Use these renovation-friendly guidelines:
Island clearance and seating spacing
- Walkway clearance: Aim for 42 inches minimum around the island; 48 inches is more comfortable in busy kitchens.
- Seating knee space: Plan for 12–15 inches overhang for counter-height seating; 15–18 inches for deeper comfort (confirm with your countertop material’s support requirements).
- Seat width: Allow 24 inches per stool (30 inches if you want a more generous, lounge-like feel).
Fluting scale: choose a groove size that matches your island
- Small islands (under 6 ft): Finer reeding tends to look more refined (tighter spacing keeps it from feeling striped).
- Large islands (7–10 ft): Medium to wider flutes read better from a distance and feel architectural.
- Depth consideration: Avoid overly deep profiles on the seating side if stools will rub against it.
Start/stop alignment that makes it look custom
- Center the pattern on the most visible face so the grooves look intentional.
- Wrap corners cleanly (mitered returns or matching end caps) so the transition doesn’t look like a patch.
- Match toe-kick height to nearby cabinetry for a built-in feel; many kitchens use a 3.5–4.5 inch toe-kick.
Material Options: What to Use (and What to Skip)
The right material depends on budget, durability needs, and whether you want a stained wood look or painted finish.
1) Solid wood (premium, best for stain)
Best for: natural wood kitchens, stained finishes, heirloom durability.
- Pros: Rich grain; can be refinished; strongest against dents.
- Cons: Higher cost; wood movement requires careful installation; stains vary by species.
- Recommended species: white oak (top trend), walnut (luxury), maple (smooth), ash (light and modern).
2) Veneered panels (high-end look with better stability)
Best for: getting a real-wood look with fewer movement issues.
- Pros: More stable than solid wood; often more budget-friendly; consistent appearance.
- Cons: Veneer can chip at edges if banged; refinishing options are limited compared to solid wood.
3) Moisture-resistant MDF (best for paint, budget-friendly)
Best for: painted fluted islands, smooth modern kitchens, cost control.
- Pros: Paints beautifully; consistent; affordable; easy to route.
- Cons: Can swell if water penetrates; edges must be sealed well.
- Tip: Choose MR-MDF (moisture-resistant) and insist on thorough priming, including inside grooves.
4) Flexible reeded sheets (great for curved islands)
Best for: rounded corners, curved island fronts, fast upgrades.
- Pros: Wraps around curves; quick installation; lighter weight.
- Cons: Durability varies; seams must be carefully planned; may not feel as substantial as solid panels.
Material comparison (quick decision guide)
- Want stain + top durability: solid wood or quality veneer.
- Want paint + smooth, crisp lines: MR-MDF.
- Want a curved island: flexible reeded sheets over a smooth substrate.
Design Approaches That Look Current (and Stay Functional)
Fluted paneling can lean modern, transitional, or softly traditional depending on the pairings. These combinations align with today’s kitchen renovation trends—without sacrificing timeless usability.
White oak fluting + light quartz (warm modern classic)
- Pair with matte black or aged brass hardware.
- Use simple slab or Shaker perimeter cabinets to keep the island as the star.
- Works especially well with creamy whites and greige walls.
Painted fluted island + statement pendant lighting (high impact, controlled budget)
- Deep tones like olive, charcoal, navy, or warm putty elevate a painted island.
- Choose a durable cabinet enamel or 2K finish if available.
- Balance texture with a simpler countertop edge (eased or small radius).
Fluting only on the back + storage-forward work side (best of both worlds)
- Keep the kitchen work zone practical: drawers, pull-outs, trash, and dishwasher panels remain standard.
- Add fluting where guests see it most: the seating side.
Curved fluted end panels (softens traffic flow)
- Helpful in tighter layouts where sharp corners get bumped.
- Pairs nicely with rounded countertop corners for a cohesive look.
Product and Build Recommendations (What to Ask For)
Whether you DIY the island facelift or work with a cabinet maker, use these specifications to get better results.
Recommended build details
- Finish durability: Ask for a catalyzed conversion varnish or similar cabinet-grade topcoat for stained wood.
- Edge protection: Specify clean, reinforced outer corners—especially on seating ends.
- Seam planning: If the face is longer than a single panel, plan seams near corners or breaks (like legs) to hide them.
- Integrated “furniture base”: Consider adding a slightly recessed plinth base or bun-foot-inspired toe detail for a custom furniture look.
Smart add-ons that improve daily function
- Outlet placement: Place outlets on the island ends or under the counter overhang to keep the fluted face clean.
- Trash pull-out location: Put it near prep zones, not where stools will block access.
- Protective stool spacing: Choose stools with footrests and avoid sharp metal backs that may scrape the grooves.
Cost Ranges and Budget Planning
Costs vary by material, island size, whether you’re refacing an existing island, and local labor rates. Use these realistic ranges as a planning tool for your kitchen remodel budget.
Typical pricing (installed)
- DIY peel-and-stick or lightweight decorative panels: $150–$600 (best for low-wear areas; quality varies widely).
- Refacing with MDF or veneered fluted panels: $800–$2,500 depending on size and finish quality.
- Custom fluted millwork (solid wood, furniture-grade finish): $2,500–$7,500+, especially if wrapping multiple sides or adding curved details.
Budget levers (where to save vs. splurge)
- Save: Flute only the seating side and keep work-side cabinetry standard.
- Save: Choose painted MR-MDF instead of stained wood if your kitchen design doesn’t require visible grain.
- Splurge: Durable finish systems and professional spray finishing—this is what keeps the grooves looking clean over time.
- Splurge: Curves and radius corners (more labor, higher craftsmanship).
Maintenance and Cleaning: Keep the Grooves Looking Crisp
Fluting adds texture—texture collects dust. The good news: with the right finish and a simple routine, upkeep is easy.
Weekly cleaning routine
- Dust first: Use a microfiber cloth or soft brush attachment on a vacuum.
- Wipe with a damp cloth: Mild dish soap in warm water is usually enough.
- Dry immediately: Especially for MDF and veneer edges.
What to avoid
- Abrasive pads or powders (can dull paint and topcoats on the ridges).
- Heavy degreasers on stained wood (can weaken finishes over time).
- Soaking grooves with water (risk of swelling or finish failure).
Pro tip for high-touch areas
If kids frequently kick the island or stools bump the face, consider a slightly more satin sheen instead of dead-flat. It’s more wipeable and hides fingerprints better without looking glossy.
Common Mistakes to Avoid
- Choosing a too-busy groove pattern: Very tight, high-contrast fluting can create a “striped” look that overwhelms small kitchens.
- Ignoring clearances: If your walkway is under 42 inches, a thick applied panel can make the space feel cramped.
- Not sealing all surfaces: Unsealed grooves and edges are where moisture damage starts.
- Poor seam placement: Visible butt seams across the center of the island face read as an afterthought.
- Overdesigning the island: Fluting plus heavy corbels plus ornate hardware can look cluttered—choose one hero detail and let it breathe.
FAQ: Kitchen Fluted Wood Island Paneling
Is fluted wood island paneling hard to clean?
It takes slightly more effort than a flat panel, but it’s manageable. Dust with a microfiber cloth or vacuum brush, then wipe with a damp cloth and mild soap. A durable cabinet-grade finish makes the biggest difference.
Can I add fluted paneling to an existing kitchen island?
Yes. Many homeowners reface the seating side and/or end panels without changing the countertop. Confirm that added thickness won’t reduce walkway clearance and plan outlet locations before installing.
What’s better for a painted fluted island: wood or MDF?
For paint, moisture-resistant MDF typically delivers the smoothest, most consistent finish and crisp grooves at a lower cost. Solid wood is better when you want a stained look and visible grain.
Does fluted paneling work in small kitchens?
It can, especially if you keep it to one surface (usually the seating side) and choose a finer profile. Pair it with simple cabinetry and uncluttered countertops to avoid visual overload.
How do I prevent fluted panels from looking dated?
Keep the surrounding choices timeless: simple cabinet doors, classic hardware shapes, and a restrained color palette. Think of fluting as texture—like a good rug—rather than a theme.
Can fluted paneling be used on a curved island?
Yes. Flexible reeded sheets or carefully kerfed wood systems can wrap curves. This usually increases labor and cost but creates a high-end, architectural result.
Next Steps: Plan Your Fluted Island Upgrade with Confidence
Start by deciding where fluting will have the most impact—typically the seating side or island ends—then choose a material based on your finish goals (stained wood vs. painted), lifestyle, and budget. Measure your clearances (aim for 42–48 inches around the island), confirm seating needs, and prioritize a durable, cleanable finish. If you’re working with a contractor or cabinet shop, bring reference photos and ask how they’ll handle corners, seams, and sealing.
For more kitchen renovation ideas, island design inspiration, and practical organization upgrades, explore the latest guides and trend roundups on thedecormag.com.
More Articles
 Best Kitchen Towel Storage Ideas - The Decor Mag
 How to Choose Kitchen Cabinet Glass Type - The Decor Mag
 Best Kitchen Ladder for High Shelf Access - The Decor Mag
 Minimalist Kitchen Design Essentials - The Decor Mag
 Kitchen Marble Countertop Pros and Cons - The Decor Mag
 How To Match Nightstand With Lighting: A Practical, Design-Forward Guide
 Best Kitchen Lighting for Function & Style (2026)
 How to Design a Kitchen for Entertaining - The Decor Mag
 Kitchen Patina Brass Faucet Beauty - The Decor Mag
 Kitchen Plaster Walls Organic Feel - The Decor Mag