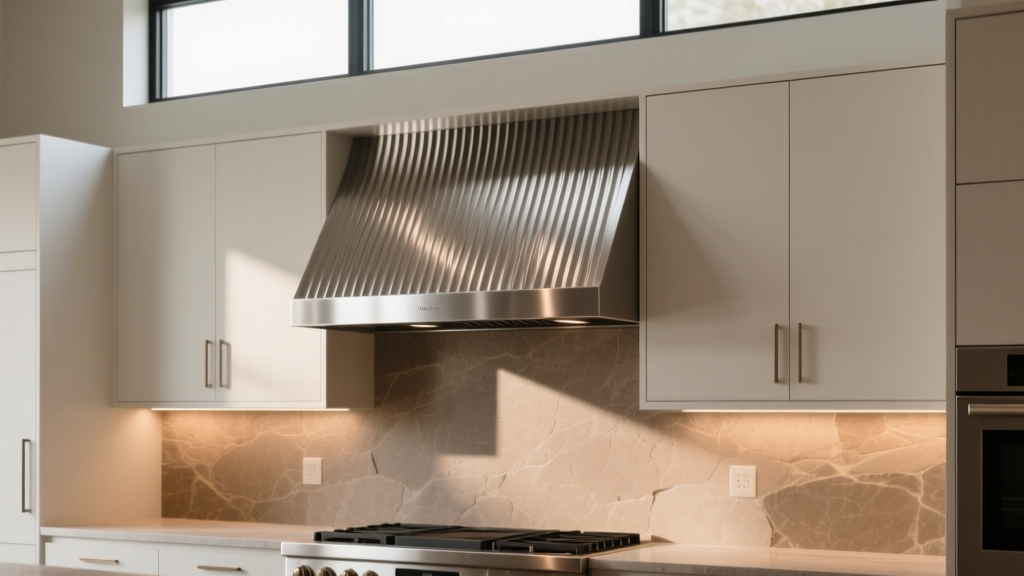
Kitchen Fluted Range Hood Cover Ideas - The Decor Mag
A range hood is one of the hardest-working elements in a kitchen renovation, yet it’s often treated like a purely functional box. A fluted range hood cover changes that equation. With vertical grooves that catch light and add depth, fluting turns ventilation into architecture—creating a focal point that feels custom, current, and intentional.
For homeowners planning a kitchen remodel (or even a targeted refresh), fluted range hood covers offer a sweet spot: they’re visually impactful, compatible with many cabinet styles, and available across price points. Better still, they pair beautifully with today’s most requested kitchen design trends—warm whites, natural wood, mixed metals, and statement stone—while still delivering timeless functionality.
This guide shares practical fluted range hood cover ideas, material recommendations, size guidelines, cost ranges, and common pitfalls to avoid, so your new hood looks as good as it performs.
Why Fluted Range Hood Covers Are Trending (and Why They Last)
Fluting isn’t new—it’s rooted in classical architecture and mid-century millwork—but it’s having a major moment in kitchen design. The appeal is simple: vertical grooves create texture without visual clutter, making them ideal for both modern kitchens and transitional spaces.
- Creates height and emphasis: Vertical lines draw the eye upward—especially helpful in kitchens with standard 8-foot ceilings.
- Adds texture without busy patterns: A fluted hood can replace ornate corbels or fussy trim while still feeling elevated.
- Plays well with many finishes: Paint-grade MDF, stained wood, plaster, and even ribbed metal can all be fluted.
- Pairs with organization-minded layouts: A strong focal point above the range helps anchor symmetrical cabinetry, shelves, and backsplash design.
Start With Function: Range Hood Size, Venting, and Clearances
Before choosing a hood cover style, lock in the ventilation plan. A gorgeous fluted cover won’t matter if smoke lingers or grease builds up.
Key measurements to confirm
- Hood width: Ideally the hood insert is the same width as your cooktop or 3 inches wider on each side for better capture (example: 30" cooktop → 30"–36" hood).
- Mounting height above cooking surface:
- Electric/induction: typically 20"–24"
- Gas ranges: typically 24"–30" (follow manufacturer requirements)
- Duct size: Many mid-to-high-performing inserts require 6"–10" ducting. Undersized ducts reduce performance and increase noise.
- Depth: Standard inserts are often 18"–22" deep. Deeper can be better for heavy cooking (wok, searing, frying).
CFM guidelines (quick planning rule)
- 30" range: often 350–600 CFM depending on cooking style
- 36" range or frequent high-heat cooking: often 600–1,200 CFM
Budget note: Higher CFM often means a larger insert, stronger blower, better make-up air planning, and a higher installed cost.
Fluted Range Hood Cover Styles That Work in Real Kitchens
1) Full-height fluted hood (cabinet-to-ceiling statement)
This is the most dramatic option and a favorite in current kitchen renovation projects. A full-height fluted cover that runs to the ceiling eliminates awkward soffits and makes the range wall feel bespoke.
Best for: ceiling-height cabinetry, minimalist kitchens, slab or shaker cabinets, large-format backsplashes.
- Typical proportions: 36"–48" wide; 18"–24" deep; height varies by ceiling.
- Design tip: Keep fluting consistent from the lower hood body to the upper chimney for a clean, tailored look.
Cost range: $1,200–$4,500 for the cover (materials + fabrication), plus $500–$2,500 for the insert and installation complexity.
2) Fluted “chimney” with a smooth lower band
For a softer, more layered look, use fluting on the upper section and a smooth or lightly trimmed band at the bottom. This also helps reduce grease exposure on the grooved portion.
Best for: busy households, gas cooking, kitchens prioritizing easy maintenance.
- Practical detail: Make the lower 8"–12" smooth (painted wood, metal trim, or plaster) for easier wipe-down.
- Trend pairing: Add a slim brass rail or stainless reveal at the transition for a modern touch.
Cost range: $1,000–$3,800 depending on material and trim details.
3) Curved or arched fluted hood cover
Arches are still trending, especially in warm, organic modern kitchens. Fluting on a curved form creates a high-end, artisan feel—but fabrication is more complex.
Best for: Mediterranean-inspired kitchens, European country, soft modern design.
- Spacing recommendation: Use slightly wider flutes (around 1"–1.5") so the grooves read clearly across curves.
- Material note: Plaster and flexible ribbed panels can handle curves more gracefully than rigid carved wood.
Cost range: $2,500–$7,500+ (custom work), plus insert and venting.
4) Fluted wood hood cover (warm minimalism)
Natural wood kitchens continue to lead design trend boards, and a fluted wood hood adds texture without introducing another color. Match the hood to shelving, island panels, or a nearby pantry wall for cohesion.
Best for: Scandinavian, Japandi, modern organic, and transitional kitchens.
- Wood species to consider: white oak, walnut, rift-sawn oak (for a straighter grain).
- Finish tip: A matte, hardwax oil or durable conversion varnish helps resist cooking moisture.
Cost range: $2,000–$6,000 for custom fluted woodwork; higher for premium species or seamless grain matching.
5) Fluted plaster hood (seamless and sculptural)
Plaster hoods look like they’re part of the architecture—especially paired with a plaster backsplash or limewash walls. They’re a strong choice for timeless design with a handcrafted edge.
Best for: modern European, rustic modern, earthy color palettes, stone backsplash slabs.
- Texture control: Choose smooth Venetian plaster for crisp fluting or a slightly sandy finish for a softer look.
- Maintenance reality: Plaster can stain if not sealed properly; specify a kitchen-appropriate sealer.
Cost range: $3,500–$10,000+ including substrate build-out and plaster finish work.
6) Painted fluted hood cover (high impact, controlled budget)
Painted fluted MDF or poplar is one of the most budget-friendly ways to get the look. It’s also a smart option if you like to refresh your kitchen color every few years.
Best for: homeowners who want a statement hood without committing to stone or custom plaster.
- Color ideas: warm white, soft greige, dusty green, deep charcoal, or a muted blue for contrast.
- Sheen recommendation: satin or pearl is easier to clean than flat paint while still looking upscale.
Cost range: $800–$2,800 for the cover depending on size and who fabricates it (cabinet shop vs. contractor), plus insert costs.
Material Comparisons: What to Choose for Your Kitchen Renovation
| Material | Look | Durability & Cleaning | Typical Cost |
|---|---|---|---|
| MDF (paint-grade) | Crisp, uniform flutes; modern to transitional | Good if sealed/painted well; avoid direct steam exposure | $–$$ |
| Poplar/Maple (painted) | Slightly richer than MDF; strong edges | Very stable; easy to repaint | $$ |
| White oak/Walnut (stained) | Warm, high-end, natural texture | Durable with proper topcoat; needs gentle cleaners | $$$ |
| Plaster | Sculptural, seamless, artisan | Needs sealing; can chip if impacted | $$$$ |
| Ribbed metal (custom) | Industrial-modern; striking with minimal lines | Wipeable; shows fingerprints depending on finish | $$$–$$$$ |
Design Details That Make Fluting Look Custom
Choose the right flute size and spacing
- Small flutes (about 1/2"): refined, contemporary, best for smaller kitchens
- Medium flutes (about 3/4"–1"): versatile, reads well at most distances
- Large flutes (1 1/4"+): bold statement, best for wide hoods (42"+)
Use symmetry to your advantage
A fluted hood cover looks most intentional when the range wall is designed as a centered composition:
- Match upper cabinet widths on both sides when possible.
- Align the hood centerline with the cooktop and any ceiling feature (beam, light).
- If using open shelves, keep shelf lengths proportional to the hood width (often 70%–90% of hood width looks balanced).
Pair fluted hoods with backsplash materials that won’t compete
- Best pairings: slab stone, simple subway tile, zellige in a single tone, or large-format porcelain.
- If you want pattern: keep grout lines minimal and choose a low-contrast pattern so the fluting remains the focal point.
Product and Build Approaches (From Semi-Custom to Fully Custom)
Option A: Cabinet shop–built fluted cover (most seamless)
A cabinet maker can build the hood shell to match your cabinet door style, paint color, and crown details.
- Best for: full kitchen renovations, custom layouts, ceiling-height builds
- Ask for: removable panels or an access door for insert servicing
Option B: Decorative fluted panels applied to a simple hood
This approach uses fluted paneling (wood, MDF, or flexible ribbed material) over a basic plywood/MDF box.
- Best for: budget-controlled remodels or when you want fluting without full custom millwork
- Detail to specify: clean corner returns so flutes wrap neatly rather than ending abruptly
Option C: Plaster finish over a framed form
A carpenter frames the hood shape; plaster is applied and sealed.
- Best for: high-end, sculptural kitchens
- Plan for: extra time in the schedule for drying/finishing and proper sealing
Budget Planning: Where the Money Goes
A fluted range hood cover budget usually includes:
- Vent hood insert/blower: $300–$2,500+
- Ducting and roof/wall cap: $150–$800 (more if relocating ductwork)
- Electrical work: $150–$600
- Cover fabrication: $800–$7,500+ depending on material and complexity
- Finish work (paint, stain, plaster sealing): $200–$2,000+
Realistic total installed ranges:
- Budget-friendly: $1,500–$3,500 (painted fluted cover + midrange insert)
- Midrange custom: $3,500–$7,500 (custom millwork + quality insert + duct optimization)
- High-end statement: $7,500–$15,000+ (plaster/arched forms, premium insert, complex venting)
Maintenance Advice: Keeping Fluted Surfaces Looking Fresh
Fluting adds grooves—grooves collect dust and, near cooking, a fine film of grease. With the right finish and habits, it’s easy to manage.
- Weekly: dust flutes with a microfiber cloth or soft brush attachment.
- Monthly: wipe gently with warm water + mild dish soap; dry immediately.
- Avoid: abrasive pads, harsh degreasers on painted finishes, and soaking plaster.
- Filters: clean baffle filters every 3–6 weeks if you cook often (check your insert manual).
Finish tip: If you’re painting, ask your painter for a durable cabinet-grade enamel and a washable sheen (satin/pearl). For wood, use a kitchen-rated topcoat that resists moisture.
Common Mistakes to Avoid
- Choosing style before performance: Undersized CFM or poor ducting leads to lingering odors and greasy surfaces.
- Incorrect hood width: A hood that’s narrower than the cooktop captures less smoke and looks visually “pinched.”
- Flute scale that doesn’t match the kitchen: Tiny grooves can look busy on a 48" hood; oversized grooves can feel cartoonish in a small kitchen.
- No service access: Your insert will need maintenance—plan removable panels or an access point.
- Using porous materials without sealing: Unsealed plaster or unfinished wood near cooking zones can stain.
- Overcomplicating the range wall: Busy backsplash patterns, heavy pot rails, and ornate lighting can compete with the fluted focal point.
FAQ: Fluted Range Hood Covers
Are fluted range hood covers harder to clean?
They can collect more dust than flat surfaces, but a sealed finish and regular microfiber dusting keeps maintenance simple. If you fry or sear often, consider a smooth lower band near the cooking area.
Can I add fluted panels to an existing hood cover?
Often, yes—if the existing cover is structurally sound and you have enough clearance around the insert. A contractor can wrap the hood with fluted panels and add trim for clean edges. Verify heat clearances and avoid blocking ventilation paths.
What’s the best material for a painted fluted hood?
Paint-grade MDF is common for crisp grooves and affordability, while poplar or maple offers stronger edges and better dent resistance. Use cabinet-grade primer and enamel for durability.
Does a fluted hood work with modern kitchens?
Yes. Choose a simple hood shape, consistent fluting, minimal trim, and pair it with slab cabinets or thin shaker doors. Matte black or stainless hardware and a slab backsplash keep the look clean and contemporary.
How wide should my hood be for a 30-inch range?
A 30" insert can work, but many designers prefer 36" for better capture and a more substantial focal point. Always confirm the insert specs and your cabinet/range wall layout.
Next Steps: How to Plan Your Fluted Hood Like a Pro
- Confirm your ventilation: choose insert size, CFM, duct path, and required mounting height.
- Pick a fluted style: full-height, banded, arched, wood, plaster, or painted—based on your kitchen layout and cleaning preferences.
- Dial in proportions: match hood width to your cooktop and select flute spacing that suits the scale of the room.
- Coordinate finishes: pair the hood with backsplash, hardware, and lighting so the range wall feels intentional, not crowded.
- Build in maintenance: specify washable paint or sealed plaster/wood, and ensure service access to the insert.
A fluted range hood cover is one of those renovation decisions that instantly elevates a kitchen—without sacrificing the everyday function that makes a space enjoyable to cook in. For more kitchen design trends, renovation planning tips, and organization-focused ideas, explore the latest inspiration on thedecormag.com.
More Articles
 Kitchen Style & Function: Design Tips (2026)
 Best Kitchen Specialty Pan Storage - The Decor Mag
 Best Kitchen Cutting Board Care Products - The Decor Mag
 Best Kitchen Wine Storage Solutions - The Decor Mag
 Best Kitchens for Functional Design: Layouts, Brands, and Ergonomic Principles That Work Every Day
 Professional Kitchen Design: Tips for 2026
 10 Sustainable Kitchen Swaps for 2026
 Kitchen Window Treatments for Steam & Grease (2026)
 How to Choose Kitchen Cabinet Hinge Quality - The Decor Mag
 Kitchen Butcher Block Countertop Care - The Decor Mag