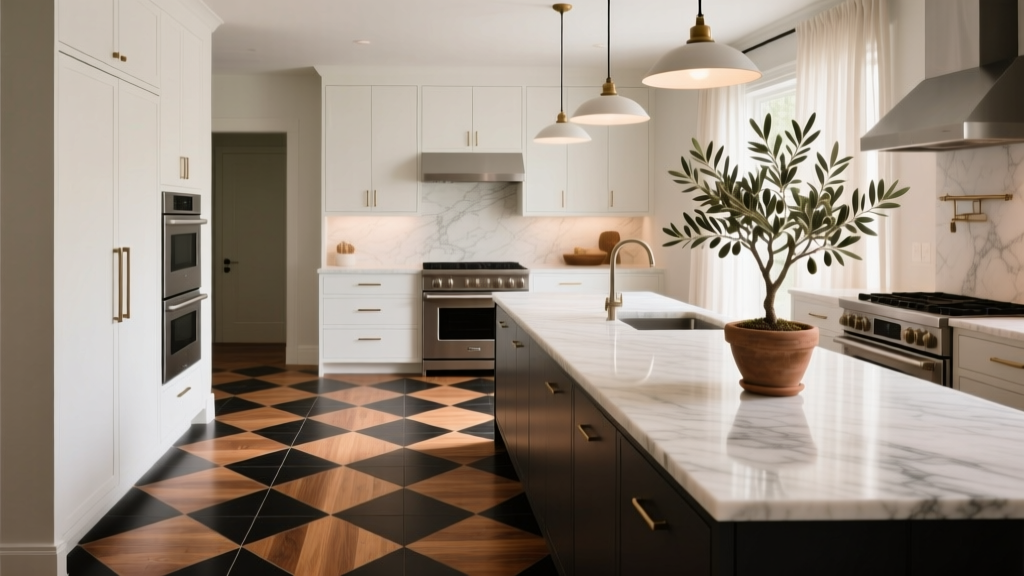
Kitchen Checkerboard Floor Revival - The Decor Mag
Checkerboard floors are having a very real moment in kitchen design—and not as a fleeting “trend of the month.” Homeowners planning kitchen renovations are returning to classic black-and-white (and plenty of updated colorways) because the pattern does something few finishes can: it brings instant structure to a room that’s often visually busy with cabinets, appliances, and countertops.
Beyond style, a checkerboard floor can solve practical design problems. It can make a narrow kitchen feel wider, help an open-plan space read as a defined “kitchen zone,” and disguise everyday crumbs and scuffs better than a solid light floor. With today’s materials—luxury vinyl tile (LVT), porcelain, sealed natural stone, and even modern linoleum—reviving the checkerboard look can be more durable and budget-friendly than you might expect.
This guide walks through layout planning, material options, current kitchen design trends, cost ranges, and common mistakes to avoid, so your checkerboard floor looks intentional, performs well, and stays easy to maintain.
Why Checkerboard Works: Style, Scale, and Function
A timeless pattern that adapts to current kitchen trends
Checkerboard floors pair naturally with today’s most popular kitchen looks:
- Modern farmhouse: Warm white cabinets + matte black hardware + soft black/ivory checks.
- European-inspired kitchens: Creamy cabinets, brass, and stone-look porcelain in a larger-scale check.
- Color-forward kitchens: Sage + cream, navy + bone, terracotta + sand, or charcoal + warm gray.
- Minimalist kitchens: Flat-front cabinetry and a restrained two-tone floor that becomes the focal point.
Visual benefits you can design around
- Makes spaces feel larger: Diagonal layouts (45°) can visually widen tight galley kitchens.
- Adds rhythm: The alternating tiles create order—helpful in kitchens with mixed finishes.
- Defines zones: In open-plan renovations, a checkerboard can subtly “anchor” the kitchen without walls.
Planning Your Checkerboard Layout Like a Pro
Choose your tile size: scale matters
Tile size changes the entire feel of a checkerboard floor. Use these guidelines as a starting point:
- 8" x 8" tiles: Best for smaller kitchens (under ~120 sq ft). Feels charming and vintage.
- 12" x 12" tiles: The most versatile size; works in most mid-size kitchens.
- 16" x 16" or 18" x 18" tiles: Ideal for larger kitchens and open plans; reads more contemporary and less “busy.”
Practical tip: If you’re working with LVT, the closest equivalent might be 9" x 9" or 12" x 24" planks cut into a check pattern (manufacturer-dependent). For true squares, look for LVT tile formats.
Straight-set vs diagonal: what to pick
- Straight-set (grid aligned to walls): Cleaner, more modern, easier to install and plan. Great when cabinets are crisp and contemporary.
- Diagonal (set at 45°): Adds movement and can make narrow rooms feel wider. Typically creates more cuts and waste.
Waste factor: Plan for 10% extra material on straight-set layouts and 15–20% extra for diagonal installations.
Centering the pattern: the detail that makes it look custom
A checkerboard floor looks best when the pattern feels “balanced” in the room. During layout, aim to:
- Establish a focal centerline (often centered on the main sink, island, or range wall).
- Dry-lay or digitally plan a few rows to see where cuts land at the perimeter.
- Avoid skinny slivers along key sightlines (like the doorway into the kitchen). Adjust the starting point so perimeter cuts are at least half a tile when possible.
Grout lines: small choice, big impact
Grout width and color can make a checkerboard look sharp or muddy.
- Porcelain/ceramic tile: Typical grout width is 1/8" (sometimes 1/16" with rectified tile).
- Natural stone: Often 1/8"–3/16", depending on calibration and edge finish.
- LVT (groutable lines): Some allow a faux grout; many are tight-fitting with no grout.
Grout color tip: A mid-tone gray is often the most forgiving for kitchens—less stark than white, hides soil better, and won’t compete with the pattern like black grout can.
Material Options: Pros, Cons, and Best Uses
Porcelain tile: the renovation workhorse
Why homeowners love it: Porcelain is durable, water-resistant, and widely available in checkerboard-friendly colors and finishes (matte, satin, textured).
- Best for: High-traffic kitchens, households with kids/pets, resale-friendly renovations.
- Look for: Matte or textured finishes for slip resistance; PEI rating suitable for floors.
- Maintenance: Regular sweeping + damp mopping. Seal grout yearly if using cement-based grout.
Cost range: $3–$12/sq ft for tile, plus $6–$15/sq ft installed (labor varies by region and subfloor condition).
Luxury vinyl tile (LVT): budget-smart and forgiving
Modern LVT has become a go-to for kitchen renovation projects that prioritize comfort underfoot and easy cleaning.
- Best for: Quick upgrades, DIY-friendly projects, households that want a softer, warmer floor.
- Look for: A thick wear layer (20 mil is a strong target for kitchens), waterproof construction, and a rigid core if the subfloor isn’t perfectly flat.
- Maintenance: Sweep often, damp mop with manufacturer-approved cleaner, avoid steam mops unless approved.
Cost range: $2–$7/sq ft for materials; professional installation often $3–$8/sq ft. DIY can reduce labor costs substantially.
Natural stone (marble, limestone, slate): elevated, but needs commitment
A stone checkerboard floor is stunning in classic kitchens, but it requires thoughtful selection and maintenance.
- Best for: High-end renovations, period homes, homeowners who don’t mind ongoing care.
- Watch for: Etching from acids (especially marble), staining, and slip risk when polished.
- Maintenance: Seal stone on schedule (often every 6–12 months depending on product and use). Use pH-neutral cleaners only.
Cost range: $8–$25+/sq ft for material; installed $15–$40+/sq ft depending on stone type, cuts, and labor.
Linoleum: a true retro revival with modern performance
Real linoleum (not vinyl) is made from natural materials and has a soft, warm feel underfoot. It’s seeing renewed interest in eco-conscious kitchen design.
- Best for: Vintage-inspired kitchens, sustainability-minded remodels.
- Watch for: Needs proper installation and moisture control; can dent under heavy point loads.
- Maintenance: Follow manufacturer care; some products require periodic finishing or specific cleaners.
Cost range: $4–$10/sq ft materials; installed pricing varies widely ($6–$14/sq ft is a common range) due to prep requirements.
Design Recommendations: Color, Contrast, and Pairings
Pick a colorway that works with your cabinets and counters
Classic black-and-white is popular because it’s crisp and resale-friendly, but it’s not the only option. Consider:
- Soft contrast: Warm white + charcoal, cream + taupe, or light gray + medium gray for a quieter look.
- Warm modern: Clay + bone, cocoa + sand—especially good with white oak cabinetry.
- Moody kitchens: Deep green + warm white or navy + ivory for a tailored feel.
Match undertones to avoid “off” whites
Undertones matter. If your cabinets are warm (cream, ivory), choose an off-white tile with warmth rather than a stark, blue-white. For cool white cabinets, a bright white tile can look intentional and fresh.
Finish selection for real-life kitchens
- Matte/satin: Hides smudges and water spots better; generally safer underfoot.
- Polished: Glamorous, but shows footprints and can be slippery—use cautiously in busy family kitchens.
- Textured: Excellent for traction; ensure it’s still easy to mop (deep texture can trap grime).
Budget Planning and Where the Money Goes
A checkerboard floor can be a relatively contained kitchen upgrade, but costs swing based on subfloor condition and layout complexity.
Typical project cost scenarios (ballpark)
- Budget refresh (LVT, DIY-friendly): $300–$1,500 for a 100–200 sq ft kitchen, depending on product and prep.
- Mid-range renovation (porcelain, pro install): $1,500–$4,500 for 150–250 sq ft with standard prep and baseboard removal/reinstall.
- High-end statement (natural stone, detailed layout): $5,000–$15,000+ depending on stone choice, diagonal layout, and subfloor work.
Don’t forget these line items
- Subfloor leveling: Self-leveling compound and labor can add $1–$5/sq ft if needed.
- Underlayment: Often required for LVT or floating systems ($0.50–$2/sq ft).
- Grout and sealers: Small costs that pay off in stain resistance.
- Transition strips: Especially where the kitchen meets hardwood or carpet.
Installation and Practical Measurements That Prevent Headaches
Check floor height and appliance clearances
Flooring thickness can affect dishwashers and ranges. Before installation:
- Measure new floor build-up (tile + mortar or LVT + underlayment).
- Confirm dishwasher can be removed later; you may need to adjust legs or plan a slightly lower underlayment under appliance areas.
- Plan thresholds so you don’t create a toe-stubbing lip.
Plan for movement and grout performance
- Tile floors: Use proper expansion gaps at perimeter (covered by baseboard/shoe molding).
- LVT floors: Follow manufacturer spacing for expansion, especially around islands and door frames.
Maintenance: Keeping the Checkerboard Crisp
- Sweep daily (or as needed): Grit is what dulls finishes and scratches floors over time.
- Use the right cleaner: pH-neutral for tile/stone; manufacturer-approved cleaner for LVT/linoleum.
- Protect high-traffic zones: Add a washable runner near the sink (choose a non-slip pad safe for your floor type).
- Seal strategically: If you have cement-based grout, consider a penetrating sealer; reapply based on product directions and kitchen use.
Common Mistakes to Avoid
- Choosing a tile size that fights the room: Tiny tiles in a large open-plan kitchen can look overly busy; oversized tiles in a tiny kitchen can feel awkward with too few “checks” visible.
- Ignoring undertones: Cool white tile next to warm white cabinets can make both look wrong.
- Skipping subfloor prep: Uneven floors lead to lippage in tile and failure points in LVT seams.
- Going too high-contrast with high clutter: If countertops are patterned and cabinets are dramatic, consider a softer checkerboard to avoid visual overload.
- Using the wrong grout color: Bright white grout in a high-traffic family kitchen can turn into a maintenance burden fast.
- Forgetting transitions: Poor threshold planning makes even an expensive kitchen renovation look unfinished.
FAQ: Kitchen Checkerboard Floors
Is a checkerboard floor too busy for a small kitchen?
Not necessarily. Use 8" x 8" or 12" x 12" tiles, choose a soft-contrast colorway (like cream and warm gray), and keep counters and backsplashes relatively calm.
What’s the most durable checkerboard flooring for a family kitchen?
Porcelain tile is typically the most durable and heat/water resistant. If comfort and quick installation matter most, a high-quality waterproof LVT with a 20 mil wear layer is a strong contender.
Do I need two different tiles to create the checkerboard look?
Usually, yes—two colors of the same tile line. Some manufacturers offer coordinated colors designed to match thickness and finish. For LVT, you can mix two SKUs (confirm they’re compatible) or use purpose-designed patterns.
Should I run the checkerboard under cabinets?
For tile, running under cabinets can create a cleaner look but increases cost and may complicate future changes. For floating LVT, you generally should not run it under fixed cabinets and islands because it needs room to move—follow the manufacturer’s installation rules.
What grout is best for a kitchen tile floor?
Many homeowners prefer stain-resistant grout (such as newer premixed or epoxy options) for kitchens. Traditional cement grout can work well too, but sealing and periodic maintenance become more important.
Can I do a diagonal checkerboard in a galley kitchen?
Yes, and it can be especially effective. Expect more cuts and waste (often 15–20% extra material) and plan carefully so the pattern looks centered in the main sightline from the entry.
Next Steps: How to Bring the Checkerboard Back
Start by measuring your kitchen and deciding what you want the floor to accomplish: brighten a dark space, add character to a plain cabinet run, or define a kitchen zone in an open layout. Then pick a tile size that suits your square footage, test undertones against cabinet and countertop samples in natural and evening light, and budget for subfloor prep so the finish looks crisp for years.
If you’re ready to narrow choices, create a simple shortlist: one porcelain option (durable, classic), one LVT option (comfortable, budget-friendly), and one “dream” option (stone or premium designer tile). Compare total installed cost, maintenance commitment, and how each option supports your overall kitchen renovation plan.
For more practical kitchen design ideas, smart renovation guides, and organization upgrades, explore the latest inspiration on thedecormag.com.
More Articles
 Best Kitchen Compost Bin Options - The Decor Mag
 Best Kitchen Faucet Styles for 2026 - The Decor Mag
 Open Concept Kitchen Renovation: Pre-Demolition Checklist
 Best Kitchen Baking Sheet Organization - The Decor Mag
 Kitchen Vintage Inspired Hardware Guide - The Decor Mag
 Textiles on a Budget: Smart, Stylish, and Sustainable Kitchen Linen Solutions
 Best Kitchen Cutting Board Display | The Decor Mag
 How to Choose Kitchen Cabinet Door Styles - The Decor Mag
 How to Organize Family Life: Practical Systems for Calm, Connection, and Consistency
 How to Choose Kitchen Cabinet Hinge Quality - The Decor Mag