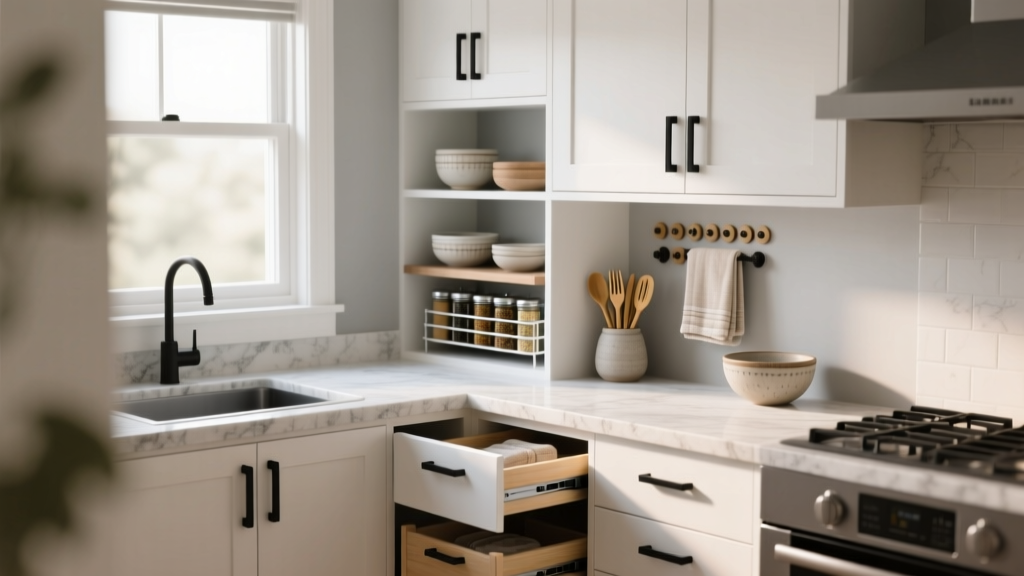
Small Kitchen Storage Hacks That Work (2026)
Small kitchens can be a joy to cook in—everything is within reach, cleanup is faster, and the footprint is efficient. The frustration starts when everyday items don’t have a logical home: pans stack precariously, spices disappear behind appliances, and the countertop becomes the default landing zone for everything.
Smart small kitchen storage isn’t about cramming more into the same cabinets. It’s about redesigning how you store: using vertical space, making the “dead zones” accessible, and choosing organizers that fit your real cooking habits. Whether you’re planning a kitchen renovation or simply trying to make your current layout work harder, the right storage moves can transform a tight kitchen into one that feels calm, streamlined, and surprisingly spacious.
Below are storage hacks that designers rely on because they solve common pain points—and they continue to work long after the novelty wears off.
Start With a 30-Minute Storage Audit (The Hack Behind All Hacks)
Before buying bins and racks, take a quick inventory. The goal is to align storage zones with how you move through the kitchen.
Make 4 Functional Zones
- Prep: knives, cutting boards, mixing bowls, measuring tools
- Cooking: pots, pans, oils, spices, utensils
- Clean-up: trash/recycling, dish soap, towels, dishwasher tabs
- Storage: pantry goods, small appliances, food containers
Measure the “Pain Points”
Take quick measurements before selecting organizers:
- Cabinet depth: many base cabinets are 24" deep; uppers often 12" deep.
- Clearance for pull-outs: allow 1–2" side clearance depending on hardware.
- Drawer height: know your interior height to avoid wasted space (common: 3", 6", 10").
- Toe-kick height: typically 3.5"–4" (a hidden storage opportunity in some renovations).
Budget tip: Spend money where it changes daily behavior (pull-out trash, drawer dividers) and use lower-cost bins where the gains are minor (pantry categories that don’t move often).
Maximize Base Cabinets: The Workhorse Storage Zone
Base cabinets hold the heaviest, bulkiest items—so they’re where the best upgrades deliver the biggest return.
1) Add Pull-Out Shelves (The Best “Small Kitchen” Upgrade)
Deep base cabinets turn into black holes. Pull-out shelves (also called roll-out trays) make the full depth usable.
- Best for: pots, small appliances, pantry staples, mixing bowls
- Recommended specs: 18"–22" depth trays with full-extension, soft-close slides rated at 75–100 lbs
- Materials:
- Plywood with dovetail corners: durable, higher-end, refinishable
- Melamine: budget-friendly, easy to wipe, can chip at edges
- Wire pull-outs: good visibility, can snag packaging and collect grime
Cost range: $60–$200 per shelf (DIY kits); $200–$600+ installed per cabinet depending on size and hardware quality.
Maintenance: Vacuum crumbs periodically; wipe slides with a dry cloth. Avoid greasy cleaners on soft-close mechanisms.
2) Use a Vertical Pan Storage Rack (Stop the Clanging Stack)
Storing pans vertically eliminates unstable stacks and makes it easier to grab the right piece without unloading everything.
- Best for: sheet pans, cutting boards, skillets, lids
- Where it works: a 9"–12" wide cabinet or a base cabinet with a divider insert
- Measurements: allow 2"–3" per pan slot; allocate 12"–18" height for standard baking sheets
Cost range: $20–$60 for adjustable racks; $80–$250 for built-in cabinet dividers.
3) Install a Pull-Out Trash/Recycle Center
One of today’s most requested kitchen renovation upgrades is a concealed pull-out waste system. It clears floor clutter and improves workflow near the sink and prep area.
- Recommended layout: place within 1–2 steps of sink and prep surface
- Common sizes: 35–50 qt bin for trash + 35–50 qt bin for recycling
- Hardware tip: choose soft-close, 100 lb-rated slides for longevity
Cost range: $120–$350 for quality kits; $300–$900 installed in a remodel depending on cabinet modifications.
Make Corner Cabinets Useful (Without Regret)
Corner storage is where small kitchens often lose valuable square footage. The right solution depends on what you store and how often you use it.
1) Lazy Susan vs. LeMans vs. Blind-Corner Pull-Out
- Lazy Susan: Great for pantry items and small appliances; simplest mechanism.
- Pros: affordable, easy to use
- Cons: can waste vertical space; items can topple if overloaded
- Cost: $80–$250
- LeMans-style swing trays: Pull shelves out and around for high accessibility.
- Pros: excellent access, feels “custom”
- Cons: pricier; must be installed correctly
- Cost: $400–$1,200
- Blind-corner pull-out: Great when you have a blind corner (one cabinet door).
- Pros: retrieves items from deep corner space
- Cons: can reduce usable width; choose sturdy hardware
- Cost: $250–$900
Trend meets function: Many designers now minimize corner cabinet reliance by using more drawers and a slightly longer run of base cabinets—timeless usability over tricky mechanics when layout allows.
Upgrade Drawers: Small Changes, Big Daily Wins
Drawers are a hallmark of modern kitchen design trends because they’re inherently ergonomic. If you have the option during renovation, prioritize deep drawers over shelves.
1) Convert Lower Cabinets to Deep Drawers
- Best for: pots, pans, plates, pantry items, food containers
- Ideal sizes: 24" wide drawer stacks; depths typically 21"–22" inside
- Hardware: full-extension, soft-close, 90–120 lb rated slides
Cost range: In a remodel, upgrading from doors to drawer bases can add roughly $150–$500 per cabinet (varies widely by brand and finish). For existing cabinets, retrofit drawer kits range $200–$800 per opening plus labor.
2) Add Drawer Dividers That Match Your Tools
Skip one-size-fits-all organizers. Tailor compartments to what you actually own.
- Utensil drawers: 2"–3" high inserts for spatulas and whisks
- Knife storage: in-drawer knife blocks (safer than countertop blocks)
- Spice drawer: angled spice inserts; allow 2"–2.5" per jar
Material comparison:
- Bamboo: warm look, stable, wipe-clean; avoid soaking
- Maple/wood: premium, refinishable; needs occasional conditioning
- Plastic: inexpensive; can slide around unless fitted
Cost range: $15–$60 for adjustable inserts; $80–$300 for custom-fit wood organizers.
Rethink Upper Cabinets (And Use the Space Above Them)
Upper cabinets can either help or hinder a small kitchen. Overcrowded uppers feel visually heavy, but the right approach adds storage without closing the room in.
1) Go to the Ceiling (If You’re Renovating)
One of the most timeless small-kitchen renovation moves: extend cabinetry to the ceiling to eliminate dust-collecting gaps and gain a top shelf for less-used items.
- Best for: seasonal servingware, specialty appliances
- Design tip: use a 12"–15" tall top cabinet or stacked cabinets with a small step stool storage plan
Cost consideration: Taller cabinets cost more than standard 30" uppers; expect an additional $200–$800+ per cabinet depending on construction and finish. The payoff is long-term storage and a more built-in look.
2) Add Under-Cabinet Rail Systems
A slim rail with hooks can store frequently used items without cluttering the counter.
- Use it for: measuring cups, small utensils, mugs (if weight-rated), towels
- Placement: keep 18"–20" clearance above countertops for comfortable use (standard backsplash height)
Cost range: $30–$150 depending on brand and length.
Use “In-Between” Spaces Designers Love
The most effective small kitchen storage hacks often come from overlooked inches.
1) A 3"–9" Pull-Out Pantry Next to the Range
Narrow pull-outs are perfect for oils, spices, and sauces—especially beside the stove.
- Ideal widths: 3", 6", or 9"
- Best for: spice bottles, cooking sprays, vinegars
- Safety tip: keep oils away from direct heat; choose a pull-out that doesn’t sit flush against the oven wall if heat transfer is a concern
Cost range: $150–$600 (insert); $400–$1,500+ during renovation if it requires cabinet reconfiguration.
2) Toe-Kick Drawers (Renovation-Level Hack)
Toe-kick drawers use the space under base cabinets—great for flat items.
- Best for: baking mats, sheet pans, pet bowls, table linens
- Measurement: typically fits a 3.5"–4" high toe-kick; requires custom cabinet build
Cost range: $300–$900 per drawer depending on cabinetry and hardware.
3) Add a Slim Rolling Cart as a “Mobile Cabinet”
If renovation isn’t on the table, a rolling cart can act as a pantry, coffee bar, or prep station.
- Best width: 10"–18" for tight kitchens
- Top material: butcher block for warmth; stainless steel for easy sanitizing
- Pro tip: choose locking casters and a lip edge if storing bottles
Cost range: $60–$300 for most retail carts; $400–$1,000 for furniture-grade pieces.
Countertop and Backsplash Storage (Without Visual Clutter)
Small-kitchen organization fails when every surface becomes storage. Aim for “intentional display” with limits.
1) Magnetic Solutions for Knives and Spices
- Magnetic knife strip: frees drawer/counter space; mount away from high-traffic corners
- Magnetic spice tins: best on a side panel or refrigerator; keep away from heat and direct sunlight
Cost range: $20–$120.
Maintenance: wipe strips weekly to prevent grease buildup; ensure mounting anchors match your wall type (drywall vs. tile vs. plaster).
2) Add a Single Open Shelf (Not a Wall of Them)
Open shelving is a current design trend, but it works best as an accent—especially in small kitchens where dust and visual noise add up quickly.
- Best placement: one shelf near the sink or coffee zone
- Best for: daily glasses, a small plant, a compact cookbook stand
- Material pick: sealed oak or walnut for warmth; powder-coated steel brackets for a modern look
Cost range: $50–$250 depending on shelf length and bracket quality.
Materials and Finishes That Hold Up in Tight, Busy Kitchens
In a small kitchen, organizers and surfaces see more frequent contact—so durability matters.
- Cabinet interiors: melamine is easy-care; plywood is more robust for retrofits and screws.
- Hardware: look for soft-close hinges and full-extension slides with reputable ratings (Blum, Salice, Grass are common pro-grade names).
- Shelf liners: choose washable EVA or textured liners; avoid adhesive liners that leave residue.
- Bins: clear PET plastic is sturdy and visibility-friendly; wire bins look airy but can be harder to clean.
Maintenance Routine (10 Minutes Weekly)
- Wipe high-touch cabinet pulls and drawer handles.
- Quick-vacuum crumbs in one drawer/cabinet per week (rotate through zones).
- Check under-sink area for moisture; replace damp liners immediately.
Budget Planning: Where to Spend vs. Save
High-Impact Splurges
- Pull-out trash/recycling center
- Roll-out trays in deep base cabinets
- Deep drawer conversions (if renovating)
- Corner solutions with durable hardware
Smart Saves
- Matching bins for pantry categories (buy as needed, not all at once)
- Adjustable drawer dividers instead of custom inserts in low-priority drawers
- A rolling cart instead of new cabinetry
Realistic ranges: A “weekend re-organization” can land between $50–$300. A targeted storage upgrade plan (trash pull-out, 2–4 roll-outs, dividers) often totals $400–$2,000. Renovation-level cabinet improvements can range $2,000–$10,000+ depending on cabinet scope and finish level.
Common Small Kitchen Storage Mistakes to Avoid
- Buying organizers before measuring: even a 1" mismatch wastes space and money.
- Overusing open shelving: it looks great in photos but can become visual clutter fast.
- Ignoring workflow: storing oils across the kitchen from the stove or cutting boards far from prep space creates daily friction.
- Storing heavy items up high: keep Dutch ovens and stacks of plates in lower drawers to avoid strain.
- Under-sink chaos: moisture ruins cardboard and rusts metal organizers—use plastic bins and a leak detector if possible.
- Too many duplicates: small kitchens can’t support “just in case” gadgets. If you haven’t used it in a year, it’s stealing prime storage.
FAQ: Small Kitchen Storage and Renovation Questions
What’s the best small kitchen storage upgrade if I only pick one?
A pull-out trash/recycling center or roll-out trays in base cabinets. Both improve daily function and reduce countertop clutter immediately.
Are drawer bases better than cabinets with shelves?
For most homeowners, yes. Deep drawers offer full visibility and easy access. Shelves can work if you add roll-out trays, but drawers are typically the most ergonomic choice.
How do I organize a small kitchen with no pantry?
Use a zone-based approach and add:
- clear bins in a cabinet for baking, snacks, and breakfast
- a 3"–9" pull-out for spices/oils if space allows
- a rolling cart or slim freestanding pantry cabinet (12"–18" deep) for overflow
Do pull-out shelves work with older cabinets?
Often, yes—if the cabinet box is structurally sound and square enough for slides. Plywood cabinet sides hold screws better than particleboard, but there are retrofit kits designed for both.
What’s the easiest way to reduce countertop clutter?
Create a “daily-use” drawer near prep for utensils, measuring tools, and the knife solution you prefer (in-drawer block or wall strip). Then limit the counter to one intentional zone (coffee, for example) and store everything else.
How can I keep organizers clean in a cooking-heavy kitchen?
Choose wipeable materials (PET plastic, sealed wood, melamine), avoid wire where grease accumulates, and do a quick weekly wipe of the areas closest to the range and sink.
Next Steps: Turn These Hacks Into a Storage Plan
Pick one problem area—usually the base cabinets, the corner, or the countertop clutter—and address it with a single high-impact change. Measure first, choose durable hardware, and organize by zones so your kitchen supports the way you actually cook. If you’re planning a kitchen renovation, prioritize deep drawers, ceiling-height cabinetry, and pull-outs that make every inch accessible.
For more kitchen design inspiration, renovation planning advice, and organization ideas that balance today’s trends with timeless functionality, explore more guides on thedecormag.com.
More Articles
 Kitchen That Inspires Cooking: Design Ideas (2026)
 Kitchen Statement Ceiling Design Ideas - The Decor Mag
 Small Alternatives to Spaces: Smart, Space-Saving Kitchen Solutions That Actually Work
 Kitchen Natural Stone Backsplash Guide - The Decor Mag
 Open Concept Kitchen Renovation: Pre-Demolition Guide
 The Ultimate Sustainable Kitchen Guide: Practical, Proven, and Planet-Positive Actions
 Baking Station Ideas for Kitchens (2026)
 Cheap vs Premium Real: What the Label Doesn’t Tell You About Butter, Cheese, and Olive Oil
 Best Kitchen Baking Supply Organization - The Decor Mag
 How to Repair Sustainably: Practical Strategies for Extending the Life of Kitchen Appliances, Cookware, and Fixtures