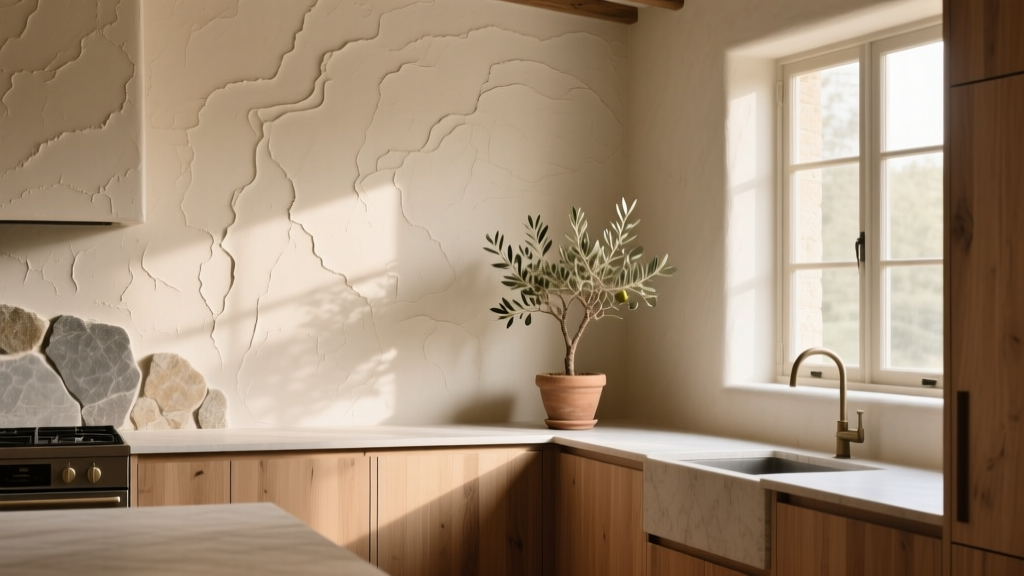
Kitchen Plaster Walls Organic Feel - The Decor Mag
There’s a reason plaster walls are showing up in today’s most beautiful kitchen renovations: they make a space feel lived-in, calm, and tactile—without relying on busy patterns or trendy colors. In a room filled with hard, reflective surfaces (stone countertops, tile backsplashes, stainless appliances), plaster adds softness and visual warmth. It’s an organic counterpoint that helps kitchens feel like welcoming rooms, not just work zones.
Homeowners are also craving materials that read as authentic. The current kitchen design trend cycle is leaning toward “quiet luxury,” earthy neutrals, and natural textures—think warm whites, oak cabinetry, unlacquered brass, and handmade finishes. Plaster fits right in, and it pairs beautifully with both modern layouts and more traditional kitchen architecture.
The best part: you can get the plaster wall look at multiple budget levels, from true lime plaster to high-performance microcement and even plaster-look paints. The key is choosing the right system for a kitchen’s realities: steam, grease, splashes, and frequent cleaning.
Why Plaster Walls Make a Kitchen Feel More Organic
“Organic” in kitchen design isn’t just about plants and wood. It’s about how a space feels to the eye and touch—subtle variation, softened edges, and a sense of depth that flat paint can’t replicate.
- Movement and depth: Plaster reflects light unevenly, creating gentle shadows that make walls look dimensional.
- Softens hard lines: In kitchens with slab cabinets or large-format tile, plaster brings balance and warmth.
- Timeless finish: Plaster predates modern paint systems and still feels current when paired with updated cabinetry and lighting.
- Color richness: Tinted plaster holds pigment differently than paint, often reading more “mineral” and less “flat.”
Best Types of Plaster (and Plaster-Like Finishes) for Kitchens
Not all plaster is equal in a high-use kitchen. Here’s a practical comparison to help you pick a finish that matches your design goals and maintenance tolerance.
1) Lime Plaster (Traditional, breathable, naturally beautiful)
- Look: Soft, cloudlike variation; matte to velvety finish.
- Best for: Accent walls, dining nooks connected to the kitchen, or low-splash zones.
- Pros: Breathable; natural mold resistance; ages gracefully.
- Cons: Can stain if left unsealed; requires skilled application.
- Typical cost: $12–$30+ per sq ft installed (materials + labor), depending on region and artisan level.
2) Venetian Plaster (Polished plaster, more sheen, more drama)
- Look: Smooth with depth; can be satin to high gloss.
- Best for: Feature walls away from heavy splatter; homeowners who want a refined, stone-like surface.
- Pros: More wipeable when properly finished; elegant in modern kitchens.
- Cons: Higher skill requirement; repairs can be visible if poorly patched.
- Typical cost: $15–$40+ per sq ft installed.
3) Microcement / Mineral Coatings (Contemporary, durable, great for wet zones)
- Look: Minimal, seamless, modern; subtle mottling.
- Best for: High-splash walls, backsplash alternatives, or continuous surfaces that wrap corners.
- Pros: Excellent durability with correct sealers; water-resistant; ideal for a plaster backsplash look.
- Cons: System-based (primer/basecoat/topcoat/sealer); improper installation can crack.
- Typical cost: $18–$45 per sq ft installed; DIY kits exist but are riskier in kitchens.
4) Tadelakt-Inspired Finishes (Spa-like lime plaster, traditionally waterproofed)
- Look: Smooth, soft sheen; artisan finish.
- Best for: Statement areas, specialty projects, or homeowners working with experienced plaster pros.
- Pros: Beautiful and naturally water-shedding when executed properly.
- Cons: Highly technique-dependent; premium labor.
- Typical cost: $25–$60+ per sq ft installed.
5) Plaster-Look Paints and Textured Finishes (Budget-friendly and DIY-accessible)
- Look: Can mimic plaster movement; typically less depth than real plaster.
- Best for: Quick refreshes, rentals (where allowed), or experimentation before committing.
- Pros: Lower cost; easier touch-ups; faster install.
- Cons: Doesn’t fully replicate mineral depth; may scuff in high-traffic areas.
- Typical cost: $2–$8 per sq ft DIY (materials); $6–$15 per sq ft with a painter.
Where Plaster Works Best in a Kitchen (Layout-Based Guidance)
Strategic placement matters. Plaster is gorgeous, but kitchens demand smart zoning.
Low-Splash Zones (ideal for lime and Venetian plaster)
- Breakfast nook walls
- Open shelving back walls (not directly behind the cooktop)
- Perimeter walls away from the sink and range
- Kitchen-adjacent dining areas in open-concept layouts
Medium-to-High Splash Zones (best for microcement/mineral coatings or protected plaster)
- Behind a prep sink: Consider a 12–18 inch stone or tile “waterline” plus plaster above.
- Near the range: If you want plaster near cooking, keep a noncombustible backsplash surface at least 18 inches high behind the cooktop, or run a full-height slab/tile panel and use plaster on the surrounding walls.
- Traffic pinch points: Corners near doorways and pantry runs benefit from a more washable finish or a protective sealer.
Open-Concept Kitchens (a top trend where plaster shines)
In open layouts, plaster helps unify the kitchen with living spaces. Use it to wrap the main kitchen wall and continue into the dining area for a cohesive, organic flow. Keep cabinetry and countertops relatively simple to let the wall texture do the talking.
Design Approaches That Make Plaster Feel Intentional
Choose a Warm, Mineral Palette
For an organic feel, avoid stark cool whites. Instead, aim for warm whites, soft sand, oatmeal, greige, or pale clay tones. Plaster’s undertones shift in daylight and under warm LEDs, so test large samples.
- Tip: View samples under 2700K–3000K lighting (common for kitchens) and in natural daylight.
- Tip: If your countertops are veiny quartz or marble, keep plaster variation subtle so the room doesn’t feel visually noisy.
Pair Plaster with Natural Wood and Matte Finishes
Plaster looks especially timeless with:
- White oak or walnut cabinetry
- Matte or honed stone countertops
- Unlacquered brass, bronze, or matte black hardware
- Handmade ceramic pendants or woven shades
Balance Texture with Clean Lines
If you’re using a heavy plaster texture, simplify other elements:
- Choose slab or Shaker cabinetry rather than ornate door profiles
- Limit open shelving to one focal area
- Use large-format flooring (wide plank wood or large tiles) to reduce visual breaks
Consider a “Plaster Backsplash” Look—Safely
The plaster backsplash trend is everywhere, but kitchens need real protection. A practical compromise:
- Run a durable backsplash material (tile, slab, or stainless) to 18 inches behind counters (or full height behind the range).
- Apply plaster above that line to get the organic look where it’s less exposed.
- Use a washable, kitchen-appropriate sealer where needed.
Materials and Product Recommendations (What to Ask For)
You’ll get better bids and better results when you specify the system, not just “plaster.” Bring photos, but also ask direct questions.
Recommended System Components
- Substrate prep: Level 4–5 drywall finish or cement board in wet-prone areas; crack isolation mesh at joints if recommended by the manufacturer.
- Primer: Bonding primer compatible with mineral finishes.
- Base coats: 2–3 coats depending on product.
- Sealer/topcoat: A breathable wax for traditional lime (low-splash zones) or a more washable polyurethane/acrylic sealer for microcement systems (high-use zones).
What to Request from Your Installer
- Sample boards at least 24" x 24" (small swatches mislead).
- Clarify sheen level: matte, eggshell, satin, polished.
- Written guidance on cleaning products that won’t dull the finish.
- Plan for corners and edges (rounded corners feel more organic and hide dings better).
Cost Ranges and Budget Planning
Plaster costs vary widely by region, wall condition, and artisan skill. Use these ranges to set expectations:
- Plaster-look paint (DIY): $200–$600 for a standard kitchen wall refresh, depending on kit and tools.
- Professional decorative paint/plaster effect: $1,000–$3,500 for feature walls.
- True lime or Venetian plaster (installed): $3,000–$10,000+ for multiple walls, depending on square footage and complexity.
- Microcement/mineral coating in backsplash zones: $1,500–$5,000+ depending on coverage and system.
Budget tip: If you love the look but need to control cost, plaster one focal wall (often the wall facing the entry or the dining-side wall) and use a premium washable paint elsewhere in a closely matched tone.
Practical Measurements and Planning Tips
- Backsplash height: Standard is 18 inches from countertop to upper cabinets. If you’re going plaster above, keep the lower zone highly durable.
- Range area protection: Consider full-height noncombustible material behind the cooktop, especially if you frequently sear or stir-fry.
- Corner durability: In busy kitchens, place plaster away from tight passageways. If unavoidable, add subtle corner guards or choose a more washable finish.
- Ventilation: A strong range hood reduces grease settling on walls. Aim for a hood that covers the cooking surface and vents outside when possible.
Maintenance: Keeping Plaster Walls Beautiful in a Working Kitchen
Maintenance depends on the finish and sealer, but these guidelines help most kitchens.
Cleaning Routine
- Dust with a microfiber cloth weekly (texture holds dust more than flat paint).
- Wipe light marks with a damp, soft cloth and a gentle pH-neutral soap.
- Avoid abrasive sponges and harsh degreasers unless the manufacturer explicitly approves them.
Stain Prevention
- Use an effective range hood to reduce airborne grease.
- Seal appropriately for your zone: wax is often fine for low-splash areas; tougher sealers suit high-use walls.
- Address splatters quickly—mineral finishes can absorb oils if left sitting.
Repairability
One advantage of plaster is repair potential, but matching texture takes skill. Save leftover material and keep photos of the finish process for your contractor. For noticeable chips, a professional touch-up is often worth it.
Common Mistakes to Avoid
- Putting unsealed lime plaster directly behind the sink or cooktop: Water and oil stains can become permanent.
- Skipping sample boards: Plaster color and movement change dramatically with lighting and application technique.
- Over-texturing in small kitchens: Heavy texture on every wall can feel busy; focus on one or two surfaces.
- Choosing the wrong sealer: Some sealers yellow, add unwanted sheen, or reduce breathability. Match sealer to product and location.
- Ignoring wall prep: Plaster highlights imperfections if the substrate isn’t flat and stable.
- Planning without ventilation: A weak hood means more grease on walls—plaster or paint.
FAQ: Kitchen Plaster Walls and Organic Design
Are plaster walls practical for kitchens?
Yes—when you choose the right finish and sealer for the location. Traditional lime plaster is best for lower-splash areas, while microcement/mineral coatings perform better in backsplash-like zones.
Can plaster be used as a backsplash?
It can, but it should be a system designed for moisture and staining resistance (often microcement or a mineral coating with a durable sealer). Many homeowners get the look by using a more durable backsplash up to 18 inches and plaster above.
How do plaster walls compare to paint for cleaning?
Standard paint is generally easier to wipe repeatedly, especially in semi-gloss finishes. Plaster can be cleanable, but textured finishes trap dust and some sealers are more delicate. For heavy-use kitchens, choose a washable plaster system and confirm approved cleaning products.
Will plaster crack in a kitchen?
Hairline cracking can happen if the substrate moves, corners aren’t reinforced, or the system is applied incorrectly. Proper prep (including mesh where needed) and stable wall construction greatly reduce the risk.
What kitchen styles work best with plaster walls?
Plaster is flexible: it complements modern organic kitchens, Mediterranean-inspired spaces, Scandinavian warmth, and updated traditional kitchens. The key is balancing texture with clean cabinetry lines and cohesive natural materials.
Do plaster walls increase home value?
Quality finishes can elevate perceived value by making a kitchen feel custom and high-end. Poor installation or impractical placement (like staining behind the sink) can have the opposite effect, so craftsmanship and planning matter.
Next Steps: How to Bring the Organic Plaster Look Into Your Kitchen
- Identify your zones: Decide where splashes happen most (sink, range, coffee station) and plan durable surfaces there.
- Pick the right finish: Lime or Venetian plaster for ambiance walls; microcement/mineral coatings for higher-wear areas.
- Order large samples: Aim for 24" x 24" boards and test them in morning and evening light.
- Confirm sealing and care: Get written maintenance instructions and choose a sealer that matches your cleaning habits.
- Balance the room: Pair plaster with warm wood, matte finishes, and thoughtful lighting for a truly organic, timeless kitchen design.
If you’re planning a kitchen renovation or simply refreshing your space, plaster walls are a powerful way to add texture, warmth, and an effortless organic feel—without sacrificing function. Explore more kitchen design ideas, renovation guidance, and organization tips on thedecormag.com.
More Articles
 Kitchen Book-Matched Stone Backsplash - The Decor Mag
 Kitchen Zellige Tile Backsplash Guide - The Decor Mag
 Best Kitchen Specialty Cooking Oil Storage - The Decor Mag
 The Ultimate Sustainable Kitchen Guide: Practical, Proven, and Planet-Positive Actions
 Kitchen Countertop Maintenance: Choose Your Level
 Kitchen Textured Backsplash Tile Trends - The Decor Mag
 Kitchen Leathered Finish Granite Guide - The Decor Mag
 Kitchen Marble Countertop Pros and Cons - The Decor Mag
 Kitchen Fluted Detail Cabinet Trend - The Decor Mag
 Kitchen Sink Styles and Materials Compared - The Decor Mag