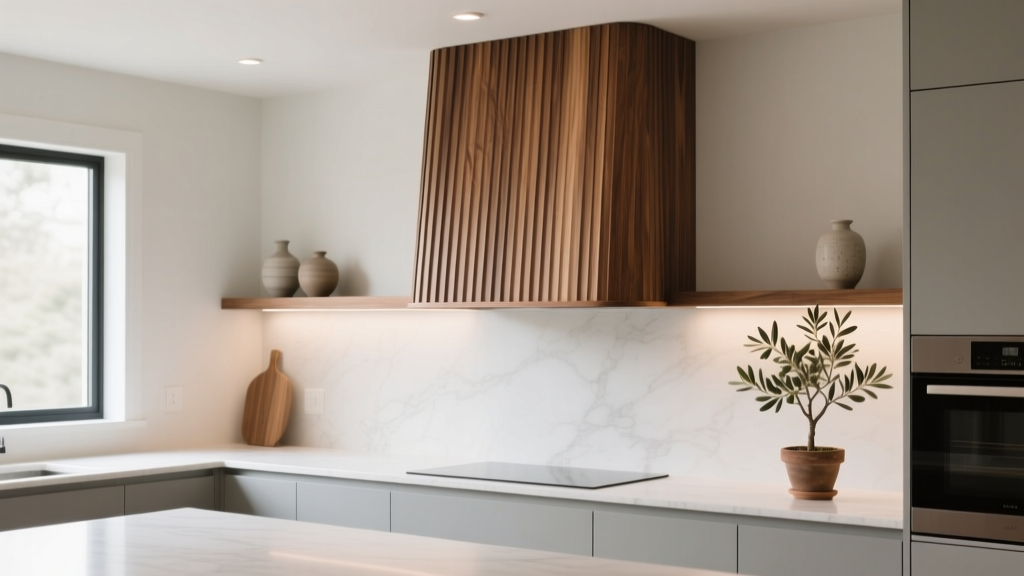
Kitchen Fluted Wood Range Hood Cover - The Decor Mag
A range hood is one of the most functional elements in a kitchen renovation, yet it’s often treated like an appliance to hide rather than a feature to celebrate. A fluted wood range hood cover changes that. The vertical ridges add architecture, rhythm, and a custom-built look—turning a necessary ventilation zone into a focal point that feels tailored to the room.
Homeowners are also prioritizing texture and natural materials in today’s kitchen design trends. Fluted details echo the reeded glass, slatted cabinet doors, and ribbed tile showing up in new builds and remodels alike. At the same time, wood brings warmth to the hard surfaces that dominate most kitchens—stone, tile, metal, and glass.
If you’re planning a kitchen renovation or looking for a high-impact upgrade, this guide breaks down how to choose the right layout, materials, finish, and ventilation approach for a fluted wood hood cover—plus costs, sizing tips, maintenance advice, and mistakes to avoid.
Why Fluted Wood Range Hood Covers Work (Aesthetics + Function)
Texture that elevates the whole kitchen
Fluting introduces shadow lines and depth, making the hood feel more like furniture than a box above a stove. It pairs especially well with:
- Shaker or slab cabinets (adds detail without making everything busy)
- Natural stone backsplashes (balances movement in veined marble or quartzite)
- Minimal hardware (lets the hood be the star)
- Mixed materials (wood hood + brass accents + matte tile is a timeless combination)
A focal point that’s easier to update than a full remodel
Even if you’re not replacing cabinets, swapping a basic stainless hood for a wood hood cover can make the kitchen feel custom. In many cases, you’re updating the “visual center” of the cooking wall—where eyes naturally land.
Function still leads the decision
A hood cover is only as good as the ventilation insert (also called a liner). The right liner, properly sized, protects finishes from grease and keeps odors out of adjacent rooms—especially in open-concept layouts.
Design Options: Styles, Shapes, and Where Fluting Looks Best
Popular shapes for a fluted wood hood
- Chimney (tapered): wider at the bottom and narrower near the ceiling; classic and flattering in most kitchens
- Box (straight): clean and modern; ideal when you want the fluting to feel graphic
- Curved or arched: softer and more traditional; pairs well with inset cabinets
- Hidden hood with fluted valance: fluting appears as a band, great for small kitchens
Where to place fluting (full wrap vs. accent)
Fluting doesn’t have to cover every face. Choose based on sightlines and how busy your kitchen already is:
- Front-only fluting: best for kitchens with lots of cabinet detail or patterned backsplash
- Front + sides: ideal for island ranges where the hood is visible from multiple angles
- Fluted frame + smooth center panel: a balanced look that still reads custom
Trend watch: what’s current, what’s timeless
- Current trends: light oak and white oak tones, matte finishes, minimal seams, and fluting that aligns with cabinet reveals.
- Timeless principles: proper hood sizing, durable finishes, and a silhouette that matches your cabinet style (sleek hood for slab cabinets; more shaped hood for traditional doors).
Measurements That Matter: Sizing for Performance and Proportion
Hood width: match the cooktop (or go slightly wider)
For most kitchen renovations, a good rule is:
- Minimum hood width = cooktop width
- Better = hood 3–6 inches wider than cooktop (especially for gas)
Examples:
- 30-inch range: choose a 30–36 inch hood
- 36-inch range: choose a 36–42 inch hood (if space allows)
Mounting height: avoid the “too high to work” mistake
- Electric/induction: typically 24–30 inches above the cooking surface
- Gas: typically 27–36 inches (check manufacturer specs)
Higher isn’t better—going too high reduces capture efficiency and can lead to grease buildup on cabinetry and the hood cover.
Depth and capture area
Many standard inserts are 19–22 inches deep. If you do a lot of high-heat cooking, consider deeper coverage (when available) so the hood captures steam and grease before it spreads.
Ceiling height and hood proportions
With 8-foot ceilings, a hood that ends 18–24 inches below the ceiling often looks balanced. With 9–10 foot ceilings, you may need a taller chimney section or a stacked profile to avoid an undersized look.
Materials and Construction: Choosing Wood, Fluting Profiles, and Heat-Safe Assembly
Best wood species for a range hood cover
- White oak: top choice for durability and a modern natural tone; takes stain well, looks great clear-coated
- Maple: smooth grain for painted or light stains; stable and widely available
- Walnut: premium, rich look; best when you want contrast against light cabinetry
- Ash: similar vibe to oak with bold grain; good for contemporary kitchens
MDF vs. plywood vs. solid wood (what to use where)
- Solid wood: best for face frames, trim, and areas that may get bumped; can move slightly with humidity
- Plywood: excellent for the hood box structure; stable and strong; holds screws well
- MDF: very smooth for painted finishes and routed fluting; must be well sealed to resist moisture
Practical approach: use plywood for the internal structure and solid wood or MDF for the fluted face panels depending on whether you’re staining or painting.
Fluting profile options (and how they change the look)
- Reeded (rounded grooves): softer, classic, works in transitional kitchens
- Chamfered/V-groove: crisp, modern, more graphic shadow lines
- Applied half-round dowels: strong 3D texture; often used for bold contemporary hoods
Spacing tip: for a refined look, many designers land in the range of 3/4 inch to 1 1/2 inches per flute (center-to-center), depending on hood size and how dramatic you want the texture.
Heat and safety basics
- Use a proper metal liner/insert designed for wood hood applications.
- Follow the insert manufacturer’s clearance requirements and local code.
- Plan for service access (filters, lights, blower access) without removing the entire cover.
Ventilation Choices: Inserts, CFM, Noise, and Ducting
How much CFM do you need?
CFM (cubic feet per minute) measures airflow. General guidelines:
- 30-inch range: often 400–600 CFM works well for typical cooking
- 36-inch pro-style gas range: often 600–1,200 CFM depending on BTUs and cooking habits
A practical rule some pros use: 100 CFM per 10,000 BTU for gas cooking, then adjust based on duct length and elbows. Always confirm with your hood manufacturer and installer.
Make-up air considerations
Higher-CFM systems (commonly 600+ CFM, depending on local code) may require make-up air so the home can replace exhausted air safely. This is especially relevant in airtight homes and major kitchen renovations.
Ducting tips that protect performance
- Use the largest duct size recommended (often 6–10 inches).
- Keep duct runs short and straight; minimize elbows.
- Vent to the exterior when possible (recirculating can’t match true venting for grease and odor).
Noise management
For a quieter kitchen design, consider:
- In-line blower (motor located in the attic) or remote blower (outside)
- Hoods rated with lower sones at typical speeds
- Good duct design (poor ducting increases noise and reduces airflow)
Finish and Color Recommendations (Paint, Stain, or Natural)
Natural clear-coated wood
Best for white oak, walnut, and ash. Choose a durable, kitchen-appropriate topcoat (often catalyzed or conversion finishes through a cabinet shop). A matte or satin sheen hides fingerprints and looks current.
Stained wood
Staining is ideal when you want to coordinate with flooring or open shelves. Tip: do a large sample board and view it next to your countertops and backsplash under both daylight and evening lighting.
Painted fluted hood covers
Paint emphasizes shadow lines and can look very high-end. Off-whites, warm greiges, deep olive, and charcoal are popular in current kitchen design. If you paint MDF fluting, insist on excellent priming and sealing so it won’t swell in a humid cooking environment.
Cost Ranges and Budget Planning
Costs vary widely based on size, wood species, fluting method, and ventilation specs. Use these ranges as planning numbers for a typical 30–48 inch installation.
Budget-friendly (approx. $800–$2,000)
- Simpler hood shape (box style)
- MDF or paint-grade materials
- Mid-range insert (often 400–600 CFM)
- More DIY involvement or semi-custom shop labor
Mid-range custom (approx. $2,000–$5,500)
- Custom-built cover with refined fluting
- Better insert/liner quality, improved lighting and baffles
- Professional finishing, stain matching, cleaner seams
High-end (approx. $5,500–$12,000+)
- Premium hardwoods (walnut, rift-sawn white oak)
- Complex shaping (curves, stacked forms) and full wrap fluting
- Higher CFM, remote blower, make-up air integration
- Designer + cabinetmaker + HVAC coordination
Budget extras people forget
- Ductwork upgrades or rerouting
- Electrical work (new circuit, lighting placement)
- Make-up air system (where required)
- Backsplash adjustments if the hood footprint changes
Layout and Styling Tips: Making the Hood Look Intentional
Align with cabinet lines
- Match hood width to the range and cabinet symmetry.
- Align fluting with cabinet stiles or vertical lines when possible.
- Keep trim thickness similar to other millwork (crown, light rail) for a cohesive kitchen design.
Backsplash pairing ideas
- Slab backsplash (stone or quartz): lets the fluted texture stand out
- Handmade tile: warm, layered look—keep grout subtle
- Vertical stacked tile: echoes the fluting and makes ceilings feel taller
Lighting considerations
Choose an insert with strong, warm lighting (often 2700K–3000K) so the cooking surface is well lit and the wood tones don’t look flat.
Maintenance and Cleaning: Keep Fluted Wood Looking Sharp
Weekly and monthly care
- Weekly: dust the flutes with a microfiber cloth or a soft brush attachment on a vacuum.
- Monthly: wipe gently with a damp cloth and mild soap; dry immediately to prevent moisture from sitting in grooves.
Filter maintenance (non-negotiable)
- Clean baffle or mesh filters every 3–6 weeks for frequent cooking, or at least every 2–3 months.
- Many stainless baffles are dishwasher-safe—check your insert manual.
Protecting the finish
- Avoid abrasive pads and harsh degreasers on finished wood.
- Address grease quickly; fluting can hold residue in grooves.
- If you chose a natural matte finish, consider a periodic pro touch-up in heavy-use kitchens.
Common Mistakes to Avoid
- Choosing style over suction: a beautiful fluted hood won’t help if the insert is underpowered or poorly ducted.
- Mounting too high: reduces capture efficiency and increases grease on surrounding cabinets.
- Ignoring make-up air requirements: can lead to failed inspections or comfort problems in tight homes.
- Using the wrong materials near heat: unsealed MDF or improper clearances can cause long-term damage.
- Overly tight fluting: extremely narrow grooves can be harder to clean and may look visually busy from a distance.
- No service plan: make sure you can remove filters and access the blower without disassembling the hood cover.
FAQ: Fluted Wood Range Hood Covers
Is a fluted wood range hood cover practical for a busy kitchen?
Yes, if you pair it with a strong insert and clean filters regularly. The main upkeep is dusting and occasional wipe-downs in the grooves, so choose a durable finish and avoid overly delicate profiles if you cook daily.
What’s the best finish for a fluted wood hood near cooking grease?
A professional-grade cabinet finish (often conversion varnish or similar) in matte or satin holds up well. For natural wood, a quality clear coat is easier to clean than an oil-only finish.
Can I add fluting to an existing hood cover?
Often, yes. Many homeowners retrofit by applying fluted panels or half-round dowels to the front face, then refinishing. Confirm that the existing structure is sound and that access to filters and controls won’t be blocked.
Should the hood match the cabinets or contrast?
Both work. Matching creates a seamless built-in look; contrasting (white kitchen with a natural oak hood, for example) highlights the hood as a focal point. Decide based on how much visual emphasis you want on the cooking wall.
Do I need a liner if I’m building a wood hood cover?
In most cases, yes. A metal liner/insert protects the wood, contains grease, and provides the proper mounting system for filters, lighting, and blowers. Follow manufacturer specs and local building codes.
Next Steps: Plan Your Fluted Hood Like a Pro
To move from inspiration to a confident plan, focus on these steps:
- Measure your range (width and cooking style) and choose an insert size that matches or slightly exceeds it.
- Confirm mounting height based on your range and hood manufacturer requirements.
- Select a fluting profile that fits your kitchen style and cleaning preferences.
- Coordinate ducting early (duct size, route, and whether make-up air is required).
- Choose a finish that complements cabinets, countertops, and backsplash—and holds up to real-life cooking.
A kitchen fluted wood range hood cover is one of those rare upgrades that combines design impact with everyday function—especially when it’s properly sized, well-vented, and finished for durability.
Explore more kitchen renovation ideas, layout tips, and design trends on thedecormag.com to keep your project moving from concept to a kitchen you’ll love using every day.
More Articles
 How to Choose Kitchen Countertop Thickness - The Decor Mag
 Kitchen Quartz vs Granite Countertops - The Decor Mag
 Best Kitchen Appliance Maintenance Schedule - The Decor Mag
 How to Start Bedroominspiration: A Practical, Space-Smart Guide for Real Homes
 How to Design a Kitchen That Feels Collected - The Decor Mag
 Best Kitchen Cookware Organization: Cabinet Solutions (2026)
 How to Design a Kitchen with an Eat-In Area - The Decor Mag
 Kitchen Waterfall Island Design Ideas - The Decor Mag
 Smart Kitchen Tech: How to Incorporate in 2026
 How to Choose Kitchen Cabinet Door Styles - The Decor Mag