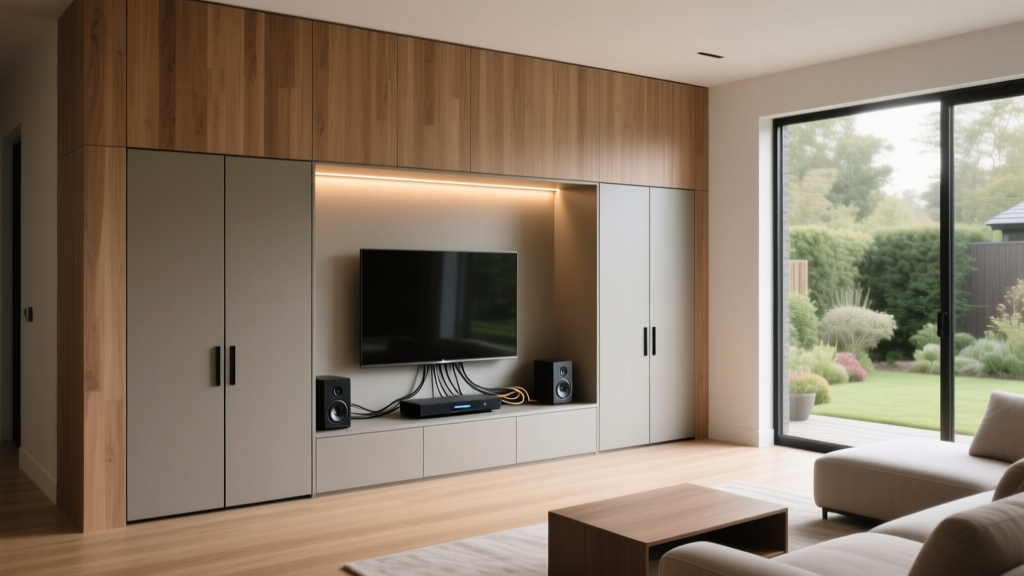
Living Room Entertainment Center Hideaway Ideas (2026)
The TV wall and entertainment center are often the visual “center of gravity” in a living room—yet they’re also where clutter loves to gather. Remotes, game controllers, cables, streaming devices, soundbars, kids’ toys, and stacks of media can quickly make even a beautifully styled space feel messy. That’s why entertainment center hideaway ideas are having a major moment: homeowners and renters want living rooms that look calm and intentional, without sacrificing comfort or functionality.
The good news is you don’t need a massive renovation to create a hidden, streamlined media setup. From sliding panels and lift-up cabinets to renter-friendly curtains and clever cord management, there are ways to tuck away screens and accessories while still keeping everything easy to use. Ahead, you’ll find practical design strategies, measurements that help you plan with confidence, material and finish recommendations, and budget ranges—from quick weekend upgrades to custom built-ins.
If your goal is a cleaner TV wall, a more polished living room layout, or a stylish entertainment center that doesn’t dominate the room, these ideas will help you get there.
Start With the “Hideaway” Goal: What Are You Trying to Conceal?
Before buying a cabinet or planning built-ins, decide what “hideaway” means for your home. Most living room entertainment center hideaway projects fall into three categories:
- Hide the TV when it’s off (to make the living room feel less screen-centric).
- Hide the clutter (cables, remotes, devices, discs, toys).
- Hide the whole media zone (TV, speakers, storage) behind doors or panels for a more furniture-like look.
Quick planning tip: measure these items now, not later.
- TV size: measure width and height of the actual screen (not just diagonal).
- Soundbar width: many are 35–45 inches; plan a shelf with at least 2 inches of breathing room on each side.
- Console depth: allow 15–20 inches deep for most receivers and game consoles, plus cable clearance.
Idea #1: Sliding Panels for a Clean, Architectural TV Wall
Sliding panels are one of the most design-forward ways to hide a television. When closed, they look like a wood feature wall, textured laminate, or minimalist panel system. When open, your screen is ready for movie night.
How to pull it off
- Track system: use a top-mounted sliding door track (common in modern wardrobes and barn-door styles). A top track keeps the floor area visually clean.
- Panel sizing: plan each panel 2–4 inches wider than half the TV area you want to cover, so seams don’t land right at the edge of the screen.
- Material recommendations: white oak veneer, walnut veneer, painted MDF, slatted wood (great for warm modern spaces), or fluted panels for a trend-forward look.
Real-world scenario: In an open-concept apartment where the TV faces the dining area, a set of walnut sliding panels can make the media wall read like a sophisticated built-in, rather than a “TV zone.” When guests come over, slide it closed and the space instantly feels more like a lounge.
Budget range: $150–$600 for a basic track + DIY panels; $1,500–$6,000 for custom millwork, depending on wall size and finish.
Idea #2: Cabinet Doors That Disappear (Pocket Doors and Bi-Folds)
If you love the idea of closing doors over a TV but don’t want doors swinging into the room, consider pocket doors (doors that slide into the cabinet sides) or bi-fold doors.
Planning tips
- Depth matters: pocket doors require extra internal space. Aim for a cabinet depth of at least 18–24 inches for comfortable hardware clearance.
- Ventilation: add vent holes or a ventilated back panel if you’re hiding a receiver or gaming system.
- Hardware quality: choose soft-close hinges and smooth-glide tracks to avoid rattling and misalignment over time.
Design trend tie-in: Warm minimalism is everywhere right now—clean lines, natural materials, and functional storage. Pocket doors fit that trend while still feeling timeless.
Budget range: $500–$2,000 for a ready-made cabinet with doors; $3,000–$12,000 for a custom wall of cabinetry with integrated door systems.
Idea #3: TV Lift Cabinets for “Now You See It, Now You Don’t” Living Rooms
A TV lift cabinet hides the TV inside a console so the screen rises when you want it. This is especially helpful if you want the fireplace, view, or artwork to be the main focal point instead of the TV.
Best uses
- Small living rooms: keeps the room from feeling dominated by a big black rectangle.
- Multi-use spaces: living room/home office combos where you want a calmer backdrop during work hours.
- Design-forward homes: ideal if your style leans traditional, coastal, or organic modern.
Measurement and safety notes
- Check lift capacity: match the lift’s weight rating to your TV.
- Top clearance: allow at least 3–5 inches above the TV height inside the cabinet for the lift mechanism.
- Stability: anchor the cabinet if you have kids or pets, and ensure cords don’t snag during movement.
Budget range: $700–$2,500 for prebuilt TV lift consoles; $2,500–$8,000+ for custom builds.
Idea #4: Art That Acts as a Cover (DIY-Friendly and Renter-Friendly)
If you like the “TV disappears into decor” effect, consider covering it with art. One approach is a framed art cover that hangs in front of the TV, sliding up or to the side. Another is using a picture ledge and oversized artwork to visually distract from the screen.
Options to consider
- Framed art on a rail: mount a simple wall rail above the TV and hang a lightweight framed piece that slides.
- Hinged art panel: a shallow “cabinet door” that opens to reveal the TV.
- Styling trick: place two tall bookcases or cabinets on each side of the TV wall, then center artwork elsewhere to reduce TV dominance.
Material recommendations: lightweight wood frames, acrylic instead of glass for safety, and canvas prints for low glare.
Budget range: $50–$300 DIY; $400–$1,500 for custom framing and rail hardware.
Idea #5: Curtains and Fabric Panels to Soften the Media Zone
Fabric isn’t just for windows. Curtains can conceal a TV wall, open shelving, or an entire entertainment center while adding softness and acoustic benefits—great if your space feels echo-y.
How to style it without looking “temporary”
- Mount high and wide: place the curtain rod 3–6 inches below the ceiling and extend it 8–12 inches past the media zone on both sides.
- Choose heavier fabrics: linen blends, cotton velvet, or textured weaves read more elevated than thin sheers.
- Color tip: match curtain color to wall color for a seamless, built-in look, or go one shade deeper for depth.
Renter win: use no-drill adhesive hooks rated for the curtain’s weight, or a tension rod inside an alcove.
Budget range: $60–$300 for rod + panels; $300–$900 for custom curtains.
Idea #6: Storage-First Consoles That Hide Cords, Remotes, and Devices
If hiding the TV isn’t essential, hiding everything around it can still transform your living room. Look for entertainment centers with closed storage, cable cutouts, and enough depth for devices.
What to look for when shopping
- Depth: 16–20 inches deep is ideal for most devices and plugs.
- Ventilation: louvered doors, mesh panels, or back cutouts help prevent overheating.
- Cable management: built-in grommets and a rear channel keep cords from spilling out.
- Door style: fluted glass, cane/rattan, or perforated metal hides clutter while allowing remote signals through.
Step-by-step: a cleaner console in one afternoon
- Label cords with tape or cable tags (HDMI, power, soundbar, console).
- Add a surge protector mounted to the back of the console interior (adhesive strips or screws if allowed).
- Bundle cables with Velcro ties (easier than zip ties when you swap devices).
- Use a cable box for the power strip if the console is open-backed.
- Create a “remote home” (small lidded box or tray inside a drawer).
Budget range: $10–$60 for cord management accessories; $250–$2,500 for a quality media console, depending on size and materials.
Idea #7: Built-In “Niche” Hideaways Around Fireplaces and Awkward Walls
Some living rooms come with tricky architecture: a narrow wall, a fireplace bump-out, or an off-center layout. A niche (recessed zone) can make your entertainment center feel intentional and less bulky.
Design guidelines
- Recess depth: even a 3–5 inch recess helps the TV feel more integrated; deeper is better if your wall allows it.
- Frame it: surround the niche with shelves or slim cabinets (12–15 inches deep) for balanced storage.
- Finish it differently: paint the niche a shade darker than the wall, or add wood paneling to create depth and hide the screen visually.
Real-world scenario: A renter with a narrow living room places a slim console under the TV and flanks it with two tall bookcases. By adding matching baskets and closing off the bottom shelves, the whole setup mimics a built-in—without construction.
Idea #8: Hidden Media in a Credenza or Sideboard (Not Just “TV Stands”)
One of the easiest ways to make a living room feel more curated is to choose furniture that doesn’t scream “electronics.” A long credenza or sideboard can act as an entertainment center hideaway with style.
Best styles for current trends
- Mid-century modern: timeless lines, great for warm wood tones.
- Scandinavian: light oak + clean silhouettes for smaller spaces.
- Organic modern: travertine-look tops, rounded edges, slatted doors.
Shopping tip: Make sure the top surface is wide enough for your TV feet if you’re not wall-mounting, or plan a center stand. Many TVs have feet that are surprisingly wide.
Common Mistakes to Avoid (So Your Hideaway Actually Works)
- Mounting the TV too high: A comfortable center-of-screen height is often 40–45 inches from the floor when seated. Above a fireplace can be too high; consider a pull-down TV mount if needed.
- Ignoring ventilation: Closed cabinets can trap heat. Use vented doors, add ventilation holes, or choose mesh/cane panels for airflow.
- Underestimating depth: Many consoles are too shallow for plugs and HDMI cables. Plan 2–3 inches behind devices for connectors.
- No cable plan: A gorgeous entertainment center can still look messy if cords dangle. Add a paintable cable raceway if wall-mounting.
- Over-styling around the TV: Too many small objects can create visual noise. Aim for a few larger pieces (books, a vase, a bowl) instead of many tiny decor items.
Quick Product Recommendations (Easy Upgrades That Make a Big Difference)
- Cable raceways: paintable channels to hide wall-mounted TV cords (typically $10–$30).
- Velcro cable ties + labels: the simplest way to keep cords tidy ($10–$20).
- Ventilated door inserts: cane webbing, perforated metal sheets, or mesh panels for DIY cabinet upgrades ($20–$80).
- Storage bins for consoles: lidded boxes or baskets sized 10–12 inches wide for remotes and controllers ($15–$60 each).
- LED backlighting: soft bias lighting behind the TV reduces eye strain and adds ambiance ($20–$80).
FAQ: Living Room Entertainment Center Hideaway Ideas
How do I hide a TV in a small living room without remodeling?
Use a curtain panel on a ceiling-mounted track, or choose a media console with closed doors (cane, fluted glass, or solid wood). Add a paintable cable raceway to eliminate visible cords. These changes can dramatically clean up a small space with minimal tools.
What’s the best cabinet door style if I need remotes to work through it?
Look for cane/rattan, perforated metal, or mesh inserts—these allow IR signals through better than solid wood. If you already own a solid-door cabinet, an IR repeater kit is a practical workaround.
How much space should I leave around devices inside a closed entertainment center?
Aim for at least 2 inches on the sides and 3–4 inches above heat-producing devices like receivers and game consoles. If the cabinet is fully enclosed, add ventilation holes or a vented back panel.
Is it okay to place a TV in front of a window with a hideaway setup?
It can work, but glare is the issue. Choose light-filtering shades, position the screen to reduce reflections, and consider curtains that can close behind the TV when watching. A matte-finish screen or adjustable mount can help.
What are the best materials for a timeless entertainment center?
Wood veneers (oak, walnut), painted MDF in a satin finish, and metal accents are all timeless and durable. For doors, cane and fluted glass are trend-forward but still classic when used in simple silhouettes.
What’s a realistic budget for a built-in hideaway entertainment center?
For a custom built-in with doors, shelves, and cable management, many homeowners spend $3,000–$12,000 depending on size, finish level, and whether electrical work is needed. A semi-custom approach (IKEA-style cabinets with upgraded fronts) can land around $1,500–$5,000.
Next Steps: Choose One Hideaway Upgrade You Can Do This Week
A more peaceful, pulled-together living room doesn’t require a full makeover. Start by choosing one change that gives you the biggest visual payoff:
- If your room feels cluttered: upgrade cord management and add closed storage.
- If you want a more design-forward space: try sliding panels or pocket doors.
- If you want a screen-free vibe when entertaining: consider a TV lift cabinet or art cover solution.
Once your entertainment center is streamlined, styling becomes easier too—fewer items, better scale, and more breathing room for the decor you actually love.
For more living room design and decor inspiration—from TV wall ideas to furniture layouts and storage solutions—explore the latest guides on thedecormag.com.
More Articles
 Pet-Proof Sofa Choices for Stylish Homes
 Living Room Statement Piece Furniture Guide - The Decor Mag
 Living Room Window Seat Ideas - The Decor Mag
 Living Room Color Guide: Science-Backed Picks for 2026
 Living Room Ottoman and Pouf Styling Ideas - The Decor Mag
 Leather Furniture for Living Rooms (2026)
 Mix Metal Finishes in Living Room Hardware (2026)
 Best Bench Options at the End of a Sofa - The Decor Mag
 Best Pendant Lighting for Living Rooms - The Decor Mag
 2026 Living Room Bathroom Ideas: Smart & Stylish Hybrids