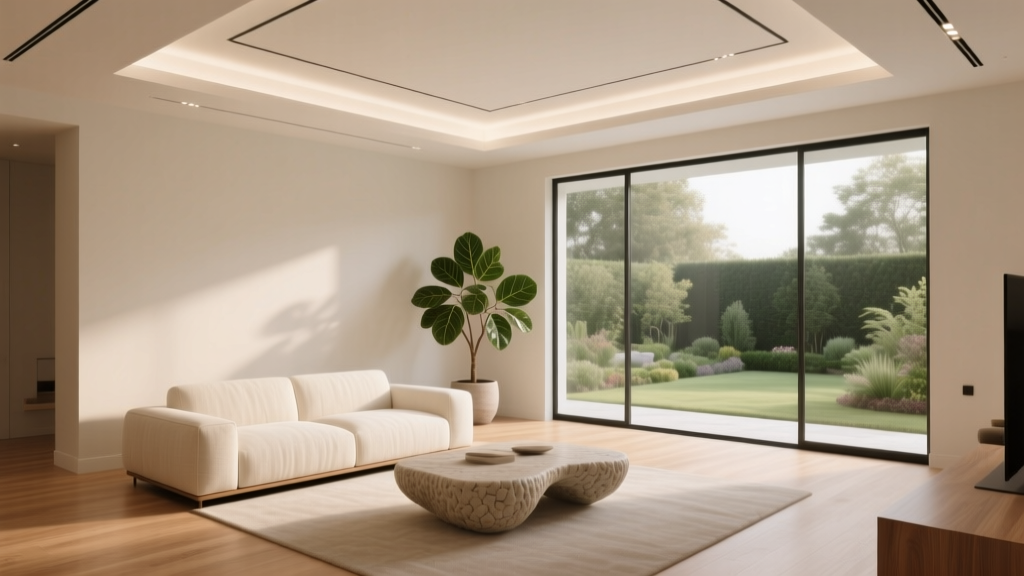
Living Room Tray Ceiling Design Ideas - The Decor Mag
A living room tray ceiling can change the entire feel of a space—often more than a new sofa or a fresh paint color. By creating a recessed “step” in the ceiling plane, a tray ceiling adds depth, architectural character, and a natural focal point that draws the eye upward. The result? A living room that feels more intentional, more layered, and (in many cases) taller and brighter.
Whether you’re a homeowner planning a renovation or a renter looking for a ceiling-friendly upgrade, tray ceiling design offers options at nearly every budget. In this guide, you’ll find practical living room tray ceiling ideas, lighting strategies, recommended materials, real-world scenarios, and common mistakes to avoid—plus measurements and cost ranges to help you plan with confidence.
What Is a Tray Ceiling (and Why It Works in Living Rooms)
A tray ceiling (also called an inset or recessed ceiling) features a center section that’s higher than the perimeter, creating a “tray” shape. Some versions are simple and modern; others include molding, beams, wallpaper, or dramatic lighting.
Why tray ceilings are a standout living room design move
- Architectural interest: Adds dimension without changing the floor plan.
- Better lighting opportunities: Perfect for layered lighting (recessed lights, cove lighting, pendants, chandeliers).
- Visual height: The recessed center can make a room feel taller, even if the actual ceiling height stays the same.
- Zoning: Helps define an open-concept living room area without walls.
Typical tray ceiling measurements to know
- Drop depth (the “step”): Commonly 6–12 inches. For grander rooms, 12–18 inches can look stunning.
- Perimeter width: Often 8–16 inches around the edge; wider perimeters suit larger living rooms.
- Minimum ceiling height: Works best with 9-foot ceilings or higher, but shallow trays can work at 8 feet with careful detailing and lighting.
Design Styles: Tray Ceiling Ideas for Every Living Room
1) Modern minimal tray ceiling
If your living room leans contemporary—clean-lined furniture, simple window treatments, and neutral color palettes—keep the tray ceiling crisp and uncluttered.
- Look: Flat, smooth drywall with tight corners and minimal trim.
- Best lighting: Recessed LED downlights spaced evenly (typically 4–6 feet apart), plus a single statement fixture centered in the tray.
- Color tip: Paint the tray center 1–2 shades lighter than the perimeter to subtly lift the ceiling.
Real-world scenario: In a 12' x 18' condo living room with a 9' ceiling, a 6" tray depth plus slim recessed lights keeps the space modern without overwhelming it.
2) Transitional tray ceiling with crown molding
Transitional style blends modern simplicity with classic details—tray ceilings fit naturally here.
- Trim choice: 3–5" crown molding along the tray step is a sweet spot for most living rooms.
- Finish: Satin or eggshell paint to soften glare from lighting.
- Fixture pairing: A chandelier or semi-flush mount that’s 24–36" wide for medium living rooms (rough guideline: fixture diameter in inches ≈ room width + room length in feet).
3) Traditional coffered-tray hybrid
If you love classic architecture, consider combining a tray with coffering or panel detail inside the recessed area.
- Materials: Painted wood beams or high-density polyurethane beams (lighter, often more budget-friendly).
- Palette: Warm whites, soft taupes, or heritage-inspired colors for the tray center.
- Lighting: Warm 2700K LEDs and a chandelier with traditional lines.
Budget note: Coffered details can add cost quickly. If you want the look for less, use applied molding grids instead of full-depth beams.
4) Rustic or farmhouse tray ceiling with beams
Wood beams instantly add texture and coziness—perfect for farmhouse, cottage, or rustic living room decor.
- Beam sizing: Faux beams often look best at 6–8" tall in an average living room; oversized beams can overwhelm low ceilings.
- Finishes: Whitewashed oak, warm walnut stain, or reclaimed wood for character.
- Lighting: Black iron chandelier or lantern pendant; add dimmers for evening ambiance.
Real-world scenario: A suburban living room with a stone fireplace and a 10' ceiling benefits from a tray with two faux beams running parallel to the longest wall, visually elongating the room.
5) Bold tray ceiling with color or wallpaper
One of the biggest current design trends is treating ceilings like a “fifth wall.” A tray ceiling is the ideal canvas because it frames the design.
- Paint idea: Deep navy, smoky green, or warm terracotta in the tray center, with a crisp white perimeter.
- Wallpaper idea: Grasscloth, subtle metallic, or a soft geometric print inside the tray for depth.
- Pro tip: Use matte paint for dark colors to reduce glare and hide minor ceiling imperfections.
Renter-friendly option: Try peel-and-stick wallpaper in the recessed area (test a small patch first). Pair with plug-in wall sconces to boost the effect without hardwiring.
Lighting a Tray Ceiling: Layered, Flexible, and High Impact
Lighting can make or break a tray ceiling. The goal is to highlight the ceiling’s shape without creating harsh shadows or a “runway” of too-bright recessed cans.
Step-by-step: Build a tray ceiling lighting plan
- Start with ambient light: Use recessed lights or a central fixture to light the overall room.
- Add accent light: Consider LED cove lighting along the tray perimeter to emphasize depth.
- Layer in task lighting: Floor lamps near seating and table lamps on consoles for practical, cozy light.
- Put key lights on dimmers: A must-have for living room mood and flexibility.
Recommended lighting specs for living rooms
- Color temperature: 2700K–3000K for a warm, inviting living room.
- CRI: Aim for 90+ for accurate color rendering (fabrics, paint, art).
- Recessed light spacing: A common guideline is spacing lights about half the ceiling height apart (e.g., 9' ceiling → around 4.5' spacing), adjusted for layout.
- Cove lighting: LED strip lighting (dimmable) installed in an aluminum channel with a diffuser for a clean glow and heat management.
Product recommendations (practical, widely available types)
- Dimmable recessed LED downlights: Look for “warm dim” models that shift warmer as you dim—great for evenings.
- LED strip + channel: 24V LED strip lights (more consistent brightness over longer runs) and a compatible dimmable driver.
- Smart dimmers: Ideal if you want scenes like “Movie Night” or “Entertaining” without rewiring.
- Statement chandelier or pendant: Choose a scale that fits the tray; in many living rooms, 24–36" diameter is a safe starting range.
Materials and Finishes That Look Great (and Last)
Drywall and trim
- Drywall tray ceiling: Clean, cost-effective, and adaptable to any style.
- MDF trim: Budget-friendly and paintable; best for low-humidity spaces.
- Solid wood trim: More durable and premium, especially for stained finishes.
- Polyurethane moldings: Lightweight, crisp detailing, good for DIY-friendly upgrades.
Paint sheens for ceilings
- Flat/matte: Best for hiding imperfections and reducing glare.
- Eggshell: Works when you want a slight glow and easier cleaning, but can highlight flaws.
Wood treatments
- Whitewash: Keeps things airy and coastal.
- Medium walnut stain: Adds warmth and contrast in neutral living rooms.
- Charcoal/ebonized stain: A modern-rustic look that pairs well with black accents.
Budget Ranges: What a Tray Ceiling Might Cost
Costs vary widely based on ceiling height, labor rates, and complexity. These ranges can help you estimate before getting quotes.
- Budget-friendly “faux tray” (paint + molding illusion): $150–$800
- Great for renters (with removable products) or homeowners testing the look.
- Uses paint, lightweight trim, and strategic lighting.
- Standard drywall tray ceiling (simple step + basic lighting): $1,500–$4,500
- Mid-range tray with crown molding + recessed lights: $3,000–$8,000
- High-end custom tray (coffered details, beams, premium fixtures, cove lighting): $8,000–$20,000+
Money-saving tip: If your ceiling already has a tray feature, spending on upgraded lighting (cove + a new fixture) and paint often delivers the biggest visual payoff for the lowest cost.
Real-World Design Pairings: How to Match a Tray Ceiling to Your Living Room
Open-concept living room + kitchen
Use the tray ceiling to define the living zone. Keep the tray aligned with the main seating area rather than the entire open space.
- Best approach: A rectangular tray that matches the rug footprint (or slightly larger) visually “anchors” the room.
- Lighting: Recessed lights on separate dimmers from the kitchen lights for better ambiance control.
Small living room (apartment or townhome)
A shallow tray can still work—especially if the detailing stays minimal.
- Tray depth: 4–6" is often enough.
- Color trick: Paint the tray center the same color as the ceiling to avoid chopping up the height.
- Fixture: Choose a semi-flush mount rather than a large chandelier if clearance is tight.
Living room with a fireplace feature wall
Let the ceiling reinforce the focal point.
- Layout: Center the tray on the fireplace and seating axis.
- Finish: If the fireplace is stone or heavily textured, keep the tray ceiling simpler to avoid visual overload.
Renter-Friendly Tray Ceiling Alternatives (No Major Construction)
If you can’t alter the ceiling structure, you can still capture the tray ceiling vibe with smart styling choices.
- Paint illusion tray: Use painter’s tape to create a large inset rectangle and paint it 1 shade lighter or darker than the surrounding ceiling. A 6–10" “border” around the edge reads like a tray from below.
- Peel-and-stick ceiling medallion + fixture swap (where allowed): Adds character around a central light.
- Lightweight trim strips: Some renters use removable adhesive solutions—always test to avoid damage and check your lease.
- Cove-light effect: Place LED strip lighting on top of tall bookcases or crown-like ledges to create a soft perimeter glow.
Common Mistakes to Avoid
- Oversizing the tray depth for the ceiling height: A deep tray in an 8' room can feel heavy and reduce perceived height.
- Too many recessed lights: Creates a harsh, over-lit ceiling. Use fewer lights plus lamps and dimmers.
- Ignoring alignment: A tray that isn’t centered on the seating area or main focal point can look “off,” even if measurements are technically correct.
- Choosing the wrong paint sheen: Glossy finishes can emphasize seams and imperfections overhead.
- Skipping a lighting plan: Adding a tray without upgrading lighting can make the ceiling detail disappear at night.
- Going too ornate in a busy room: If you already have bold wallpaper, patterned rugs, or a dramatic gallery wall, keep the tray design cleaner.
FAQ: Living Room Tray Ceiling Design
Does a tray ceiling make a living room look bigger?
It can. By adding depth and drawing the eye upward, tray ceilings often increase perceived height and make the room feel more open—especially when paired with soft cove lighting and a light tray color.
What is the best lighting for a tray ceiling?
A layered approach works best: recessed downlights for general lighting, LED cove lighting to highlight the tray shape, and a central statement fixture for style. Put key lights on dimmers for flexibility.
Can I add a tray ceiling to an 8-foot ceiling living room?
Yes, but keep it shallow (around 4–6") and avoid heavy crown molding. A simple drywall tray with minimal trim and careful lighting is usually the most flattering option.
What paint color should I use on a tray ceiling?
For a timeless look, use a white or warm off-white in the tray and perimeter. For a designer-forward statement, try a deeper color in the recessed center (navy, charcoal, olive) with a lighter perimeter to frame it.
Are tray ceilings outdated?
Not when they’re styled thoughtfully. Current trends lean toward cleaner profiles, mixed materials (like subtle beams), and ceiling-as-a-feature approaches (color, texture, wallpaper). Classic tray ceilings with elegant trim also remain timeless in traditional and transitional homes.
How do I choose the right chandelier size for a tray ceiling?
A common guideline is: add the room’s length and width (in feet) to get the fixture diameter (in inches). For example, a 12' x 18' living room suggests around a 30" fixture. Adjust based on ceiling height and furniture scale.
Next Steps: Choose a Tray Ceiling Direction That Fits Your Space
Start by looking at your ceiling height, living room size, and the mood you want—calm and minimal, warm and rustic, or bold and dramatic. Then sketch a simple plan: tray depth, trim style, and a lighting layout with dimmers. If you’re renovating, get quotes that separate drywall/trim work from lighting so you can see where upgrades will matter most. If you’re renting, use paint, removable materials, and layered lighting to create the same architectural effect without permanent changes.
For more living room design and decor inspiration—ceiling ideas, lighting guides, layout tips, and trend-forward styling—explore more at thedecormag.com.
More Articles
 Reading Nook Ideas for Living Rooms (2026)
 Comfortable Seating for Aging Bodies: Sofas & Chairs (2026)
 How to Mix Old and New in Living Room Decor - The Decor Mag
 Best Console Tables for Entry Living Rooms - The Decor Mag
 Living Room Layered Rug Ideas - The Decor Mag
 Living Room Global Bazaar Style - The Decor Mag
 Pet-Friendly Living Room Furniture Picks - The Decor Mag
 Scandinavian Living Room Design Essentials - The Decor Mag
 Checklist Alternatives to Studio Living That Fit Your Life
 Gallery Wall Ideas for Living Rooms (2026)