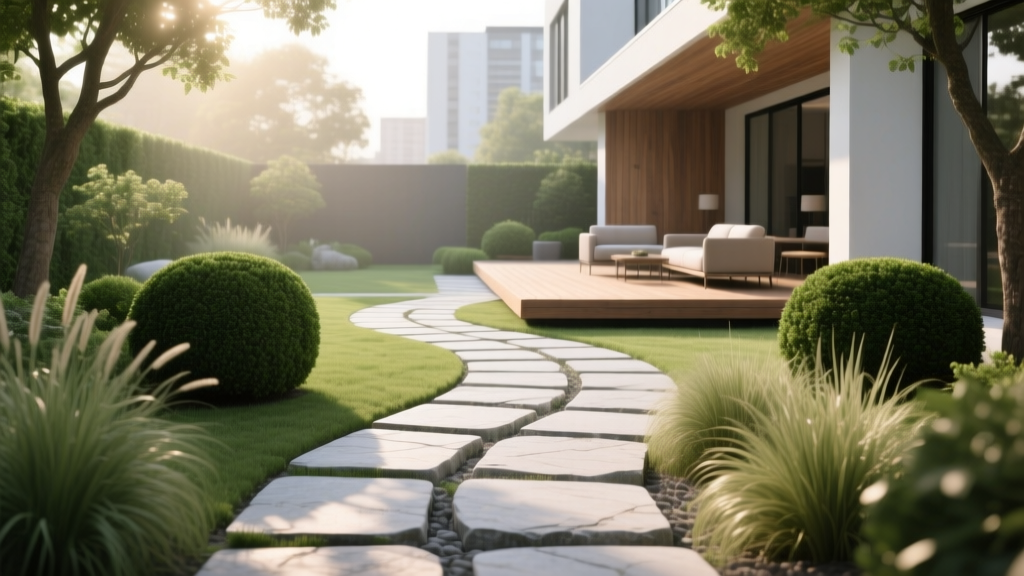
How to Design a Garden Pathway - The Decor Mag
A well-designed garden pathway does more than get you from point A to point B. It choreographs how you experience your outdoor living space—slowing you down near a flowering border, guiding you toward a patio seating area, and making the yard feel purposeful and inviting year-round. When a path is thoughtfully planned, it becomes the backbone of your landscape design, connecting patios, porches, fire pits, raised beds, and side-yard access with ease.
Pathways also solve everyday problems that homeowners feel immediately: muddy shoes after rain, worn “desire lines” across the lawn, and dark corners that feel underused after sunset. The right materials and layout can brighten shady zones, improve drainage, reduce maintenance, and add curb appeal in a single weekend project—or become a high-end hardscape feature that elevates the entire property.
Whether you’re working with a compact patio garden or a sprawling backyard, this guide breaks down practical garden pathway design choices—materials, layouts, edging, lighting, and planting—so your path looks beautiful, functions well in every season, and fits your budget.
Start With a Path Plan: Function First, Then Style
Define the purpose (and users) of the path
Before choosing pavers or gravel, clarify what the path needs to do. The best landscaping choices come from real-life use.
- Primary circulation: Front walk to the entry, driveway to door, patio to back steps. Prioritize durability, safe footing, and snow/leaf management.
- Secondary routes: Garden bed access, side-yard gates, compost or shed routes. Practical surfaces and easy maintenance matter most.
- Leisure paths: Wandering routes through planting beds or around a water feature. Curves, textures, and sensory planting shine here.
Measure widths that feel comfortable
Path width influences how your outdoor living space feels—tight and utilitarian or generous and welcoming.
- 24–30 inches: Minimum for a simple garden path (single person). Best for secondary routes.
- 36–42 inches: Comfortable for most backyard pathways and for carrying a tray to an outdoor dining set.
- 48–60 inches: Ideal for front walks, side-by-side strolling, wheelbarrows, strollers, and accessible design.
Lay out the route with stakes, string, or a garden hose
Mock the pathway before you build. A hose makes it easy to test curves; string lines help you confirm straight runs. Walk it at different times of day—morning glare, afternoon shade, evening lighting—and adjust for natural flow.
Choose a Layout That Matches Your Home and Landscape Style
Straight paths: Clean, modern, and efficient
Straight paths are perfect for contemporary landscape design, small yards, and direct routes from patio to gate. They feel structured and often look best with large-format pavers, linear lighting, and crisp edging.
Curved paths: Softer, more natural, and great for gardens
Gentle curves slow movement and create discovery—ideal for cottage gardens, woodland landscapes, and planting-rich borders. Keep curves broad and intentional; tight zigzags often look forced and become awkward to walk.
Stepping-stone rhythms: Casual and charming
Steppers invite a relaxed pace and work well in lightly used areas (between raised beds, to a hammock, or around a fire pit seating zone). Place stones so the stride feels natural:
- 18–24 inches center-to-center for most adults
- Test spacing by walking it before setting stones
Best Garden Pathway Materials (With Pros, Cons, and Budget Ranges)
Gravel or decomposed granite (DG)
Look: Natural, relaxed, French-country to modern depending on edging.
- Pros: Budget-friendly, fast to install, excellent drainage, easy to refresh.
- Cons: Needs edging, can migrate, may require topping up, not ideal for steep slopes.
- Best for: Side yards, garden loops, informal patio transitions.
Budget range: $4–$12 per sq. ft. installed (varies by base depth, edging, and local material costs).
Pro tip: Use angular gravel (like 3/8" minus) for better compaction and less rolling underfoot than pea gravel.
Pavers (concrete or clay brick)
Look: Classic, structured, versatile for patio living areas and walkways.
- Pros: Durable, clean edges, easy to sweep, broad style selection, great for high traffic.
- Cons: More labor, requires a solid base, weeds can appear in joints if not maintained.
- Best for: Front entries, connecting patios, outdoor kitchen routes.
Budget range: $12–$30+ per sq. ft. installed.
Pro tip: Consider permeable pavers if drainage is a concern or if your area has stormwater requirements.
Natural stone (flagstone, bluestone, limestone)
Look: High-end, timeless, pairs beautifully with lush planting and upscale outdoor furniture zones.
- Pros: Premium aesthetic, long lifespan, stays cooler than some concrete in hot climates (varies by stone color).
- Cons: Higher cost, irregular shapes require skill, some stones can be slippery if polished or algae-prone in shade.
- Best for: Feature garden paths, courtyards, seamless patio-to-path transitions.
Budget range: $18–$45+ per sq. ft. installed.
Pro tip: Choose a thermal or naturally cleft finish for better traction in rainy climates.
Mulch or wood chips
Look: Soft, woodland, kid-friendly.
- Pros: Lowest cost, easy DIY, gentle on joints, great for informal garden zones.
- Cons: Needs frequent replenishing, can wash away on slopes, not ideal for year-round muddy areas.
- Best for: Vegetable gardens, woodland borders, temporary paths while you plan hardscape upgrades.
Budget range: $1–$5 per sq. ft. installed.
Concrete (poured or stamped)
Look: Minimalist to decorative; can mimic stone with stamping.
- Pros: Smooth and accessible, easy to shovel in snow climates, long-lasting when properly installed.
- Cons: Cracks can occur, less forgiving to change later, may reflect heat in full sun.
- Best for: Front walks, modern yards, long runs where maintenance ease is key.
Budget range: $8–$20+ per sq. ft. installed.
Design Details That Make a Path Feel “Finished”
Edging: The secret to a crisp, low-maintenance pathway
Edging keeps gravel and mulch contained, prevents lawn creep, and makes the entire landscape look more intentional. Strong options include:
- Steel edging: Sleek, modern, flexible for curves; excellent with gravel and DG.
- Brick edging: Timeless, pairs with cottage and traditional homes.
- Concrete curbing: Durable and clean for high-traffic zones.
- Stone setts/cobbles: Beautiful with natural stone paths; adds old-world character.
Lighting for safety and year-round patio living
Path lighting extends outdoor living into the evening and makes winter navigation safer. Layer lighting like you would indoors:
- Low path lights (spaced 6–10 feet apart) for guidance without glare
- Step lights where grade changes occur
- Uplights to highlight specimen trees, grasses, or a focal-point sculpture near the path
Recommendation: Warm white LEDs (2700K) feel inviting and complement most patio furniture finishes and exterior materials.
Create destinations with small “pause points”
A pathway feels luxurious when it leads somewhere intentional. Add a simple moment to stop and enjoy the garden:
- A bistro set tucked beside fragrant planting for morning coffee
- A bench near a birdbath or fountain
- A small gravel pad with two lounge chairs at sunset-facing edges of the yard
Outdoor furniture tip: For path-adjacent seating, choose powder-coated aluminum or teak for durability, and use quick-dry cushions if your climate is humid or rainy.
Planting Along a Garden Path: Color, Texture, and Scent
Design principles for path planting
- Keep it legible: Repeat a few plants for rhythm instead of using one of everything.
- Respect the walkway width: Leave a clear “shoulder” so plants don’t flop into the path.
- Use height intentionally: Low plants at edges, taller shrubs or grasses set back for depth.
- Seasonal interest: Mix evergreen structure with flowering perennials and ornamental grasses.
Reliable plant suggestions (swap by climate zone)
Sunny paths (6+ hours sun):
- Lavender (fragrance, drought-tolerant; great for Mediterranean-style landscaping)
- Salvia (pollinator-friendly, long bloom)
- Catmint (Nepeta) (soft edging, low maintenance)
- Ornamental grasses like feather reed grass (structure and winter interest)
- Thyme between stepping stones (light foot traffic, aromatic)
Part shade/shade paths:
- Hosta (bold leaves; choose slug-resistant varieties where needed)
- Ferns (woodland feel, great texture)
- Heuchera (coral bells) (colorful foliage, compact mounds)
- Hydrangea (for larger spaces; offers summer drama)
- Sweet woodruff or ajuga as groundcover (excellent for edging)
Year-round structure:
- Boxwood alternatives (like inkberry holly) for evergreen form
- Dwarf conifers for low-maintenance shape and winter presence
- Rosemary (in mild climates) as a fragrant, edible hedge along sunny paths
Climate-Smart and Maintenance-Smart Pathway Design
Wet climates and heavy rain
- Choose permeable materials (gravel, DG, permeable pavers) to reduce puddling.
- Build a proper compacted base and maintain a slight slope (about 1–2%) away from structures.
- Avoid slick finishes; select textured stone and consider anti-slip sealers where appropriate.
Snow, ice, and freeze-thaw regions
- Favor pavers or poured concrete for easy shoveling and consistent footing.
- Use polymeric sand in paver joints to reduce weed growth and erosion.
- Allow space for plow/shovel clearance—keep plantings slightly set back from the path edge.
Hot, sunny climates
- Light-colored stone or pavers can stay cooler underfoot than dark materials.
- Incorporate shade with small trees, pergolas, or tall ornamental grasses near seating nodes.
- Choose drought-tolerant plants and consider drip irrigation along path borders.
Low-maintenance upkeep checklist
- Blow or sweep debris weekly during heavy leaf drop.
- Top up gravel/DG every 1–3 years depending on traffic.
- Re-seal stone or concrete when recommended by the manufacturer (often every 2–5 years).
- Edge beds seasonally to keep a crisp line between lawn and walkway.
Common Garden Pathway Mistakes to Avoid
- Skipping the base: A weak base leads to sinking pavers, uneven stones, and constant repairs.
- Making it too narrow: Tight paths feel cramped and are frustrating when carrying food to the patio.
- Overly tight curves: They look awkward, waste space, and can be hard to navigate at night.
- No edging for loose materials: Gravel and mulch will spread into lawns and planting beds.
- Ignoring drainage: Water pooling shortens material lifespan and creates slippery, muddy spots.
- Planting “pretty” but aggressive spreaders: Some groundcovers quickly swallow stepping stones and increase maintenance.
Budget Planning: What a Great Path Typically Costs
Your total cost depends on excavation, base depth, edging, and whether you DIY or hire a hardscape pro. Here are realistic ranges to guide planning:
- DIY mulch path (basic): $100–$500 for small garden sections
- DIY gravel/DG path with steel edging: $500–$2,500 for a typical backyard run
- Professional paver walkway: $3,000–$12,000+ depending on size and complexity
- Natural stone feature path: $5,000–$20,000+ for premium materials and skilled installation
Where to spend: Base preparation, edging, and lighting deliver the biggest long-term payoff for outdoor living and landscaping value.
FAQ: Garden Pathway Design
How wide should a garden pathway be?
For comfortable daily use, aim for 36–42 inches. Use 48+ inches for front walks, side-by-side strolling, or accessibility needs. Secondary garden-only paths can work at 24–30 inches.
What’s the best low-maintenance path material?
Pavers or poured concrete are easiest to keep clean and level long-term. For a softer, more natural look, decomposed granite with solid edging is a strong low-maintenance option if installed with a proper base.
How do I keep weeds out of gravel paths?
Install landscape fabric (or a woven geotextile) under the gravel, use sturdy edging, and top up gravel as needed. Occasional spot treatment or hand-pulling is still normal, especially where windblown seeds collect.
Can I put stepping stones directly on grass?
You can, but it often becomes uneven over time. For a better result, set stones into a shallow excavated bed with compacted base material so the tops sit flush with the lawn for easy mowing.
What lighting works best for pathways?
Warm white (2700K) LED path lights spaced 6–10 feet apart provide safe, welcoming guidance. Add step lights where grades change and consider motion sensors for side-yard utility routes.
How do I connect a garden path to a patio?
Match or complement the patio materials and repeat details like edging or joint style. A short transition zone—such as a gravel apron, a soldier course of brick, or a border of the same paver—makes the connection feel intentional.
Design Your Path, Then Make It a Year-Round Habit
Start by mapping how you actually move through your yard: from the back door to the grill, from the patio seating area to the garden beds, from the driveway to the gate. Choose a layout that suits your home’s style, pick a material that matches your climate and maintenance tolerance, then elevate it with clean edging, layered lighting, and planting that looks good across seasons—from spring bulbs to summer blooms to winter structure.
Next steps:
- Mark your route with a hose or string and test-walk it.
- Decide your ideal width and whether the path is primary or secondary.
- Select a material based on drainage, slope, and budget.
- Plan edging, lighting, and two or three repeating plant groupings for a cohesive look.
For more outdoor design inspiration—patio living ideas, landscaping upgrades, lighting guides, and backyard layout tips—explore the latest articles on thedecormag.com.
More Articles
 Best Outdoor Bar Tool Storage Ideas - The Decor Mag
 Best Outdoor Coffee Table Materials - The Decor Mag
 How to Design a Hummingbird Garden - The Decor Mag
 Best Outdoor Chaise Lounge Picks - The Decor Mag
 Best Outdoor Beverage Tub Options - The Decor Mag
 Outdoor Daybed and Cabana Ideas - The Decor Mag
 How to Create a Square Foot Garden - The Decor Mag
 Small Balcony Garden Design Inspiration - The Decor Mag
 Outdoor Pergola Integrated Speaker System - The Decor Mag
 How to Create a Lantern Garden - The Decor Mag