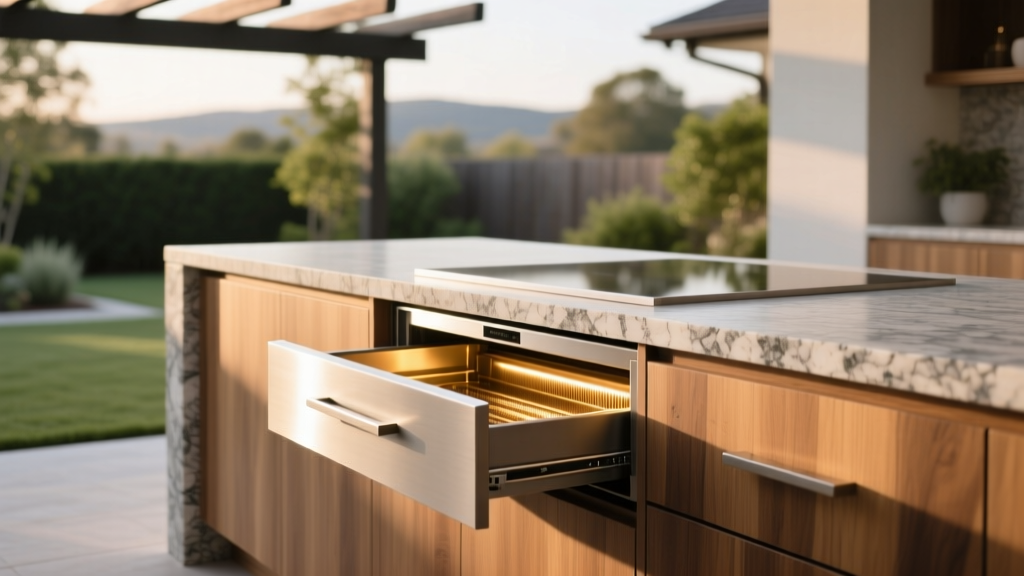
Outdoor Kitchen Warming Drawer Install - The Decor Mag
If you love hosting outside—whether it’s a casual family burger night or a full-on backyard party—timing is everything. One of the biggest challenges in outdoor cooking is keeping food hot without overcooking it, drying it out, or running back and forth to the indoor kitchen. That’s where an outdoor kitchen warming drawer earns its keep.
A warming drawer turns a good outdoor kitchen into a truly functional outdoor living space. It keeps proteins juicy, sides steamy, plates warm, and appetizers ready while you finish grilling. It also reduces stress: you can cook in waves, serve buffet-style, and still enjoy the patio with your guests. If your goal is a polished, year-round outdoor kitchen design that feels as capable as your indoor setup, a warming drawer is one of the most practical upgrades you can make.
What an Outdoor Warming Drawer Does (and Why You’ll Use It More Than You Think)
An outdoor warming drawer is a built-in appliance designed to hold cooked food at safe, serving-ready temperatures. Many models also include “proof” settings for dough (pizza nights!), low-temp drying for herbs, and humidity controls to prevent food from drying out.
Best uses for an outdoor kitchen warming drawer
- Hold grilled meats (steak, chicken, ribs) while you finish batches or rest proteins properly
- Keep sides hot (corn, roasted veggies, baked beans, mac & cheese)
- Warm buns and tortillas without scorching on the grill
- Warm plates and serving platters for an elevated dining experience
- Entertaining buffer so guests can graze while you cook
For homeowners building an outdoor kitchen island, a warming drawer often becomes the “quiet hero” appliance—especially when paired with a grill, pizza oven, or smoker.
Plan First: Placement, Layout, and Outdoor Kitchen Design Considerations
A successful outdoor kitchen warming drawer install starts with layout. You’re not just adding an appliance—you’re improving workflow across your patio kitchen.
Ideal placement in an outdoor kitchen island
- Near the grill or cooktop so food transitions quickly from heat to holding
- Away from heavy foot traffic to prevent bumping into a hot drawer during parties
- Adjacent to prep space (countertop landing zone) for trays, platters, and cutting boards
- Close to serving area if you entertain buffet-style
Recommended layout approach: the “Cook–Hold–Serve” zone
- Cook: grill/pizza oven/smoker
- Hold: warming drawer installed under counter
- Serve: countertop space, bar ledge, or dining table path
If you’re designing a patio living area with a bar counter, consider installing the warming drawer on the cook side, not the guest side. The goal is a clean, safe entertaining flow.
Choosing the Right Outdoor-Rated Warming Drawer
Not all warming drawers belong outdoors. For outdoor kitchen design, look for weather resistance, durable components, and safe electrical requirements.
Features worth paying for
- Outdoor-rated construction: 304 stainless steel (ideal for most climates) or 316 stainless (best for coastal/salt air)
- Sealed controls and quality gaskets to resist moisture
- Humidity control (vents or moisture settings) for better food texture
- Temperature range typically 80°F–210°F for warming, plus proofing on some models
- Ball-bearing slides for smooth operation under heavy platters
- Flush installation trim kits for a built-in, furniture-like look
Common sizes and fit
- 24-inch warming drawers are the most common for outdoor kitchens and pair well with standard grill islands.
- 30-inch models offer more capacity but require more island width and often more robust electrical planning.
Budget ranges for warming drawers
- Value: $700–$1,200 (often indoor-rated; verify suitability before using outdoors)
- Mid-range outdoor-rated: $1,200–$2,200
- Premium outdoor-rated: $2,200–$4,000+ (coastal-grade stainless, higher-end controls, pro styling)
For year-round outdoor living, prioritizing an outdoor-rated unit is one of the best long-term investments you can make.
Install Basics: What’s Behind a Clean, Safe Built-In Look
A warming drawer install is part carpentry, part electrical, part weatherproofing. Many homeowners hire a pro for the final hookup, but it still helps to understand what a correct installation includes.
1) Verify power requirements (before you build the island)
- Most units require a dedicated circuit (often 120V, sometimes 240V depending on model).
- Use GFCI protection as required for outdoor electrical safety.
- Plan a route for wiring that stays protected from water and heat sources.
Tip: If you’re adding other outdoor kitchen appliances (ice maker, beverage fridge, lights), plan circuits together with an electrician to avoid overload and messy retrofits.
2) Build the right opening: framing and support
Warming drawers need solid support and the correct cutout dimensions. Always follow manufacturer specs for:
- Cutout width/height/depth
- Ventilation clearances (some models require airflow around the chassis)
- Weight capacity (a drawer loaded with platters can be heavy)
Material recommendations for outdoor kitchen framing:
- Galvanized steel studs: straight, rot-proof, ideal for outdoor kitchen islands
- Cement board: stable substrate under stone, tile, or stucco finishes
- Exterior-grade screws and fasteners: corrosion-resistant hardware is non-negotiable outdoors
3) Weather protection: keep water out
Outdoor kitchens live in the real world—rain, sprinklers, humidity, and freeze-thaw cycles. Protect your investment with:
- A properly overhung countertop (even a small lip helps shed water)
- Silicone sealant where recommended around trim (avoid sealing areas that require ventilation)
- Strategic placement away from direct sprinkler spray and roof runoff
- Appliance cover when not in use, especially in wet seasons
4) Heat management: don’t crowd the grill
Keep adequate clearance between the warming drawer and high-heat appliances. Good outdoor kitchen design includes a heat buffer for comfort and safety. If the warming drawer sits under a countertop near the grill, ensure the grill’s insulation and venting are installed correctly to avoid heat transfer into the island cavity.
Countertops, Finishes, and Materials That Complement a Warming Drawer
A warming drawer should look like it belongs in your outdoor kitchen island, not like an afterthought. The best pairings feel cohesive with your patio and landscaping style.
Countertop recommendations for outdoor kitchens
- Granite: durable, classic, heat resistant; seal annually
- Concrete: modern and customizable; needs proper sealing and may develop character cracks
- Porcelain slabs: extremely durable, low maintenance, UV stable; premium price but fantastic performance
- Soapstone: beautiful and heat tolerant; can weather outdoors depending on climate and sealing approach
Island finish ideas that elevate patio living
- Stone veneer: timeless, pairs well with stainless appliances
- Large-format porcelain tile: clean lines, modern outdoor kitchen design vibe
- Smooth stucco: Mediterranean or contemporary; choose exterior-rated systems
- Brick: classic, warm, and great with cottage-style landscaping
Design tip: Repeat materials from the patio hardscape—pavers, retaining wall stone, or fireplace surround—to make the outdoor kitchen feel integrated with the entire backyard.
Make the Space Feel Finished: Furniture, Lighting, and Planting Around the Outdoor Kitchen
A warming drawer improves cooking. The surrounding design makes the outdoor living space irresistible.
Furniture recommendations for outdoor dining and lounge zones
- Bar stools: powder-coated aluminum frames with quick-dry cushions (easy maintenance for patio living)
- Dining set: teak or cast aluminum for durability; add an umbrella for summer comfort
- Serving cart: stainless or all-weather wicker—perfect for moving hot items from drawer to table
Lighting that supports year-round outdoor living
- Task lighting: under-counter LED strips or dedicated grill lights for safe evening cooking
- Ambient lighting: string lights, sconces, or pendant lights under a covered patio
- Path lighting: low-voltage LEDs along walkways to guide guests between kitchen and seating
Plant suggestions: beauty + function near an outdoor kitchen
Choose plants that handle heat, occasional smoke, and foot traffic, while supporting your outdoor entertaining vibe.
- Herb planters (sunny spots): rosemary, thyme, sage, oregano (also more drought-tolerant than basil)
- Fragrant, tough edging: lavender, dwarf rosemary, santolina
- Structure and privacy: clumping bamboo (non-invasive varieties), podocarpus, or pittosporum (climate dependent)
- Container stars for patios: citrus (in suitable climates), bay laurel, ornamental grasses
Placement tip: Keep plants at least 2–3 feet away from the hottest cooking zone to prevent leaf scorch and grease film buildup.
Climate and Maintenance: Keep Your Warming Drawer Performing Season After Season
Outdoor kitchens face harsher conditions than indoor appliances. Climate-smart choices protect both performance and finish.
Coastal and humid climates
- Choose 316 stainless if possible and wipe down stainless surfaces weekly.
- Use a stainless cleaner/protectant and avoid chlorine-based cleaners.
- Install the island where it can dry quickly—good airflow helps fight corrosion.
Freeze-thaw and snowy regions
- Confirm the unit is rated for outdoor use in low temperatures.
- Use a fitted cover and consider a covered patio or pergola roof for added protection.
- Shut off power at the breaker during deep winter if you fully close the outdoor kitchen for the season (follow manufacturer guidance).
Hot, high-sun climates
- Provide shade with a pergola, umbrella, or roof extension for comfort and to reduce UV wear on finishes.
- Opt for UV-stable materials (porcelain, stone, powder-coated metals) around the island.
Simple maintenance checklist
- Clean spills after each use to avoid baked-on residue.
- Check drawer gaskets seasonally and replace if cracked.
- Inspect the electrical outlet and GFCI function a few times per year.
- Deep-clean inside the drawer monthly during peak entertaining season.
Common Mistakes to Avoid (So the Install Looks Built-In and Lasts)
- Buying an indoor-only unit: it may rust, fail early, or become unsafe outdoors.
- Skipping electrical planning: extension cords and outdoor appliances don’t mix—plan a proper circuit.
- Installing in a splash zone: sprinklers, roof runoff, and exposed edges shorten appliance life.
- Ignoring ventilation requirements: a too-tight cavity can overheat components and void warranties.
- Undersizing the island support: drawers need strong framing to stay aligned and glide smoothly.
- Forgetting workflow: if the drawer is far from the grill or lacks landing space, you won’t use it.
Cost Planning: What to Budget for an Outdoor Kitchen Warming Drawer Install
Your total cost depends on whether you’re adding the drawer to an existing outdoor kitchen island or building new.
- Warming drawer appliance: $1,200–$2,200 (most outdoor-rated sweet spot)
- Electrical (new circuit, GFCI, conduit): $300–$1,200+
- Island modification/framing: $300–$1,500+
- Finish work (tile/stone/stucco repairs): $200–$1,500+
Typical total range: $2,000–$5,500+ installed, depending on complexity and regional labor rates.
FAQ: Outdoor Kitchen Warming Drawer Install
Do I really need an outdoor-rated warming drawer?
Yes if it will be exposed to humidity, temperature swings, or any direct weather. Outdoor-rated models use better stainless steel, sealed components, and construction designed for patio living conditions.
Can a warming drawer go under a grill?
Sometimes, but it depends on the grill’s insulation and the warming drawer’s required clearances. Many outdoor kitchen islands place storage or drawers under grills with heat shields. Follow both appliance manuals and confirm with your installer.
How much space do I need around the warming drawer?
It varies by brand and model. Plan for the manufacturer’s cutout dimensions plus required ventilation gaps. Also leave practical “landing space” on the countertop nearby for hot trays.
Is a warming drawer useful in winter?
Absolutely. In cooler seasons, it’s even easier for food to lose heat outdoors. A warming drawer supports cozy, year-round outdoor living—especially under a covered patio with heaters or a fire pit nearby.
What’s better for outdoor entertaining: a warming drawer or a second grill?
If your biggest problem is timing and keeping food hot for a crowd, a warming drawer usually delivers more day-to-day value. If you’re running out of cooking surface, a second grill or a griddle insert may be the better upgrade.
How do I keep stainless steel looking clean outdoors?
Wipe with the grain using mild soap and water, then dry. Use a stainless protectant periodically. Avoid abrasive pads and chlorine-based cleaners, especially in coastal climates.
Next Steps: Make Your Outdoor Kitchen Work Like a Pro Kitchen
If you’re planning an outdoor kitchen upgrade, start by evaluating your cooking flow on the patio: where food comes off the grill, where it rests, and where it’s served. Measure your island, confirm power access, and choose an outdoor-rated warming drawer that matches your climate and your entertaining style. Pair it with durable countertops, smart lighting, and heat-tolerant landscaping, and your backyard will feel ready for every season—from summer cookouts to crisp fall gatherings.
For more outdoor kitchen design ideas, patio living inspiration, and landscaping tips that elevate your yard, explore more articles on thedecormag.com.
More Articles
 DIY Summer Porch Makeover: Budget Refresh Under $100
 Best Outdoor Serving Cart Options - The Decor Mag
 Outdoor Pavilion Mist Cooling System - The Decor Mag
 How to Design a Prairie Garden - The Decor Mag
 Warm Lighting vs. Lighting Checklists: Why Relying Solely on Lists Compromises Outdoor Ambiance and Safety
 How to Choose the Best Patio Furniture Set - The Decor Mag
 Outdoor Pizza Oven Installation Guide - The Decor Mag
 Ultimate Style Guide: Designing Outdoor Living Spaces That Reflect Your Personality and Elevate Everyday Life
 Modern Outdoor Living Space Ideas for 2026 - The Decor Mag
 How to Create a Lasagna Garden Bed - The Decor Mag