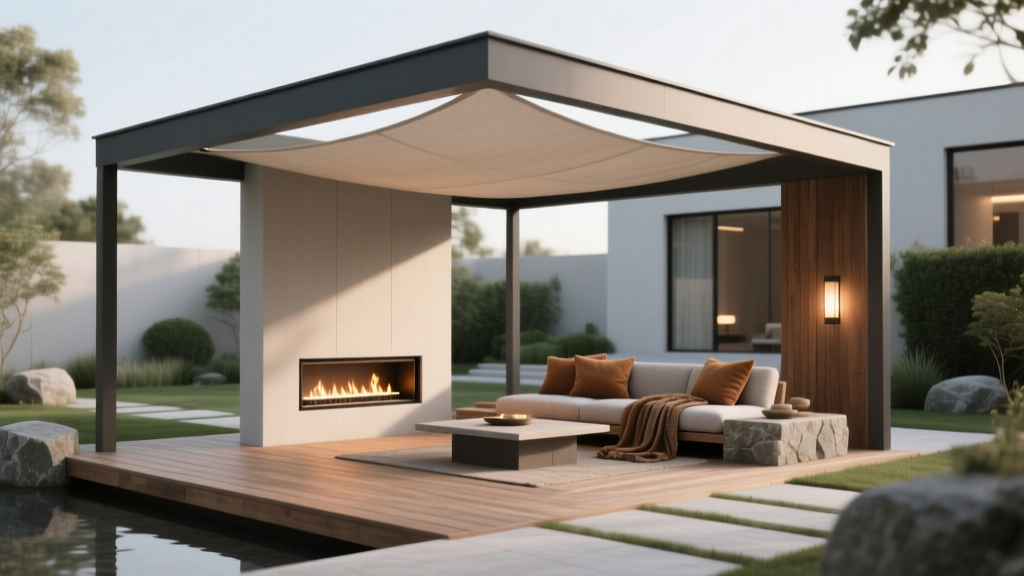
Outdoor Pavilion Heater Placement - The Decor Mag
Few upgrades transform outdoor living as quickly as a well-placed heater. A pavilion already gives you structure, shade, and a sense of “room outdoors”—but when the temperature drops, that beautiful space can sit unused for months. Smart outdoor pavilion heater placement keeps the air comfortable, protects your furniture and finishes, and encourages year-round patio living without turning your ceiling into a heat hazard.
Placement is where comfort, safety, and style meet. Put a heater in the wrong spot and you’ll feel hot on your shoulders while your feet stay cold, or you’ll fight constant wind loss, glare, and awkward furniture layouts. Place it correctly and your pavilion becomes a true four-season retreat: warm dinners in fall, cozy winter gatherings, early-spring coffee mornings, and longer summer nights when the breeze turns cool.
This guide walks you through practical, design-forward heater placement for pavilions—whether you’re working with a compact patio pavilion, a poolside structure, or a full outdoor kitchen and lounge.
Start With the Pavilion “Room Plan” (Before You Pick a Heater)
The best heater placement starts with how you actually use the space. Think like an interior designer: define zones, circulation, and focal points, then position heat where people sit—not where it’s easiest to mount.
Map your primary zones
- Dining zone: Table and chairs, usually centered under the pavilion.
- Lounge zone: Sofa/sectional and lounge chairs around a coffee table or fire feature.
- Outdoor kitchen/bar: Grill, prep counter, sink, and seating line.
- Circulation: Walkways to the yard, pool, or house doors.
Placement rule of thumb: heat the people, not the air
Most pavilion heaters are radiant (especially electric infrared and gas infrared). Radiant heat warms bodies and surfaces in its path. That’s why placement relative to seating matters more than pavilion size alone.
Quick measuring checklist
- Pavilion ceiling height (and slope).
- Post locations and beam direction (mounting options).
- Seating layout dimensions (where heads/shoulders will be).
- Wind direction and exposure (open sides vs. screens/curtains).
- Clearances to combustible materials (wood ceiling, curtains, cushions).
Choose the Right Heater Type for Your Pavilion
Heater type influences placement more than any décor decision. Select a heater that matches your pavilion structure, climate, and how enclosed the space is.
Electric infrared heaters (best for covered pavilions)
- Pros: Clean heat, fast warm-up, easy control, no gas line, ideal for covered patio living.
- Cons: Requires dedicated electrical circuits; performance drops in high wind.
- Placement sweet spot: Ceiling- or wall-mounted aimed at seating zones.
- Budget range: $250–$900 per heater, plus $200–$1,200 for electrical (more if trenching is needed).
Gas infrared heaters (natural gas or propane)
- Pros: Strong heat output, great for larger pavilions and colder climates.
- Cons: Ventilation requirements, fuel line planning, more maintenance.
- Placement sweet spot: Over dining or lounge zones with proper clearances and airflow.
- Budget range: $400–$1,200 per heater; gas line install can add $300–$2,500+ depending on distance and trenching.
Freestanding patio heaters (flexible, but tricky under a pavilion)
- Pros: No mounting, easy to move, great for temporary layouts.
- Cons: Takes floor space, can be top-heavy, clearance issues under low ceilings.
- Placement sweet spot: Near the edge of the seating cluster with generous overhead clearance.
- Budget range: $150–$600.
Fireplaces and fire pits (for ambiance + zone heat)
- Pros: Strong focal point, adds luxury and resale appeal, complements landscaping design.
- Cons: Requires careful ventilation; not ideal under low roofs; local codes vary.
- Placement sweet spot: At an open side of the pavilion or just outside it, anchoring a lounge zone.
- Budget range: $500–$3,000 for a fire pit; $3,000–$15,000+ for an outdoor fireplace feature.
Best Practices for Outdoor Pavilion Heater Placement
1) Place heaters over “occupied rectangles”
Mark the footprint of your dining table and lounge seating. Position heaters so their heat spreads across where people sit—especially shoulders and core.
- Dining tables: Two smaller heaters often outperform one large unit, especially for rectangular tables.
- Sectionals: Angle a wall-mounted heater toward the longest seating run.
- Conversation sets: Use symmetrical placement (two heaters) to avoid “hot seat/cold seat” complaints.
2) Use perimeter mounting to preserve the ceiling’s clean look
If your pavilion has a tongue-and-groove wood ceiling or stained beams, perimeter wall/beam mounting keeps the centerline visually open. It also prevents the heater from dominating your overhead sightlines—important for outdoor design cohesion.
Design tip: Match heater housing color to your pavilion: matte black for modern, bronze for traditional, and stainless steel for coastal or contemporary patios.
3) Aim with intention (angle matters)
Radiant heaters should be angled to “wash” heat across seating. A slight downward tilt typically improves comfort, especially with taller ceilings.
- If your ceiling is high, prioritize units designed for higher mounting heights.
- If your pavilion is open on multiple sides, angle heaters away from the prevailing wind to reduce heat loss.
4) Create heat zones, not one overheated pavilion
For year-round outdoor living, zoning is the secret. Instead of blasting the entire pavilion, install separate heaters for dining and lounging so you can heat only where you’re entertaining.
- Small pavilion (8x10 to 10x12): 1–2 heaters, typically one over dining or centered over the main seating group.
- Medium pavilion (12x14 to 14x16): 2–3 heaters, with at least one dedicated to dining.
- Large pavilion (16x20+ or outdoor kitchen pavilions): 3–5 heaters, often in pairs for balanced coverage.
5) Respect clearances—especially with wood ceilings and drapery
Your heater’s manual and local codes are non-negotiable. Wood beams, slatted ceilings, and outdoor curtains are common in pavilion design, and they demand careful spacing.
- Keep heaters away from hanging greenery baskets, string lights, and fabric panels.
- Avoid placing heaters directly above tall-backed seating where heat can concentrate.
- If you use outdoor curtain panels, mount heaters so curtains cannot drift into the heat path on windy days.
Furniture Layouts That Pair Perfectly With Pavilion Heaters
Dining layout: warm the table, protect the host
- Layout move: Center the table under the pavilion, then mount one heater parallel to the long side of the table—or two heaters aligned over each half.
- Best furniture materials: Powder-coated aluminum dining sets (low maintenance), teak (luxury, weathers beautifully), or all-weather wicker with quick-dry cushions.
- Comfort add-on: Add an outdoor rug (polypropylene) to reduce cold underfoot in shoulder seasons.
Lounge layout: a “heat triangle” feels the most natural
For conversational seating, a triangle works beautifully: heater coverage + a coffee table + a visual focal point (outdoor TV, fireplace, or landscape view).
- Layout move: Place a sectional along the back wall, two chairs opposite, then angle a wall-mounted heater toward the seating arc.
- Materials that handle heat well: Aluminum frames, teak, and high-performance outdoor fabrics (solution-dyed acrylics).
- Accessory tip: Use textured throws stored in a weatherproof deck box—cozy, easy, and stylish for winter patio nights.
Outdoor kitchen layout: keep heat away from flames and prep zones
- Mount heaters away from grill hoods and smoke paths.
- Prioritize heating bar seating and dining areas rather than over the cooking line.
- Choose non-porous countertop materials like granite or porcelain slabs that handle temperature swings.
Landscaping and Plant Choices That Support a Warmer Pavilion
Smart landscaping design can make your pavilion feel warmer by reducing wind and creating a more sheltered microclimate—without turning your patio into a closed-in box.
Wind-filtering plant ideas (great near open pavilion sides)
- Evergreen screening: Arborvitae (‘Emerald Green’), holly, or podocarpus (milder climates).
- Ornamental grasses (movement + filtering): Feather reed grass (Calamagrostis), miscanthus (check invasiveness in your region).
- Hardy shrubs: Boxwood, viburnum, or dwarf conifers for structure.
Container plants for seasonal flexibility
- Cool-season containers: Pansies, dusty miller, ornamental kale, and small evergreen topiaries.
- Warm-season containers: Lavender, rosemary (also fragrant), geraniums, and salvia.
Placement tip: Keep containers out of direct heater beams to prevent rapid drying. Use drip trays and check moisture more often during winter heating.
Materials and Finishes That Handle Heat and Weather
- Ceilings: If using wood (cedar or pine), use an exterior-grade finish and confirm heater clearance. Fiber cement or soffit-rated panels can be a low-maintenance alternative.
- Flooring: Concrete pavers, porcelain pavers, or natural stone (thermal mass helps hold warmth). Add a polypropylene outdoor rug for comfort.
- Mounting surfaces: Secure into structural members (beams/posts). Avoid mounting into thin decorative boards.
- Lighting coordination: Recessed LEDs and wall sconces pair well with heaters; keep string lights away from heat output paths.
Climate and Seasonal Considerations for Year-Round Outdoor Living
Cold climates (snow, freezing temps)
- Prioritize higher-output heaters and multiple zones.
- Add wind management: outdoor curtains, roll-down screens, or a partial privacy wall.
- Choose rust-resistant finishes and stainless hardware for longevity.
Windy or coastal areas
- Use corrosion-resistant materials (marine-grade stainless where possible).
- Angle heaters away from prevailing winds; consider screens or slatted wind walls.
- Rinse heater exteriors periodically to reduce salt buildup.
Mild climates (three-season patios that want to become four-season)
- Electric infrared is often enough for shoulder-season comfort.
- Focus on lounge zones and dining zones rather than full coverage.
- Use seasonal textiles: heavier cushion inserts and throws from fall through spring.
Maintenance Tips to Keep Pavilion Heaters Performing
- Monthly (during heavy use): Wipe exterior surfaces and check for debris or insect nests near mounting areas.
- Seasonally: Inspect mounting brackets, tighten hardware, and verify GFCI protection for electric units.
- Annually: For gas heaters, have lines and connections inspected; clean reflectors and check ignition systems.
- Storm prep: If your pavilion is exposed, use manufacturer-approved covers for off-season protection.
Common Mistakes to Avoid
- Centering one heater and expecting whole-room comfort: Most pavilions do better with two smaller heaters aimed at seating.
- Ignoring wind: Open sides can steal comfort fast—plan for screens, curtains, or landscaping wind buffers.
- Placing heaters over walkways: You want warmth where people linger, not where they pass through.
- Mounting too high: Excess height reduces radiant effectiveness; choose a model suited to your ceiling height.
- Forgetting furniture movement: If you rearrange for parties, make sure heater coverage still hits the “new” seats.
- Mixing heat and flammables: Curtains, hanging plants, and string lights need clear separation from heat output zones.
Budget Planning: What Homeowners Commonly Spend
- Budget-friendly: $400–$1,200 (one electric infrared heater + basic install; best for small patio pavilions)
- Mid-range: $1,200–$3,500 (two to three heaters, zoned controls, upgraded mounting and lighting coordination)
- High-end: $3,500–$10,000+ (multiple zones, gas + electric mix, automated controls, wind screens, and integrated outdoor kitchen/living upgrades)
FAQ: Outdoor Pavilion Heater Placement
How many heaters do I need for my pavilion?
It depends on pavilion size, ceiling height, and wind exposure. Many homeowners find that two smaller heaters aimed at seating zones feel better than one large unit. For medium pavilions (12x14 to 14x16), plan on 2–3 heaters for dining and lounge comfort.
Where should I place a heater for an outdoor dining table?
Place the heater so radiant heat hits seated guests’ upper bodies. For rectangular tables, two heaters aligned over each half often provide the most even warmth. Keep clearances from umbrellas, hanging décor, and any outdoor curtains.
Are electric patio heaters effective in winter?
In mild-to-moderate winters and sheltered pavilions, electric infrared heaters can be very effective. In colder climates or very open, windy structures, performance improves with zoned multiple heaters plus wind management (screens, curtains, or landscape buffers).
Can I put a freestanding propane heater under a pavilion roof?
Sometimes, but it’s often the trickiest option because of overhead clearance and stability. Many pavilions do better with ceiling- or wall-mounted infrared heaters designed for covered outdoor spaces. Always follow manufacturer requirements and local codes.
How do I reduce heat loss in an open-sided pavilion?
Combine smart heater placement with wind control: outdoor-rated curtains, roll-down screens, slatted privacy walls, and evergreen planting screens. Even a partial wind break on the prevailing wind side can make your patio living space feel dramatically warmer.
What’s the best setup for year-round outdoor living?
A zoned approach: separate heaters for dining and lounge areas, dimmable lighting, weather-resistant furniture, and seasonal accessories (rugs and throws). Add wind management and durable materials like porcelain pavers, powder-coated aluminum furniture, and solution-dyed acrylic cushions.
Next Steps: Make Your Pavilion the Warmest “Room” in the House
Start by sketching your pavilion’s furniture layout and identifying where people sit the longest. From there, choose a heater type that suits your climate and structure, then plan placement that targets those seating zones with safe clearances and smart wind awareness. If you’re updating the entire outdoor design, pair your heater plan with wind-filtering landscaping, durable patio materials, and lighting that complements the pavilion’s architecture.
For more outdoor living ideas—patio layouts, landscaping inspiration, pavilion styling, and seasonal design upgrades—explore the latest guides at thedecormag.com.
More Articles
 How to Create a Starlight Garden - The Decor Mag
 How to Choose Outdoor Umbrella or Sail Shade - The Decor Mag
 Deck vs Patio Design Comparison - The Decor Mag
 Kid-Safe Outdoor Furniture: Materials That Survive Play
 Upcycled Garden Planters for Balconies (2026)
 Outdoor Pergola Motorized Shade System - The Decor Mag
 Container Garden Design Inspiration - The Decor Mag
 Garden Room and Greenhouse Design - The Decor Mag
 How to Design a Coastal Garden - The Decor Mag
 How To Choose Outdoor Decor: A Practical, Climate-Smart Guide for Patios, Decks, and Gardens