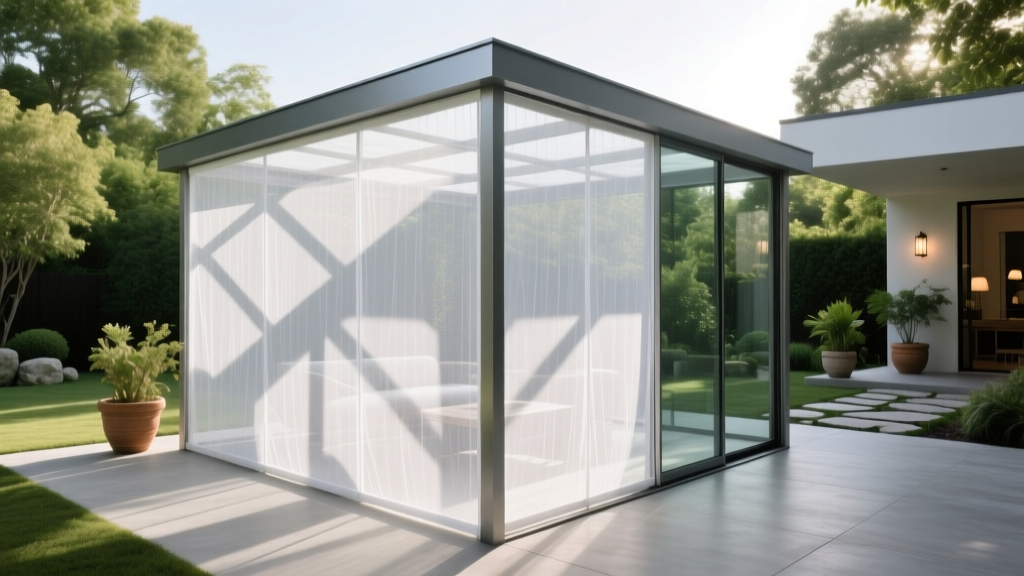
Outdoor Pavilion Insect Screen Options - The Decor Mag
An outdoor pavilion can be the crown jewel of a backyard—part shade structure, part entertaining hub, and part everyday escape. But once dusk hits, the same space that felt breezy and serene can become a magnet for mosquitoes, gnats, and moths. If you love year-round outdoor living (or even three-season patio living), insect screening is one of the smartest upgrades you can make to protect comfort without sacrificing style.
The best pavilion insect screen options do more than block bugs. They shape the look of your structure, influence airflow and light, and determine how “indoors” the space feels. The right choice also supports your layout—whether you’re hosting outdoor dinners, setting up a TV lounge, or creating a garden-view reading nook. Below, you’ll find practical, design-forward screening ideas, material recommendations, budget ranges, and the common pitfalls that can make a screened pavilion feel clunky instead of curated.
Start With the Big Decision: Temporary vs. Permanent Screening
Before comparing mesh types and hardware, decide how you want the pavilion to function across seasons. This single choice will narrow your options fast.
Temporary / Flexible Screens (Best for occasional use)
- Ideal for: mild climates, weekend entertaining, renters, or homeowners who want an open-air pavilion most of the time.
- Pros: lower cost, easier installation, minimal visual impact when open.
- Cons: less durable in high wind, may need frequent adjustments, can look “add-on” if not tailored.
Permanent / Built-In Screens (Best for 3-season to year-round outdoor living)
- Ideal for: mosquito-heavy regions, wooded lots, water-adjacent yards, and homeowners investing in a long-term outdoor room.
- Pros: cleaner detailing, better bug seal, increased usability and resale appeal.
- Cons: higher cost, more planning for doors/thresholds, may slightly reduce breeziness if poorly designed.
Outdoor Pavilion Screen Types (And Where Each One Shines)
1) Fixed Screen Panels (Framed “porch-style” screening)
Fixed panels create a classic screened porch feel—clean lines, strong structure, and excellent insect protection. These are typically framed in wood, aluminum, or composite, then fitted with mesh. For pavilions used as outdoor dining rooms or lounge spaces, fixed screening is often the most polished-looking option.
Best for: permanent pavilions, high-end outdoor living spaces, homes with traditional or craftsman architecture.
Design tips:
- Match panel framing to your pavilion posts (stained cedar with cedar, black aluminum with black steel).
- Break up wide openings into evenly spaced bays so the screening looks intentional, not like an afterthought.
- Add a kick plate (10–18 inches tall) at the base to protect screens from pets, shoes, and furniture bumps.
Budget range: $3,000–$12,000+ depending on pavilion size, framing material, and door count.
2) Retractable Screens (Motorized or manual “disappearing” screens)
Retractable screens are the go-to for homeowners who want an open-air pavilion by day and bug protection at night. They tuck into side channels or a hidden housing and can be deployed only when needed. In upscale patio living designs, retractables offer the best “invisible when not in use” look.
Best for: modern pavilions, entertaining-focused layouts, poolside structures, and homeowners who want flexibility.
Material recommendations:
- PVC-coated fiberglass mesh: durable, budget-friendly, good visibility.
- Polyester mesh: stronger and more tear-resistant than basic fiberglass; great for windy sites.
- “No-see-um” mesh upgrade: tighter weave for gnats and midges (especially near water).
Budget range: $4,000–$18,000+ (motorized systems, multiple bays, and custom sizing raise costs).
3) Screen Curtains / Mosquito Netting (Soft screening)
Screen curtains bring a resort vibe—light, airy, and romantic—while still reducing bugs. They’re typically hung on tracks or rods and can be tied back like drapery. This option works best when your pavilion is primarily a lounging space and you’re willing to accept a small gap here and there.
Best for: boho, coastal, cottage gardens, and budget-conscious upgrades.
Style + function tips:
- Choose outdoor-rated mesh curtains with mildew resistance and UV stability.
- Add weighted hems or discreet bottom magnets to reduce billowing on breezy days.
- Layer with outdoor drapery for shade and privacy—screen inside, drape outside.
Budget range: $200–$1,500 depending on length, track system, and number of openings.
4) Sliding Screen Doors and Hinged Screen Doors
If your pavilion has one main entry from the patio or pool deck, a well-chosen screen door is the difference between constant bug battles and effortless flow. Sliding doors save space; hinged doors feel traditional and can seal tightly when installed correctly.
Best for: pavilions with permanent screens, outdoor kitchens, frequent foot traffic.
Recommendations:
- Use self-closing hinges or pneumatic closers for family-friendly convenience.
- Add a high-quality latch that won’t rattle in wind.
- If you have pets, consider a pet-resistant mesh panel or a mid-rail for durability.
Budget range: $300–$2,500 per door (installed), depending on size and framing.
5) Storm + Screen Panel Systems (Seasonal “swap” panels)
For homeowners aiming at extended seasonal comfort, interchangeable panels let you switch between insect screens and clear vinyl or glass-like inserts. This can transform a pavilion into a three-season sanctuary—especially in spring/fall when bugs linger but nights cool down.
Best for: shoulder-season use, windy locations, lake houses, and homeowners who want more weather protection.
Budget range: $6,000–$20,000+ depending on panel type and structure size.
Mesh Matters: Picking the Right Screen Material
Not all insect screens perform the same. Visibility, airflow, durability, and pest control depend heavily on what you choose.
- Fiberglass: affordable, good visibility, easy to install; can stretch or tear more easily over time. Great for moderate use.
- Aluminum: stronger than fiberglass and holds shape; can dent and may be less “disappearing” visually. Good for fixed panels.
- Polyester (high-strength): excellent tear resistance; ideal for retractables and windy areas.
- No-see-um mesh: tighter weave for gnats/midges; slightly reduces airflow and visibility—best near water or in humid climates.
- Pet-resistant mesh: thicker, reinforced; visibility is slightly lower, but it holds up to claws and bumps.
Designing a Screened Pavilion That Still Feels Open-Air
The best outdoor design balances protection and ambiance. Use these design approaches to keep your pavilion light, breezy, and intentionally styled.
Layout ideas that work beautifully with screens
- Dining-first pavilion: Center a table under a pendant or ceiling fan; keep 36–48 inches of clearance around the table for easy movement and screen-door flow.
- Lounge zone + fire feature: Place seating in an “L” or “U” with a gas fire table (less smoke against screens than wood burning).
- Outdoor kitchen edge: Put the grill on the windward side and add a vent hood if the pavilion has a ceiling—screens can trap smoke if airflow is poor.
Furniture recommendations for a screened pavilion
- Seating: powder-coated aluminum frames (rust-resistant) with quick-dry cushions for humid climates.
- Dining: teak or HDPE lumber for durability; consider a table with rounded corners for tighter screened layouts.
- Rugs: polypropylene outdoor rugs (easy to hose off; great under dining sets).
- Lighting: warm LED string lights along beams + a central damp-rated fixture; add solar path lights leading to the pavilion for evening usability.
Plants that help deter bugs (and look great doing it)
Plants won’t replace screening, but they can improve comfort and reinforce a lush, landscaped feel around your pavilion.
- Lavender: loves sun, beautiful along walkways, light pest deterrence.
- Rosemary: edible, drought-tolerant, great in pots near seating.
- Lemongrass (warm climates): architectural look, nice in large containers.
- Marigolds: cheerful seasonal color for borders near entrances.
- Mint (container only): spreads aggressively in beds; excellent near doors for fragrance.
Landscape tip: Reduce standing water (saucers, clogged gutters, low spots) within 50–100 feet of your pavilion to cut mosquito pressure dramatically.
Climate + Maintenance Considerations
Humid, mosquito-heavy regions
- Upgrade to no-see-um mesh if gnats/midges are common.
- Choose mildew-resistant fabrics and quick-dry cushions.
- Plan for airflow: add a ceiling fan (damp-rated) to keep air moving and discourage insects.
Coastal and salt-air environments
- Use marine-grade stainless or corrosion-resistant hardware.
- Prefer powder-coated aluminum frames over untreated steel.
- Rinse screens and frames periodically to reduce salt buildup.
Cold winters / four-season ambitions
- Consider swappable panels or pair screens with clear vinyl winter panels.
- Add an infrared heater and weather-resistant curtains for shoulder seasons.
- Store soft screens/curtains in winter to prolong life.
Maintenance checklist (simple but effective)
- Vacuum screens with a soft brush attachment monthly during peak use.
- Wash gently with mild soap and water; avoid pressure washers (they can stretch mesh).
- Inspect bottom edges and door seals each spring—tiny gaps are where bugs win.
- Lubricate retractable tracks and check tension per manufacturer guidelines.
Budget Planning: What Screening Usually Costs
Costs vary by pavilion size, number of openings, and whether you’re retrofitting an existing structure or building new. Use these ranges as a realistic starting point:
- Budget-friendly (DIY-friendly): $200–$1,500 for screen curtains/netting and basic hardware.
- Mid-range (contractor install): $3,000–$12,000 for fixed screen panels, one or two screen doors, and upgraded mesh.
- High-end (custom + motorized): $8,000–$25,000+ for motorized retractables, multiple bays, premium framing, and seasonal panel systems.
Common Mistakes to Avoid
- Leaving gaps at the base: Even a 1/2-inch gap can invite mosquitoes. Plan thresholds, sweeps, and tight corners.
- Choosing the wrong mesh for your region: Standard mesh may fail near lakes or marshy areas—upgrade to no-see-um where needed.
- Ignoring wind: Screen curtains and low-grade retractables can whip and tear. If your yard is windy, prioritize strong tracks, tension systems, and durable mesh.
- Poor door placement: A door that swings into furniture or a dining chair is a daily annoyance. Design traffic flow early.
- Trapping smoke from grills or fire pits: Screens reduce ventilation. Use gas fire tables and position grills strategically to keep air moving.
- Skipping lighting strategy: Bright, cool-toned lights attract insects. Use warm LEDs (2700K) and position fixtures away from seating when possible.
FAQ: Outdoor Pavilion Insect Screens
What’s the best insect screen option for a pavilion used mostly at night?
Retractable screens are a top choice—open during the day, closed at dusk. Pair with warm LED lighting and a ceiling fan for maximum comfort.
Do no-see-um screens reduce airflow?
Yes, slightly. The tighter weave blocks smaller insects but can reduce breeze and visibility a bit. In gnat-heavy areas, the comfort payoff is usually worth it.
Can I add insect screens to an existing pavilion?
Absolutely. Most homeowners retrofit with screen curtains, framed fixed panels, or retractable systems. Measure openings carefully and confirm posts/headers can support tracks or framing.
What’s the most durable screen for pets and kids?
Pet-resistant mesh is the best upgrade for high-traffic zones. Also consider adding a kick plate or mid-rail to protect the lower portion from wear.
How do I keep bugs from getting in around the door?
Use a quality door sweep, ensure the frame is square, and install tight weatherstripping. If you’re building new, plan a proper threshold detail—this is where many screened pavilions fail.
Will screening make my pavilion feel darker?
Some mesh types slightly reduce light. Darker mesh often offers better visibility “through” the screen, while lighter mesh can be more noticeable. Retractables eliminate the issue when open.
Next Steps: Choose Your Screen Strategy Like a Designer
Start by listing how you want to use your pavilion—weekend dinners, poolside lounging, outdoor movie nights, or a daily coffee spot. Then match your screen type to your climate and lifestyle: fixed panels for a polished, porch-like room; retractables for flexible patio living; curtains for a breezy, budget-friendly upgrade; or seasonal panel systems if you’re aiming for extended comfort in spring and fall.
Once you’ve chosen a direction, measure openings, map traffic flow, and pick materials that complement your pavilion’s architecture. Add a few bug-deterring plants in containers near entrances, choose warm lighting, and commit to simple seasonal maintenance so your screened pavilion stays crisp year after year.
Want more outdoor design inspiration? Explore more landscaping ideas, patio living upgrades, and outdoor room guides on thedecormag.com.
More Articles
 Best Outdoor Bar Chip and Dip Station - The Decor Mag
 How to Create a Keyhole Garden - The Decor Mag
 Best Outdoor Side Car Cart Bar Ideas - The Decor Mag
 Best Outdoor Bar Muddler and Jigger Storage - The Decor Mag
 How to Design a Gravel Garden - The Decor Mag
 Best Outdoor Bar Citrus Squeezer Station - The Decor Mag
 Outdoor Bar Top Material Comparison - The Decor Mag
 Outdoor Pergola Integrated Speaker System - The Decor Mag
 Best Outdoor Bar Tool Storage Ideas - The Decor Mag
 Best Outdoor Bench Options for Entryways - The Decor Mag