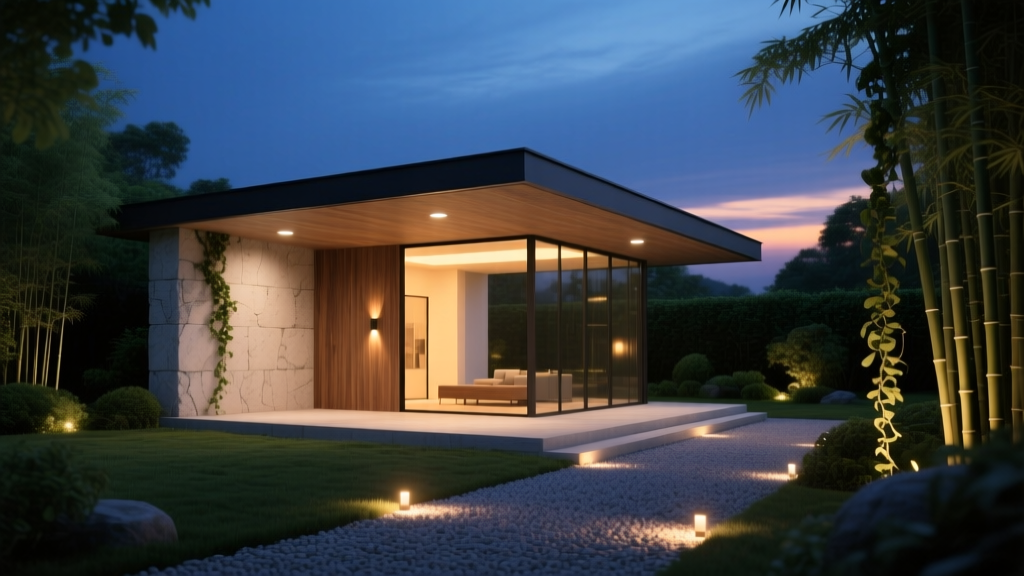
Outdoor Pavilion Lighting Design - The Decor Mag
An outdoor pavilion can be the most magnetic spot in your yard—part shade structure, part open-air living room, part entertaining hub. But without the right lighting, it often turns into a “daytime only” space or a nighttime dark hole that feels disconnected from the rest of your patio, garden, and landscape design.
Thoughtful outdoor pavilion lighting design changes everything. It extends your usable hours, improves safety on steps and walkways, highlights the architecture of the pavilion, and creates the kind of atmosphere that makes guests linger. Whether you’re building a new pavilion or upgrading an existing patio cover, a layered lighting plan delivers comfort, beauty, and serious curb appeal—season after season.
Below, you’ll find expert, practical strategies—from fixture types and layouts to materials, plants, and maintenance—so your pavilion feels welcoming for casual weeknights, weekend parties, and year-round outdoor living.
Start With a Lighting Plan: Function, Mood, and Flow
The best pavilion lighting feels effortless because it’s designed in layers. Before choosing fixtures, map the space like you would a kitchen: what happens where, and how do people move through it?
Define Your Zones
- Dining zone: table area, serving station, grill or outdoor kitchen edge
- Lounge zone: sofa/sectional, coffee table, fire pit, TV wall (if you have one)
- Circulation: entry points, steps, nearby pathways, transitions to patio or pool
- Perimeter + landscape: nearby planting beds, trees, privacy screens, water features
Use Layered Lighting (Like an Interior Room)
- Ambient lighting: overall glow (pendants, chandeliers, flush mounts)
- Task lighting: targeted brightness (downlights over cooking, table lighting, step lights)
- Accent lighting: drama + depth (uplights on columns, tree lights, wall washers)
Warm Color Temperature Wins Outdoors
For a welcoming patio living vibe, aim for 2700K–3000K LEDs. Go warmer (around 2200K) if you want a candlelit look. Avoid cool white (4000K+) unless you’re lighting a utilitarian area like a workbench or security perimeter.
Choose the Right Fixture Types for Your Pavilion
1) Statement Pendants and Chandeliers (Best for Dining + Style)
A central fixture anchors the pavilion the way a chandelier defines an indoor dining room. It’s also the fastest way to make an outdoor living space feel designed, not temporary.
- Best for: dining tables, conversation areas, outdoor bars
- Materials to look for: powder-coated aluminum, marine-grade stainless steel, brass, composite shades, outdoor-rated wicker/resin
- Shade styles: open cage (casts patterns), linen-look outdoor fabric, seeded glass for softer diffusion
Installation tip: Hang the bottom of the fixture 30–36 inches above the table (or about 7 feet above the floor for open walking areas).
2) Recessed Downlights (Clean, Modern, and Highly Functional)
Recessed LEDs in a pavilion ceiling deliver a smooth, low-profile look—ideal for modern landscaping and contemporary patio design.
- Spacing guideline: typically 4–6 feet apart depending on brightness and ceiling height
- Choose: outdoor wet-rated fixtures and dimmable drivers
- Glare control: look for deep baffles or regressed trims
3) String Lights (Instant Ambience, Great for Budget Upgrades)
Outdoor string lights are the quickest path to “magical” and work beautifully with pergolas and pavilions alike—especially when combined with more permanent lighting.
- Best for: casual entertaining, party lighting, boho or relaxed backyard style
- Look for: commercial-grade, heavy-duty cords, shatter-resistant bulbs, warm LED filament style
- Design tip: run lights in straight lines or a gentle zig-zag to avoid visual clutter
4) Wall Sconces and Post-Mounted Lanterns (For Structure + Safety)
If your pavilion has solid walls, a fireplace surround, or a built-in outdoor kitchen, sconces provide soft, flattering side light that makes faces look great.
- Placement: typically 60–66 inches above finished floor
- Choose: dark-sky friendly fixtures that shield glare where possible
5) Step Lights and Path Lights (Quietly Essential)
Safety lighting keeps your outdoor living area comfortable for guests of all ages. It’s also one of the most “high-end” landscape lighting moves because it looks intentional.
- Use for: pavilion steps, seat walls, perimeter edges, nearby garden paths
- Pro move: low-level lighting prevents harsh brightness and preserves mood
Layouts That Feel Designed (Not Random)
A Simple, Reliable Lighting Layout
- Centerpiece: pendant/chandelier over dining or lounge
- Even coverage: recessed downlights around the perimeter (on a dimmer)
- Soft edges: sconces or column lights to define boundaries
- Landscape tie-in: 2–4 uplights on nearby trees or architectural plants
- Safety layer: step/path lights along approaches
Recommended Dimmers and Controls
- At minimum: separate switches for ambient and accent lighting
- Best experience: smart dimmers + scene controls (Dinner, Lounge, Party, Late Night)
- Convenience: astronomical timers for landscape lights (auto-adjust with seasons)
Materials and Finishes That Hold Up Outdoors
Outdoor lighting lives in sun, rain, and temperature swings. The finish you choose can determine whether fixtures look fresh in five years—or tired in one.
- Coastal or high-humidity climates: choose marine-grade stainless steel (316), brass, or high-quality powder coat. Avoid cheap painted steel.
- Hot, sunny climates: UV exposure fades finishes—look for UV-stable composites and premium powder coating.
- Cold climates: ensure fixtures are rated for temperature swings and that seals/gaskets are robust to prevent moisture intrusion and freeze damage.
Glass vs. acrylic: Glass looks luxurious and stays clearer longer, but acrylic can be more impact-resistant near pools or play areas.
Bring the Pavilion to Life With Plants and Landscape Lighting
Lighting doesn’t stop at the pavilion posts. The most inviting patio living spaces connect the pavilion to the surrounding garden with a few strategic plantings and uplights.
Plant Suggestions by Look and Maintenance Level
- Architectural evergreens (year-round structure): boxwood, dwarf holly, yew (cold climates), podocarpus (warm climates)
- Ornamental grasses (movement + glow at night): fountain grass, switchgrass, blue oat grass (drought-tolerant options vary by region)
- Fragrant plants near seating: lavender, rosemary, gardenia (warm climates), jasmine (climbing), nicotiana (seasonal)
- Climbers for softness and privacy: star jasmine, clematis (cool climates), climbing roses (sunny sites), evergreen wisteria (milder regions)
- Container favorites for patios: citrus (warm zones), herbs, dwarf conifers, hydrangea (with adequate moisture)
Where to Aim Landscape Lights Around a Pavilion
- Uplight a small tree 10–20 feet from the pavilion to add depth
- Wash a textured wall or stone fireplace to emphasize material
- Backlight grasses or bamboo screens for a soft glow (great for privacy)
Tip: Use fewer, better-placed fixtures. Over-lighting flattens the space and kills the cozy mood.
Furniture and Decor Choices That Work With Lighting
Lighting design and furniture layout go hand in hand. If you’re upgrading the pavilion, consider these pairing strategies.
Furniture Recommendations That Look Great Under Warm LEDs
- Seating: teak, powder-coated aluminum, or all-weather wicker with quick-dry cushions
- Dining: a rectangular table under a linear pendant; round table under a single chandelier
- Soft goods: outdoor rugs and pillows in warm neutrals (they reflect light gently and feel inviting)
Layout Tips for Better Light
- Keep the primary seating within the brightest “pool” of light (but dimmed for ambience).
- Place side tables where portable lamps or candles can add sparkle.
- If you have a TV, avoid downlights directly in front of the screen to reduce glare.
Seasonal and Year-Round Outdoor Living Considerations
Your pavilion should feel just as intentional in October as it does in June. Lighting helps bridge seasons—especially when days get shorter.
- Summer: add dimmable ambient lighting for late dinners; consider bug-friendly warm LEDs and keep bright task lights limited to cooking zones.
- Fall: emphasize amber warmth (2700K or lower) and highlight foliage with uplights; add lanterns for cozy gatherings.
- Winter: prioritize safe pathways and steps; use timers for early sunsets; ensure fixtures are weather-rated and sealed.
- Spring: aim lights away from nesting areas and refresh lenses/fixtures after storms and pollen season.
All-season comfort pairing: If you use a heater or fire feature, include a lower, warmer lighting scene to match the glow and reduce harsh contrast.
Maintenance and Durability: Keep It Beautiful
A well-lit pavilion stays beautiful with light upkeep. Plan for maintenance the same way you plan for furniture covers or seasonal planting refreshes.
- Clean lenses and shades 2–4 times per year (more in dusty or pollen-heavy regions).
- Check seals and gaskets annually—especially after freeze/thaw cycles.
- Trim plants away from fixtures to prevent heat buildup and shadowing.
- Use LED lamps to reduce bulb changes and keep consistent color temperature.
Budget Ranges: What Outdoor Pavilion Lighting Typically Costs
Costs vary by pavilion size, wiring access, and whether you’re adding landscape lighting. Here are realistic ranges homeowners often see:
- Budget refresh ($200–$800): commercial-grade string lights, plug-in sconces, portable rechargeable lamps, basic timers
- Mid-range upgrade ($800–$3,500): outdoor-rated chandelier/pendant, dimmers, a few recessed lights, basic path lighting
- High-end design ($3,500–$12,000+): layered lighting plan, multiple circuits, premium fixtures (brass/marine-grade), full landscape lighting, smart control system
Pro tip: Spend more on the fixtures that define the space (the centerpiece and key accents), and keep supporting lights simple and durable.
Common Mistakes to Avoid
- Using one bright light source: A single flood-like fixture creates glare and harsh shadows. Layer instead.
- Skipping dimmers: Without dimming, the pavilion feels like a parking lot or too dark. Dimmers are the comfort switch.
- Mixing color temperatures: Warm + cool LEDs in the same sightline look mismatched. Keep it consistent.
- Forgetting the approach: A gorgeous pavilion still feels unwelcoming if the path or steps are dark.
- Choosing indoor-rated fixtures: They fail quickly outdoors. Look for damp-rated or wet-rated as required by exposure.
- Over-lighting the landscape: Too many uplights flatten your garden. Use contrast and shadows for a premium look.
FAQ: Outdoor Pavilion Lighting Design
How many lights do I need in an outdoor pavilion?
It depends on pavilion size and use, but a common approach is one central statement fixture, 4–8 recessed downlights for even coverage, and 2–6 landscape or path lights to connect the pavilion to the yard. Put lights on separate switches so you can adjust the mood.
What is the best color temperature for pavilion lighting?
For most outdoor living spaces, 2700K is the sweet spot—warm, flattering, and inviting. If you want a firelight feel, consider 2200K–2400K for accent layers.
Are string lights enough for a pavilion?
String lights create ambience, but they rarely provide good task lighting for dining or cooking. Pair them with a dimmable pendant or recessed lights so the pavilion works for meals, games, and cleanup.
What lighting is best near an outdoor kitchen or grill?
Use dedicated task lighting: recessed downlights or directional fixtures aimed at prep surfaces and the grill area. Choose glare-controlled fixtures and keep them on a separate switch from the mood lighting.
How do I make my pavilion lighting more bug-friendly?
Choose warm LEDs (2700K or lower), avoid overly bright fixtures, and use shielded lights that direct illumination downward. Keeping lights dimmer also reduces insect attraction.
Do I need a professional electrician or landscape lighting installer?
If you’re adding new hardwired circuits, recessed fixtures, or tying into an existing outdoor electrical plan, hire a licensed electrician. For low-voltage landscape lighting, a specialized installer can design beam spreads and placement that look polished and avoid glare.
Actionable Next Steps for a Pavilion You’ll Use Every Night
- Sketch your zones (dining, lounge, circulation) and decide what needs task light.
- Pick one statement fixture sized to your table or seating area.
- Add dimmable layers (recessed + accents) on separate switches.
- Connect the pavilion to the landscape with a few uplights and safe pathway lighting.
- Choose weather-ready materials suited to your climate—especially coastal or freeze-prone regions.
Your outdoor pavilion can feel like a true extension of your home—bright enough to function, warm enough to relax, and designed enough to impress. For more inspiring outdoor design, landscaping ideas, and patio living upgrades, explore the latest guides and trends on thedecormag.com.
More Articles
 How to Design a Hummingbird Garden - The Decor Mag
 Smart, Stylish, and Sustainable Outdoor Storage Ideas for Modern Living Spaces
 Outdoor Arbor and Gate Design Ideas - The Decor Mag
 How to Design a Fern Garden - The Decor Mag
 Best Outdoor Bar Garnish Tray Ideas - The Decor Mag
 Best Outdoor Bar Wine Glass Hanger - The Decor Mag
 Practical Aging Safety Tips for Outdoor Living Spaces
 How to Design a No Dig Garden - The Decor Mag
 Best Outdoor Bar Citrus Squeezer Station - The Decor Mag
 How to Create a Cut Flower Garden - The Decor Mag