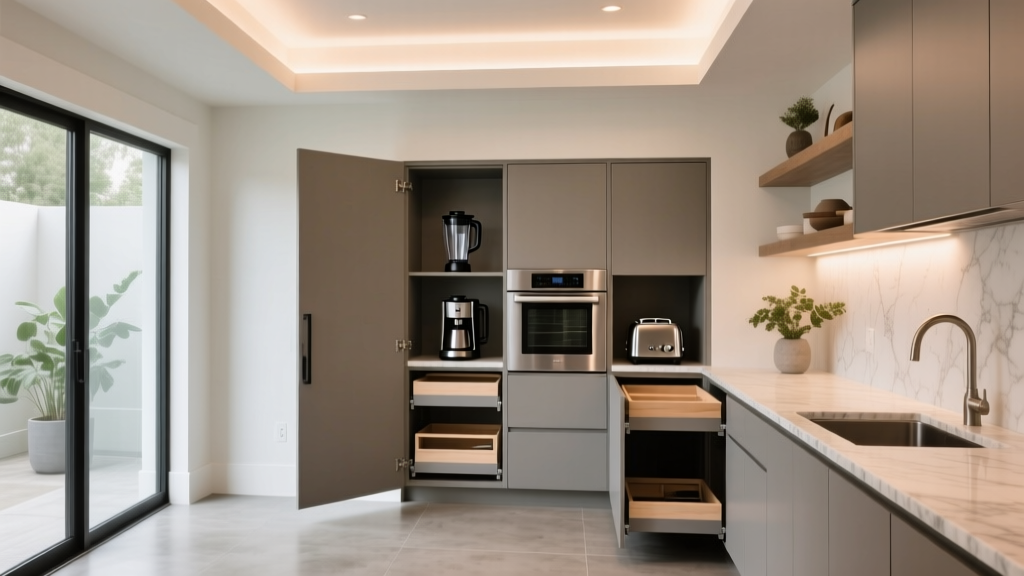
Best Kitchen Appliance Garage Ideas - The Decor Mag
Kitchen counters have a way of becoming “landing zones” for daily life: coffee makers, toasters, blenders, phone chargers, mail, and whatever appliance you used last and didn’t want to put away. The result is visual clutter, reduced prep space, and a kitchen that feels harder to keep clean—especially during busy mornings.
An appliance garage is one of the most practical kitchen renovation upgrades you can make. It creates a dedicated, built-in home for small appliances while keeping them accessible, plugged in, and ready to use. Done well, it supports timeless functionality (easy workflow, durable materials, and safe electrical planning) while aligning with current kitchen design trends like clean lines, concealed storage, and minimalist countertops.
Below, you’ll find the best kitchen appliance garage ideas—complete with layout guidance, recommended dimensions, material comparisons, budget ranges, and common mistakes to avoid—so you can plan a solution that looks custom and works every day.
What Is a Kitchen Appliance Garage (and Why Homeowners Love Them)?
A kitchen appliance garage is a cabinet or enclosure designed to store frequently used countertop appliances (think toaster, espresso machine, stand mixer) out of sight. It can be built into a base cabinet, a tall pantry cabinet, or a wall cabinet run, typically with a door that lifts, slides, or retracts.
Key benefits
- Cleaner countertops: Supports the “uncluttered kitchen” look that’s dominating modern renovation wish lists.
- Faster routines: Appliances stay plugged in and positioned for quick use.
- Better workflow: Keeps coffee, breakfast, and baking zones organized and efficient.
- Less daily cleaning: Fewer items to wipe around; easier to maintain a tidy surface.
- Protects appliances: Reduces exposure to grease and splatter, especially near cooking zones.
Planning Your Appliance Garage: Function First
The best kitchen design choices start with how you actually use your space. Before choosing doors or finishes, list the appliances you want to store and measure them (including cords and clearance for ventilation).
Common appliances to plan for
- Coffee maker or espresso machine (often the tallest item)
- Toaster or toaster oven
- Blender or food processor
- Stand mixer (heavy—consider lift shelves)
- Electric kettle
- Air fryer (requires extra heat/ventilation planning)
Recommended measurements (practical starting points)
- Interior height: 16–20 inches for most coffee makers; 20–22 inches if you have a taller espresso setup.
- Interior depth: 14–18 inches; aim for 16 inches minimum if storing appliances with handles or rear water reservoirs.
- Width: 24–36 inches for a multi-appliance garage; 18–24 inches for a dedicated coffee station.
- Counter landing space: Leave at least 15 inches of clear counter adjacent for setting cups, bowls, or ingredients.
- Clearance for doors: Ensure door hardware doesn’t block the outlet or interfere with appliance lids/handles.
Placement tip: Keep your appliance garage away from the main cooking splash zone. It performs best near the fridge (breakfast station) or near pantry storage (baking and snack station).
Top Kitchen Appliance Garage Layout Ideas
1) The Classic Counter-Height Appliance Garage (Most Versatile)
This is the go-to option: a dedicated cabinet sitting on the counter, usually at the end of an upper cabinet run. It’s ideal for toasters, kettles, and coffee setups.
- Best for: Medium-to-large kitchens; homeowners who want daily convenience without sacrificing a full pantry cabinet.
- Design approach: Match door fronts to surrounding cabinetry for a seamless built-in look.
- Add-on ideas: Under-cabinet lighting inside the garage; a small shelf for mugs or coffee pods.
Budget range: $300–$1,200 for stock cabinet modification + hardware; $1,500–$4,000 for semi-custom/custom with specialty doors and integrated power.
2) The Coffee Bar Appliance Garage (Beverage Zone Favorite)
A coffee bar appliance garage is a dedicated beverage hub that hides the espresso machine and supplies when not in use—perfect for homeowners who want a calm, clutter-free kitchen aesthetic.
- Best for: Coffee/tea lovers; open-concept kitchens where countertop clutter is highly visible.
- Recommended features: Pull-out tray for the machine, a drawer below for pods/filters, and a shelf for mugs.
- Water planning: If you’re using an espresso machine with a reservoir, allow extra depth and consider a wipeable back panel for drips.
Budget range: $800–$2,500 (mid-range cabinetry and good hardware); $3,000–$7,000 for a full built-in beverage station with lighting and premium fronts.
3) The Tall Pantry Appliance Garage (Appliance Tower)
This solution places appliances inside a tall cabinet with a counter-height interior shelf (or pull-out) for use. It’s especially effective in kitchens where upper cabinets are minimal or where you want long, uninterrupted countertops.
- Best for: Contemporary kitchen renovations; households with many appliances.
- Design approach: A tall cabinet with a “work pocket” section in the middle and closed storage above/below.
- Accessibility: Great for keeping heavy items like mixers at a comfortable working height.
Budget range: $1,500–$5,000 depending on cabinet construction, internal pull-outs, and electrical needs.
4) The Corner Appliance Garage (Smart Use of Awkward Space)
Corners can be challenging in kitchen design. A corner appliance garage can turn an underused area into a functional storage pocket—especially for appliances used a few times per week.
- Best for: L-shaped kitchens with dead corner zones.
- Watch-outs: Ensure door swing and interior access are comfortable; avoid placing tall appliances too deep into the corner.
- Pro tip: Use angled or bi-fold doors to reduce obstruction.
Budget range: $600–$2,500; custom corner solutions can run higher due to complex carpentry and specialized hardware.
5) The Lift-Up Door Appliance Garage (Modern and Minimal)
Lift-up (or flip-up) doors are a major trend in modern kitchen cabinetry. They open upward, keeping the door out of your way during use.
- Best for: Contemporary kitchens; anyone who dislikes traditional door swing interference.
- Hardware recommendation: Choose soft-close lift systems designed for frequent use.
- Design tip: Pair with slab or flat-panel doors for a sleek, uninterrupted look.
Budget range: $150–$500 for quality lift hardware (per door) plus cabinet costs; $1,500–$4,500 total for a complete built-in section.
Doors & Openings: Picking the Right Mechanism
Your door choice impacts daily usability more than most homeowners expect. Consider how often you’ll open it, whether you’ll use appliances inside the garage, and how much clearance you have.
Popular door options
- Tambour (roll-top) door: Slides into a track. Classic, space-saving, and great when you don’t want an open door blocking the counter. Clean tracks regularly.
- Lift-up door: Opens upward and stays out of the way. Ideal for frequently used appliances.
- Pocket/retractable door: Slides into the cabinet sides. Premium feel and excellent access, but requires careful sizing and quality hardware.
- Bi-fold door: Folds upward or sideways with less swing than a single door. Good for tighter spaces.
Practical tip: If you plan to operate the toaster or blender inside the garage, avoid doors that hang down into the working area.
Materials & Finishes That Hold Up (and Look Great)
Appliance garages deal with heat, moisture, crumbs, and frequent wiping. Material selection should prioritize durability and easy maintenance.
Interior surface recommendations
- Laminate panel (high-pressure laminate): Durable, affordable, and easy to wipe. Great for the back panel and shelves.
- Painted MDF: Smooth and budget-friendly, but can scuff; choose a washable, high-quality finish.
- Plywood cabinet boxes: Strong and moisture-resistant; a solid upgrade in semi-custom cabinetry.
- Stainless steel insert/back panel: Excellent behind coffee/espresso setups and for heat resistance near toaster ovens (verify appliance clearance requirements).
Countertop choices inside or adjacent
- Quartz: Nonporous and low maintenance; ideal for coffee spills and daily use.
- Porcelain slab: Highly heat-resistant and stain-resistant; premium price but excellent for appliance zones.
- Butcher block: Warm and timeless; needs regular sealing and careful moisture management near coffee makers.
Maintenance advice
- Wipe interior surfaces weekly to prevent grease film and coffee residue buildup.
- Vacuum crumbs from tracks (especially tambour doors) to keep operation smooth.
- Use shelf liners only if they won’t trap moisture; avoid thick foamy liners near heat-producing appliances.
Power, Lighting, and Ventilation: The Details That Make It Work
Electrical planning (must-have for organization)
- Outlets: Install at least two outlets inside the garage; three or four is ideal for multi-appliance stations.
- USB outlets: Helpful for charging devices, but keep cords away from heat and water sources.
- GFCI protection: Essential if the garage is near a sink or water source; follow local electrical code.
- Cord management: Add a grommet or cable pass-through and a designated cord clip to prevent tangles.
Cost range: Adding outlets typically runs $150–$500 per location depending on access, plus $50–$250 for under-cabinet lighting. Complex rewiring can increase costs.
Lighting upgrades
- LED puck lights or strip lighting: Improves visibility and adds a high-end feel.
- Door-activated switch: Light turns on when the door opens—very convenient for early mornings.
Ventilation and heat management
- Don’t run heat-producing appliances (toaster ovens, air fryers) in a fully enclosed space unless the manufacturer allows it and you’ve built proper clearance.
- Consider a perforated metal back panel, side vents, or leaving the door open during use.
- Plan for steam: electric kettles and espresso machines need overhead clearance to reduce moisture damage.
Smart Storage Features to Add (Small Upgrades, Big Payoff)
- Pull-out shelf: Brings appliances forward for use and keeps cords from snagging. Expect $150–$400 per pull-out shelf for good-quality slides.
- Mixer lift: Ideal for heavy stand mixers; reduces strain and frees shelf space. Expect $250–$600 for hardware plus installation.
- Shallow drawers: Store tea bags, filters, measuring spoons, and attachments neatly.
- Vertical dividers: Perfect for cutting boards, baking sheets, or grills used with countertop appliances.
- Appliance mat or sliding pad: Helps move heavy machines without scratching the surface; budget $10–$40.
Budget Considerations: What You’ll Spend and Where to Save
Typical cost ranges
- Budget-friendly (DIY/stock cabinet tweaks): $200–$900
- Mid-range (semi-custom cabinet + quality door hardware + outlets): $1,000–$4,000
- High-end (custom cabinetry, retractable doors, premium interiors, integrated lighting): $4,000–$10,000+
Where to spend
- Door hardware (lift/pocket systems) for smooth, long-term performance
- Electrical upgrades for safety and convenience
- Pull-out shelves if you’ll use appliances frequently
Where you can save
- Choose durable laminate interiors instead of specialty panels
- Use a standard cabinet box and invest in a better door mechanism
- Skip custom organizers until you’ve lived with the setup for a few months
Common Mistakes to Avoid
- Undersizing the space: Measure your tallest appliance and add clearance. A garage that’s 1 inch too short becomes wasted storage.
- Forgetting ventilation: Heat and steam can warp finishes and shorten appliance life.
- Not enough outlets: Power strips inside cabinets often create clutter and can be unsafe if overloaded.
- Placing it too close to the cooktop: Grease buildup is harder to clean and can damage door tracks.
- Door choice that blocks workflow: A swinging door can collide with people, bar stools, or nearby cabinets.
- Ignoring daily habits: If you make coffee every morning, prioritize the coffee station location over symmetry.
FAQ: Kitchen Appliance Garage Ideas
Are appliance garages still in style?
Yes—especially in modern kitchen design trends that emphasize clean countertops and hidden storage. Today’s versions lean more minimal with lift-up or pocket doors and integrated lighting.
Can you put an air fryer in an appliance garage?
You can store it there, but using it inside a closed garage is often not recommended due to heat and airflow needs. Many homeowners use a pull-out shelf so the air fryer can be pulled forward and operated with the door open.
What’s the best door type for an appliance garage?
For daily use, lift-up doors and pocket/retractable doors are the most convenient because they stay out of the way. Tambour doors save space but require regular track cleaning.
How deep should an appliance garage be?
Plan for 14–18 inches of interior depth, with 16 inches as a practical minimum for many coffee makers and toaster ovens. Check your appliance depth and include cord clearance.
Do appliance garages need special outlets?
They typically need multiple standard outlets and, depending on proximity to water, GFCI protection. A dedicated circuit may be needed for high-draw appliances—an electrician can confirm based on your kitchen renovation plan.
Can I add an appliance garage without a full kitchen remodel?
Often, yes. Many homeowners retrofit one by converting an existing cabinet area, adding a specialty door, and installing outlets/lighting. Costs depend on electrical access and whether cabinet modifications are needed.
Next Steps: Build an Appliance Garage That Fits Your Kitchen
Start by identifying your top three countertop appliances and deciding whether you want to store them, use them in place, or pull them out for operation. Measure each item, choose a layout that supports your kitchen workflow (coffee zone, breakfast zone, baking zone), and select door hardware that won’t frustrate you day to day. From there, plan outlets, lighting, and an easy-clean interior so your appliance garage stays as practical as it is polished.
For more kitchen renovation inspiration, organization upgrades, and layout ideas that balance trends with timeless function, explore more articles at thedecormag.com.
More Articles
 World Kitchens Essentials: Core Tools, Ingredients, and Techniques Across Seven Global Cuisines
 Kitchen Limewash Paint Cabinet Finish - The Decor Mag
 How to Incorporate Color in a White Kitchen - The Decor Mag
 Kitchen Mixed Material Countertop Design - The Decor Mag
 Best Kitchen Serving Tray Storage - The Decor Mag
 How to Organize Family Life: Practical Systems for Calm, Connection, and Consistency
 Minimalist Alternatives to Essential Kitchen Tools: Smart Substitutions That Reduce Clutter Without Compromising Performance
 Best Kitchen Cookware Organization: Cabinet Solutions (2026)
 Best Kitchen Flooring Options for Durability - The Decor Mag
 Kitchen Brass Hardware Renaissance - The Decor Mag