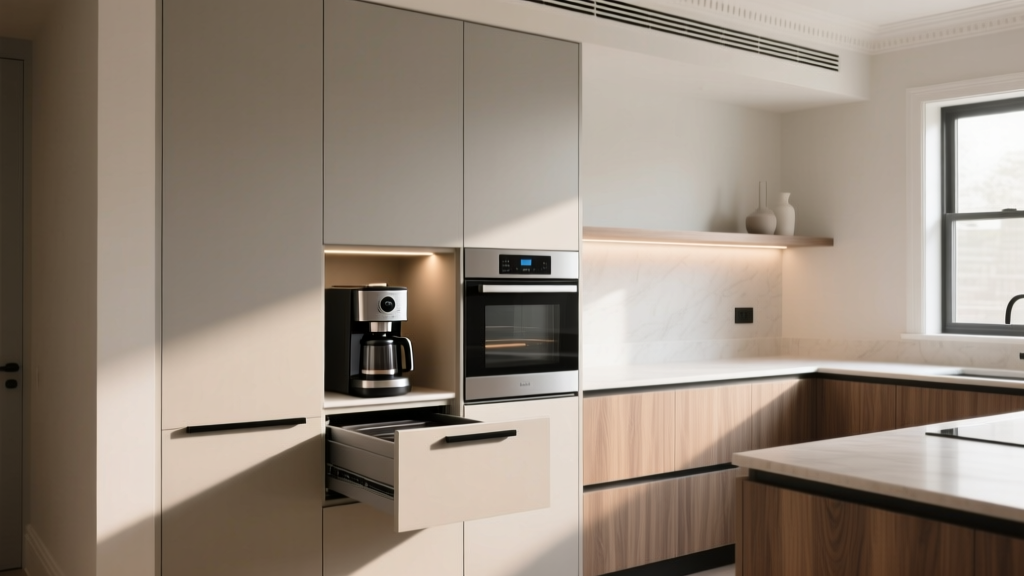
Kitchen Hidden Appliance Drawer Ideas - The Decor Mag
Countertops tend to collect the same daily essentials: the toaster you use every morning, the coffee setup that never moves, the stand mixer that’s too heavy to lift in and out of a cabinet. Even in a well-planned kitchen renovation, “small appliances” quickly become visual clutter, stealing the clean lines homeowners want from today’s most popular kitchen design trends—think streamlined cabinetry, minimal hardware, and calmer surfaces.
Hidden appliance drawers and “appliance garages” solve that problem without sacrificing convenience. The right approach keeps your kitchen organized, protects appliances from dust and grease, reduces cord chaos, and frees up prep space—while still keeping everything within arm’s reach. Whether you’re planning a full kitchen remodel or improving one cabinet at a time, these ideas help you build timeless functionality into a modern, organized kitchen.
What Is a Hidden Appliance Drawer (and Why Homeowners Love Them)?
A hidden appliance drawer is a drawer-based storage solution designed to hold countertop appliances inside cabinetry—often with integrated power, ventilation, and access that makes the appliance easy to use without lifting it. Depending on the layout, the drawer may:
- Pull out like a standard drawer so you can use the appliance on the extended shelf
- Include a hinged lid, tambour door, or lift-up front to keep appliances concealed
- Integrate outlets (and sometimes USB) inside the drawer or cabinet
Why they’re trending in kitchen renovations:
- Cleaner countertops: Supports the “uncluttered kitchen” aesthetic.
- Better workflow: Creates dedicated stations (coffee, breakfast, baking).
- Accessibility: Keeps heavy appliances at waist height rather than in a base cabinet.
- Protection: Reduces grease and dust buildup on appliance surfaces.
Plan First: Key Measurements and Clearances
Before choosing a drawer system, measure the appliance you want to hide (including cords, handles, and any top clearance needed for heat or opening lids). Use these practical sizing guidelines as a starting point:
Standard Drawer and Cabinet Sizing Guidelines
- Interior depth: Aim for 21"–23" usable depth for most small appliances. Many base cabinets are 24" deep, but drawer boxes and back panels reduce the interior depth.
- Interior width: 15"–36" depending on cabinet size. Coffee stations often work best in 18"–24" widths.
- Interior height:
- Toaster/toaster oven: 10"–14" (check manufacturer specs)
- Stand mixer (tilt-head): 14"–16"
- Stand mixer (bowl-lift): 16"–18"+
- Blender: 16"–20" depending on jar height
- Counter clearance for use: If you plan to run appliances while stored, ensure safe clearance above and behind (especially for heat-producing appliances).
- Ventilation space: Leave 1"–2" around heat-producing appliances unless the manufacturer specifies more.
Electrical Planning (Safety and Convenience)
Hidden appliance storage works best when power is integrated correctly:
- Install a recessed outlet or in-drawer power strip rated for cabinetry use.
- Confirm your electrician follows local code for outlet placement and GFCI requirements (especially near sinks).
- Plan for cord routing so cords don’t pinch in drawer slides or hinge points.
Top Hidden Appliance Drawer Ideas (with Practical Design Approaches)
1) Pull-Out Appliance Shelf for Daily Workhorses
A pull-out shelf (sometimes called a mixer lift shelf when paired with a lift) is one of the most practical solutions for appliances you use frequently. The appliance stays in the cabinet, and the shelf glides out to operating position.
Best for: toaster, blender, air fryer (with ventilation), food processor, espresso machine (if height allows)
Design tips:
- Choose full-extension, soft-close slides rated for at least 100 lb if you’re storing heavier appliances.
- Use a durable shelf surface (see material recommendations below) that handles vibration and heat.
- If using an air fryer or toaster oven, add a heat shield panel and consider venting (or store it here but use it on the countertop).
Typical cost range: $150–$600 for quality pull-out hardware + shelf materials; $300–$1,200 installed depending on cabinetry modifications.
2) Mixer Lift Drawer: Lift-Up Platform Behind a Cabinet Front
A mixer lift keeps your stand mixer hidden, then lifts it to counter height with a lever-assisted mechanism. This is a classic “timeless functionality” upgrade that still feels current in modern kitchen design.
Best for: stand mixers, heavy appliances you don’t want to lift
Measurements that matter:
- Allow at least 14"–18" interior height depending on your mixer model.
- Confirm the lift’s weight rating (many range 60–100 lb).
- Plan for clearance above so the mixer head can tilt up if needed.
Typical cost range: $250–$800 for the lift hardware; $600–$2,000 installed if you’re altering drawers/cabinet faces.
3) Appliance Drawer with a Flip-Up Front (“Pocket” Access)
This approach looks like a drawer face but opens upward, allowing you to access appliances stored inside while keeping the façade clean. It’s a smart compromise when you want a concealed look without giving up counter-height storage.
Best for: coffee grinder, electric kettle, toaster, charging station, smoothie tools
Recommended layout:
- Create a dedicated breakfast zone near the fridge and sink (milk, water, cleanup).
- Add a shallow top drawer for filters, pods, tea bags, and spoons.
Typical cost range: $300–$1,500+ depending on door hardware and custom millwork; higher if integrated power and lighting are added.
4) Built-In Coffee Station Cabinet with Tambour or Pocket Doors
A coffee station is one of the most popular kitchen organization upgrades in current renovation projects. Tambour doors (slatted roll-up doors) and pocket doors (doors that slide into the cabinet sides) hide a full setup while keeping it easy to access.
Best for: espresso machine, drip coffee maker, grinder, mugs, syrups
Pro-level recommendations:
- Include under-cabinet lighting inside the station for a premium, hotel-like feel.
- Use a spill-resistant surface (quartz, stainless, or compact laminate) for the station “counter.”
- Add pull-out waste/compost nearby for used grounds and filters.
Typical cost range: $1,000–$5,000+ (semi-custom to custom cabinetry), depending on door mechanism, interior finish, and electrical.
5) Charging + Appliance Drawer Combo (Hidden Cords Done Right)
For households that use tablets for recipes or keep rechargeable gadgets in the kitchen, a dedicated drawer can prevent cords from sprawling across the counter.
Best for: immersion blender, hand mixer, food scale, tablets, battery chargers
Smart details:
- Use a UL-listed in-drawer power solution designed for cabinetry.
- Add divider inserts to keep adapters and cords separated.
- Choose a drawer location away from heat and water—often near a desk nook or pantry cabinet.
Typical cost range: $150–$600 for power + inserts; $300–$1,200 installed depending on wiring access.
6) Island Appliance Drawers: Hide Tools Where You Prep
Kitchen islands are prime real estate for hidden storage. Adding one or two appliance drawers in the island keeps prep appliances close to the action without crowding perimeter counters.
Best for: blender, food processor, mixer accessories, slow cooker (stored, then used elsewhere)
Layout guidance:
- Keep the appliance drawer at least 24"–36" away from seating overhangs to avoid knee conflicts and traffic bottlenecks.
- If you plan to plug in appliances in the island, include island outlets per code and plan conduit runs early.
Typical cost range: $500–$2,500+ depending on the island build, electrical, and drawer hardware.
Material Recommendations: What Holds Up in a Working Kitchen
Shelf/Drawer Base Materials (Comparison)
- Plywood (3/4"): Strong, stable, and screw-holds well. Great for pull-out shelves and heavy appliances. Mid-to-high cost depending on grade.
- Melamine-coated particleboard: Budget-friendly and easy to wipe clean, but edges can chip and it’s less durable with moisture. Best for light appliances and dry zones.
- Quartz remnant surface: Excellent stain resistance and premium look for coffee stations; heavy and needs solid support. Mid-to-high cost, often cost-effective if using remnants.
- Stainless steel liner/panel: Heat tolerant and easy to clean, ideal near toaster ovens. Mid cost; can show fingerprints.
- Compact laminate: Highly durable and water resistant, thinner profile than many options. Mid cost and very practical.
Hardware That Makes or Breaks the Experience
- Full-extension slides: Easier access to appliances and cords; choose soft-close for a quieter, high-end feel.
- Weight ratings: 75 lb minimum for typical appliances; 100 lb+ for stand mixers and loaded drawers.
- Pulls and handles: If you want a seamless look, consider integrated pulls or touch-latch (but note touch-latch can be less reliable in high-use drawers).
Budget Considerations: What to Spend and Where to Save
- Budget-friendly ($200–$800): Convert an existing base cabinet into a pull-out shelf; use melamine or plywood; add a simple recessed outlet nearby (not inside the drawer).
- Mid-range ($800–$2,500): Add mixer lift hardware, upgrade to heavy-duty slides, include in-cabinet power, and improve interior finishes.
- High-end ($2,500–$7,500+): Custom appliance garage with pocket doors, quartz/stainless interior surface, integrated lighting, specialty storage inserts, and professional electrical planning.
Where to invest: slides/lift hardware, electrical safety, durable surfaces in coffee/heat zones.
Where to save: interior panels (use wipeable paint or durable laminate), standard drawer boxes with upgraded slides, remnant stone for small station surfaces.
Maintenance and Longevity Tips
- Crumb control: Line shelves with a removable mat or use a shallow tray for toasters and grinders. Clean weekly to prevent odor and pests.
- Grease protection: Avoid placing open appliances near the cooktop in a hidden drawer—grease aerosol can build up inside cabinets.
- Ventilation check: If you store heat-producing appliances, inspect surrounding panels for discoloration and follow manufacturer clearance rules.
- Slide care: Don’t overload drawers; vacuum debris from slide tracks every few months to keep soft-close smooth.
Common Mistakes to Avoid
- Designing around the cabinet, not the appliance: A “standard” drawer height may not fit your blender or espresso machine. Measure first, then design.
- Ignoring heat and steam: Toaster ovens, air fryers, and kettles can damage cabinetry if used in enclosed spaces without clearance.
- Underestimating weight: Cheap slides sag quickly under mixers and large appliances. Choose proper weight-rated hardware.
- Poor outlet placement: Cords can snag in slides or get pinched. Plan a safe cord path and use a recessed, code-compliant solution.
- Choosing inconvenient locations: A coffee station far from the sink is frustrating. Put water-based zones near plumbing when possible.
- No landing space: If you’ll pull an appliance out to use it, ensure you have at least 15"–18" adjacent countertop landing space for ingredients and tools.
Design Trends Meets Timeless Function
Today’s kitchen design trends favor calm surfaces and integrated storage, but the best hidden appliance solutions also respect everyday routines. The most successful renovations pair:
- Minimal, continuous cabinet fronts (trend) with high-performance hardware (timeless)
- Dedicated “stations” like coffee and baking (trend) with smart work triangles and zones (timeless)
- Warm wood or textured laminates (trend) with easy-clean, durable surfaces (timeless)
FAQ: Kitchen Hidden Appliance Drawers
Are hidden appliance drawers safe for toaster ovens and air fryers?
They can be, but only if the appliance is used with proper clearance and ventilation per the manufacturer’s instructions. Many homeowners store these appliances in a hidden drawer or garage but pull them out onto the countertop for use to avoid heat buildup.
Do I need a special outlet for an appliance drawer?
You’ll want a code-compliant solution, often a recessed outlet or a UL-listed in-cabinet power strip. GFCI may be required depending on location (especially near sinks). Work with a licensed electrician during your kitchen renovation planning.
What’s the best hidden solution for a stand mixer?
A mixer lift is typically the most ergonomic option, especially for heavier mixers. Choose a lift rated for your mixer’s weight and confirm the interior cabinet height supports the lifted position and any tilt-head clearance.
How much space should I plan for a coffee station cabinet?
As a rule of thumb, plan a cabinet section 24"–36" wide with at least 18"–20" of vertical clearance for many espresso machines, plus space for mugs and supplies. Measure your exact machine and any top-fill requirements.
Can I retrofit hidden appliance drawers into existing cabinetry?
Often, yes. The simplest retrofit is a pull-out shelf with heavy-duty slides inside an existing base cabinet. Mixer lifts and pocket-door appliance garages may require more carpentry and electrical work but are still possible in many kitchens.
What’s the easiest way to keep hidden appliance areas clean?
Use removable liners or trays, wipe interior surfaces weekly (especially coffee zones), and vacuum crumbs from corners and slide tracks. Avoid storing appliances with food residue and let appliances cool fully before closing doors.
Next Steps: How to Choose the Right Hidden Appliance Approach
Start by listing the appliances you use at least three times a week, then decide whether each one should be stored only (pulled out for use) or used in place (requires power, clearance, and ventilation). Bring those measurements to your cabinet designer or contractor and prioritize one high-impact zone—often a coffee station or mixer lift—before expanding to additional drawers.
For more kitchen renovation guidance, cabinet layout ideas, and organization upgrades, explore more kitchen inspiration on thedecormag.com.
More Articles
 The Actually For Checklist: A Precision-Driven Kitchen Readiness System for Home Cooks and Professionals
 Best Kitchen Cleaning Supply Storage - The Decor Mag
 Kitchen Island Prep Stations: Summer Party Command Center
 Kitchen Natural Stone Backsplash Guide - The Decor Mag
 Kitchen Slab Backsplash Seamless Look - The Decor Mag
 Kitchen Wood Beams Ceiling Design - The Decor Mag
 Kitchen Two-Tone Cabinet Ideas - The Decor Mag
 Best Kitchen Drawer Organization Systems - The Decor Mag
 Chef Kitchen Design: Transform Your Space (2026)
 How to Incorporate Color in a White Kitchen - The Decor Mag