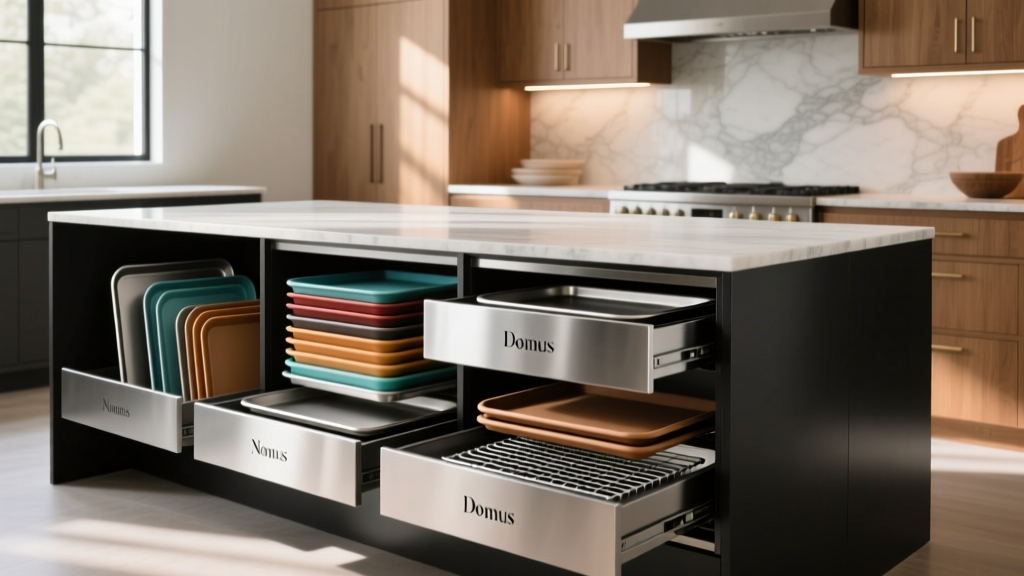
Best Kitchen Baking Sheet Organization - The Decor Mag
Baking sheets, muffin tins, cooling racks, and cutting boards are some of the most-used—yet most awkward—items to store in a kitchen. They’re wide, flat, and prone to toppling into noisy stacks that scratch finishes and waste time when you’re trying to pull out “just one pan.” If you’re planning a kitchen renovation (or simply refining your current layout), baking sheet organization is a small upgrade that delivers outsized daily benefits.
The best solutions blend two priorities: easy access (no heavy lifting or unstacking) and cabinet health (fewer scuffs, less warping, and reduced wear on hinges and shelves). Today’s kitchen design trends—think streamlined fronts, hidden storage, and highly functional interiors—make it easier than ever to create a dedicated, purpose-built home for these essentials without sacrificing style.
Below, you’ll find practical, renovation-friendly strategies, product and material recommendations, cost ranges, and the common mistakes that derail even the most beautiful kitchen organization plans.
What “Good” Baking Sheet Organization Looks Like
Before selecting an organizer or changing cabinet layouts, define what success means for your household. A smart baking sheet storage setup typically achieves the following:
- Vertical storage so pans slide out like files (no stacking)
- Right-sized spacing to prevent jamming and scratches
- One-motion access near the oven, range, or primary prep zone
- Stable dividers that won’t flex when you pull out a heavy sheet pan
- Easy cleaning (crumbs and grease happen)
Take Inventory First (5-Minute Checklist)
Organization works best when it’s based on what you actually own. Pull everything out and measure:
- Largest sheet pan (common sizes: half sheet ~18" x 13", quarter sheet ~13" x 9")
- Thickest item (often a heavy-duty aluminum pan or cutting board)
- Odd shapes (pizza stone, roasting pan with handles, wire racks)
Practical spacing tip: Plan divider slots at 2"–2.5" wide for sheet pans and cooling racks; allocate 3"–4" for bulky items like a roasting pan or thick cutting boards.
Best Places to Store Baking Sheets (Layout Recommendations)
1) Base Cabinet Near the Oven (Most Renovation-Friendly)
For most kitchens, the ideal location is a base cabinet within 1–3 steps of the oven. It supports a smooth “grab-pan, load, bake” workflow and keeps heavy items below waist height for safer handling.
Recommended cabinet size:
- 12" wide base cabinet: great for a slim tray divider pull-out
- 15"–18" wide base: easiest for mixed storage (sheets + cutting boards + racks)
- 24" wide base: can store large trays and even sauté pans, but needs careful dividers to avoid a cluttered “catch-all”
2) Deep Drawer Storage with Pegs or Rails (Best for Modern Kitchens)
Current kitchen design trends favor large drawers over doors. A deep drawer can store sheet pans flat or on edge with a drawer insert—especially helpful in handleless or minimalist kitchens where clean lines are a priority.
Drawer dimensions to aim for:
- Interior depth: 21"–22" (common in standard base cabinetry)
- Interior height: at least 6" for flat storage; 8"–10" for vertical divider inserts
Best use case: If you prefer a “silent kitchen” feel, drawers reduce banging and make it easier to maintain order.
3) Above-Fridge or Pantry Zone (Good for Occasional Baking)
If you only bake seasonally, storing specialty pans in a tall pantry cabinet can free up prime space near the oven. Use vertical dividers to prevent leaning stacks.
Design caution: Avoid placing heavy sheet pans in overhead cabinets—lifting wide metal pans down near your face is a safety risk and can chip cabinet frames.
Top Organization Systems (With Materials, Pros/Cons, and Costs)
Vertical Tray Dividers (Built-In or Retrofit)
Vertical dividers are the gold standard for baking sheet organization. They reduce scratches, improve visibility, and prevent avalanches.
Material options:
- Birch plywood dividers: Stable, paintable, budget-friendly. Best for custom or semi-custom cabinetry.
- Solid wood dividers: Durable and premium-looking; higher cost and may move slightly with humidity.
- Metal dividers (powder-coated or stainless): Slim profile and very strong; great for heavy pans and a modern interior aesthetic.
- Plastic inserts: Affordable and easy to clean; less rigid for heavy-duty sheet pans.
Cost range:
- Retrofit wire/metal rack insert: $20–$80
- Midrange pull-out tray divider system: $150–$500
- Custom built-in dividers in a new cabinet: $200–$800+ depending on finish and labor
Installation tip: If you’re adding fixed dividers, place the first divider about 2.5"–3" from the cabinet side so larger pans don’t scrape the wall during removal.
Pull-Out Baking Sheet Organizers (Best for Tight Spaces)
A pull-out organizer maximizes access in narrow bases. It’s a popular choice in renovations where every inch matters, especially in smaller kitchens or galley layouts.
Look for:
- Full-extension slides rated for 75–100 lbs for long-term durability
- Soft-close hardware to reduce clang and cabinet wear
- Adjustable dividers so the organizer can evolve with your cookware
Cost range: $180–$700 depending on brand, slide quality, and cabinet width.
DIY Slot Systems (Surprisingly Effective on a Budget)
If you’re not renovating, a DIY divider setup can create a major improvement with minimal cost. The key is stability—flimsy solutions become frustrating fast.
DIY approach ideas:
- Cabinet-floor rack insert: Choose a metal rack sized for your cabinet interior; add non-slip shelf liner beneath.
- Tension-rod “rails”: Use two rods to keep pans upright (works best in narrow spaces).
- Plywood base with slots: A simple plywood panel with mounted strips creates custom spacing for your exact pans.
Cost range: $10–$60 for rack inserts and liners; $40–$150 for more custom DIY materials.
Design Details That Make the System Feel Built-In
Choose the Right Cabinet Interior Finish
Interior surfaces take abuse from sharp pan edges. Consider:
- Melamine: Smooth, easy to wipe, common in modern cabinetry; can chip if abused.
- UV-coated plywood: More durable than basic melamine; excellent mid-to-high-end option.
- Wood veneer interiors: Beautiful and premium; requires gentler handling and occasional touch-ups.
Trend meets timeless: Many homeowners are investing in elevated interiors—think light wood tones or matte finishes—because organization is now part of the “showpiece” kitchen experience, even behind closed doors.
Add Protective Details to Reduce Noise and Wear
- Non-slip shelf liner: Prevents sliding and dampens sound (choose a washable, non-adhesive type).
- Edge guards or felt pads: Useful where pans scrape cabinet sides.
- Soft-close hinges or drawer slides: Extends cabinet life and reduces daily impact stress.
Plan for Airflow and Cleaning
Baking sheets can retain grease residue even after washing. Storing them with a little breathing room helps reduce odor and sticky buildup.
- Leave at least 1/2" clearance above the tallest item so it doesn’t wedge under a shelf.
- Choose organizers with open wire or spaced dividers to avoid trapping crumbs.
Maintenance Advice: Keep It Organized Long-Term
- Wipe cabinet floors monthly: Crumbs and flour accumulate quickly near prep zones.
- Degrease quarterly: Use a gentle degreaser on organizer surfaces; avoid harsh abrasives on powder-coated finishes.
- Re-set spacing twice a year: If you add a new pan, adjust dividers rather than forcing it into a too-tight slot.
- Store by frequency: Keep your daily sheet pan and cooling rack at the front; specialty pans go farther back.
Budget Planning: What to Spend (and Where It Pays Off)
Under $50: Quick Wins
- Wire rack insert + shelf liner
- Simple cabinet dividers (plastic or basic metal)
Best for: Renters, quick refreshes, or homeowners planning a renovation later.
$50–$200: Better Access and Stability
- Higher-quality metal dividers
- Drawer peg systems or adjustable inserts
Best for: Busy households that want daily reliability without remodeling.
$200–$800+: Renovation-Level Upgrades
- Dedicated pull-out tray divider cabinet
- Custom-sized vertical slots integrated into semi-custom or custom cabinetry
- Premium slides and upgraded interior finishes
Best for: Full kitchen renovations where workflow and resale-friendly features matter.
Common Mistakes to Avoid
- Storing sheet pans flat in tall stacks: Leads to scratches, noisy clanging, and wasted time.
- Making slots too narrow: Tight spacing causes jamming and chips cabinet interiors. Aim for 2"–2.5" per slot for most households.
- Placing storage too far from the oven: If it’s inconvenient, pans migrate to countertops and clutter returns.
- Buying a pull-out without checking clearances: Verify cabinet opening width, hinge intrusion, and handle clearance.
- Ignoring weight ratings: Heavy pans plus a weak slide system equals sagging and early failure. Look for 75–100 lb slide ratings.
- Over-organizing with too many categories: Keep it simple—sheets, racks, boards, specialty pans. Complexity discourages upkeep.
Practical Setup Examples (Steal These Layouts)
Option A: The “Baker’s Base Cabinet” (15"–18" Wide)
- Vertical dividers for: 2 half sheets, 2 quarter sheets, 1 roasting pan, 2 cooling racks
- Shelf liner on cabinet floor
- Front slot reserved for the most-used pan
Option B: The “Modern Drawer System” (24" Wide Deep Drawer)
- One deep drawer with adjustable dividers for sheets and racks
- Second drawer beneath for parchment paper, silicone mats, and foil
- Soft-close slides for quiet operation
Option C: The “Pantry Sidecar” (For Specialty Bakeware)
- Upper vertical section for muffin tins, cake pans, pizza stone
- Lower shelf for stand mixer attachments or large bowls
- Label dividers subtly (inside the door) for quick resets
FAQ: Kitchen Baking Sheet Organization
What is the best way to store baking sheets without stacking?
Vertical storage with dividers is the most efficient. Use slots spaced about 2"–2.5" apart and place the organizer in a base cabinet near the oven for easy access.
Should baking sheets be stored in drawers or cabinets?
Both work. Drawers feel more modern and ergonomic, while a narrow pull-out cabinet is ideal when space is tight. Choose based on your kitchen layout and whether you prefer doors or drawers in your renovation plan.
How wide should a pull-out organizer be for sheet pans?
A 9"–12" pull-out can handle several sheet pans vertically if dividers are sturdy. If you also want cutting boards and roasting pans, consider 15"–18" for easier sorting.
What materials last longest for baking sheet dividers?
Powder-coated metal and quality plywood are long-lasting choices. Metal offers maximum strength with a slim profile; plywood is stable and easy to customize, especially in semi-custom cabinetry.
How do I prevent pans from scratching my cabinets?
Use a non-slip liner on the cabinet floor, ensure divider spacing isn’t too tight, and consider adding felt pads or edge protection where pans commonly rub.
Can I add baking sheet storage during a kitchen renovation without custom cabinets?
Yes. Many semi-custom and stock cabinet lines support tray divider kits or pull-out accessories. Plan the cabinet width early (often 12"–18") and confirm hardware compatibility with your cabinet brand.
Next Steps: Build a Kitchen That Works as Beautifully as It Looks
Start by measuring your largest pans, then choose a storage zone within a few steps of your oven. If you’re renovating, reserve a 12"–18" base cabinet for a tray-divider system with quality slides and a durable interior finish. If you’re upgrading an existing kitchen, a sturdy rack insert and better spacing can transform the way your kitchen functions in a single afternoon.
For more renovation-friendly storage ideas, cabinet planning tips, and timeless kitchen design inspiration, explore the latest guides on thedecormag.com.
More Articles
 Meal Prep Kitchen Design: Functional Ideas (2026)
 Best Kitchen Appliance Maintenance Schedule - The Decor Mag
 How to Choose Kitchen Cabinet Pull Length - The Decor Mag
 Best Kitchen Herb Garden Window Ideas - The Decor Mag
 Minimalist Kitchen Design Essentials - The Decor Mag
 Kitchen Design for Cooking: Functional Ideas (2026)
 Kitchen Cabinet Depth Standards (2026)
 Friendly vs. Solutions: A Practical, Kitchen-Tested Comparison of Two Leading Countertop Materials
 Kitchen Pantry Organization: Pro Tips (2026)
 Kitchen Shaker Cabinet Timeless Appeal - The Decor Mag