How to Choose Kitchen Floor Tile Pattern - The Decor Mag
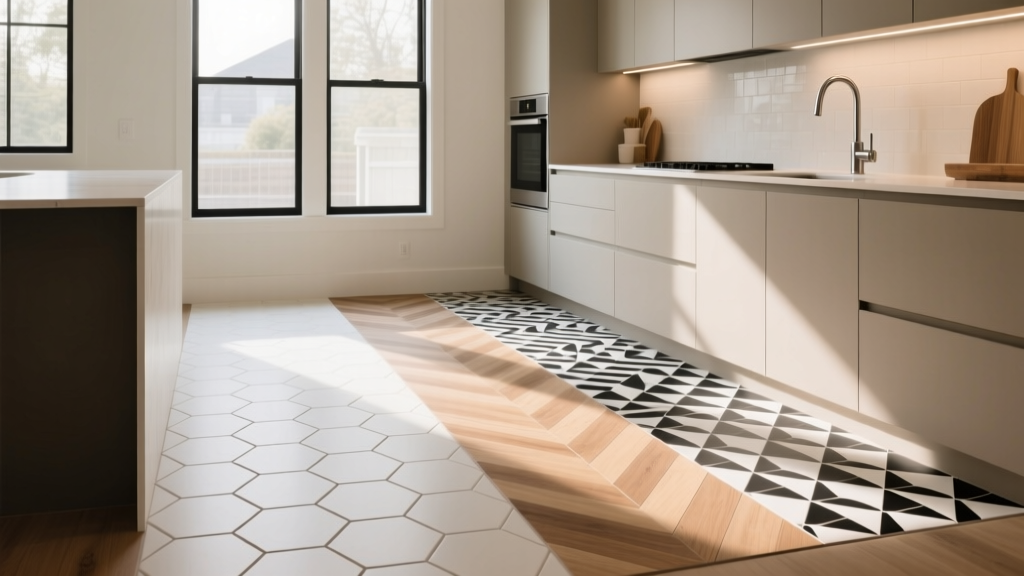
The right kitchen floor tile pattern does more than “look nice.” It influences how large the room feels, how clean the space looks day to day, and how well the floor hides crumbs, scuffs, and the inevitable splash by the sink. A smart pattern choice can even make an awkward kitchen layout feel more balanced and intentional.
For homeowners planning a kitchen renovation, tile pattern decisions often come late—after cabinets, countertops, and appliances. That’s a missed opportunity. Your floor is a major visual plane, and it’s also your hardest-working surface. Choosing a tile layout that supports your kitchen design, traffic flow, and maintenance habits will pay off for years.
This guide breaks down the most practical, beautiful kitchen floor tile patterns, how to choose the best one for your space, and what to avoid—so your kitchen renovation feels cohesive, functional, and timeless.
Start with Your Kitchen’s Layout, Size, and Sightlines
Before selecting a pattern, take a few measurements and observe how you move through the room. A tile pattern should reinforce the architecture and make the kitchen feel calm rather than busy.
Measure and map the “visual run”
- Room dimensions: Measure length and width of the main floor area (in inches for tile planning accuracy).
- Main sightline: Identify what you see first when entering—often the island or sink wall.
- Longest run: Note the longest uninterrupted line (e.g., from pantry to sliding door). Patterns that align with this run can make the space feel larger.
- Transitions: Note doorways to dining rooms, mudrooms, or hallways. Pattern continuity (or a clean break) matters here.
Practical size guidance (fast rules that work)
- Small kitchens (under ~150 sq ft): Larger-format tiles (12" x 24" or 24" x 24") with minimal grout lines often feel less busy. Simple patterns like straight lay or 1/3 offset are typically safest.
- Medium kitchens (150–250 sq ft): Most patterns work. Choose based on cabinet style, countertop movement (veining), and how much visual texture you want.
- Large kitchens (250+ sq ft): Patterns like herringbone, Versailles/French pattern, and checkerboard can look intentional rather than overwhelming—especially with quieter tile colors.
Choose a Tile Material That Matches the Pattern (and Your Lifestyle)
Some patterns demand tighter tolerances and flatter tiles. A pattern can fail visually if the material warps, chips at edges, or creates lippage (when tile edges sit at different heights).
Best materials for kitchen floor tile patterns
- Porcelain (recommended for most kitchens): Dense, water-resistant, durable, and available in convincing stone and wood looks. Great for high-traffic kitchen flooring and most patterns.
- Ceramic: Often more budget-friendly than porcelain, but typically less dense. Fine for many kitchens, but be cautious with heavy impacts (cast iron pans) and choose a good PEI rating.
- Natural stone (marble, limestone, slate, travertine): Beautiful and timeless, but needs sealing and more maintenance. Patterned installs (like Versailles) can be stunning, but plan for ongoing care.
- Cement encaustic-look tile: Trend-forward and character-rich. True cement tile is porous and stain-prone unless sealed carefully; many homeowners choose porcelain look-alikes for easier maintenance.
- Wood-look porcelain planks: Perfect for herringbone, chevron looks, or staggered plank patterns with superior water resistance compared to real wood in busy kitchens.
Slip resistance and finish
Kitchens need traction. Look for:
- Matte or textured finishes near sinks and prep zones.
- DCOF (Dynamic Coefficient of Friction) of 0.42+ for level interior areas when available on product specs.
- Avoid highly polished stone in active family kitchens unless you’re committed to careful upkeep.
Kitchen Floor Tile Patterns: What They Do Visually (and When to Use Them)
Tile layout is design strategy. Each pattern changes scale, rhythm, and the way your eye reads the room.
1) Straight lay (grid pattern)
Best for: Modern kitchens, minimalist design, large-format tile, and clean sightlines.
- Look: Crisp, structured, timeless.
- Tip: Align grout lines with major features (island edges, cabinet runs) if possible for a high-end finish.
- Works well with: Concrete-look porcelain, large neutral tiles, and slab-style cabinets.
2) Running bond / brick pattern (1/2 offset or 1/3 offset)
Best for: Transitional kitchens, hiding minor subfloor imperfections, adding gentle movement.
- Look: Familiar and forgiving.
- Important: For 12" x 24" tiles and larger, many manufacturers recommend 1/3 offset (not 1/2) to reduce lippage caused by tile warpage.
- Works well with: Stone-look porcelain, rectangular ceramic tiles, subway-scale floor tiles.
3) Herringbone
Best for: Creating a focal floor, adding movement in narrow kitchens, elevating basic materials.
- Look: Sophisticated, boutique-hotel energy—very popular in current kitchen design trends.
- Tip: Choose a larger plank (e.g., 4" x 16" or 6" x 24") for fewer grout lines and easier cleaning.
- Watch: Installation labor is higher, and layout precision matters around islands and doorways.
4) Chevron
Best for: High-impact design in contemporary kitchens, especially with wood-look porcelain.
- Look: Crisp, directional “V” pattern (more graphic than herringbone).
- Tip: Use chevron when you want an intentional statement; keep countertops and backsplashes calmer to avoid visual overload.
5) Diagonal (diamond) lay
Best for: Small or boxy kitchens that need visual expansion.
- Look: Dynamic; makes walls feel farther apart.
- Tip: Plan for more tile waste due to diagonal cuts—especially along the perimeter.
6) Checkerboard
Best for: Vintage, cottage, and modern-classic kitchens; a bold, timeless statement when done right.
- Look: Iconic and high-contrast (or soft and subtle in tonal variations).
- Trend meets timeless: Current updates include cream + warm gray instead of stark black and white.
- Tip: Use 12" x 12" or 18" x 18" squares for a cleaner look; smaller checks can read busy in open-plan kitchens.
7) Versailles / French pattern (modular stone layouts)
Best for: Large kitchens, Mediterranean or European-inspired renovations, homes with character.
- Look: Layered and architectural.
- Tip: Choose a porcelain French pattern for easier maintenance than porous limestone or travertine.
8) Mixed-size grid (modular contemporary)
Best for: Modern rustic kitchens, natural stone looks, and floors that need subtle movement.
- Look: More interesting than a simple grid, less busy than French pattern.
- Tip: Keep grout color close to tile color to avoid visual noise.
Pattern + Grout: The Detail That Makes or Breaks the Floor
Grout isn’t an afterthought. It’s part of the pattern.
Grout width recommendations
- Rectified porcelain tile: typically 1/16" to 1/8" grout lines for a sleek, modern look.
- Non-rectified ceramic or handmade-look tile: often 1/8" to 3/16" to accommodate size variation.
- Natural stone: commonly 1/8", depending on edge finish and flatness.
Grout color strategy
- Match grout to tile for a seamless, expansive feel (great for small kitchens).
- Contrast grout to emphasize pattern (best with simple layouts like straight lay or brick pattern).
- Kitchen reality check: Pure white grout shows stains. A light warm gray or greige often looks cleaner longer.
Grout type for kitchens
- High-performance cement grout: budget-friendly and durable; may need sealing depending on product.
- Epoxy grout: stain-resistant, great near sinks and ranges; higher material cost and more demanding installation.
Budget and Cost Ranges (Materials + Installation)
Kitchen renovation budgets vary widely, but pattern choice affects labor, waste, and prep requirements.
Typical cost ranges (USD)
- Ceramic tile: $1–$6 per sq ft (material only)
- Porcelain tile: $3–$12 per sq ft
- Natural stone: $6–$25+ per sq ft
- Installation (basic patterns): $6–$12 per sq ft
- Installation (herringbone/chevron/modular): $10–$20+ per sq ft
- Subfloor prep/leveling: $1–$5 per sq ft (varies by condition)
Plan for waste by pattern
- Straight lay: +5–10% tile overage
- Diagonal: +10–15%
- Herringbone/chevron: +10–20%
- French pattern/modular: +10–15% (and buy extra in case of future repairs)
Specific Design Recommendations That Work in Real Kitchens
If you have busy countertops or dramatic stone veining
- Choose a simple floor pattern (straight lay or 1/3 offset).
- Use large-format porcelain in a matte finish to reduce competing movement.
If your kitchen is narrow (galley kitchens)
- Run rectangular tiles lengthwise to elongate the space, or use herringbone for added width perception.
- Avoid tiny mosaics—too many grout lines can feel cluttered and are harder to keep spotless.
If you have an open-concept kitchen
- Keep the pattern calm and continuous so it doesn’t fight the living/dining areas.
- Consider wood-look porcelain planks laid in a staggered pattern for a seamless flow that still performs like tile.
If you want a high-end look on a midrange budget
- Choose a standard porcelain tile and upgrade the layout: herringbone or diagonal lay.
- Use rectified edges and a 1/8" grout line for a cleaner finish.
Maintenance Advice: Keep Your Pattern Looking Crisp
- Daily/weekly: Sweep or vacuum grit (it scratches grout and dulls finishes). Damp mop with a pH-neutral cleaner.
- Skip harsh chemicals: Avoid acidic cleaners on natural stone and cement tile; they can etch or discolor.
- Seal when needed: Natural stone and some cement-based grouts benefit from periodic sealing (follow product guidance).
- Protect high-splash zones: Use washable runners near the sink and dishwasher, especially with light grout.
Common Mistakes to Avoid
- Choosing pattern before confirming tile flatness and size consistency. Handmade-look tiles can be beautiful, but they may require wider grout lines and simpler patterns.
- Ignoring lippage risk with large rectangular tile. For many 12" x 24" tiles, a 1/3 offset is safer than 1/2 offset.
- Overcomplicating the floor in a visually busy kitchen. If cabinets have heavy grain and counters are dramatic, let the floor be quieter.
- Forgetting transitions. Plan how the pattern meets hardwood, carpet, or another tile. A clean threshold and aligned grout lines look intentional.
- Picking white grout in high-traffic family kitchens without a plan. Consider light gray grout or epoxy grout for stain resistance.
- Not ordering extra tile. Buy extra for future repairs—especially for patterned layouts or tiles that may be discontinued.
FAQ: Choosing the Best Kitchen Floor Tile Pattern
What tile pattern makes a small kitchen look bigger?
Large-format tile in a straight lay with minimal grout lines often makes a small kitchen feel bigger. A diagonal layout can also visually expand the room, but it increases cuts and waste.
Is herringbone too busy for a kitchen floor?
Not if the tile color is calm and the rest of the kitchen finishes are balanced. Herringbone looks best with simple cabinets and low-movement countertops. Choose a slightly larger plank size to reduce grout lines and visual noise.
Should kitchen floor tile run under cabinets?
In many renovations, tile is installed under appliances and sometimes under cabinets, depending on the project scope and cabinet layout. If you’re replacing cabinets soon, running tile wall-to-wall can simplify future changes. If cabinets are staying and you’re matching floor height, a pro can advise the best approach for your kitchen renovation.
What is the most timeless kitchen floor tile layout?
A straight lay grid or a 1/3 offset running bond in a neutral porcelain tile tends to age well across design trends. Pair it with a grout color close to the tile for a classic look.
How do I choose grout color for patterned tile floors?
If the pattern is the star (checkerboard, herringbone), use grout that blends with one of the dominant tile tones. For a subtle floor, matching grout makes the space feel larger and cleaner.
What pattern is best for wood-look porcelain in kitchens?
A random stagger (with the manufacturer-recommended offset) is the easiest and most realistic. For a statement floor, herringbone or chevron works beautifully—especially in open-concept kitchen design where you want the flooring to feel intentional.
Actionable Next Steps for Your Kitchen Renovation
- Photograph your kitchen from the entry and main walkway—these are the angles your pattern will be judged from every day.
- Pick 2–3 pattern options and sketch them over a simple floor plan (even a rough one).
- Get sample tiles and view them next to cabinets and countertops in your actual lighting.
- Confirm specifications (DCOF, rectified edges, recommended offset, grout width).
- Price out labor for your chosen layout—herringbone and chevron can change the total project cost significantly.
A kitchen floor tile pattern is where design meets daily life. Choose a layout that supports your space, makes cleanup manageable, and fits the style you want to live with long-term.
For more kitchen design ideas, renovation planning tips, and smart ways to elevate your home, explore the latest guides on thedecormag.com.
More Articles
 Safety-First Bedroom Inspiration: Essential Design Principles, Verified Products, and Measured Layouts
 Sleep FAQ Answered: Science-Backed Answers from a Kitchen Specialist and Culinary Consultant
 How to Choose Kitchen Counter Depth - The Decor Mag
 The Practical Kitchens Kitchen Design & Buying Guide: Space, Function, and Real-World Value
 Kitchen Cabinet Depth Standards (2026)
 Best Kitchen Flooring Options for Durability - The Decor Mag
 Minimalist Kitchen Design Essentials - The Decor Mag
 Kitchen Stainless Steel Appliance Guide - The Decor Mag
 Kitchen Fluted Detail Cabinet Trend - The Decor Mag
 Best Kitchen Tupperware Organization - The Decor Mag