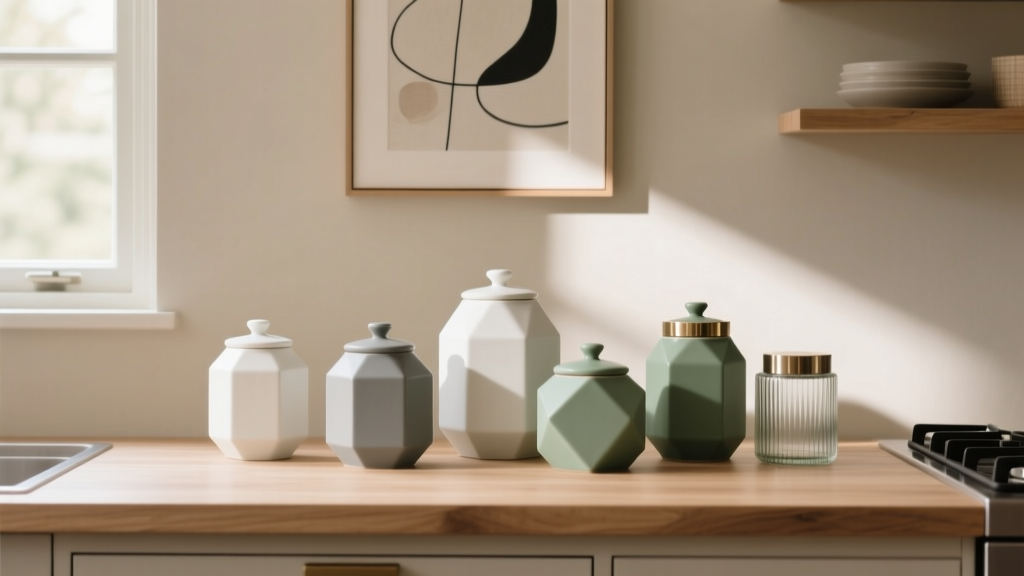
Best Kitchen Canister Set Displays - The Decor Mag
A kitchen canister set display is one of those small design moves that quietly does a lot of heavy lifting. It keeps everyday staples within reach, reduces visual clutter, and adds a styled, finished look to a countertop or open shelf. For homeowners renovating a kitchen—or simply trying to make their current space feel more functional—canisters are an easy win: they blend kitchen organization with decor in a way few accessories can.
Today’s best kitchen canister displays reflect two big priorities in modern kitchen design: streamlined surfaces and intentional styling. As kitchens continue to trend toward warm minimalism, natural materials, and thoughtful storage zones, canisters become part of a “working vignette”—beautiful enough to leave out, practical enough to use daily. The key is choosing the right materials, sizes, and placement so your display looks curated (not cluttered) and supports how you actually cook.
This guide covers canister materials, layout ideas, measurements that keep things proportional, budget ranges, and the most common mistakes homeowners make. You’ll leave with clear, renovation-friendly strategies for creating a canister display that feels custom—whether you have a compact galley kitchen or a large open-plan space.
What Makes a Great Canister Display? (Function First, Then Style)
The best kitchen canister set displays follow the same principles designers use for cabinetry and lighting: define a purpose, keep visual lines clean, and plan for everyday use.
Start with a “Kitchen Zone” Mindset
Before buying anything, decide what your canisters will do. Most homeowners get the best results by building a display around one of these zones:
- Baking zone: flour, sugar, brown sugar, baking powder/soda, chocolate chips
- Coffee/tea zone: coffee beans/grounds, tea bags, sugar, pods, stirrers
- Everyday cooking zone: rice, pasta, lentils, oats, snacks
- Pet zone (yes, it counts): treats, kibble toppers, scoops—kept tidy and sealed
Right-Size the Set (Most Kitchens Need 3–5 Canisters)
A common renovation mistake is overbuying canisters. Too many containers quickly reads as countertop clutter—especially in kitchens with standard 18-inch deep counters.
- Small kitchens: 2–3 canisters + a tray
- Average kitchens: 3–5 canisters (mix of heights)
- Large kitchens: 5–7 canisters, but consider relocating extras to pantry shelving
Practical Measurements That Keep Displays Clean
Use these sizing guidelines to avoid awkward proportions and poor clearance:
- Counter depth: Most counters are 24 inches deep; keep canisters within the front 10–12 inches so they don’t compete with appliances at the back.
- Height under upper cabinets: Typical clearance is 18 inches; choose canisters under 12–14 inches tall so you can easily lift lids and scoop.
- Tray sizing: A tray between 12–16 inches wide and 6–10 inches deep fits most canister groupings without swallowing the counter.
- Spacing: Leave 1–2 inches between canisters to prevent a “packed” look and allow easy grip.
Best Materials for Kitchen Canister Sets (With Real-World Pros & Cons)
Material choice affects more than aesthetics. It changes how well food stays fresh, how much maintenance you’ll do, and how a canister set works with your kitchen renovation style—whether you’re leaning modern, transitional, farmhouse, or Scandinavian.
Ceramic Canisters (Timeless and Trend-Ready)
- Best for: sugar, flour, coffee, tea; decorative countertop displays
- Look: classic, farmhouse, English pantry, warm minimalism
- Pros: opaque (hides visual clutter), substantial, often dishwasher-safe bodies
- Cons: can chip; some lids aren’t truly airtight
- Maintenance tip: Confirm the lid has a silicone gasket if you’re storing moisture-sensitive items (brown sugar, coffee).
Glass Canisters (Best for Pantry Organization and “Clean Kitchen” Styling)
- Best for: pasta, rice, grains, snacks; open shelving and pantry displays
- Look: modern, minimalist, Scandinavian, coastal
- Pros: you can see inventory at a glance; easy to wash; food-safe
- Cons: can look busy if contents don’t match; fingerprints show; breakable
- Maintenance tip: Use a microfiber cloth weekly for a crisp, renovation-showroom finish.
Stainless Steel Canisters (Sleek and Light-Blocking)
- Best for: coffee, tea, spices, items sensitive to light
- Look: contemporary, industrial, professional-style kitchens
- Pros: durable, hides mess, blocks light, often airtight
- Cons: can show smudges; may feel “cold” in warm, wood-heavy kitchens unless balanced with texture
- Maintenance tip: Wipe with a damp cloth, then buff dry to prevent streaks.
Bamboo or Wood-Lidded Canisters (Warm Minimalism and Organic Texture)
- Best for: countertop styling with a natural element; dry goods
- Look: Japandi, modern organic, transitional
- Pros: adds warmth; pairs beautifully with wood shelves and cutting boards
- Cons: wood lids need drying promptly; gasket quality varies
- Maintenance tip: Never soak wood lids; hand-wash and dry immediately to prevent warping.
Plastic/Acrylic Canisters (Budget-Friendly, Not Always Display-Worthy)
- Best for: inside cabinets and pantries; high-traffic family kitchens
- Pros: affordable, lightweight, often stackable
- Cons: scratches over time; may retain odors; less “high-end” for open displays
- Maintenance tip: Avoid abrasive sponges to reduce clouding and scratches.
Display Layout Ideas That Look Designed (Not Random)
1) The Tray Method (Most Renovation-Friendly Option)
Grouping canisters on a tray creates a defined “landing zone,” which instantly looks intentional and keeps crumbs contained.
- Best trays: wood, stone, stainless, or melamine for easy wipe-down
- Where it works: near the range, coffee station, or baking prep area
- Pro styling formula: 3 canisters + 1 accent piece (small plant, spoon rest, or salt cellar)
Size tip: For a standard counter, aim for a tray around 14" x 8". It fits three medium canisters without eating your prep space.
2) The “Stair-Step” Height Mix (Designer-Approved Proportion)
A set where all canisters are identical height often looks flat. Mix heights for a more dynamic, high-end feel:
- Suggested trio: 6–7" (small), 8–9" (medium), 10–12" (large)
- Placement: tallest at the back corner of the tray or vignette
3) Corner Counter Display (Smart Use of Underutilized Space)
Corner counters often become clutter magnets. A canister set can organize that area while keeping it attractive.
- Use a lazy Susan (10–12") for easy access
- Stick to 3–4 pieces to avoid a crowded corner
- Pair with one vertical element (a utensil crock or olive oil bottle)
4) Open Shelving Display (For Renovations with Floating Shelves)
Open shelves are a current kitchen design trend, but they require discipline. Canisters shine here because they create repetition and order.
- Choose matching canisters for a calm, cohesive line
- Keep shelf depth in mind: common depths are 10–12 inches; canisters should be under 8 inches in diameter to leave breathing room
- Limit to 1–2 rows; avoid stacking canisters behind each other
5) Coffee Bar Display (A High-Impact Upgrade Without Renovating)
A coffee station is one of the easiest “mini-renovations” you can do. Canisters organize supplies and make the area feel boutique.
- Include canisters for: coffee, sugar, tea, pods
- Add a small jar for stir sticks
- Choose materials that match your hardware finish (brushed brass, matte black, chrome)
Specific Recommendations: Styles, Finishes, and Product Features to Look For
Features Worth Paying For
- Airtight seal: Silicone gasket or clamp lid; keeps coffee and sugar fresher
- Wide mouth: Minimum 3.5–4 inches opening for easy scooping
- Flat, stable base: prevents wobble on trays and shelves
- Label-friendly surface: matte finishes or smooth glass for clean labeling
Design Approaches That Fit Today’s Trends
- Warm minimalism: matte ceramic + wood lids + neutral labels
- Modern farmhouse (updated): creamy ceramics, simple typography, avoid overly themed words
- Contemporary: stainless or smoked glass, minimal labels, clean-lined trays
- Modern organic: clear glass with bamboo lids, paired with stone trays and wood boards
Cost Ranges and Budget Considerations
Canister sets range widely depending on material, brand, and seal quality. Use these ranges to plan your kitchen renovation budget realistically.
- Budget ($20–$50): basic glass or plastic sets (often 3–5 pieces). Best for pantry storage or short-term upgrades.
- Mid-range ($50–$120): better gaskets, thicker glass, ceramic bodies, coordinated designs. Ideal for countertop displays.
- Premium ($120–$250+): designer ceramics, stainless sets with high-performance seals, or modular systems. Best for open shelving and showpiece kitchens.
Where to Spend vs. Save
- Spend on: airtight lids for coffee/brown sugar, durable ceramic if it will live on the counter, a quality tray (stone or sealed wood)
- Save on: overflow containers stored in the pantry; secondary sets for snacks
Maintenance and Food-Freshness Tips (That Keep Displays Looking New)
- Don’t store flour long-term on the counter if your kitchen runs warm. Keep a smaller “working” amount in the canister and refill from pantry storage.
- Wash and fully dry lids before reassembling, especially wood and bamboo.
- Use pantry labels thoughtfully: uniform labels elevate the look; include “opened” dates for items like coffee if you’re particular about freshness.
- Prevent clumping: add a brown sugar terra-cotta saver or keep sugar canisters away from the kettle/steam sources.
- Weekly reset: wipe tray and canisters, straighten labels, and discard crumbs. This keeps a “renovation-ready” appearance year-round.
Common Mistakes to Avoid
- Choosing canisters that are too tall for under-cabinet clearance. If you can’t comfortably lift the lid, you’ll stop using them.
- Buying mismatched whites (warm ivory vs. cool bright white) that clash with countertops and backsplash tile.
- Overfilling clear canisters with visually chaotic packaging or mixed-color snacks—open shelving will look messy fast.
- Ignoring the seal and ending up with stale coffee or rock-hard brown sugar.
- Letting the display sprawl across the counter. A defined tray or lazy Susan keeps it contained and intentional.
FAQ: Kitchen Canister Set Displays
How many canisters should be on the countertop?
For most kitchens, 3 to 5 canisters is the sweet spot. If you need more storage, keep overflow in a pantry or cabinet and treat the countertop set as your “daily-use” portion.
Are glass canisters better than ceramic?
Neither is universally better. Glass is excellent for inventory visibility and pantry organization, while ceramic hides visual clutter and often looks more decorative on countertops. For a clean, styled countertop, ceramic is often easier to keep looking calm.
What size canister is best for flour and sugar?
Look for a large canister around 2.5–4 quarts with a wide mouth (at least 4 inches) for easy scooping. Many homeowners prefer keeping a smaller working supply on the counter and refilling as needed.
Do I need airtight canisters for everything?
Airtight seals matter most for coffee, tea, brown sugar, and anything that goes stale quickly. For items you use fast (like crackers in a snack zone), an airtight seal is still helpful but less critical.
How do I style canisters without making the counter look cluttered?
Use a tray, stick to a tight color palette, and keep one supporting accent item max (such as a small plant or spoon rest). Choose varied heights and leave 1–2 inches between pieces.
Where should canisters go in a renovated kitchen layout?
Place them where they support a task: near the coffee machine, next to the range for cooking staples, or close to the main prep area for baking ingredients. Avoid placing them where they block appliance garages, outlets, or landing space.
Next Steps: Build a Display That Works Like Part of the Kitchen
Start by choosing your zone (coffee, baking, everyday cooking), then measure your available counter or shelf space—especially height under cabinets. Pick a material that fits your kitchen design style and your maintenance tolerance, then keep the display contained with a tray or lazy Susan. Finish with one consistent labeling approach and a weekly wipe-down routine to keep everything looking crisp.
For more practical kitchen renovation guidance, countertop styling ideas, and smart kitchen organization upgrades, explore more inspiration and expert tips on thedecormag.com.
More Articles
 Best Kitchen Mixing Bowl Storage - The Decor Mag
 Wood and Colors Compared: How Species, Finishes, and Pigments Shape Kitchen Design Decisions
 Kitchen Pot Filler Faucet Guide - The Decor Mag
 Kitchen Statement Range as Focal Point - The Decor Mag
 Best Kitchen Specialty Cooking Oil Storage - The Decor Mag
 Sustainable vs. Kitchen: Rethinking Design, Appliances, and Daily Habits for Real Environmental Impact
 Best Kitchen Stool and Bar Seating Picks - The Decor Mag
 Kitchen Fluted Wood Range Hood Cover - The Decor Mag
 Kitchen Textured Cabinet Door Trends - The Decor Mag
 Kitchen Waterfall Island Design Ideas - The Decor Mag