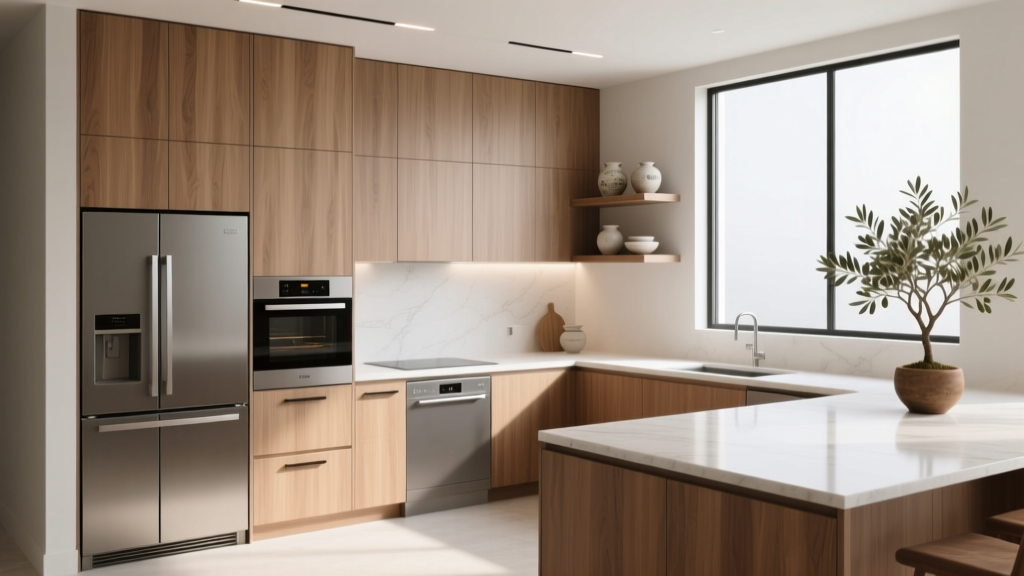
Kitchen Integrated Look Appliance Paneling - The Decor Mag
A kitchen can be beautifully renovated and still feel visually “busy” if stainless boxes, mismatched finishes, and bulky appliance fronts interrupt the cabinetry lines. Integrated look appliance paneling solves that problem by wrapping select appliances in cabinet-matching panels so the whole room reads as one cohesive design. The result is a calmer, more custom kitchen—often without changing your layout at all.
This approach matters now more than ever because current kitchen design trends lean toward warmer materials, fewer visual breaks, and furniture-like cabinetry. Homeowners are also prioritizing timeless functionality: easy cleaning, durable surfaces, and layouts that stay flexible as families grow. Appliance paneling can support all of that—when it’s planned correctly for clearances, ventilation, hardware, and service access.
Below is a practical guide to choosing the right appliances, panel materials, and design strategies to create a seamless integrated kitchen look—plus cost ranges, maintenance advice, and the common mistakes that derail projects.
What “Integrated Look” Appliance Paneling Really Means
In kitchen renovation language, “integrated” can refer to a few different levels of concealment. Knowing the vocabulary helps you shop and plan accurately.
Panel-ready vs. fully integrated appliances
- Panel-ready: The appliance is designed to accept a custom front panel and (usually) a matching handle. You still see a small reveal or control area depending on the model.
- Fully integrated: Controls are typically hidden on the top edge or inside, and the face is entirely covered by a cabinet-style panel for the most seamless look.
- “Appliance garage” or enclosure: Not true paneling, but a design method where small appliances (coffee machine, toaster) are hidden behind doors or tambour panels.
Best candidates for appliance paneling
- Dishwashers (the most common and usually the most affordable to panel)
- Refrigerators (especially column fridges/freezers or panel-ready French door models)
- Undercounter beverage fridges
- Trash/recycling pull-outs (cabinetry solution that contributes to an integrated look)
Ranges, ovens, and cooktops are typically left exposed as “feature appliances,” although some homeowners use cabinetry surrounds to soften their visual weight.
Why Homeowners Choose the Integrated Look
Design benefits
- Cleaner sightlines: Continuous cabinet fronts reduce visual noise, especially in open-concept homes.
- Elevated resale appeal: A cohesive kitchen reads as higher-end and more intentional.
- More freedom with finishes: If appliances are hidden, you can lean into wood cabinetry, painted finishes, or statement stone without competing metals.
Functional benefits
- Fewer fingerprints: Wood or matte-painted panels can show fewer smudges than stainless.
- Better organization cues: Integrated columns and tall pantry-style runs create “zones” that support efficient kitchen organization.
- Timelessness: Cabinet faces date more slowly than appliance finishes.
Planning the Layout: Where Paneling Makes the Biggest Impact
Integrated look appliance paneling works best when it supports a logical kitchen layout. Aim for a balanced mix of concealed and statement elements.
High-impact placement ideas
- Dishwasher next to the sink: Standard best practice; paneling keeps the cleanup zone cohesive.
- Fridge in a tall cabinet “bank”: Surrounding the refrigerator with pantry and oven towers creates a furniture-like wall.
- Island-facing appliances: If your dishwasher or beverage fridge faces the living area, paneling dramatically improves the view.
- Symmetry with columns: Pair a panel-ready fridge column with a matching freezer column for a premium integrated look.
Practical measurements to confirm early
- Panel thickness: Many panel-ready appliances are designed around 3/4 inch (19 mm) panels. Confirm the manufacturer’s spec.
- Toe-kick height: Common toe-kick heights range 3 1/2–4 1/2 inches. Appliance toe-kicks may need coordination with cabinetry.
- Door swing clearance: Plan at least 36 inches of walkway in front of major appliances; 42 inches is more comfortable for multi-cook kitchens.
- Fridge ventilation: Panel-ready refrigerators often require specific top/back ventilation gaps. Do not assume a “tight” fit is acceptable.
Material Recommendations: Panels, Edges, and Finishes That Last
Appliance panels need to handle heat, humidity, cleaning, and repeated handling. The best choice depends on your cabinet style, budget, and tolerance for maintenance.
Best panel materials (with comparisons)
- Painted MDF: Smooth and stable for painted shaker or slab doors. Cost-effective and consistent. More susceptible to edge damage if banged.
- Plywood with veneer: Great for woodgrain looks (oak, walnut). More durable edges than MDF when properly banded. Costs more than MDF.
- Solid wood frames: Ideal for traditional or inset cabinetry styles. Can move slightly with humidity; needs quality finishing.
- Thermofoil (RTF): Budget-friendly and wipeable, but can peel near heat sources if quality is low or installation is poor. Avoid near ovens.
- Laminate or high-pressure laminate (HPL): Excellent durability and low maintenance; modern colors and textures. Edge detailing must be done well to look premium.
Edge details that keep panels looking custom
- Matching edge banding on veneer panels to prevent chipping and moisture intrusion.
- 5-piece door construction (frame + center panel) to match surrounding cabinet doors in shaker kitchens.
- True slab panels for modern kitchens—pair with minimal reveals for a seamless run.
Finish trends that suit integrated kitchens
- Warm whites and greiges for timeless appeal.
- Natural oak and walnut for organic modern kitchens.
- Soft matte paints (lower sheen hides small scuffs and fingerprints).
- Mixed materials: wood tall units with painted base cabinets; integrated appliances help the mix feel intentional.
Appliance & Hardware Choices That Make or Break the Look
Dishwashers: the easiest integrated win
Fully integrated dishwashers hide the controls on the top edge of the door. For the cleanest look, match the panel to your base cabinet doors and use the same handle style.
- Tip: Choose a dishwasher rated 44 dBA or quieter for open-concept kitchens.
- Panel fit: Many models require a specific panel weight range—too heavy can strain hinges.
Refrigerators: choose your level of commitment
Panel-ready refrigeration tends to be the biggest visual payoff and the biggest cost driver.
- Panel-ready French door: More budget-friendly; still looks built-in with side panels and a cabinet above.
- Column refrigerator/freezer: Premium, highly integrated, often with superior storage organization.
Handles and pulls: consistent and comfortable
- Match the handle family across cabinets and integrated appliances for continuity.
- Plan grip clearance: A pull that’s too small can be frustrating on heavy fridge panels.
- Modern integrated option: Consider edge pulls or recessed pulls for slab cabinetry (confirm compatibility with appliance door thickness and swing).
Cost Ranges and Budget Considerations
Costs vary by region, cabinet brand, and appliance tier, but these ranges help homeowners plan a realistic renovation budget.
Typical added costs for integrated look appliance paneling
- Dishwasher panel: $150–$600 for the panel; $50–$250 for hardware (depending on handle). Installation may be included with appliance install or run $100–$300.
- Panel-ready refrigerator premium: Expect to pay $1,500–$6,000+ more than a standard freestanding fridge, depending on brand and size.
- Cabinet panels and fridge surround (side panels, top panel, fillers): $400–$2,500+ depending on material and complexity.
- Column fridge/freezer set: Often $10,000–$20,000+ for the appliances alone, plus panels and installation.
Smart ways to control costs
- Prioritize visibility: Panel the dishwasher and any island-facing appliances first.
- Use a “built-in look” kit: For some refrigerators, adding side panels and a cabinet above creates a near-integrated appearance without a true panel-ready model.
- Keep panel design simple: Slab or shaker panels in standard sizes reduce custom labor.
- Spend on hinges where needed: Heavy panels require robust hinges; cutting corners can cause sagging.
Design Approaches That Look Custom (Even in Everyday Kitchens)
Create a tall “appliance wall” zone
Grouping refrigeration, pantry storage, and ovens into one wall reduces visual clutter elsewhere and improves kitchen workflow. This is a favorite in modern kitchen renovation plans because it keeps the main prep run cleaner.
Blend paneling with open shelving carefully
If you love open shelves, integrated appliances help keep the kitchen from feeling too busy. Limit open shelving to one section and use it for frequently used items to support kitchen organization.
Balance integrated and statement finishes
- Integrated fridge + a statement range in a contrasting metal finish
- Integrated dishwasher + bold vent hood as the focal point
- Wood-paneled tall cabinets + light stone backsplash for brightness
Maintenance Advice: Keeping Panels Looking New
- Clean with gentle products: Use a damp microfiber cloth and mild soap. Avoid abrasive pads that can dull paint or scratch laminate.
- Watch water exposure: Wipe drips quickly, especially along the bottom edge of dishwasher panels and toe-kicks.
- Check alignment annually: Heavy-use doors can shift. A quick hinge adjustment keeps reveals even.
- Touch-up kit: Keep matching paint or stain for small nicks—especially on edges near handles.
Common Mistakes to Avoid
- Skipping the appliance spec sheet: Every panel-ready model has rules for panel thickness, weight, ventilation, and handle placement.
- Assuming all panels are interchangeable: A dishwasher panel is not the same as a fridge panel—hardware requirements and weights differ.
- Forgetting service access: Techs need room to pull appliances and access components. Tight “perfect” fits can turn into expensive removals.
- Misaligned reveals: Small gaps matter. Poor filler planning can make an integrated kitchen look awkward instead of seamless.
- Using the wrong material near heat: Low-quality thermofoil near ovens or heat vents can peel or warp.
- Over-paneling everything: A kitchen needs focal points. Sometimes a beautiful range or hood should remain visible for character.
Action Plan: How to Get the Integrated Look Right
- Identify the key sightlines: Stand at your kitchen entry and living area. Panel the appliances most visible from those angles.
- Choose your cabinet style first: Shaker, slab, inset, or beadboard—then match appliance panels to that exact door style.
- Select panel-ready appliances early: Confirm lead times and panel specs before cabinetry is ordered.
- Plan filler panels and clearances: Especially around fridges and dishwashers near walls so doors can open fully.
- Coordinate hardware: Decide on handle size and placement across the whole kitchen for comfort and consistency.
- Confirm installer experience: Integrated appliances require precise installation; choose a team familiar with panel-ready models.
FAQ: Kitchen Integrated Look Appliance Paneling
Is appliance paneling worth it for a mid-range kitchen renovation?
Yes—especially for the dishwasher and any appliance facing an island or living area. Paneling one or two key items often delivers most of the design impact without the cost of fully integrated refrigeration.
Can I add panels to my existing appliances?
Only if the appliance is designed as panel-ready or has an approved panel kit. Standard appliances usually can’t accept panels safely due to ventilation needs, door balance, and hinge design.
What panel thickness do I need?
Many integrated and panel-ready appliances are designed for 3/4 inch (19 mm) panels, but requirements vary. Always follow the manufacturer’s specifications for thickness and total panel weight.
Will a paneled refrigerator reduce storage space?
Some built-in and column refrigerators have slightly less interior volume than a large freestanding model, but often provide better organization (drawers, compartments, and consistent temperatures). If maximum cubic feet matters most, compare interior dimensions and shelving layout before committing.
Do integrated appliances make repairs harder?
They can if service clearances weren’t planned. With proper ventilation gaps, access panels, and correct installation, most panel-ready appliances are serviceable without major disruption.
How do I prevent my dishwasher panel from getting water damage?
Ensure the dishwasher is properly leveled, use the manufacturer-recommended moisture barrier if provided, and wipe drips quickly. Choosing a durable finish (HPL or quality paint/clear coat) and protecting bottom edges helps long-term.
Next Steps for a Seamless, Organized Kitchen
Start by deciding which appliances you want to visually minimize, then work outward: cabinet style, panel materials, hardware, and clearances. Bring appliance spec sheets to your cabinet designer, confirm panel thickness and weight requirements, and budget for the surround panels and fillers that make the installation look truly built-in.
For more practical kitchen renovation ideas, layout inspiration, and organization upgrades, explore the latest guides and home design features on thedecormag.com.
More Articles
 Sleep FAQ Answered: Science-Backed Answers from a Kitchen Specialist and Culinary Consultant
 Kitchen That Grows With Your Family (2026)
 Meal Prep Kitchen Design: Functional Ideas (2026)
 Kitchen That Inspires Cooking: Design Ideas (2026)
 Best Kitchen Specialty Cooking Oil Storage - The Decor Mag
 Kitchen Herringbone Backsplash Installation - The Decor Mag
 Kitchen Countertop Maintenance: Choose Your Level
 Kitchen Cabinet Finish Durability (2026)
 Kitchen Curved Architectural Details - The Decor Mag
 Kitchen to Outdoor Flow Design (2026)