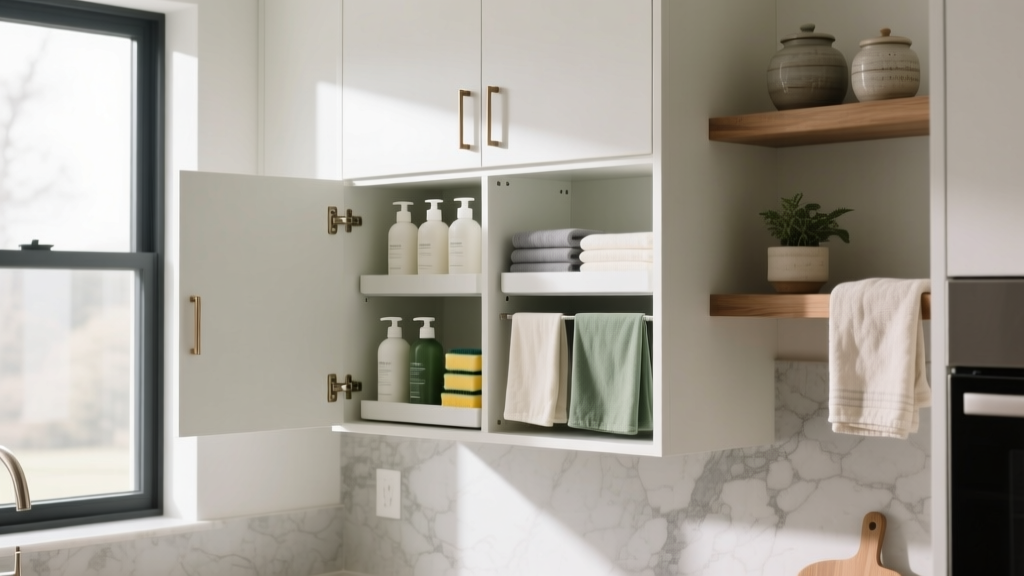
Best Kitchen Cleaning Supply Storage - The Decor Mag
A well-designed kitchen isn’t just about countertops and cabinet finishes—it’s also about the systems that keep everyday life running smoothly. Cleaning supplies are one of the most-used “hidden” categories in any kitchen, yet they’re often stored wherever there’s leftover space: under the sink, in a random base cabinet, or scattered between pantry shelves and laundry rooms. The result is clutter, wasted time, and a higher chance of leaks, odors, and damaged cabinetry.
The best kitchen cleaning supply storage is intentional. It protects your cabinets from moisture, keeps chemicals safely out of reach, and puts what you use most right where you need it. Whether you’re planning a full kitchen renovation or simply upgrading your kitchen organization, smart cleaning supply storage can make the space feel more premium—and more livable—without requiring a major footprint.
Below are practical, renovation-friendly approaches you can use to design a cleaner, safer, and more efficient kitchen. You’ll find layout recommendations, measurements, material comparisons, cost ranges, and common pitfalls to avoid—so your kitchen looks streamlined while working harder behind the scenes.
What “Best” Cleaning Supply Storage Really Means
Before choosing organizers or adding pull-outs, define the goal. Great kitchen storage balances daily convenience with long-term durability.
Key criteria for cleaning supply storage
- Accessibility: Frequently used items should be reachable without moving half the cabinet.
- Safety: Chemicals should be secured away from children and pets; sharp tools should be contained.
- Moisture resistance: Under-sink areas and wet items need water-tolerant materials and ventilation.
- Containment: Spills should be caught before they damage cabinet floors or seep into seams.
- Zone-based organization: Cleaning tools live close to where messes happen (sink, trash/recycling, prep areas).
The Best Places to Store Cleaning Supplies in a Kitchen
1) Under-sink cabinet (when designed correctly)
Under the sink is the natural home for dish soap, sprays, sponges, dishwasher pods, and trash bags—if it’s planned for plumbing and moisture.
Recommended dimensions:
- Base cabinet width: 30"–36" is ideal if you want room for pull-outs plus plumbing clearance.
- Usable height: Plan for at least 18"–22" clear height for most spray bottles.
- Pull-out clearance: Allow 2"–3" around the sink trap and shutoff valves so hardware doesn’t rub.
Best uses: Daily cleaners, sponges, scrubbers, dishwasher tabs, gloves, small trash bags.
2) A dedicated “utility” cabinet (the premium renovation move)
If you’re renovating, consider adding a slim utility cabinet near the sink or pantry. This is the most design-forward solution for kitchen organization because it keeps the messy category contained and can double as a broom closet.
Space planning guidelines:
- Ideal cabinet width: 18"–24" (wide enough for vertical storage and shallow shelves).
- Depth: 12"–15" works well for bottle storage without items disappearing in the back.
- Height: Full-height (84"–96") maximizes vertical space for mops and brooms.
Best uses: Taller bottles, refills, microfiber cloths, paper towels, broom/mop, dustpan, handheld vacuum.
3) Pantry integration (best for bulk and refills)
Pantries aren’t only for food. A smart pantry layout includes a non-food zone for backups and refills—especially in open-plan kitchens where you want counters clear.
Practical pantry measurements:
- Shelf depth: 10"–12" for cleaners; deeper shelves encourage clutter and lost items.
- Shelf spacing: 12"–14" between shelves accommodates most bottles and canisters.
- Dedicated bin width: 10"–14" bins keep categories tidy (glass, disinfecting, dishwasher, laundry).
Best uses: Bulk paper goods, refills, extra sponges, seasonal cleaners, appliance descalers.
Storage Solutions That Actually Work (And Look Built-In)
Pull-out under-sink organizers
Pull-outs are the difference between “stuffed cabinet” and functional storage. For kitchen renovation projects, specify pull-out trays designed for under-sink plumbing.
- Two-tier pull-out: Best for maximum capacity; choose adjustable top baskets to clear pipes.
- U-shaped pull-out: Wraps around plumbing for a cleaner look and better use of space.
- Slide-out shelf: Simple, budget-friendly way to avoid kneeling and digging.
Cost range: $40–$120 for DIY organizers; $150–$400+ for premium soft-close, heavy-duty pull-outs (plus installation).
Door-mounted caddies (great for small kitchens)
Cabinet doors are valuable real estate. Door-mounted storage is ideal for lightweight items and keeps the cabinet interior open.
Best door storage items:
- Sponges and scrub brushes (in ventilated holders)
- Microfiber cloths
- Trash bags
- Dishwasher pods (in a lidded container)
Tip: Avoid storing heavy glass bottles on doors; repeated slamming can loosen screws and warp hinges over time.
Cost range: $15–$60 for door racks and caddies.
Toe-kick drawers for small, flat cleaning items
Toe-kick drawers are a current kitchen design trend that also delivers timeless functionality. They’re perfect for items you don’t want on display.
Best uses: Cleaning cloths, extra sponges, dishwasher cleaner tablets, thin dusters.
Cost range: Typically $200–$600 per drawer (often easiest to add during a cabinet order).
Integrated trash/recycling + cleaning zone
Pairing pull-out trash/recycling with nearby cleaning storage creates an efficient cleanup workflow—especially in busy family kitchens.
- Place disinfecting wipes, spray, and gloves in a cabinet adjacent to the trash pull-out.
- Store compost bags and trash bags in a labeled bin on the same side.
- Keep a small “counter wipe kit” (cloth + spray) close to prep areas.
Cost range: $150–$500 for pull-out trash systems; more for custom cabinetry.
Best Materials for Cleaning Supply Storage (Moisture, Leaks, and Longevity)
Cabinet base protection
The under-sink zone takes the most abuse. Protect it with materials that handle water and chemicals.
- Molded plastic sink mats: Affordable and easy to remove for cleaning; good spill containment. ($15–$40)
- Stainless steel liners: Premium, durable, and hygienic; ideal for high-end renovations. ($150–$400)
- Waterproof shelf liner (PVC or EVA): Budget-friendly but less protective than a molded mat; replace as needed. ($10–$25)
Organizer material comparison
- Powder-coated steel: Durable, resists rust, looks more “built-in.” Best for pull-outs and baskets.
- High-quality plastic: Great for wet items and easy cleaning; choose thick, non-brittle bins.
- Bamboo/wood: Beautiful for dry storage, but not ideal under sinks unless well-sealed and kept dry.
Hardware to prioritize in a renovation
- Soft-close slides: Prevent slamming and reduce wear on door-mounted storage.
- Full-extension glides: Let you see everything—critical for safety and expiration control.
- Adjustable shelving: Allows storage to evolve as your cleaning routine changes.
Layout Planning: Where Storage Should Go for Real-Life Workflow
Create a “cleaning command center” near the sink
In most kitchens, the sink is where daily cleaning happens. The best kitchen layouts keep your everyday supplies within 3–5 feet of the sink.
What to store nearby:
- Dish soap, hand soap refills
- Dishwasher pods, rinse aid
- Sponge/brush system (ideally ventilated)
- Counter and stove cleaner
Separate daily use from bulk storage
One of the most effective organization principles is splitting supplies into two zones:
- Daily zone: Under sink or in a nearby base cabinet for immediate access.
- Bulk zone: Pantry shelf or utility cabinet for refills and backups.
This keeps the kitchen feeling tidy while preventing overstuffed cabinets.
Budget Considerations: What to Upgrade First
Smart cleaning storage can be done at almost any budget. Prioritize what fixes your biggest daily pain point.
Budget-friendly ($50–$200)
- Add a molded under-sink mat + labeled bins
- Install a basic slide-out shelf
- Use door-mounted caddies for cloths and bags
Mid-range ($200–$800)
- Upgrade to soft-close under-sink pull-outs
- Add a pull-out trash/recycling system
- Install better task lighting inside sink cabinet (battery or hardwired)
Renovation-level ($800–$2,500+)
- Add a dedicated utility cabinet with vertical tool storage
- Specify toe-kick drawers for hidden storage
- Choose upgraded cabinet interiors (water-resistant liners, premium slides)
Maintenance Tips to Keep the System Clean (Not Just Organized)
- Decant wisely: If you decant cleaners into matching bottles for a streamlined look, label clearly and keep original instructions somewhere accessible.
- Use leak-proof bins: Store liquids in trays or bins so a drip doesn’t ruin cabinet floors.
- Ventilate wet tools: Sponges and brushes should dry between uses. Ventilated holders reduce odor and mildew.
- Monthly wipe-down: Remove bins and wipe cabinet surfaces with a mild cleaner; check for leaks around shutoff valves.
- Replace rust-prone items: If you see rust on a basket or caddy, swap it—rust stains can transfer to cabinetry.
Common Mistakes to Avoid
- Overloading the under-sink cabinet: Packing it with bulk refills makes daily access harder and increases spill risk.
- Ignoring plumbing clearance: Buying standard pull-outs without measuring around the sink trap leads to wasted money and frustrating returns.
- Storing chemicals above food: Keep cleaning supplies separated from pantry food storage whenever possible.
- Using untreated wood under the sink: Wood organizers can warp or grow mildew in damp zones.
- No containment strategy: Without a mat or tray, even a small leak can swell cabinet bottoms—especially particleboard.
- Forgetting vertical storage: Brooms and mops end up leaning in corners unless you plan for a tall compartment or wall-mounted clips.
FAQ: Kitchen Cleaning Supply Storage
What’s the safest place to store cleaning supplies in a kitchen?
A locked or latch-secured base cabinet is best, especially for homes with children or pets. If you’re renovating, consider a dedicated utility cabinet with a child-safe latch and a bottom tray for spill containment.
How do I organize under the sink with lots of plumbing?
Use a U-shaped pull-out or a two-tier system with adjustable top baskets. Measure the widest plumbing point and choose an organizer that leaves 2"–3" clearance so drawers don’t hit pipes or valves.
Are pull-out organizers worth it for a kitchen renovation?
Yes—especially under the sink and near trash/recycling. Full-extension pull-outs reduce wasted space, make cleaning routines faster, and help prevent leaks from going unnoticed behind clutter.
What materials hold up best for wet areas like under the sink?
Powder-coated steel and high-quality plastic perform best. Add a molded plastic mat or stainless liner to protect the cabinet base, and avoid unsealed wood products in damp zones.
How much space should I plan for a utility cleaning cabinet?
If you can spare it, an 18"–24" wide full-height cabinet is a sweet spot. A 12"–15" depth with adjustable shelves keeps bottles visible and prevents overstuffing.
Should I store paper towels with cleaning supplies?
Paper towels work well in a dry utility cabinet or pantry zone. Avoid storing them directly under the sink where moisture and small leaks can damage the rolls.
Next Steps: Upgrade Your Kitchen Storage With a Plan
Start by listing what you use weekly, monthly, and in bulk. Measure your under-sink cabinet (width, depth, and the plumbing “no-go” zone), then choose one improvement that removes your biggest frustration—often a pull-out, a leak-catching mat, or a dedicated bin system. If a renovation is on the horizon, consider adding a slim utility cabinet near the sink to create a true cleaning command center that supports everyday life without sacrificing design.
For more kitchen renovation ideas, cabinet planning tips, and home organization inspiration, explore the latest guides and trends on thedecormag.com.
More Articles
 How to Choose the Right Kitchen Hood Vent - The Decor Mag
 10 Sustainable Kitchen Swaps for 2026
 Kitchen Warm Wood Cabinet Comeback - The Decor Mag
 Best Kitchen Prep Bowl Collection Display - The Decor Mag
 Kitchen Plaster Range Hood Organic Look - The Decor Mag
 Best Kitchen Cookware Organization: Cabinet Solutions (2026)
 How to Design a Kitchen for Multiple Cooks - The Decor Mag
 Kitchen Fluted Cabinet Door Trends - The Decor Mag
 Best Kitchen Spice Organization Solutions - The Decor Mag
 The Ultimate Sustainable Kitchen Guide: Practical, Proven, and Planet-Positive Actions