Best Kitchen Compost Bin Options - The Decor Mag
A well-designed kitchen isn’t just about beautiful cabinetry and the perfect backsplash—it’s about how smoothly your daily routines flow. Composting is one of those habits that can dramatically cut down on kitchen trash, reduce odors, and make meal prep feel cleaner and more organized. The catch: if the compost bin is awkward, smelly, or hard to access, it won’t get used.
The best kitchen compost bin options balance three things homeowners care about during kitchen renovations: function (easy to use while cooking), hygiene (odor and pest control), and design (a bin that fits your layout and aesthetic). Whether you’re planning a full remodel or simply upgrading your kitchen organization, choosing the right compost setup can be a small change that makes the whole space work better.
What Makes a Compost Bin “Best” for a Kitchen?
Kitchen composting succeeds when it’s frictionless. Before picking a product, map your real-life routine: where you prep, where scraps land, and how often you empty the bin.
Key criteria to compare
- Odor control: tight-fitting lid, optional carbon filter, smooth interior for easy cleaning.
- Capacity: matched to household size and how often you take scraps outside.
- Footprint: countertop, under-sink, pull-out drawer, or wall-mount.
- Ease of cleaning: seamless corners, dishwasher-safe parts, and stain-resistant material.
- Pest resistance: secure lid and no exposed gaps (especially important in warm climates).
- Compatibility with compost systems: backyard pile, curbside organics, Bokashi, or worm bin.
Right-size your bin: practical capacity guidelines
- 1–2 people: 1–1.5 gallons (3.8–5.7 L)
- 3–4 people: 1.5–2.5 gallons (5.7–9.5 L)
- Busy cooks / lots of produce: 2.5–3+ gallons (9.5–11.3+ L) or a dual-bin strategy
Pro layout tip: Place the bin within one step of your primary prep zone (typically between sink and cooktop). If you’re renovating, plan compost like you plan trash—early in the design process.
Best Kitchen Compost Bin Types (and Where They Work Best)
1) Countertop compost bins: the most convenient everyday option
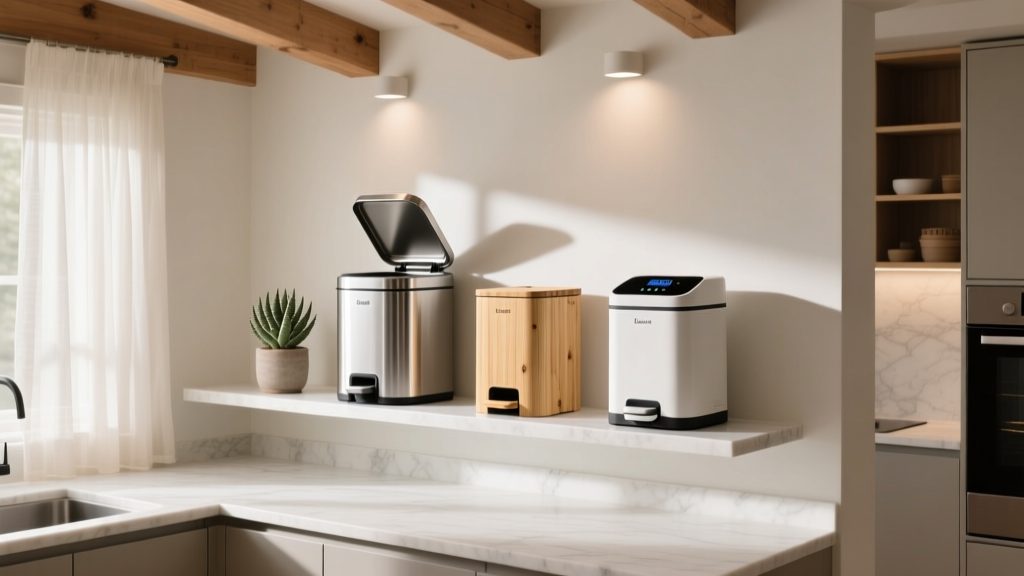
Countertop compost bins are ideal for homeowners who want quick access during prep. Today’s trend leans toward streamlined silhouettes and muted finishes (matte white, charcoal, brushed stainless) that blend with modern kitchen design.
Best for: frequent cooking, small kitchens without pull-out space, renters, or anyone testing composting.
Recommended measurements:
- Typical footprint: 7–9 in. diameter (18–23 cm) or 7 x 9 in. (18 x 23 cm)
- Common height: 9–12 in. (23–30 cm)
- Capacity sweet spot: 1.3–1.6 gallons (5–6 L)
Design approach: Create a “quiet zone” on the counter—tuck the bin near the sink or at the end of an island so it isn’t visually centered. Pair it with a matching soap dispenser or utensil crock to make it feel intentional.
Cost range: $15–$60, depending on material and filter system.
2) Under-sink compost bins: hidden and tidy for minimalist kitchens
If you prefer a clear countertop (a continuing trend in both modern and transitional kitchen renovations), an under-sink compost bin keeps the visual clutter away. This setup can also reduce odors in open-plan kitchens when paired with a tight-sealing container.
Best for: homeowners who want a clean look and have sufficient cabinet space.
Recommended clearances and measurements:
- Allow at least: 10–12 in. (25–30 cm) width for a small bin, 12–15 in. (30–38 cm) for a larger bin.
- Door swing consideration: ensure you can open the cabinet fully while holding a cutting board or bowl of scraps.
- Water lines/trap: measure around plumbing; consider a compact rectangular bin that fits behind or beside pipes.
Cost range: $20–$80 for the bin; add $30–$150 if you install an under-sink pull-out kit.
3) Pull-out compost bins (in a drawer or slide-out frame): the renovation-friendly “best” overall
For kitchen remodels, the most functional choice is often a pull-out compost bin integrated next to trash and recycling. This follows timeless kitchen design principles: store what you use where you use it, minimize steps, and keep work zones clear.
Best for: full or partial renovations, busy families, and homeowners who want a long-term organization upgrade.
Layout recommendations:
- Place near the sink/prep area: most scraps happen where you rinse and chop.
- Choose a 2- or 3-bin system: compost + trash + recycling in one pull-out zone reduces decision fatigue.
- Common cabinet widths: 12 in. (compact), 15 in. (balanced), 18 in. (ideal for multi-bin setups).
Cost range: $80–$250 for quality pull-out frames and bins; $150–$500+ if bundled with premium soft-close hardware and multi-compartment systems.
4) Wall-mounted or cabinet-door-mounted bins: small-space problem solvers
Wall-mount or door-mount compost bins are especially helpful in narrow kitchens where every inch counts. They can sit inside a cabinet door or on a pantry wall near prep.
Best for: compact kitchen layouts, apartment kitchens, and homeowners who want quick access without using counter space.
Practical placement tips:
- Mount height: 36–44 in. (91–112 cm) from the floor is comfortable for most adults.
- Avoid heat sources: keep away from ovens and direct sun to reduce odors and speed of decomposition.
- Check door hinges: ensure the added weight won’t strain hardware; consider upgrading to sturdier hinges if needed.
Cost range: $20–$70, plus optional mounting hardware.
5) Electric countertop composters: a premium option for odor control and fast volume reduction
Electric composters (often called food recyclers) dry and grind scraps to reduce volume and odor. They don’t create finished garden compost instantly, but they can produce a dry output that’s easier to store, freeze, or add to soil depending on the manufacturer’s guidance.
Best for: homeowners who want maximum odor control, have limited outdoor access, or produce lots of scraps.
Space and planning considerations:
- Counter space: plan for an appliance footprint similar to a bread maker (often 12–15 in. wide).
- Ventilation: keep some breathing room around the unit; follow manufacturer clearances.
- Noise: consider placing it away from open living areas in open-concept kitchen design.
Cost range: $250–$600+, plus ongoing carbon filter costs (often $20–$60 per replacement cycle).
Material Comparison: Stainless Steel vs. Ceramic vs. Plastic (and More)
Material affects odor, durability, aesthetics, and cleaning—key concerns in any kitchen renovation and organization plan.
Stainless steel
- Pros: durable, modern look, good odor barrier, resists staining.
- Cons: can show fingerprints; dents possible.
- Best for: contemporary kitchens, high-use households.
Ceramic
- Pros: attractive, heavy (stable), often blends with timeless kitchen decor.
- Cons: can chip; lid fit varies by brand; heavier to carry when full.
- Best for: farmhouse, cottage, transitional kitchens where decor matters.
High-quality plastic (BPA-free)
- Pros: lightweight, budget-friendly, often dishwasher-safe, good for under-sink bins.
- Cons: may stain or absorb odors over time; quality varies widely.
- Best for: concealed compost setups, starter budgets.
Silicone (collapsible bins)
- Pros: compact storage, lightweight, easy to rinse.
- Cons: can flex while carrying; odor control depends on lid design.
- Best for: tiny kitchens, RVs, or as a secondary scrap bin.
Recommended Compost Bin Features Worth Paying For
Not every upgrade is necessary, but a few features make composting dramatically easier—especially in a newly renovated kitchen where you want systems to feel seamless.
- Tight, secure lid: reduces fruit flies and keeps the kitchen smelling fresh.
- Replaceable carbon filter: helpful for countertop bins in open-plan homes.
- Smooth, rounded interior corners: faster cleaning; fewer gunk traps.
- Easy-grip handle: essential if you carry scraps outdoors daily.
- Compostable liner compatibility: choose a bin that fits standard liner sizes (often 3–6 gallon bags for larger bins; smaller countertop liners vary).
- Soft-close pull-out hardware: a quieter, premium feel during a kitchen remodel.
Budget and Cost Ranges: What to Expect
Kitchen upgrades add up quickly, so composting should be planned like any other renovation detail. Here’s a realistic budgeting snapshot.
- Budget pick (starter countertop or plastic under-sink): $15–$30
- Mid-range (stainless/ceramic countertop with filter): $30–$70
- Renovation upgrade (pull-out kit + multi-bin system): $120–$300
- Premium (electric composter + filters): $250–$600+ (plus ongoing filter costs)
Where to invest during a kitchen renovation: If you’re already ordering cabinetry, an integrated pull-out waste station (trash/recycling/compost) usually delivers the best long-term organization and the cleanest look.
Placement and Layout Tips for Renovations
Compost placement is a kitchen workflow decision, not just a product choice. Use these guidelines to align with classic work-triangle principles and today’s zone-based kitchen design trends.
- Keep compost near the prep sink: Most scraps are created where you wash and chop.
- Plan for one-handed use: lids that flip or lift easily matter when you’re holding peels or eggshells.
- Consider a two-step system: a small scrap bin near prep, emptied into a larger sealed bin in the garage or outside.
- Pair with an appliance garage or concealed zone: if you love clear counters, hide the bin under-sink or in a pull-out.
- Mind clearances: ensure the pull-out fully extends without hitting a dishwasher door or blocking a walkway.
Maintenance: How to Keep a Kitchen Compost Bin Clean and Odor-Free
Even the best compost bin needs simple habits to stay fresh. These maintenance steps are quick and keep your kitchen organization on track.
- Empty frequency: every 1–3 days for countertop bins; 2–5 days for sealed larger bins (depending on climate).
- Rinse routine: quick rinse after emptying; deep clean weekly.
- Cleaning solution: warm water + dish soap; for lingering odors, use a baking soda paste or a 1:1 vinegar-water spray.
- Dry before relining: moisture accelerates odor—air dry or towel dry the bin.
- Freeze smell-prone scraps: meat scraps (if allowed), fish skin, and shrimp shells can be frozen until drop-off day.
Tip for fruit flies: keep the lid closed, rinse sticky fruit scraps, and avoid leaving compost exposed overnight—especially in summer.
Common Mistakes to Avoid
- Choosing a bin that’s too big for your routine: a huge bin that sits too long creates odor; match size to how often you empty.
- Placing compost too far from prep: if it’s across the kitchen, scraps end up in the trash.
- Ignoring cabinet measurements: under-sink plumbing and door hinges can make a “perfect” bin unusable—measure first.
- Buying porous or hard-to-clean interiors: textured surfaces trap residue; smooth interiors are easier to maintain.
- Relying on filters alone: filters help, but emptying and cleaning frequency matter more.
- Skipping ventilation planning for electric units: crowded placement can shorten appliance life and increase odor.
FAQ: Kitchen Compost Bin Options
What size kitchen compost bin do I need?
For most households, a 1.3–1.6 gallon (5–6 L) countertop bin works well if you empty it every 1–3 days. Families or frequent cooks often prefer a 2–3 gallon (7.5–11 L) under-sink or pull-out bin, or a small countertop bin plus a larger secondary container.
Are charcoal filters necessary for a countertop compost bin?
Not always, but they’re helpful in open-concept kitchen layouts. If you empty frequently and keep the bin clean and dry, you can manage odor without a filter. If you cook daily or compost sits longer than 48 hours, a carbon filter is a smart upgrade.
Where should compost go in a kitchen renovation layout?
The most functional placement is near the primary prep sink in a pull-out waste station (compost/trash/recycling). This keeps kitchen workflow efficient and supports a clean countertop trend.
Do compostable liners help or hurt?
Liners can make cleanup easier, but they’re not required. If your city offers curbside organics pickup, check guidelines—some programs accept certified compostable liners, others don’t. If liners trap moisture or leak, they can increase odor, so choose the right size and empty regularly.
How do I prevent fruit flies in my compost bin?
Use a tight lid, empty often, rinse very sweet or sticky scraps, and keep the bin dry. In warm months, consider freezing fruit scraps until compost day or using a bin with a carbon filter.
Is an electric composter worth it?
It can be, especially if odor control is your top concern or you have limited access to outdoor composting. Expect a higher upfront cost and ongoing filter replacements. For many homeowners, a well-placed pull-out compost bin is the best value in a kitchen renovation.
Next Steps: Choose the Bin That Fits Your Kitchen and Your Habits
Start by measuring your available space (counter, under-sink, or cabinet width), then match capacity to how often you can realistically empty scraps. If you’re planning a kitchen remodel, consider a pull-out compost solution integrated with trash and recycling—one of the most practical kitchen organization upgrades you can build into cabinetry.
Looking for more renovation-friendly storage ideas, layout planning tips, and timeless kitchen design inspiration? Explore more kitchen guides and home decor updates on thedecormag.com.
More Articles
 Kitchen Butcher Block Countertop Care - The Decor Mag
 Kitchen Countertop Edge Profiles: Best Choices (2026)
 Kitchen Brass Hardware Renaissance - The Decor Mag
 Kitchen Fluted Detail Cabinet Trend - The Decor Mag
 Kitchen Cabinet Depth Standards (2026)
 Kitchen Terrazzo Floor Tile Guide - The Decor Mag
 How to Design a Kitchen with a Scullery - The Decor Mag
 Best Kitchen Drawer Organization Systems - The Decor Mag
 Kitchen Countertop Maintenance: Choose Your Level
 Best Kitchen Specialty Cooking Oil Storage - The Decor Mag