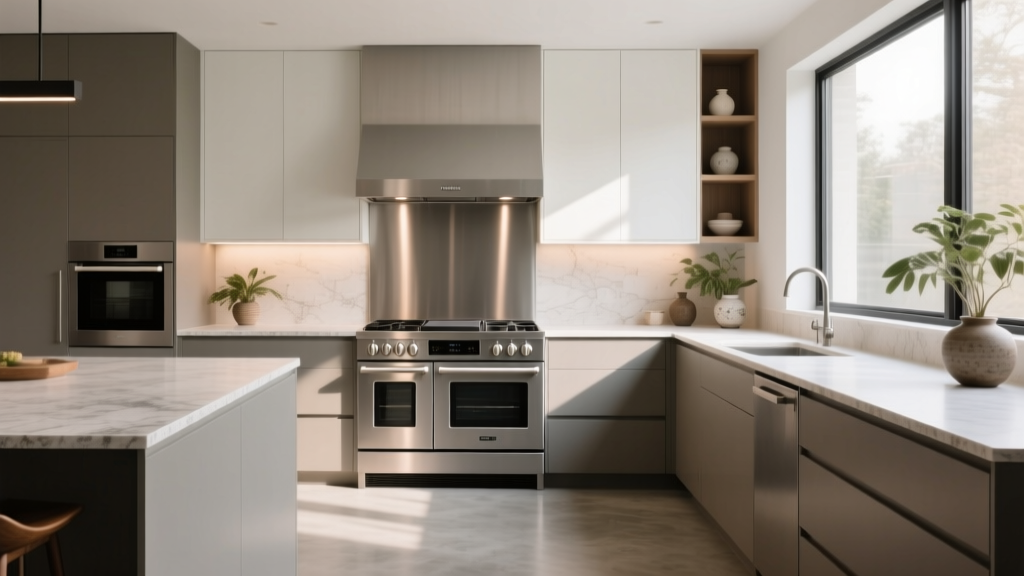
Kitchen Statement Range as Focal Point - The Decor Mag
A kitchen renovation can quickly become a sea of decisions—cabinet styles, countertops, lighting, appliances, and storage solutions. Choosing one strong focal point helps everything else fall into place, and few features anchor a kitchen like a statement range. Whether it’s a classic French-style range in a saturated color or a sleek induction model framed by custom cabinetry, the range naturally draws the eye because it signals where cooking—and gathering—happens.
Making the range the focal point isn’t only about aesthetics. It can improve layout logic, simplify material choices, and create a more functional cooking zone. When planned well, the surrounding elements—vent hood, backsplash, pot filler, lighting, and storage—work together to support real-life use while delivering the “wow” moment homeowners want from a kitchen upgrade.
This guide breaks down how to choose a statement range, design the space around it, and avoid common renovation pitfalls—along with budget ranges, practical measurements, and maintenance tips to keep your focal point looking sharp for years.
What Makes a Range a “Statement” Piece?
A statement range stands out visually and performs exceptionally well for your cooking style. In today’s kitchen design trends, that often means one (or several) of the following:
- Color: Deep navy, forest green, matte black, or creamy off-white enamel.
- Scale: Wider 36", 42", or 48" professional-style ranges that feel substantial.
- Material presence: Chunky metal knobs, brass accents, stainless trim, or sculptural handles.
- Distinctive styling: A refined “European” look, vintage-inspired doors, or minimalist slab fronts.
- High-performance configuration: Mixed-fuel (gas cooktop + electric ovens), powerful burners, griddle, or induction zones.
The best statement ranges don’t fight the kitchen’s function. They become the centerpiece because they’re used, not just admired.
Planning the Layout: Put Function First, Then Frame the Focal Point
Choose the Right Location
Most kitchens place the range on a main wall, centered between base cabinets. Other options include a range on an island (more complex ventilation) or on a feature wall with a dramatic backsplash.
For strong day-to-day usability, prioritize:
- Landing space: Aim for 15–18 inches of countertop on at least one side of the range (both sides is ideal).
- Safe circulation: Keep major traffic paths from cutting directly behind the cook. If your layout forces it, add a wider aisle.
- Prep adjacency: Put the range near your primary prep surface and within comfortable reach of utensils, oils, spices, and pans.
Clearances and Measurements That Matter
Before falling in love with a model, confirm dimensions and required clearances. Common planning guidelines:
- Aisle width: 42 inches for one cook; 48 inches for multiple cooks or heavy traffic.
- Hood width: Ideally as wide as the range or up to 3 inches wider (e.g., 39" hood for a 36" range).
- Hood mounting height: Often 24–30 inches above the cooking surface (follow manufacturer specs).
- Combustible clearances: Vary by model; confirm with the installation guide, especially near upper cabinets.
- Gas line / electrical: Gas ranges still require electricity for ignition; induction and electric ranges may require a 240V circuit.
Range as a Focal Point in Popular Kitchen Layouts
- Galley kitchens: Center the range on one run and use a bold backsplash to create a “feature corridor.” Keep upper cabinetry simple.
- L-shaped kitchens: Place the range on the longer leg for visual balance; frame it with symmetrical drawers and a statement hood.
- U-shaped kitchens: The range works well on the middle run; ensure adequate landing space and avoid crowding with corner cabinets.
- Open-concept kitchens: A statement range + hood becomes the anchor seen from living/dining areas—choose finishes that coordinate with nearby decor.
Choosing the Right Statement Range: Fuel, Size, and Features
Size: 30" vs. 36" vs. 48"
Size influences cost, cabinetry, ventilation, and everyday convenience.
- 30-inch range: Best for smaller kitchens and budget-conscious renovations. Still can be a statement through color, trim, or backsplash design.
- 36-inch range: A favorite in upscale renovations—more burners, more presence, often better spacing for larger pans.
- 48-inch range: True centerpiece. Often includes double ovens, griddle, or custom burner layouts. Requires more ventilation and planning.
Practical tip: If you rarely cook with more than 2–3 burners at once, a 30" or 36" range can feel luxurious without overpowering the room.
Fuel Options (and What They Mean for Daily Use)
- Gas: Loved for visible flame control and high heat. Requires good ventilation and may need additional make-up air depending on hood power and local code.
- Electric (radiant or smooth-top): Often budget-friendly; smooth-top is easy to wipe but can scratch and shows smudges.
- Induction: Fast, efficient, and sleek—very current in kitchen renovation trends. Great for clean design; requires magnetic cookware.
- Dual fuel: Gas cooktop + electric ovens for baking precision. Usually higher cost but popular for serious home cooks.
Features Worth Paying For
Not every premium feature is worth the splurge. These tend to deliver real value:
- High-quality oven performance: Convection, consistent temps, and strong insulation.
- Reliable simmer: Look for a low-burner setting that truly holds gentle heat.
- Easy-clean interiors: Porcelain enamel or advanced self-clean cycles (use as recommended).
- Sturdy grates and knobs: These affect daily feel more than you’d expect.
- Serviceability: Solid warranty and local service availability can matter more than an extra burner.
Designing the “Range Wall”: Hood, Backsplash, and Symmetry
Vent Hood: The Range’s Best Partner
A statement range deserves a hood that looks intentional and performs well. Current kitchen design trends lean toward:
- Plaster or microcement hoods for a warm, architectural look
- Wood-clad hoods (white oak, walnut) to soften modern kitchens
- Simple stainless canopy hoods for timeless function
- Integrated cabinetry hoods for minimalist kitchens
Performance tip: Don’t oversize the blower “just because.” Too much CFM can be noisy and may trigger make-up air requirements. Match hood power to your cooking habits and the range’s output.
Backsplash Materials: What Looks Great and Cleans Easily
The backsplash is where the focal point becomes truly memorable. Compare common options:
- Porcelain slab: High-end, minimal grout, heat-resistant. Great for bold veining or a seamless look. Higher material and fabrication cost.
- Ceramic tile: Versatile, budget-friendly. Glossy finishes wipe clean easily.
- Natural stone (marble): Gorgeous but porous—can etch and stain near a cooking zone. Best sealed and used thoughtfully.
- Quartz (as a backsplash): Low maintenance and cohesive with countertops, but confirm heat tolerance and avoid direct high-heat exposure.
- Stainless steel: Professional look, very practical behind high-output cooking, shows fingerprints but cleans fast.
Design guideline: For a focal wall, consider running the backsplash from countertop to hood (or even to the ceiling). It visually “frames” the range and looks custom.
Symmetry vs. Intentional Asymmetry
Symmetry reads as polished and is often the easiest route to a high-end look:
- Center the range
- Match drawer stacks on both sides
- Use identical sconces or pendants flanking the hood
Asymmetry can work beautifully in smaller kitchens or when windows/doors force it. If you go asymmetrical:
- Balance with visual weight (open shelves on one side, taller cabinet on the other)
- Use a continuous backsplash to unify the wall
- Keep the hood and range aligned to feel intentional
Materials and Finishes That Elevate the Statement
Range Finish Options (and How They Wear)
- Stainless steel: Timeless, durable, can show smudges; choose a brushed finish to reduce fingerprints.
- Matte black: Striking and modern; can show grease if not wiped regularly but hides some fingerprints.
- Enamel colors: True statement-maker. Generally durable but can chip if hit hard; clean with non-abrasive products.
- Mixed metals: Brass or bronze knobs add warmth; be ready to polish or embrace patina depending on finish.
Countertop Pairings That Don’t Compete
If the range is bold, let surrounding materials support it:
- Statement range + simple counters: White quartz, light granite, or honed quartzite for calm balance.
- Statement range + warm counters: Butcher block (sealed well) or walnut accents for a cozy, grounded feel.
- Statement range + bold counters: Choose one dominant pattern. If the range is colorful, keep counter veining subtle.
Storage and Organization Around the Range
The most beautiful focal point still needs to function like a hardworking cooking station. Plan storage so the range area stays uncluttered.
Best Cabinets and Inserts Near the Range
- Deep drawer stacks for pots, pans, and lids (more ergonomic than base cabinets)
- Spice pull-out (3"–9") for oils and seasonings, ideally on the non-heat side
- Tray divider cabinet for baking sheets and cutting boards
- Utensil organizers for daily tools (tongs, spatulas, thermometers)
Practical measurement: A common and efficient setup is two 24-inch drawer bases flanking a 36-inch range, depending on available wall length.
Cost Ranges and Budget Planning
A statement range can fit different budgets depending on size, fuel type, and design finish.
- Entry level (30"): $1,000–$3,000 (many reliable options; focus on styling with backsplash and hood).
- Mid-range statement (30"–36"): $3,000–$7,500 (better burners/ovens, more premium finishes, stronger brand support).
- Premium/pro style (36"–48"): $7,500–$20,000+ (custom colors, high output, specialty configurations).
Don’t forget the “focal wall” expenses that often rival the appliance cost:
- Vent hood + ducting: $800–$6,000+ (insert vs. custom plaster/wood hood varies widely)
- Backsplash: $15–$150+ per sq. ft. installed depending on tile vs. slab
- Electrical/gas/plumbing updates: $500–$5,000+ depending on relocation and code needs
- Cabinet modifications: $300–$3,000+ for filler panels, heat shields, custom surrounds, and trim
Budget strategy: If you want the statement look without the highest range price tag, invest in a strong hood design and a standout backsplash, then choose a dependable range in a classic finish.
Maintenance Advice: Keep the Focal Point Looking New
- Daily wipe-down: Use a damp microfiber cloth and mild dish soap on enamel and stainless.
- Avoid abrasives: Skip steel wool and harsh powders on painted/enamel finishes and glossy cooktops.
- Clean grates and burners regularly: Built-up grease dulls the look and affects performance.
- Backsplash care:
- Seal natural stone as recommended (often annually, depending on product and use).
- Use pH-neutral cleaners for stone to prevent etching.
- Choose stain-resistant grout or grout sealer for tile backsplashes.
- Hood filters: Clean monthly if you cook frequently; greasy filters reduce ventilation efficiency.
Common Mistakes to Avoid
- Undersizing or underpowering the hood: A gorgeous range wall won’t feel successful if odors and grease linger.
- Forgetting landing space: No room for a hot pan or ingredients creates daily frustration.
- Choosing style over service: Make sure parts and service technicians are available in your area.
- Ignoring finish coordination: Mixed metals can look intentional—if repeated elsewhere (faucet, lighting, hardware).
- Overly busy focal wall: Too many patterns (range color + bold counter + bold tile) competes. Pick one hero.
- Skipping code/planning checks: Venting, make-up air, and clearances can derail timelines and budgets if discovered late.
FAQ: Kitchen Statement Range as Focal Point
Does a statement range have to be large?
No. A 30-inch range can still be a focal point with the right hood, backsplash, lighting, and surrounding cabinetry details. Color and contrast often create more impact than width alone.
Is induction a good choice for a statement range?
Yes—induction is increasingly popular in modern kitchen renovations for its speed, efficiency, and sleek look. Pair it with a sculptural hood and a dramatic slab backsplash for a clean, high-end focal point.
What backsplash is easiest to maintain behind a range?
Porcelain slab, glossy ceramic tile, and stainless steel are among the easiest for cleaning. Natural stone can work but typically needs sealing and more careful cleaning to prevent staining or etching.
How do I make the range wall look custom on a budget?
Use a standard stainless range, then upgrade the focal elements around it:
- A well-proportioned hood (even a simple insert with a drywall/plaster surround)
- Full-height backsplash tile
- Matching drawer stacks and quality cabinet hardware
Should the hood be bigger than the range?
Often, yes—slightly. A hood that’s the same width as the range is common, but going up to 3 inches wider can improve capture, especially for gas cooking. Always follow manufacturer specs and local code.
What’s the biggest design “tell” that a range upgrade was an afterthought?
A mismatched or undersized hood, awkward filler panels, and cramped counter space beside the range. Planning the range wall as a complete composition makes the upgrade look intentional.
Next Steps: Build Your Range Wall Plan
Start by confirming your cooking needs (fuel type, burner layout, oven capacity), then measure your available wall length and aisle widths. Choose the range size that fits your kitchen layout, and design the focal wall as a set: range + hood + backsplash + lighting + storage. If you’re working with a contractor or kitchen designer, bring appliance spec sheets early so cabinetry, ventilation, and clearances are accurate from day one.
For more kitchen design ideas, renovation planning guides, and organization inspiration, explore the latest articles on thedecormag.com.
More Articles
 Kitchen Countertop Maintenance: Choose Your Level
 Cheap vs Premium Real: What the Label Doesn’t Tell You About Butter, Cheese, and Olive Oil
 Best Kitchen Counter Appliance Rotation - The Decor Mag
 Best Kitchen Baking Supply Organization - The Decor Mag
 Family Dining Tables: Durability Meets Design
 How To Match Nightstand With Lighting: A Practical, Design-Forward Guide
 Chef Kitchen Design: Transform Your Space (2026)
 Kitchen Hardware and Pull Trends - The Decor Mag
 How to Plan a Kitchen Renovation on a Budget - The Decor Mag
 Kitchen Subway Tile Alternatives - The Decor Mag