Best Kitchen Cutting Board Display | The Decor Mag
A cutting board collection can be one of the most hardworking—and best-looking—parts of a kitchen. Whether you love the warmth of walnut, the practicality of polypropylene, or the sculptural feel of marble, boards are often the tools you reach for multiple times a day. When they’re buried in a drawer, they add friction to cooking. When they’re displayed well, they become functional decor that supports a smoother workflow.
For homeowners planning a kitchen renovation or simply refining their kitchen organization, a cutting board display is a smart micro-upgrade with outsized impact. It can free up cabinet space, reduce countertop clutter, and introduce texture and character—especially in today’s trend-forward kitchens that lean into natural materials, open shelving, and curated countertop styling. The goal is a display that feels intentional, stays hygienic, and fits your layout.
What Makes a Cutting Board Display “Best”?
The best kitchen cutting board collection display balances four things: access, airflow, safety, and style. Before choosing a rack or shelf, take inventory of your boards and how you cook.
Quick self-check: boards + habits
- How many boards do you use weekly? Most households function well with 3–6 boards in rotation.
- Sizes you own: common sizes include 8x10 inches (small), 12x18 inches (everyday), and 18x24 inches (prep/serving).
- Materials: wood (maple, walnut, teak), bamboo, plastic, composite, glass/marble.
- Do you hand-wash or use the dishwasher? This affects placement and drying needs.
- Do you entertain? Serving boards may deserve a more decorative spot than daily prep boards.
Core principles for a display that works
- Airflow prevents odors and warping. Boards should dry fully, especially wood.
- Vertical storage protects edges. Stacking boards flat can trap moisture and dull surfaces.
- Clearance matters. Your display should allow easy grab-and-return without scraping cabinets or backsplashes.
- Separation improves food safety. If you keep both raw-protein and produce boards, display them in distinct slots or zones.
Display Layout Ideas (and Where They Work Best)
These display approaches align with modern kitchen design trends—think layered neutrals, warm woods, and organized “zones”—while staying timeless and practical.
1) Countertop vertical rack (best for everyday cooks)
A countertop rack keeps boards within arm’s reach of your prep area. Look for a rack with non-slip feet and wide slots so boards can dry.
Recommended measurements:
- Allow 12–16 inches of countertop length for a rack holding 4–6 boards.
- Minimum 3/4 inch slot width for thick butcher blocks; 1/2 inch is fine for thinner boards.
- Keep at least 4 inches away from a high-splash zone (directly beside the sink) unless you’re diligent about drying.
Best placement: between sink and cooktop (prep zone), or near the fridge if that’s where you do most chopping.
Cost range: $15–$80 depending on material and design.
2) “Backsplash lean” styling (best for minimalist kitchens)
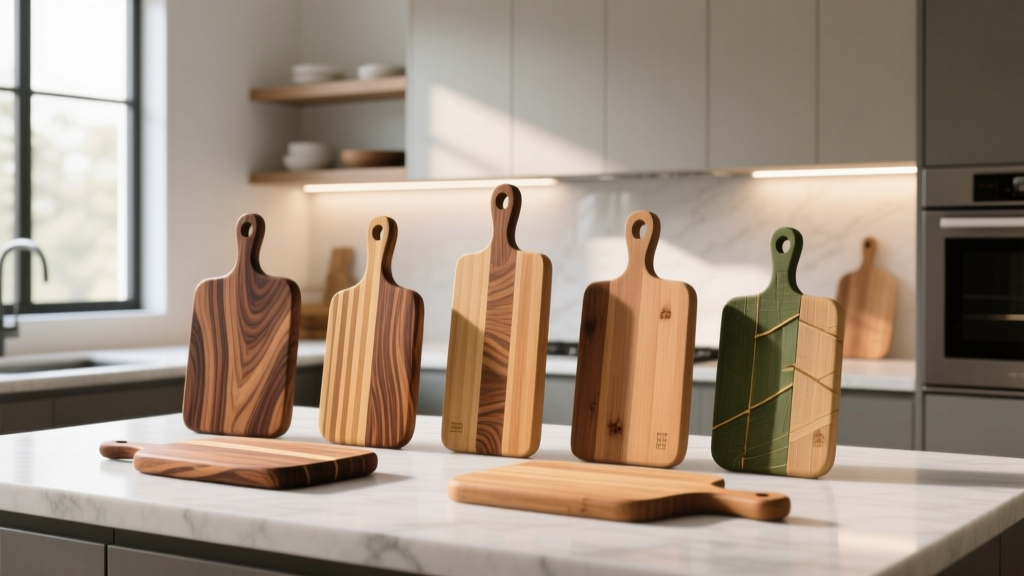
Leaning a few beautiful boards against the backsplash is a popular kitchen decor move, especially in contemporary and Scandinavian-inspired renovations. It works best when it’s curated, not crowded.
- Limit to 2–4 boards for a clean look.
- Choose boards with contrast: e.g., one light maple, one dark walnut, one round board.
- Use a low-profile silicone bumper or felt dots on the back to protect tile and reduce slipping.
Maintenance tip: Rotate boards weekly so one doesn’t trap moisture behind it.
Cost range: $0–$15 for bumpers; boards vary widely (see material section).
3) Open shelving display (best for reno-ready kitchens)
If you’re renovating and considering open shelving, boards are among the best items to display because they’re sculptural and practical. This approach pairs beautifully with trending materials like zellige tile, plaster-look walls, and warm white paint.
Shelf sizing guidelines:
- Depth: 10–12 inches is ideal for boards without feeling bulky.
- Height clearance: 14–16 inches between shelves allows you to stand boards upright in a holder or lean them safely.
- Weight: thick butcher blocks can be heavy; anchor shelves into studs or use heavy-duty brackets.
Cost range: $80–$400+ for shelves and hardware (more if custom cabinetry is involved).
4) Inside-cabinet vertical dividers (best for clean countertops)
For homeowners who want a clutter-free kitchen design, cabinet dividers keep boards organized but out of sight. This is a strong choice for smaller kitchens or anyone who prefers a calm, minimalist countertop.
Design approach options:
- Base cabinet dividers: install in a 12-inch or 18-inch cabinet near the prep zone.
- Tray divider cabinet: a tall, narrow cabinet (often 9–12 inches wide) can hold boards, sheet pans, and trays together.
Cost range: $20–$60 for retrofit dividers; $200–$600+ if adding a dedicated tray divider cabinet during a renovation.
5) Drawer-in-drawer or deep drawer organizer (best for families)
Deep drawers are a current kitchen renovation favorite for good reason: they offer ergonomic access and great organization. Boards can be stored vertically in a drawer with dividers, or flat with separators that allow airflow.
Recommended measurements:
- Drawer depth: 21–24 inches fits most standard boards.
- Drawer height: 8–10 inches works for vertical storage with rails or pegs.
Cost range: $30–$150 for drawer organizing systems; $500–$2,000+ for new drawer base cabinets depending on brand and finish.
Material Recommendations: What to Display and What to Store
Choosing the right materials is part kitchen design, part performance. A well-curated collection often includes a mix for hygiene, durability, and aesthetics.
Wood (maple, walnut, cherry)
- Best for: daily prep, knife-friendliness, warm decor.
- Look: timeless and elevated; fits nearly any kitchen style.
- Display tip: wood boards look best upright so grain becomes a design feature.
- Typical cost: $40–$200+ depending on size and wood species.
Teak (premium, low maintenance feel)
- Best for: busy kitchens; naturally oily, resists moisture well.
- Knife impact: generally friendly, though can vary with construction.
- Typical cost: $60–$250+.
Bamboo (budget-friendly, lighter weight)
- Best for: occasional use, serving, lighter boards in a display.
- Watch for: can be harder on knives and may split if poorly made.
- Typical cost: $15–$60.
Plastic (polypropylene)
- Best for: raw proteins, dishwasher-safe convenience.
- Display tip: store plastic boards in a rack near the sink/dishwasher zone for easy cleaning rotation.
- Typical cost: $10–$40.
Composite (paper composite / resin blends)
- Best for: sleek, modern kitchens; many are dishwasher safe and thin.
- Look: understated; works well in minimalist, contemporary renovations.
- Typical cost: $30–$100.
Marble, glass, stone (mostly for serving/display)
- Best for: pastry work (marble stays cool), serving cheese and appetizers.
- Avoid for: daily chopping—these materials are tough on knives.
- Display note: heavy; ensure shelf strength or choose a stable countertop stand.
- Typical cost: $25–$150+.
Product and Design Approach Recommendations
Rather than chasing a single “best” product, focus on a best-fit solution for your kitchen layout and renovation goals.
Best overall for most kitchens: stainless or coated metal rack
- Why: stable, easy to wipe clean, works with modern appliances and hardware finishes.
- Look for: non-slip feet, slots wide enough for your thickest board, rust-resistant coating.
- Budget: $20–$60.
Best for warm, organic modern style: wood stand + mixed board set
- Why: blends into “warm minimalism” kitchens—light woods, soft whites, natural textures.
- Pair with: walnut + maple boards for contrast.
- Budget: $60–$200 for stand and 2–3 boards.
Best renovation upgrade: built-in tray divider cabinet
- Why: keeps boards, sheet pans, and trays vertical and easy to access—high function, no counter clutter.
- Ideal location: near prep zone or between fridge and sink.
- Budget: $200–$600+ (more if custom cabinetry).
Best for small kitchens: wall-mounted rail + hooks (with caution)
Hanging boards can look great, but only if you can keep them clean and stable.
- Why: saves counter and cabinet space.
- Use for: lightweight serving boards more than raw-prep boards.
- Budget: $25–$120 depending on rail system and installation.
Budget Planning: How Much Should You Spend?
For most homeowners, the sweet spot is investing in one excellent daily board and creating a display that supports cleanliness and ease.
- Budget ($25–$75): metal rack + one mid-size wood or composite board.
- Mid-range ($75–$200): rack + 2–3 quality boards (wood + plastic for proteins).
- Design-forward ($200–$500): curated set of premium boards (teak/walnut) + open-shelf styling or matching organizer system.
- Renovation-level ($500–$2,000+): cabinetry changes (deep drawers, tray divider cabinet) integrated into a full kitchen renovation plan.
Maintenance Advice: Keep Your Display Beautiful and Food-Safe
Wood board care (simple routine)
- Wash: hand-wash with mild soap; avoid soaking.
- Dry: towel dry, then air-dry upright with airflow on both sides.
- Oil: apply food-grade mineral oil every 3–4 weeks (more often in dry climates).
- Condition: use board cream (oil + beeswax) monthly for extra moisture barrier.
Plastic board care
- Dishwasher-safe boards can be sanitized easily; replace when deeply grooved.
- If storing in a rack, ensure boards are fully dry to prevent mildew smell.
Display hygiene tips
- Wipe racks and dividers weekly (especially near the sink).
- Keep raw-protein boards in a separate slot or a dedicated zone.
- Avoid displaying boards directly next to a cooktop where grease can aerosolize onto surfaces.
Common Mistakes to Avoid
- Storing boards flat while damp: leads to warping, odor, and mold.
- Overcrowding the display: too many boards look cluttered and block airflow.
- Putting wood boards in the dishwasher: high heat and prolonged moisture can crack and split boards.
- Leaning boards directly against porous grout or unfinished walls: traps moisture and can discolor surfaces.
- Using decorative stone/glass boards for chopping: dulls knives quickly and can be unsafe if chips occur.
- Ignoring workflow: a pretty display across the kitchen from your prep zone becomes a daily annoyance.
FAQ: Cutting Board Collection Display
How many cutting boards should a well-organized kitchen have?
A practical baseline is 3–4: one larger wood board for prep, one small board for quick tasks, one plastic board for raw proteins, and one serving board if you entertain. If you cook frequently, 5–6 boards can make rotation and drying easier.
Is it sanitary to keep cutting boards on the counter?
Yes, if boards are fully dry before returning to the display and the rack/area is cleaned regularly. Prioritize vertical storage with airflow and keep raw-protein boards separated from produce or serving boards.
What’s the best cutting board material for a kitchen renovation upgrade?
For most homeowners, a high-quality end-grain or edge-grain wood board (maple, walnut, or teak) paired with a dishwasher-safe plastic board offers the best mix of timeless style and everyday function.
How do I prevent wooden boards from warping in a display?
Dry them upright with airflow on both sides, avoid placing them right next to the sink splash zone, and oil regularly. Warping often comes from drying one side faster than the other or storing boards before they’re fully dry.
Where should I place a cutting board display in my kitchen layout?
Place it in or near the prep zone—typically between sink and cooktop, or next to the fridge if that’s where you do most chopping. In a renovation, aim for a dedicated tray-divider cabinet within one step of your main prep surface.
Should I display my most expensive boards or keep them stored?
If you use them often, display them—daily-use items deserve prime access. If you have delicate or heavy boards (stone/marble), store them securely and display only if the surface is stable and easy to clean.
Next Steps: Build a Display That Fits Your Kitchen
Start by choosing your “core set” (a daily wood board plus a protein-safe plastic board), then decide where your prep zone truly is. Measure your available counter length or cabinet space, and pick a display style that supports airflow and easy grab-and-return. If you’re renovating, consider integrating vertical dividers or a tray-divider cabinet—small planning choices that make a kitchen feel custom and effortless.
For more kitchen design inspiration, renovation planning tips, and smart organization ideas, explore the latest guides and trends on thedecormag.com.
More Articles
 How to Choose Kitchen Counter Depth - The Decor Mag
 How to Design a Kitchen with a Scullery - The Decor Mag
 Best Kitchen Stool and Bar Seating Picks - The Decor Mag
 Best Kitchen Oil and Vinegar Storage - The Decor Mag
 10 Sustainable Kitchen Swaps for 2026
 Kitchen Statement Ceiling Design Ideas - The Decor Mag
 Heirloom Kitchen Design: Timeless Ideas for 2026
 Kitchen Backsplash Pattern Scale: How to Choose (2026)
 Kitchen Quartz vs Granite Countertops - The Decor Mag
 Kitchen Two-Tone Cabinet Ideas - The Decor Mag