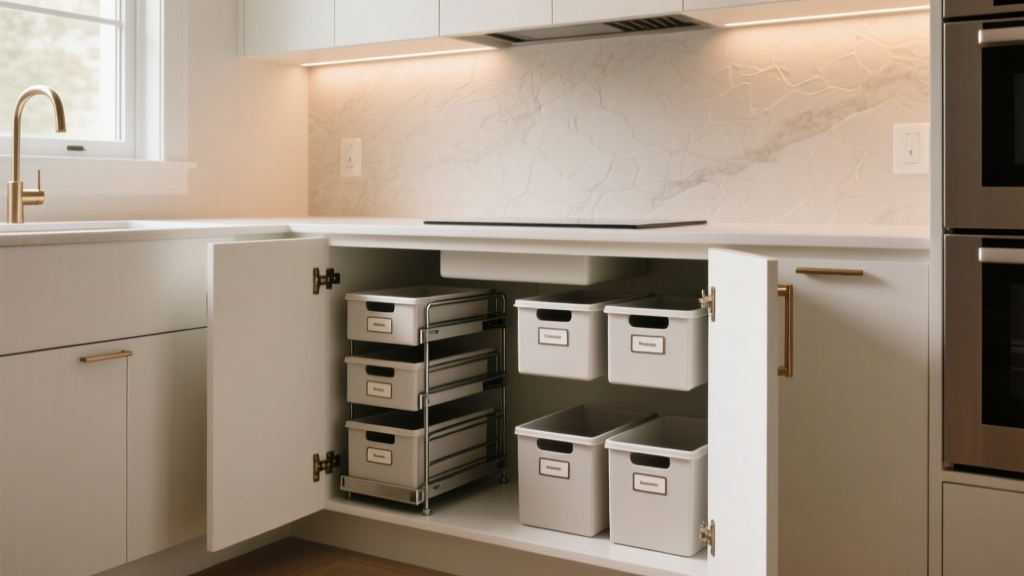
Best Kitchen Under-Sink Organization - The Decor Mag
The cabinet under the kitchen sink is one of the hardest-working spaces in the home—and one of the easiest to ignore. It’s where cleaning supplies, trash systems, water filtration, and plumbing all collide. Without a plan, it becomes a cluttered catch-all that wastes time, hides leaks, and makes even a beautiful kitchen renovation feel unfinished.
Thoughtful under-sink organization is also one of the highest-return upgrades you can make. Whether you’re planning a full kitchen remodel or simply improving your current setup, organizing this cabinet can increase daily efficiency, improve safety (especially with kids and pets), and protect your cabinetry from moisture damage. The best part: you can tailor solutions for any budget, from a $30 refresh to built-in pullouts that rival custom kitchens.
This guide covers practical layouts, materials that stand up to moisture, product-style recommendations, and measurements to help you build an under-sink system that looks clean and performs like a pro.
Why Under-Sink Organization Matters in Kitchen Design
- Functionality: A well-organized base cabinet reduces bending, reaching, and “digging” for supplies—key to timeless kitchen functionality principles.
- Safety: Proper storage prevents chemical spills, keeps sharp tools (like disposal wrenches) contained, and supports child-safe kitchens.
- Cabinet longevity: Moisture and small leaks are common. Smart liners and ventilation help prevent swelling, warping, and odors.
- Renovation readiness: If you’re upgrading your sink, adding a water filter, or installing a pullout trash system, planning under-sink storage early avoids conflicts with plumbing.
Measure First: The Under-Sink Dimensions That Decide Everything
Under-sink cabinets vary widely, so measure before buying organizers. Use a tape measure and write these down:
- Interior cabinet width (left wall to right wall): common is 30", 33", or 36" for sink bases.
- Interior depth (front frame to back wall): often 21"–24".
- Interior height (cabinet floor to underside of sink bowl): frequently 16"–22", depending on sink depth.
- Plumbing footprint: note where the drain trap sits and how far it projects; measure its clearance from left/right and the back wall.
- Door style clearance: full overlay doors open wider than inset, but hinges can still limit bulky pullouts.
Quick sizing tips
- Leave at least 1" clearance around plumbing for access and vibration.
- For slide-out organizers, allow 1/2"–1" side clearance depending on the hardware.
- If adding a pullout trash system, plan for a minimum of 12"–15" interior width for a slim single-bin, and 18"–21" for a double-bin setup.
Best Under-Sink Layouts (Choose Based on How You Use the Kitchen)
The most successful under-sink organization starts with zoning. Assign jobs to zones, then choose the right storage format for each.
Layout 1: Cleaning Zone + Backstock Zone (Most Common)
- Front zone: daily cleaners, sponges, gloves
- Side zone: dishwasher tabs, trash bags, lint rollers
- Back zone: refills and bulk items (paper towels are usually better elsewhere)
Best for: homeowners who want a simple upgrade without changing plumbing or adding built-ins.
Layout 2: Pullout System (Best for Renovations)
- Bottom pullout: tall bottles, sprays, recycling bags
- Upper pullout or shelf: smaller containers, brushes
- Door-mounted rack: cloths, gloves, small items
Best for: aging-in-place kitchens, anyone who hates kneeling, and families wanting a cleaner look.
Layout 3: Trash + Utility Cabinet (Modern, Streamlined)
If your kitchen design trend leans minimalist, consider moving most cleaning supplies out and dedicating under-sink space to:
- Pullout trash and recycling
- Disposal wrench and drain tools
- Dishwasher drain loop access
- Water filtration components
Best for: renovated kitchens with a nearby utility cabinet or pantry for supplies.
Top Product Styles and Organization Tools That Actually Work
You don’t need a single “magic” organizer—layering a few purpose-built components creates the best kitchen under-sink organization.
1) Pullout trays and sliding drawers
Why they work: They bring supplies to you, making full-depth cabinets usable.
- Materials to look for: powder-coated steel, stainless steel, or heavy-duty polymer
- Hardware: full-extension ball-bearing slides rated 75–100 lb for smoother performance
- Typical sizes: 11"–14" wide for narrow bases; 18"–22" wide for larger sink cabinets
Cost range: $50–$150 for basic pullouts; $200–$500+ for premium soft-close systems or custom inserts.
2) Two-tier under-sink shelves with plumbing cutouts
Why they work: Adds vertical storage while avoiding the drain trap.
- Choose adjustable models with a center cutout or modular pieces.
- Look for non-slip feet and rust-resistant finishes.
Cost range: $25–$80.
3) Door-mounted racks (use carefully)
Best for: lightweight items like microfiber cloths, sponges, brushes, small refill pods.
- Avoid storing heavy bottles on the door—hinges can sag over time.
- Check clearance so racks don’t hit shelves or plumbing when the door closes.
Cost range: $15–$60.
4) Leak-proof cabinet liners and drip trays
Why they work: Under-sink moisture is inevitable. Liners protect the cabinet floor and make cleanup easier.
- Best materials: molded silicone or rigid plastic trays with a raised lip
- Thickness target: 2–5 mm silicone for durability
- Tip: Choose a liner with a 1/2"–1" edge to contain small leaks.
Cost range: $20–$80.
5) Clear bins and labeled caddies (a timeless solution)
Bins create categories and make restocking simple.
- Best bin sizes: 10"–12" deep for sprays; 6"–8" deep for small items
- Material: PET or polycarbonate clear bins resist staining and are easy to wipe
- Upgrade: add a handled caddy for “quick-clean” supplies
Cost range: $20–$100 depending on quantity and quality.
6) Child-safety and chemical control
- Use a childproof latch if storing chemicals under the sink.
- Consider switching to concentrates in smaller bottles to reduce clutter and spills.
- Never store chemicals directly under a known leak point.
Material Comparisons: What Holds Up Best Under a Sink
Moisture resistance is the deciding factor under the sink. Here’s how common organizer materials compare:
- Powder-coated steel: Strong and stable; choose quality coating to prevent chips. Great for pullouts. Maintenance: wipe dry after spills.
- Stainless steel: Highly rust-resistant; premium look that fits modern kitchen design trends. Maintenance: occasional polish; avoid harsh abrasives.
- Solid wood: Beautiful but risky under sinks unless sealed extremely well. Maintenance: keep dry; reseal as needed.
- Bamboo: Popular in decor, but can warp with repeated moisture exposure. Maintenance: seal and keep dry; best in low-moisture homes.
- Plastic/polymer: Most forgiving for leaks, easy to clean, budget-friendly. Maintenance: avoid excessive heat and harsh solvents.
Design Approaches for Renovations: Build It In from the Start
If you’re planning a kitchen renovation, under-sink organization should be part of the cabinet design conversation—right alongside countertop and backsplash choices.
Specify a sink base that supports organization
- Choose a wider sink base when possible (33" or 36") for better zoning and pullout compatibility.
- Consider a shallow sink if you want more vertical storage below (common depths: 8"–10" vs. 10"–12").
- Plan for accessories: instant hot water, filtration, or disposal all reduce usable space.
Relocate what doesn’t need to be under the sink
- Put paper towels, bulk soap refills, and rarely used cleaners in a pantry or utility cabinet.
- Dedicate under-sink storage to daily essentials and plumbing-related tools.
Budget guidance for remodel-level solutions
- Value upgrades ($75–$200): liner + bins + adjustable shelf
- Mid-range ($200–$600): quality pullout + door rack + liner
- Higher-end ($600–$1,500+): custom-fit pullouts, soft-close hardware, integrated trash/recycling, professional installation
Maintenance Advice: Keep It Clean, Dry, and Easy to Reset
- Monthly 5-minute reset: remove the caddy, wipe the liner, check bottle caps, toss empties.
- Quarterly leak check: run water and inspect the P-trap, supply lines, and disposal connections.
- Odor prevention: keep a small box of baking soda in a sealed container; avoid open powders near moisture.
- Rust prevention: don’t let metal organizers sit in puddles—use a liner and dry spills quickly.
Common Under-Sink Organization Mistakes to Avoid
- Buying organizers before measuring: Plumbing offsets make “standard” sizes unpredictable.
- Overloading the cabinet door: Heavy bottles strain hinges and can cause sagging alignment issues.
- Ignoring leak protection: A $30 liner can save a cabinet floor that costs hundreds to replace.
- Storing incompatible chemicals together: Keep bleach away from ammonia-based products to reduce risk of harmful fumes if a spill occurs.
- Blocking shutoff valves: Always keep water shutoffs accessible; don’t bury them behind bins you can’t move quickly.
- Creating “deep cave” storage: If you can’t see it, you’ll rebuy it. Use pullouts or bins with handles.
FAQ: Kitchen Under-Sink Organization
What’s the best way to organize under a kitchen sink with a garbage disposal?
Use a two-zone approach: a slim pullout or bins on one side for supplies, and a clear “service zone” under the disposal for access. Choose adjustable shelves with a center cutout and avoid tall organizers that interfere with the disposal body and electrical connection.
Should I store cleaning supplies under the kitchen sink?
You can, but prioritize safety and ventilation. Store only what you use regularly, keep chemicals in a bin to contain leaks, and add a childproof latch if needed. For renovation projects, many homeowners move most cleaning supplies to a dedicated utility cabinet for a cleaner under-sink setup.
What liner is best for under-sink cabinets?
Molded silicone or rigid plastic drip trays perform best because they contain water with raised edges and wipe clean easily. Flat adhesive shelf liners can trap moisture underneath and don’t help if a leak occurs.
How do I maximize space under a sink with lots of plumbing?
Use modular shelving that splits left/right around the drain, plus narrow bins for the side gaps (often 4"–6" wide). A door-mounted rack for lightweight items also frees up the cabinet floor.
Are pullout drawers worth it for under-sink storage?
For most homeowners, yes—especially in busy kitchens or for anyone wanting easier access. Look for full-extension, soft-close hardware and moisture-resistant materials. Expect $200–$600 for a durable setup, or more for custom cabinetry solutions.
How do I keep the area under my sink from smelling musty?
First, address moisture: fix slow leaks, add a drip tray, and avoid storing damp sponges. Keep items in breathable bins where possible, wipe the liner monthly, and don’t let wet cloths sit in closed containers.
Next Steps: Build Your Under-Sink System in One Afternoon
Start with measurements, then choose a layout that matches your kitchen habits. For most homes, the winning formula is simple: a raised-edge liner, a pullout or two-tier shelf to reclaim vertical space, and a few clear labeled bins so everything has a home. If you’re renovating, discuss sink base width, pullout hardware, and trash placement early—these decisions determine how functional your kitchen feels every day.
For more kitchen renovation tips, storage ideas, and timeless design inspiration, explore the latest guides and trend updates on thedecormag.com.
More Articles
 Family Dining Tables: Durability Meets Design
 Kitchen Design for Cooking: Functional Ideas (2026)
 Farmhouse Kitchen Decor Inspiration - The Decor Mag
 Kitchen Countertop & Backsplash Combos (2026)
 Kitchen Counter Materials for Your Lifestyle (2026)
 How to Choose Kitchen Cabinet Door Styles - The Decor Mag
 Kitchen Fluted Cabinet Door Trends - The Decor Mag
 Best Kitchen Baking Ingredient Organization - The Decor Mag
 Best Kitchen Cookware Organization: Cabinet Solutions (2026)
 Open Shelf Kitchen Styling Tips - The Decor Mag