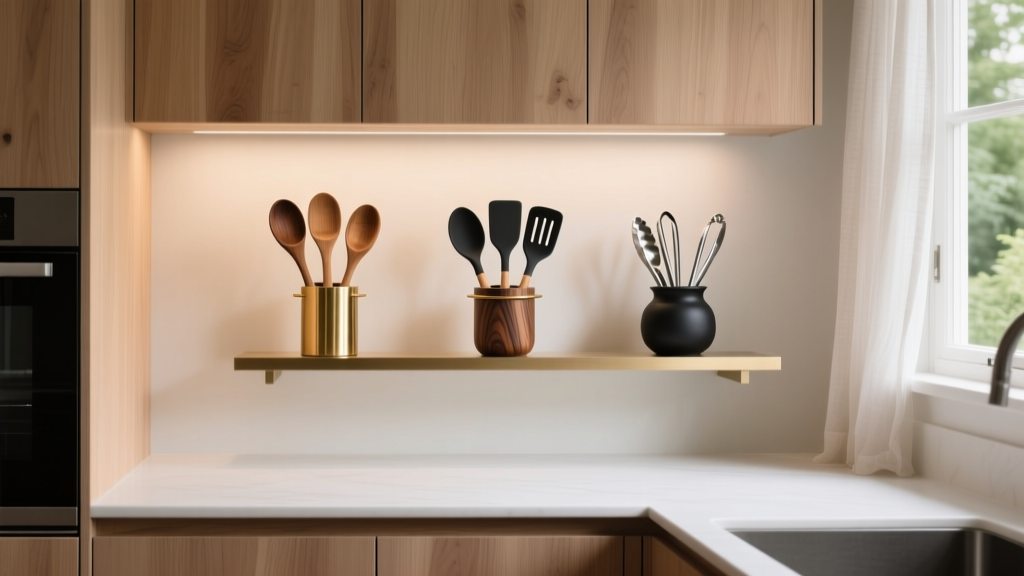
Best Kitchen Utensil Holder Picks - The Decor Mag
A kitchen renovation isn’t only about cabinetry and countertops—daily comfort comes from the small details that keep your workflow smooth. A well-chosen kitchen utensil holder is one of those deceptively impactful upgrades: it clears drawer clutter, protects tools, shortens prep time, and keeps your counters looking intentional rather than chaotic.
For homeowners refining an existing kitchen or planning a full remodel, utensil storage is also a design decision. The right holder can echo your hardware finish, complement your countertop material, and support modern kitchen organization trends like streamlined surfaces, “stations” for tasks, and flexible storage that adapts as your cooking habits change.
This guide breaks down the best kitchen utensil holder picks by material, layout, and function—plus real measurements, budget ranges, maintenance tips, and common mistakes to avoid so your utensil setup looks polished and works hard for years.
What Makes a Great Kitchen Utensil Holder?
Before choosing a style, clarify what you need the holder to do. The best utensil holders balance capacity, stability, and cleanability while fitting your kitchen’s layout and renovation goals.
Key criteria to check
- Capacity: Aim for room for 10–20 everyday tools (spatulas, tongs, ladles, whisks) without cramming.
- Height: A practical range is 6–8 inches tall. Taller (8–10 inches) keeps long tools upright, but can look bulky.
- Diameter/footprint: For countertop use, 4–6 inches in diameter fits most corners without crowding a prep zone.
- Weight and stability: Heavier bases prevent tipping when you grab a utensil one-handed.
- Easy cleaning: Smooth interiors, removable liners, and dishwasher-safe materials reduce grime buildup.
- Ventilation: Open or perforated designs help dry utensils and reduce musty odors—especially for wood or silicone tools.
- Aesthetic alignment: Match the holder’s material and finish to your kitchen design: warm woods for organic modern, ceramic for classic, stainless steel for contemporary.
How many utensils should stay on the counter?
A timeless functionality principle: keep only the tools you use daily within arm’s reach. For most households, that’s:
- 8–12 utensils for everyday cooking
- 12–18 utensils if you cook frequently or have multiple cooks in the kitchen
Everything else (specialty tools, duplicates) is better in a drawer organizer or pull-out cabinet insert to preserve a clean countertop—one of today’s most popular kitchen renovation goals.
Best Utensil Holder Types by Kitchen Layout
Kitchen layout should drive your choice as much as style. A holder that works in a spacious open-plan kitchen may feel intrusive in a compact galley.
Countertop utensil crock (best for everyday access)
Ideal if you want tools near the cooktop or prep area. Place it 12–18 inches away from the stove to reduce grease buildup, and keep it out of the main chopping zone to avoid visual clutter and accidental knocks.
In-drawer utensil organizer (best for minimalist counters)
If your renovation prioritizes clear surfaces, consider storing utensils in a drawer with a fitted organizer and only keeping a small “cooking essentials” set out.
- Drawer height: Plan for 3–4 inches internal height for standard utensils.
- Organizer depth: Most are 15–18 inches deep; confirm drawer depth before buying.
Wall-mounted rail with utensil hooks (best for tight kitchens)
A rail system frees counter space and suits compact layouts. It also fits current kitchen design trends that blend utility with display—especially in modern farmhouse or industrial kitchens.
- Installation tip: Mount rails 18–22 inches above the countertop (adjust based on backsplash height and reach).
- Best placement: Near prep space, not directly over the cooktop to minimize grease.
Cooktop caddy or behind-the-range holder (best for dedicated cooking stations)
For homeowners building a “cooking station,” a narrow, stable holder or caddy behind the range keeps cooking tools handy without eating prep space. Choose heat-safe materials and easy-clean surfaces.
Material Picks: Pros, Cons, and Best Uses
Material affects durability, maintenance, and how well the holder supports your kitchen’s overall design style.
Ceramic: classic, weighty, and design-forward
- Pros: Heavy and stable; easy to wipe; looks high-end; great color options.
- Cons: Can chip if knocked; glossy interiors can show utensil marks over time.
- Best for: Traditional kitchens, transitional design, and elegant countertop styling.
- Maintenance: Hand wash or dishwasher if labeled safe; use a baking soda paste for stubborn marks.
Budget range: $15–$60; artisan or designer ceramics $60–$120.
Stainless steel: modern, durable, and easy to sanitize
- Pros: Corrosion-resistant; lightweight yet durable; fits contemporary kitchens and pro-style ranges.
- Cons: Can show fingerprints; lighter models may tip unless weighted.
- Best for: Modern and industrial kitchens; busy households prioritizing hygiene.
- Maintenance: Wipe with microfiber; use stainless cleaner to maintain sheen; avoid abrasive pads.
Budget range: $12–$45; premium weighted or dual-compartment versions $45–$90.
Wood or bamboo: warm, trend-friendly, and natural
- Pros: Adds warmth; complements wood shelves and organic modern kitchens; hides smudges.
- Cons: Can absorb moisture and odors; needs drying discipline.
- Best for: Scandinavian, Japandi, organic modern, and modern farmhouse kitchens.
- Maintenance: Hand wash only; dry immediately; oil periodically with food-safe mineral oil if unfinished.
Budget range: $10–$40; higher-end hardwoods $40–$80.
Stoneware, marble, or concrete: statement pieces with serious heft
- Pros: Very stable; looks premium; aligns with high-contrast countertop trends.
- Cons: Heavier to move; may scratch delicate surfaces if unpadded; can stain if porous.
- Best for: Design-focused renovations; large islands; luxury kitchens.
- Maintenance: Seal porous stone if required; use felt pads underneath to protect countertops.
Budget range: $25–$90; designer stone vessels $90–$200.
Silicone or plastic: practical and budget-friendly
- Pros: Lightweight; easy to wash; often dishwasher safe; good color variety.
- Cons: Can look less elevated; may stain or warp near heat.
- Best for: Rentals, family kitchens, and budget upgrades.
- Maintenance: Dishwasher safe (check label); avoid placing too close to heat sources.
Budget range: $8–$30.
Top Kitchen Utensil Holder Picks (By Style and Function)
Rather than a one-size-fits-all “best,” these picks reflect the most functional approaches homeowners use during kitchen renovation and organization upgrades.
1) Weighted ceramic crock (best all-around countertop choice)
Why it works: A heavy ceramic utensil crock stays put, looks intentional, and suits most kitchen styles.
- Look for: 6.5–8 inches tall; 4.5–5.5 inches wide; glazed interior for easy cleaning.
- Best placement: On a counter corner near the cooktop, away from splatter zones.
- Estimated cost: $25–$80.
2) Perforated stainless steel cylinder (best for ventilation and easy cleaning)
Why it works: Perforations allow airflow and faster drying—great if you often wash and reuse tools during cooking.
- Look for: Rubberized base or weighted bottom to prevent sliding.
- Design tip: Coordinate with stainless appliances or a brushed nickel faucet for a cohesive renovation finish story.
- Estimated cost: $15–$60.
3) Two-compartment utensil organizer (best for separating prep vs. cooking tools)
Why it works: Separating categories keeps the holder from becoming a jumble and speeds up your workflow.
- Best categories: “Cooking” (spatulas, tongs, ladle) and “Prep” (whisk, peeler, microplane handle, tasting spoons).
- Look for: A divider that reaches near the base for stability.
- Estimated cost: $20–$90.
4) Rotating utensil caddy (best for larger collections in busy kitchens)
Why it works: A lazy-Susan-style base improves access without increasing countertop footprint.
- Look for: Non-slip rotation, wide base, and easy-clean interior.
- Ideal for: Households with 15–25 frequently used tools.
- Estimated cost: $25–$100.
5) Wall rail + hooks set (best space-saver for small kitchens)
Why it works: A wall-mounted utensil rail keeps tools vertical and visible, freeing countertop space—perfect for compact renovations or galley kitchens.
- Look for: Stainless or powder-coated steel for durability; 18–30 inch rail depending on wall space.
- Estimated cost: $20–$120 (more with premium rails and accessories).
6) Built-in “utensil garage” (best for high-end renovations)
Why it works: A dedicated storage pocket or appliance/utensil garage keeps counters calm while preserving quick access—aligned with current trends toward concealed countertop storage.
- Planning tip: Discuss during cabinet design; ensure adequate ventilation if stored near heat or moisture.
- Estimated cost: $150–$600+ depending on cabinetry customization and inserts.
Design Approaches That Look Good (and Stay Functional)
Create kitchen “stations”
Station-based organization is a renovation trend that also happens to be timelessly practical.
- Cooking station: Utensil holder + salt/pepper + oil tray near the stove.
- Prep station: Knives (block or drawer insert) + mixing tools in a drawer organizer near the main prep counter.
- Baking station: Spatulas, whisks, measuring tools stored together (often better in a drawer to avoid countertop overflow).
Match finishes—without overmatching
For a cohesive kitchen design, repeat one or two materials across the room:
- Stainless holder with stainless appliances and brushed metal cabinet pulls
- Ceramic crock that echoes backsplash tile tone
- Wood holder that ties into open shelving, cutting boards, or flooring
Right-size the holder to your counter depth
- Standard counter depth: ~25 inches. Keep the holder within the back third so it doesn’t intrude on prep space.
- Narrow counters (under 24 inches): Choose a slim holder (4–4.5 inches diameter) or go wall-mounted.
Budget Planning: Where to Spend and Where to Save
- Under $20: Basic stainless, plastic, or bamboo holders. Best for quick organization wins or rentals.
- $20–$60: Sweet spot for durable ceramic crocks, perforated stainless, and nicer bamboo options.
- $60–$120: Statement ceramics, rotating caddies, premium finishes, and more stable weighted designs.
- $150+: Built-in cabinetry solutions and custom inserts—worth it during a full kitchen remodel if you want a minimalist countertop.
Smart splurge tip: If you’re investing in stone countertops, upgrade the utensil holder too. A $10 plastic crock can make a renovated kitchen feel unfinished, while a $35–$60 ceramic or stainless option reads more intentional.
Maintenance and Cleaning Tips (So It Stays Fresh)
- Empty and wipe weekly: Crumbs and spice dust collect at the bottom.
- Deep clean monthly: Wash with warm soapy water; use a bottle brush to reach corners.
- Dry completely: Especially for wood/bamboo—moisture leads to odor and warping.
- Protect countertops: Add felt pads to heavy stone/ceramic holders to prevent micro-scratches.
- Control grease: If kept near the range, wipe the exterior every few days to prevent film buildup.
Common Mistakes to Avoid
- Buying too small: Overstuffed holders look messy and tip easily. If you need to force utensils in, size up.
- Keeping every utensil on the counter: This defeats the purpose of a clean, renovated look. Curate to daily essentials.
- Ignoring tipping risk: Lightweight holders slide and fall. Choose a weighted base or add a non-slip pad.
- Placing it too close to heat: Plastic and some finishes degrade near a cooktop; grease buildup also increases dramatically.
- Forgetting interior cleaning: A beautiful utensil crock can hide grime. Prioritize smooth, cleanable interiors.
- Skipping layout planning: If you’re renovating, decide whether you want countertop storage, wall storage, or drawer inserts before finalizing cabinetry.
FAQ: Kitchen Utensil Holders
What’s the best material for a kitchen utensil holder?
For most homes, ceramic and stainless steel offer the best balance of durability, easy cleaning, and design flexibility. Choose ceramic for weight and warmth, stainless for ventilation and a modern look.
How big should a utensil holder be for a family kitchen?
A practical family-size holder is 6–8 inches tall and 4.5–6 inches wide, holding roughly 12–18 utensils. If you regularly cook with multiple tools, consider a rotating caddy or a two-compartment design.
Is it better to store utensils on the counter or in a drawer?
Counter storage improves speed during cooking, while drawer storage supports a minimalist kitchen design. Many homeowners use a hybrid approach: keep 8–12 daily tools in a countertop holder and store the rest in an in-drawer organizer.
How do I keep my utensil holder from looking cluttered?
Limit it to daily essentials, group similar tools, and avoid duplicates. A simple rule: if you haven’t used it in two weeks, move it to a drawer.
Can I place a utensil holder next to the stove?
Yes, but leave 12–18 inches of space from the cooktop edge when possible. This reduces grease buildup and protects materials from heat.
What’s a good solution for a small kitchen with limited counter space?
A wall-mounted rail with hooks or an in-drawer organizer is often the most space-efficient. If you prefer countertop storage, choose a slim holder (around 4 inches diameter) and keep only a small set of tools.
Next Steps: Choose, Place, and Refine
Start by counting the utensils you truly use every day, then pick a holder that fits your kitchen layout and renovation style—ceramic for classic stability, stainless for modern practicality, wood for warmth, or a rail system for small-space efficiency. Measure your available counter or wall area, place the holder where it supports your cooking flow, and maintain it with quick weekly wipe-downs to keep your kitchen organization looking crisp.
For more kitchen renovation guidance, kitchen design trends, and smart organization ideas, explore the latest inspiration on thedecormag.com.
More Articles
 Minimalist Kitchen Design Essentials - The Decor Mag
 How to Design a Kitchen That Feels Collected - The Decor Mag
 Best Kitchens for Functional Design: Layouts, Brands, and Ergonomic Principles That Work Every Day
 How to Start Bedroominspiration: A Practical, Space-Smart Guide for Real Homes
 Blue and Fluted Cookware Compared: A Kitchen Specialist’s Deep-Dive Analysis of Le Creuset vs. Staub
 Kitchen Cabinet Interior Finish: Best Choices (2026)
 Kitchen Statement Ceiling Design Ideas - The Decor Mag
 Kitchen Textured Backsplash Tile Trends - The Decor Mag
 How to Design a Kitchen with a Breakfast Bar - The Decor Mag
 Kitchen Style & Function: Design Tips (2026)