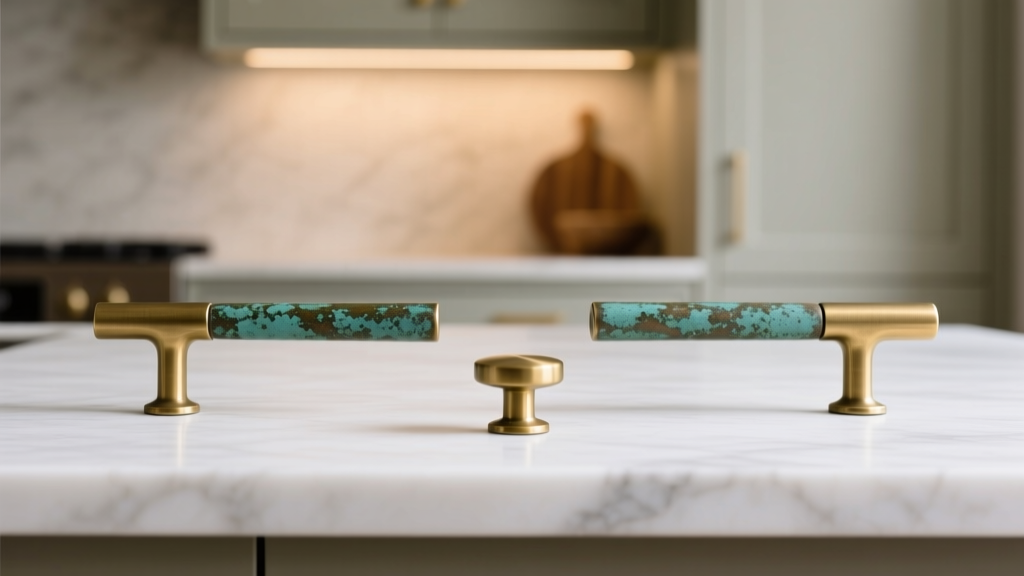
Kitchen Unlacquered Brass Hardware Patina - The Decor Mag
Few kitchen details do as much heavy lifting as hardware. Cabinet pulls and knobs are the pieces you touch dozens of times a day, and they sit right at eye level—meaning they quietly define whether a renovation feels builder-basic or tailored and elevated. Unlacquered brass hardware has become a favorite in kitchen design because it brings warmth, depth, and a “collected over time” character that many homeowners want, especially as trends shift toward organic modern, classic Shaker cabinetry, and softly aged finishes.
The magic (and the challenge) is the patina. Unlacquered brass is a living finish: it darkens, softens, and evolves with use, moisture, and even the chemistry of your hands. When you understand what that patina will look like—and how to guide it—unlacquered brass becomes one of the most satisfying upgrades you can make, whether you’re doing a full kitchen renovation or refreshing a kitchen on a budget.
This guide covers how unlacquered brass patinas, where it performs best, what it costs, and how to avoid common mistakes. You’ll also find practical tips on sizing, placement, and maintenance, so your kitchen looks intentional from day one and even better over time.
What Is Unlacquered Brass (and Why Patina Happens)
Brass is an alloy primarily made of copper and zinc. When brass is unlacquered, it has no protective clear coat. That means oxygen, moisture, skin oils, and cleaning products can interact with the metal, creating a patina that ranges from honeyed gold to deep bronze and, in damp environments, even greenish undertones (verdigris).
Unlacquered vs. lacquered brass vs. “brass-toned” finishes
- Unlacquered brass: Real brass with no topcoat. Patinas over time; will show fingerprints and water spots early on.
- Lacquered brass (often “polished brass”): Brass with a clear protective finish. Stays shiny longer; may chip or peel with wear.
- PVD brass / brushed gold: A durable coating over another metal (often stainless or zinc). Very consistent color, typically minimal patina.
- Brass-plated: Thin brass layer over base metal. Can wear through at corners over time.
For homeowners who like authenticity and a finish that tells a story, unlacquered brass is unmatched. For homeowners who prefer a uniform, low-maintenance look, PVD “brushed gold” may be a better fit.
How Patina Looks in a Real Kitchen: What to Expect
Patina is not one-size-fits-all. It depends on your household habits, kitchen layout, and where the hardware is installed. A busy family kitchen will patina faster than a rarely used prep pantry, and knobs near the sink will change differently than pulls on tall pantry doors.
Typical patina timeline
- Weeks 1–4: Bright brass, visible fingerprints, occasional water spots. High-touch pieces begin to soften in tone.
- Months 2–6: Warmer, more muted brass. Darkening around edges, corners, and recessed detailing; “high points” may stay lighter where hands rub.
- 6–18 months: Noticeable variation and character. Pulls may develop a deep bronze cast; less-used pieces remain lighter.
Where patina shows up first
- Trash pull-out and utensil drawers (frequent use)
- Dishwasher panel pull (steam exposure)
- Sink base cabinet knobs/pulls (water splash)
- Refrigerator or pantry pulls (oils from hands)
Design tip: variation is part of the appeal. If you want a more uniform look, choose a hardware style with a brushed texture or subtle detailing, which visually disguises uneven patina.
Choosing the Right Unlacquered Brass Hardware for Your Kitchen Design
Successful kitchen design blends current trends with timeless functionality. Unlacquered brass fits beautifully into today’s warmer, layered kitchens—think natural wood accents, creamy whites, mushroom neutrals, soapstone-look counters, and fluted or reeded details—while still feeling classic on Shaker cabinets.
Style recommendations by kitchen aesthetic
- Modern kitchen design: Slim bar pulls, square-edge pulls, or minimal T-pulls in brushed unlacquered brass.
- Transitional kitchens: Slightly rounded pulls, classic bin pulls for drawers, and simple knobs for uppers.
- Traditional kitchens: More ornate knobs, stepped pulls, or beaded edges; consider mixing knobs and pulls for a tailored look.
- Organic modern: Softer silhouettes, slightly irregular hand-finished brass, or subtle hammered textures.
Product and material quality: what to look for
Not all “unlacquered brass” hardware is equal. For a kitchen renovation, prioritize solid, weighty pieces that will age well.
- Solid brass construction: Best for long-term durability and authentic patina.
- Mounting hardware: Look for included screws in multiple lengths (common cabinet door thickness: 3/4 inch).
- Comfort: Edges should feel smooth; pulls should offer enough finger clearance (at least 1 inch from cabinet face is a comfortable target).
Hardware Sizing and Placement: Practical Measurements That Make a Big Difference
Even beautiful hardware looks “off” when the scale is wrong. These guidelines help your kitchen feel cohesive and functional, especially in a full renovation where new cabinetry and drawer stacks are being planned.
Choosing pull length (center-to-center)
- Small drawers (12–18 inches wide): 3"–5" center-to-center pulls, or a 1"–1.25" knob.
- Standard drawers (18–30 inches wide): 5"–8" pulls (often 128–160 mm).
- Wide drawers (30–36+ inches wide): 10"–12" pulls (often 256–320 mm), or two pulls for extra-wide/heavy drawers.
- Appliance pulls (for panel-ready fridge/pantry look): 12"–18"+ for proportion and grip.
Placement guidelines
- Upper cabinet knobs: Place 2.5–3 inches from the bottom corner on the latch side.
- Lower cabinet knobs: Place 2.5–3 inches from the top corner on the latch side.
- Drawer pulls: Centered horizontally and vertically on the drawer face for a clean, classic look.
Practical tip: create a drilling template or buy an inexpensive cabinet hardware jig. Consistent placement is one of the simplest ways to make a kitchen upgrade look professional.
Where Unlacquered Brass Works Best (and Where It’s Tricky)
Unlacquered brass is versatile, but some kitchen zones demand more resilience.
Best locations
- Pantry doors and tall cabinets (great for statement pulls)
- Island drawers and cabinets (high visibility, balanced patina)
- Bar area or coffee station (adds warmth and polish)
Use with extra care
- Near the sink: Expect water spotting and darker patina sooner. Choose a brushed or textured brass to make spots less noticeable.
- On the dishwasher: Steam accelerates patina. This can look gorgeous, but it will change faster than surrounding pieces.
Design Pairings: Cabinets, Countertops, and Lighting That Make Brass Patina Shine
Unlacquered brass patina reads richest when it has the right supporting cast. These combinations show up in current kitchen design trends because they balance warmth, contrast, and longevity.
Cabinet colors that pair beautifully with unlacquered brass
- Warm whites and creams: A timeless, bright kitchen look that feels less stark than cool white.
- Greige, taupe, and mushroom tones: A trend-forward neutral palette that makes brass feel sophisticated.
- Deep green or navy: Brass adds warmth and an elevated contrast; patina looks especially intentional.
- Natural oak or walnut: Organic modern perfection—brass becomes a warm accent rather than a “shine factor.”
Countertop and backsplash recommendations
- Quartz (marble-look): Low maintenance; choose warmer veining to complement brass.
- Soapstone or soapstone-look: Dark, matte counters make patina glow; great for timeless kitchen design.
- Zellige or handmade-look tile: Adds movement and texture—plays well with evolving brass tones.
Lighting coordination
Mixing metals is now standard in kitchen design, but it works best when you plan it.
- Pair unlacquered brass hardware with matte black pendants for contrast.
- Or keep it cohesive with warm brass accents in lighting, then add balance using stainless appliances.
- Try to limit to two metal families (warm + cool) for a calm, organized look.
Cost Ranges and Budget Considerations
Hardware is a relatively small line item compared to cabinets and countertops, but it adds up quickly. Plan based on piece count and quality level.
Typical price ranges (per piece)
- Budget (brass-toned or plated): $4–$12 per knob, $8–$25 per pull
- Mid-range (solid brass, good finishing): $12–$25 per knob, $20–$50 per pull
- Premium/designer (solid brass, hand-finished): $25–$60+ per knob, $50–$150+ per pull
Example budget totals
- Small kitchen refresh (25 pieces): $300–$1,500
- Average kitchen (40–60 pieces): $600–$3,500
- Large kitchen with pantry + appliance pulls (70–90 pieces): $1,200–$6,000+
Smart ways to save without compromising the look
- Use premium statement pulls on the island and pantry, and a simpler (less expensive) unlacquered brass style elsewhere.
- Choose knobs on uppers and pulls on lowers to reduce total cost while maintaining function.
- Standardize on one or two pull sizes to simplify ordering and reduce mistakes.
Maintenance and Cleaning: Keep It Beautiful Without Fighting the Patina
The best maintenance strategy depends on whether you want brass to age naturally or stay brighter longer. Most homeowners land in the middle: allow patina, but prevent grime and corrosion.
Everyday care (best for most kitchens)
- Wipe with a soft microfiber cloth weekly.
- For sticky residue, use mild soap and water on a damp cloth, then dry immediately.
- Dry hardware near the sink to reduce water spots.
What to avoid
- Abrasive pads, scouring powders, or gritty cleaners (they scratch and create uneven patina).
- Harsh degreasers and bleach-based sprays.
- “One-step” metal polishes if you want an even, aged look—spot-polishing can create patchiness.
If you want to brighten brass occasionally
Use a gentle brass polish sparingly and consistently (do all pieces in a zone, not just one pull). Always test on the back of a pull first. After polishing, remove residue fully and dry.
Can you seal unlacquered brass?
You can apply a clear coat, but it changes the premise: it reduces patina and can wear unevenly over time. If you love the idea of brass but not the upkeep, consider PVD “brushed gold” hardware instead for a consistent, low-maintenance finish.
Common Mistakes to Avoid
- Expecting every piece to match forever: Patina varies by location and use. Embrace the character, or choose a coated finish.
- Mixing too many warm metals: Unlacquered brass + polished brass + champagne bronze can look chaotic. Pick one brass family and stick to it.
- Undersizing pulls: Tiny pulls on wide drawers look unbalanced and feel awkward. Match pull length to drawer width.
- Skipping a layout plan: Order hardware after confirming drawer sizes, appliance panels, and door swings—especially in a kitchen renovation.
- Using harsh cleaners near brass: Overspray from countertop cleaner can spot hardware. Spray onto a cloth first, not directly on surfaces.
Recommended Design Approaches for a Cohesive Kitchen
Approach 1: Classic and timeless (easy to live with)
- Shaker cabinets in warm white or greige
- Simple unlacquered brass knobs on uppers
- Matching pulls on lowers (5"–8" centers)
- Quartz counters and a ceramic tile backsplash
Approach 2: Statement pantry + subtle everywhere else (budget-savvy)
- Use premium unlacquered brass appliance pulls on pantry and fridge panels
- Choose a more affordable, simpler solid brass pull on standard cabinets
- Keep placement consistent for a custom look
Approach 3: Organic modern warmth (trend-forward, still practical)
- White oak or walnut accents
- Brushed/hand-finished unlacquered brass hardware (hides spotting)
- Warm-toned backsplash tile with texture (zellige or handmade-look)
- Layer lighting: warm under-cabinet LEDs + pendants in a coordinating metal
FAQ: Unlacquered Brass Hardware Patina
1) Will unlacquered brass hardware turn green?
It can, especially in humid kitchens or near the sink, but most hardware develops a brown-gold to deep bronze patina. Green verdigris is more common when moisture sits on the surface repeatedly. Wiping hardware dry helps prevent it.
2) Does unlacquered brass work with stainless steel appliances?
Yes. Warm brass hardware and cool stainless appliances is a classic mixed-metal pairing in kitchen design. Tie them together with a second warm element (wood stools, warm backsplash, or brass accents in lighting).
3) How do I keep patina from looking uneven?
Choose a brushed or textured brass finish, avoid spot-cleaning with polish, and clean all hardware in an area the same way. Consistent care leads to a more intentional, even-aged look.
4) Can I speed up the patina?
Natural use is the safest method. Forced patina techniques exist, but they can turn blotchy and may void product warranties. If you want an instantly aged look, consider “antique brass” finishes designed to be consistent from the start.
5) Is unlacquered brass durable for a busy family kitchen?
Yes, especially when the hardware is solid brass. It may show fingerprints and darken faster, but that’s part of its charm. If you want a finish that looks the same every day with minimal care, a PVD brass-toned finish is more practical.
Next Steps: Plan Your Hardware Like a Pro
Start by counting every door and drawer, then decide on a sizing plan (knobs, pulls, and lengths). Order 1–2 samples and tape them in place at eye level to check scale and comfort before committing. If you’re renovating, confirm cabinet door thickness (commonly 3/4 inch) and finalize your hardware placement template early so installation goes smoothly.
Unlacquered brass hardware patina rewards patience: it takes a kitchen from “new” to “lived-in and loved,” with warmth you can’t fake. For more practical kitchen renovation advice, hardware guides, and kitchen organization ideas, explore the latest on thedecormag.com.
More Articles
 Textiles on a Budget: Smart, Stylish, and Sustainable Kitchen Linen Solutions
 Kitchen Quartz vs Granite Countertops - The Decor Mag
 Kitchen Integrated Drainboard Sink Guide - The Decor Mag
 Kitchen Soapstone Countertop Guide - The Decor Mag
 How to Design a Kitchen for Multiple Cooks - The Decor Mag
 Open Concept Kitchen Renovation: Pre-Demolition Checklist
 Best Kitchen Trash and Recycling Drawer - The Decor Mag
 Kitchen Island Size: Choose Right for Your Space (2026)
 Small Alternatives to Spaces: Smart, Space-Saving Kitchen Solutions That Actually Work
 Kitchen Marble Countertop Pros and Cons - The Decor Mag